
Subscribe to Our Youtube Channel
Related Manuals for Air Liquide Qlixbi C230


Summary of Contents for Air Liquide Qlixbi C230
- Page 1 Qlixbi User Manual Connector Models C230, C300, S230, S300, R (compatible for 230 and 300 bar) Learn how it works.
-
Page 2: Table Of Contents
Table of contents OVERVIEW AND DESCRIPTION FOR YOUR SAFETY HOW TO USE YOUR PRODUCTS GENERAL INSTRUCTIONS QLIXBI C OR S CONNECTOR 3.2.1 BEFORE 1st USE: ATTACH YOUR REGULATOR 3.2.2 COUPLE THE CYLINDER 3.2.3 TURN THE GAS ON & OFF 3.2.4 UNCOUPLE THE CYLINDER 3.2.5 SPECIFIC TO QLIXBI SMART CONNECTORS... -
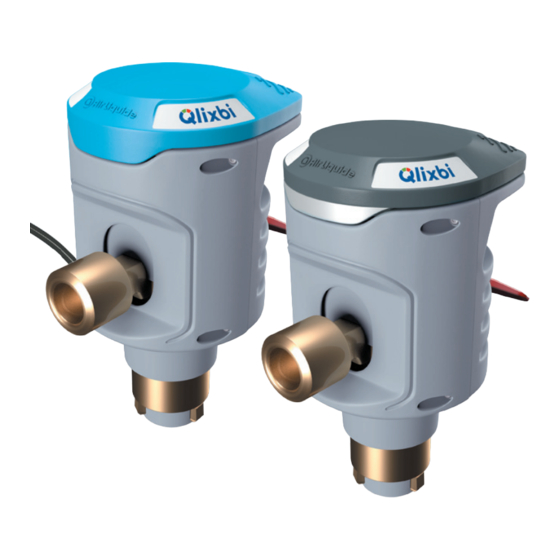
Page 3: Overview And Description
Overview and Description Qlixbi is a gas supply system consisting of the components pressurised gas cylinder and connector. The Qlixbi connectors are only intended and approved for installation on Qlixbi cylinders and only for Argon , other inert gases and inert mixtures (oxidising and flammable mixtures are excluded). - Page 4 Qlixbi C or S connector 7. Outlet connection 8. Inlet connection 9. Unlocking ring 10. On/Off Lever 11. Customizable label 12. LED indicator (smart versions only) Qlixbi R connector 13. Outlet connection 14. High pressure gauge 15. Flow gauge 16. Inlet connection 17.
-
Page 5: For Your Safety
Qlixbi cylinders. This product is not intended for any other installation or purpose. Only Qlixbi branded equipment and accessories certified by Air Liquide and brought to you by Energas specifically for use with your Qlixbi cylinders are engineered and proven to operate within its operational and safety requirements. - Page 6 Electrical safety, for the smart versions of connectors (Qlixbi S230 and S300) The smart connectors have battery-operated electrical components that enable data communication via a low-power wide- area network. Basic safety precautions should always be followed when using smart connectors to reduce the risk of fire, electrical hazard, and personal injury.
-
Page 7: How To Use Your Products
How to use your products 3.1 — GENERAL INSTRUCTIONS • Check there are no objects/particles (sand/mud/leaves…) inside the Reserve Indicator that could prevent the connection before the coupling of a Qlixbi connector with a cylinder. • Check that the docking port and the Qlixbi connector are clean and without damage. Remove dirt with a soft, dry cloth. •... -
Page 8: Qlixbi C Or S Connector
3.2. QLIXBI C OR S CONNECTOR 3.2.1 — BEFORE 1st USE: ATTACH YOUR REGULATOR • Make sure equipment is clean and free from damage. • Make sure the On/Off Lever of the Qlixbi connector is closed (red lever down). • Work area should be clean (without dust, grease, particles and liquid). •... -
Page 9: Turn The Gas On & Off
3.2.3 — TURN THE GAS ON AND OFF TURN THE GAS ON 1. Orientate the Qlixbi connector. 2. Connect the outlet of the regulator according to the instructions of the regulator. 3. Lift the On/Off Lever of the Qlixbi connector up, this action opens the cylinder valve. -
Page 10: Uncouple The Cylinder
3.2.4 — UNCOUPLE THE CYLINDER After closing the lever and allowing the regulator to purge the gas through connected equipment such as welding torches (refer to the regulator user manual), turn the regulator off, unclip the Qlixbi connector vertically by pinching the unlocking ring and cover. (During this step, the Qlixbi connector is purged automatically). -
Page 11: Qlixbi R Connector
3.3. QLIXBI R CONNECTOR The Qlixbi R connector has a built-in regulator. 3.3.1 — COUPLE THE CYLINDER 1. Make sure your equipment is clean and in good condition (If necessary, clean the docking port and Qlixbi R inlet connection). 2. If the cylinder is new, break the warranty seal on the cover cap. 3. -
Page 12: Turn The Gas On & Off
3.3.3 — TURN THE GAS ON AND OFF TURN THE GAS ON 1. Your Qlixbi rotates through 360° so you can adjust the position for the best setting. 2. Lift the On/Off Lever of the Qlixbi connector up, this action opens the cylinder valve. -
Page 13: Set The Gas Flow Rate
3.3.4 — SET THE GAS FLOW RATE FLOW RATE SETPOINT 1. Turn clockwise the handwheel of the Qlixbi R regulator to precisely set ADJUSTMENT the gas supply. 2. Torch trigger press (or gas purge button on the customer’ s process) to adjust the flow dynamically. -
Page 14: Uncouple The Cylinder
3.3.5 — UNCOUPLE THE CYLINDER • Check the red lever is firmly in the down position. • Push up the Qlixbi R paddles at the top of the connector by pinching the paddles and the cover, and uncouple vertically the Qlixbi R from the cylinder. -
Page 15: Reserve Indicator
3.5 — RESERVE INDICATOR The indicator is a low content visual warning. It is binary. It turns red when the reserve is reached, when gas is starting to run low. Green Cylinder with gas content Cylinder with low gas and pressure content and pressure 3.6 —... -
Page 16: Craning The Cylinder
3.7 — CRANING THE CYLINDER • Under NO circumstances should the equipment be lifted with the connector coupled. • An appropriate and safe snap hook or strap or sling should be used to lift the packaged gas equipment. • Lifting the cylinder using a workshop crane shall be limited to a max height of 1 metre above the ground. •... -
Page 17: Troubleshooting
Troubleshooting Repairing: Have the Qlixbi products repaired by an Energas authorised person. Please contact the customer support or the stores for after sales services. Smart version: This electronic device is in accordance with the relevant safety requirements. Repairs should only be carried out by an Energas authorised person using original spare parts, otherwise this may result in considerable danger to the user. - Page 18 Problem Cause Action Insufficient output gas flow Docking port close (Lever OFF) Open the lever on the Qlixbi connector The cylinder is empty or with low pressure Check the reserve indicator indication / of gas Change the cylinder Docking port connection defective Contact Energas Qlixbi C or S connector only: Inadequate Change the regulator...
-
Page 19: Specifications
SPECIFIC TO QLIXBI SMART CONNECTORS (S230 and S300) Problem Cause Action LED glows red 10 times Device error. Please contact Energas The data transmission doesn’t work. Qlixbi Manage Services will not be updated. LED glows alternately in GREEN then in Low battery. -
Page 20: Qlixbi C & S Connectors Technical Characteristics
6.2 — QLIXBI C & S CONNECTORS TECHNICAL CHARACTERISTICS Qlixbi C230 Qlixbi C300 Qlixbi S230 Qlixbi S300 Nominal pressure 230 bar 300 bar 230 bar 300 bar Outlet connection BS 341-3 ISO 5145 BS 341-3 Nr.3 ISO 5145 Nr.3 Nr.30 (G5/8”) -
Page 21: Qlixbi R Connectors Technical Characteristics
6.3 — QLIXBI R CONNECTORS TECHNICAL CHARACTERISTICS Qlixbi R Nominal pressure Up to 310 bar Outlet connection ISO 7289 TYPE N Smart Device Gas service ARGON & INERT MIXTURES (Oxidising and flammable mixtures are excluded) Flow range 0 - 30L / min CLASS 20 according ISO 2503 Service From -20°C to +65°C temperature... -
Page 22: Environment
Environment You can help to protect the environment. Please remember to respect the local regulations. The packaging material is recyclable. Dispose of the packaging in an environmentally friendly manner and make it available for the recyclable material collection service. Return the connectors and cylinders to Energas, its service agent or distributor. Customer support - Contact details Contact Energas Call... - Page 23 Love how it works. Qlixbi QR Code Label 50mm x 50mm copy PRINT.pdf 1 22/07/2021 08:57:20 Technical Manual Important Note Please note the latest version of the Technical Manual can be found here using the QR Code which can also be found via a sticker on your cylinder shoulder.
Need help?
Do you have a question about the Qlixbi C230 and is the answer not in the manual?
Questions and answers