Table of Contents
Advertisement
Quick Links
Advertisement
Table of Contents

Related Manuals for Microtek NDT-2000


Summary of Contents for Microtek NDT-2000
- Page 1 NDT/RT Industrial Film Digitizer User's Manual www.microtek.com...
-
Page 2: Preface
The contents of this manual have been checked carefully for accuracy, and every effort has been made to ensure that there are no errors. However, Microtek makes no guarantee as to the accuracy of the contents of this document and reserves the right to make changes to the contents without prior warning. -
Page 3: Fcc Compliance Statement
• Consult the dealer or an experienced technician for help. Any changes or modifications not expressly approved by the party responsible for compliance could void the user’s authority to operate the equipment. NDT-2000 User's Manual... - Page 4 NDT-2000 User's Manual...
-
Page 5: Safety Precautions
• Do not place the digitizer on any slippery, slanted, or unstable surface. The product may slide or fall, causing serious injury to people as well as serious damage to the product. NDT-2000 User's Manual... - Page 6 WARNING This is Class A Product. In domestic environment this product may cause radio interference in which case the user may be required to take adequate measures. NDT-2000 User's Manual...
-
Page 7: Table Of Contents
Preface ....................2 FCC Compliance Statement ..............3 Safety Precautions .................. 5 Knowing about Your Film Digitizer ............9 Features of the NDT-2000 ..............9 System Requirements ..............10 Unpacking Your Film Digitizer ..............11 Looking for Damage ................ 11 Unpacking Package Contents ............ - Page 8 Using the Multi-channel Film Feeder (MFF) ........58 Positioning the X-ray Films ............63 Using the Film-rolling Rack ............65 Using the Output Tray ............... 66 Scanning X-ray Films by Using the Multi-channel Film Feeder (MFF) 67 Specifications ................. 69 NDT-2000 User's Manual...
-
Page 9: Knowing About Your Film Digitizer
X-ray films. Equipped with a sheet-fed holder, the NDT-2000 can digitize film with a size up to 14” x 200”. Moreover, optional Auto Film Feeder (AFF) and Multi-channel Film Feeder (MFF) -
Page 10: System Requirements
DICONDE format meeting with the ASTM standard. Further, users can search, check, measure, mark, or print out these files for their preferences conveniently. System Requirements In order to use your NDT-2000, your computer must satisfy the following system requirements: • CD-ROM/DVD-ROM drive (for installing software) •... -
Page 11: Unpacking Your Film Digitizer
After unpacking the shipping carton, follow the steps shown below to take out your digitizer and other accessory components. 1. Ensure that you put the shipping carton with the correct side up on a flat surface. Then, lift up the top cover. NDT-2000 User's Manual... - Page 12 Do not hold the digitizer with one hand before putting it down on a flat surface. NOTE: The digitizer is quite heavy (almost 44 pounds). Make sure you can handle the digitizer properly before removing it from the carton. NDT-2000 User's Manual...
- Page 13 5. Turn over the digitizer and make it stand vertically. 6. Remove the foam support at the top of the digitizer. 7. Pull out the digitizer from the other foam support. Then, remove the digitizer from its packaging plastic bag. NDT-2000 User's Manual...
-
Page 14: Package Contents
Package Contents After you have unpacked your digitizer package, please check for the major components listed below. NDT-2000 Film Digitizer Accessory Box NDT-2000 User's Manual... - Page 15 Accessories in the Box Output Guide Feed Tray Power Cord Hi-Speed USB Cable Cleaning Bag 8.5” x 4.5” Holder Output Basket 12” x 3 1/3” Holder NDT-2000 User's Manual...
-
Page 16: How To Repack Your Film Digitizer For Shipping
How to Repack Your Film Digitizer for Shipping To ship back your NDT-2000 for repairing, maintenance services, or other reasons, in order to not damage your NDT-2000, it is strongly recommended that using the original carton and other packing materials. Follow the steps below to repack your NDT-2000 correctly. - Page 17 5. Put four cardboards back into the shipping carton. 6. Put the accessory box with accessories in the shipping carton and close the top cover. Then, seal the carton with tape. NDT-2000 User's Manual...
-
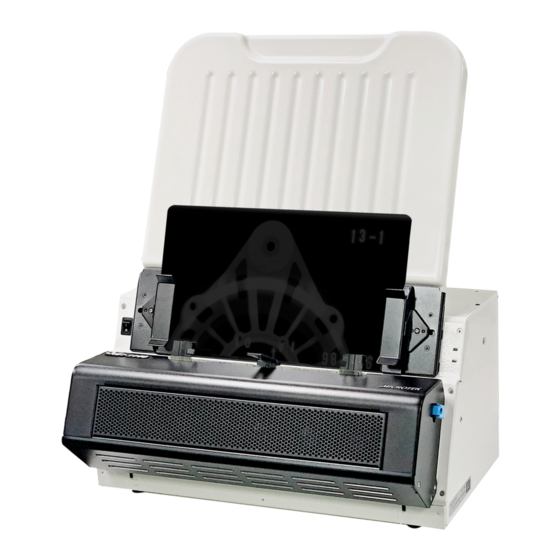
Page 18: Taking A Closer Look
Uses to hook either the Output Guide or the Output Basket onto the digitizer. Release Buttons Releases the front cover to open the lamp holder. There are two Release buttons located on each side of the front cover. Press the buttons down simultaneously to release the front cover. NDT-2000 User's Manual... -
Page 19: Rear / Side View
Rear / Side View Names of Parts Functions of Parts Hi-Speed USB Port Connects the Hi-Speed USB (USB 2.0) cable to the computer. Power Connector Connects the digitizer to the power cord. NDT-2000 User's Manual... -
Page 20: Assembling Your Film Digitizer
Holes at both ends of the front-top of the digitizer. Feed Tray 2. Insert and push down both sides of the Feed Tray into its compartment holes, making sure the Feed Tray snaps into place. Feed Tray Holes NDT-2000 User's Manual... -
Page 21: Installing The Output Tray
(a), making sure the Output Guide snaps into place. Or, Insert and push down both sides of the Output Basket into its compartment holes (b), making sure the Output Basket snaps into place. Output Basket Output Guide NDT-2000 User's Manual... -
Page 22: Output Basket
In order to take out output film conveniently from the basket, open the upper door if necessary. • If the output film slips out from the basket, please close both upper and lower doors at the Output Basket. NDT-2000 User's Manual... -
Page 23: Installing Your Film Digitizer
“My Computer”; the CD/DVD- ROM icon; then cdsetup.exe to start the installer program. 4. Click EXIT on the Microtek Software Installer screen when all the software have been installed. 5. Restart your computer. NDT-2000 User's Manual... -
Page 24: Connecting The Film Digitizer
To the Hi-Speed USB Cable 3. Connect one end of the Hi-Speed USB cable to your computer. 4. Connect the other end of the Hi-Speed cable to the digitizer’s USB port, locating at the left side of the digitizer NDT-2000 User's Manual... - Page 25 6. Turn the power switch at the front-left panel of the digitizer to “On”; once the digitizer is detected by your system, the LED lights on the front panel will brighten, and the digitizer is ready to scan. Power switch LEDs NDT-2000 User's Manual...
-
Page 26: Using Light Shield To Digitize Industrial X-Ray Films
Using Light Shield to Digitize Industrial X-ray Films The light shield is a tool equipped in your NDT-2000, used to block out unnecessary light when scanning. It can help to improve the quality of the scanned image. However, the maximum limit for the width of the Light Shield is about 10.24 inches (26 cm). -
Page 27: Positioning Industrial X-Ray Films
Light Shield Positioning Industrial X-ray Films NDT-2000's Feed Tray can hold only one piece of X-ray film at a time. This section shows you how to position a single-sheet of X-ray film into the Feed Tray with the aim of the Light Shield. -
Page 28: Scanning Industrial X-Ray Films
Scanning Industrial X-ray Films ScanWizard Industry is a scanning software designed by Microtek for Industrial X-ray films scanning used for an industrial purpose. Its user-friendly interface enables you to easily start the scanning process and finish all the scan jobs. - Page 29 – If ScanWizard Industry is launched as a Plug-In from an application program, the scanned image is delivered after the scan to your application, where the image can be saved, viewed, or printed further. NDT-2000 User's Manual...
- Page 30 Light Shield, the selected area of the Light Shield will be cropped out automatically and will not appear in the saved image file. If the scanned image is too big, the auto-crop function will be cancelled. Settings window Scan frame (enclosed by red dotted lines) Preview window NDT-2000 User's Manual...
-
Page 31: Using Film Holders To Digitize Industrial X-Ray Films
Push the holder into the tray until the edge of it touches the bottom edge of the Feed Tray. 12.5" x 3 1/3" Film Holder 4. Make sure that the Light Shield has been pull up. NDT-2000 User's Manual... -
Page 32: Using The 12" X 3 1/3" Film Holder
Push the holder into the tray until the edge of it touches the bottom edge of the Feed Tray. 12.5" x 3 1/3" Film Holder 4. Make sure that the Light Shield has been pull up. NDT-2000 User's Manual... -
Page 33: Scanning Industrial X-Ray Films
Scan Frame drop-down menu. When done, you will see a flashing frame (marquee) around the selected area. Settings window Scan frame (enclosed by red dotted lines) Preview window NDT-2000 User's Manual... -
Page 34: Digitizing Industrial X-Ray Films In Other Sizes
X-ray films up to 14” x 200” (35.56 x 508 cm). Positioning Industrial X-ray Films NDT-2000's Feed Tray can hold only one piece of X-ray film at a time. This section shows you how to position a single-sheet of X-ray film into the Feed Tray. - Page 35 • Remove clips or staples before placing the film into the Feed Tray. DO NOT use the digitizer to scan your X-ray film with clips or staples because they may cause film jams or damage the digitizer. NDT-2000 User's Manual...
-
Page 36: Scanning Industrial X-Ray Films
Films” in the “Using Light Shield to Digitize Industrial X-ray Film” chapter to launch the ScanWizard Industry software, to specify your scanning requirements and to start scanning. Scan Frame tool Settings window Scan frame (enclosed by red dotted lines) Preview window NDT-2000 User's Manual... -
Page 37: Digitizing Industrial X-Ray Films Automatically
If you want to save your scanned files as your desired parameters, click the Scan button to bring up the “Save As” dialog box where you can specify the file name, file format, storage location for saving files Scan Process Tool button NDT-2000 User's Manual... -
Page 38: Care And Cleaning
Care and Cleaning To ensure optimal performance from the NDT-2000, it is important to clean several critical parts of the digitizer on a regular basis. Cleaning the Glass and Components on the Front Cover 1. Push down two Release buttons at both sides of the front cover of the digitizer and open the front cover. - Page 39 Perforation perpendicularly by both hands, the glass may be damaged and broken. 4. Use a soft, nonabrasive, and lint-free cloth to gently wipe both sides of the glass. NDT-2000 User's Manual...
- Page 40 After you wipe off dirt and stains each time, make sure to fold the cloth to a clean side or use another clean cloth to continue cleaning. Do not keep on using the dirty side of the cloth to clean in order to avoid the glass surface getting dirty again. NDT-2000 User's Manual...
-
Page 41: Cleaning The Glass Surface On The Digitizer
6. Put the glass cover back into its original position. Please store the printed document about how to clean the indented glass carefully for the use in the future. . Clean the indented glass NDT-2000 User's Manual... -
Page 42: Cleaning The Rollers
Clean the rollers periodically to maintain performance. Rollers are found in two areas of the NDT-2000: Directly on the digitizer, and on the inner side of the front cover. To clean the rollers inside of the digitizer: 1. -
Page 43: Maintenance
In this cases, contact your local dealers or wholesales for the maintenance services. NOTE: Your digitizer need a professional to perform the required service or maintenance. Do not attend to fix or perform the maintenance by yourself, or it may cause dangers to you or the digitizer. NDT-2000 User's Manual... -
Page 44: Appendix
NOTE: To remove the jammed film from the digitizer, you have to open the front cover first. Otherwise, your film may be damaged if they are forcedly removed. NDT-2000 User's Manual... -
Page 45: Troubleshooting
“Code -204, Scanning lamp or image sensor circuit failure. Please don't select fast preview or draft scan!” This error message appears when the luminance of lamps is insufficient or surpassed. Click “OK” first; then contact the professional technician for the further help. NDT-2000 User's Manual... - Page 46 Make sure the glass surface on the front cover has been set into its proper position. Make sure the Light Shield has been set into its proper position. Make sure you have selected a correct scan process tool and device connected runs properly. NDT-2000 User's Manual...
-
Page 47: Optional Auto Film Feeder (Aff)
Scanning Area: Min .2.5” x 10”; Max. 14” x 17” The coming section describes how to install the AFF on the NDT-2000 through the NDT-2000's accessory port and how to scan X-ray films by using the AFF. NDT-2000 User's Manual... -
Page 48: Installing And Connecting The Auto Film Feeder (Aff)
1. Look for two sets of the Feed Tray Holes at both ends of the front-top of the digitizer. 2. Insert and push down both sides of the AFF into its compartment holes, making sure the AFF snaps into place. NDT-2000 User's Manual... - Page 49 3. Plug the connector of the AFF into the digitizer’s 9-pin accessory port securely and properly. NDT-2000 User's Manual...
-
Page 50: Positioning The X-Ray Films
X-ray films into the tray of the AFF correctly. 1. Install the AFF onto your digitizer before using it. Refer to the previous sections “Installing and Connecting the Auto Film Feeder (AFF)” for the detail. Top Bar 2. Lift up the Top Bar. Rear Rollers NDT-2000 User's Manual... - Page 51 Please take note that the bottom of the films should be placed against the front side of the bottom rail as shown in the graphic and rest the back against the AFF housing. NDT-2000 User's Manual...
- Page 52 Top Bar so the films are sandwiched between the Top Bar and the AFF's tray. 5. If the width of the film is large than 10.24” (26 cm), pull the Light Shied up, otherwise pull it down. NDT-2000 User's Manual...
-
Page 53: Using Output Tray
Before start using the AFF to scan, make sure that the Output Tray (e.g., Output Basket) has been installed correctly on your NDT-2000 too; otherwise, improper outputs of piles of films may cause jams of films and bring damage to your digitizer. -
Page 54: Scanning X-Ray Films By Using The Auto Film Feeder (Aff)
NOTE: When scanning with the AFF function, the height limit for the scan frame is 17”. If the value of the height in the scan frame is larger than 17, it will be set back to 17” automatically by the system. NDT-2000 User's Manual... - Page 55 Settings window Preview window NDT-2000 User's Manual...
-
Page 56: Optional Multi-Channel Film Feeder (Mff)
– Dimension: 700 (L) x 420 (W) x 255 (H) mm – Weight: 4.45 kg The coming section describes how to install the MFF on the NDT-2000 and how to scan X-ray films by using the MFF. NDT-2000 User's Manual... -
Page 57: Installing The Multi-Channel Film Feeder (Mff)
For how to install the MFF and its related components, please refer to the printout coming with the MFF package. Please store the printout carefully for the use in the future. Film-rolling Rack Multi-channel Film Tray Back Support Base Tray NDT-2000 User's Manual... -
Page 58: Using The Multi-Channel Film Feeder (Mff)
Pinch both sides of a Film-separation Bar and then take it out from its component part. Take turns to remove all Film-separation Bars attached with the Multi-channel Film Tray. There should be four pieces of Film-separation Bars in total. Film-separation NDT-2000 User's Manual... - Page 59 Four surfaces of a Rectangular Prism contains 9 measurement scales in total: Surface O : 60, 90 Surface OO: 70, 100 Surface OOO: 80, 120, 140 Surface OOOO: 3.3", 4.5" Top and bottom Rectangular Prisms NDT-2000 User's Manual...
- Page 60 The long notch next to the measurement scale Measurement scale 4. When done, put the top Guardrail and the bottom Guardrail back into their component parts. Finally, screw Quick-lock Nuts clockwise to secure both Guardrails. Top Guardrail Bottom Guardrail NDT-2000 User's Manual...
- Page 61 When you try to remove the glass out from its compartment part, if the glass has not been pulled out to the end of the track and has not been lifted up perpendicularly by both hands, the glass may be damaged and broken. NDT-2000 User's Manual...
- Page 62 When install a Glass Mask onto the glass, please take extra attention for the glass is pretty fragile. Also, do not touch the glass surface when changing the Glass Mask in order to ensure the quality of the scanned image. NDT-2000 User's Manual...
- Page 63 When done, insert the glass with the Glass Mask into the compartment part of the front cover and then push it back along the tracks until it snaps into place. Finally, push back the front cover until it snaps into place. NDT-2000 User's Manual...
-
Page 64: Positioning The X-Ray Films
X-ray films at the middle channel. Then, you can put the other one at either the left or right channel as preferred. Make sure that the Light Shield has been lifted up. NDT-2000 User's Manual... -
Page 65: Using The Film-Rolling Rack
X-ray films, you should put the first one roll of X-ray films at the middle channel. Then, you can put the other one at either the left or right channel as preferred. Make sure that the Light Shield has been lifted up. NDT-2000 User's Manual... -
Page 66: Using The Output Tray
Output Tray” for the details about how to mount the Output Tray onto your NDT-2000. NOTE: To ensure that the after-scan film can stay in the basket neatly, make sure that the lower door of basket is closed. Output Basket (with lower door closed) NDT-2000 User's Manual... -
Page 67: Scanning X-Ray Films By Using The Multi-Channel Film Feeder (Mff)
(default folder assigned by the software), or retrieve it from your assigned folder. • If ScanWizard Industry is launched as a Plug-In from an image-editing program, the scanned image is delivered to your application, where the image can be saved, viewed, or modified further. NDT-2000 User's Manual... - Page 68 Settings window Preview window NDT-2000 User's Manual...
-
Page 69: Specifications
Environment Operating temperature: 50° to 104°F (10° to 40°C) Relative humidity: 20% to 85% Storage temperature: 14° to 140°F (-10° to 60°C) Relative humidity: 20% to 95% Optional Accessory Automatic Film Feeder (AFF), Multi-channel Film Feeder (MFF) NDT-2000 User's Manual...
Need help?
Do you have a question about the NDT-2000 and is the answer not in the manual?
Questions and answers