Table of Contents
Advertisement
Quick Links
Advertisement
Table of Contents

Related Manuals for Uwatec Galileo HUD


Summary of Contents for Uwatec Galileo HUD
- Page 1 ® Galileo HUD User Manual...
- Page 2 The HUD is delivered in deep sleep mode. Charge it and press the push-wheel to activate it before the first dive. Hereby, Uwatec AG declares that the radio equipment type PAN1740 is in compliance with Directive 2014/53/EU. The combination of SCUBAPRO HUD and SCUBAPRO high pressure transmitter is a personal protective equipment in compliance with the essential safety requirements of the EU Regulation 2016/425.
-
Page 3: Table Of Contents
Dive display “lite” ..............57 3.2.3 Dive profile ................57 3.2.4 Navigation ................58 3.2.5 Deco stop table ................ 59 Alarms and warnings during diving ............59 3.3.1 Maximum depth ............... 59 3.3.2 Dive time .................. 59 GALILEO HUD USER MANUAL... - Page 4 Modification Statement ............. 89 7.3.2 Interference Statement ............. 89 7.3.3 Wireless Notice ................. 89 7.3.4 FCC Class B Digital Device Notice ..........89 7.3.5 CAN ICES-3 (B) / NMB-3 (B) ............ 89 Manufacturer ..................89 GLOSSARY ......................90 GALILEO HUD USER MANUAL...
-
Page 5: Introduction To The Hud
HUD. (Note: the HUD can be used with contact lenses or optical lenses.) • Always carry a second dive computer as a backup. GALILEO HUD USER MANUAL... -
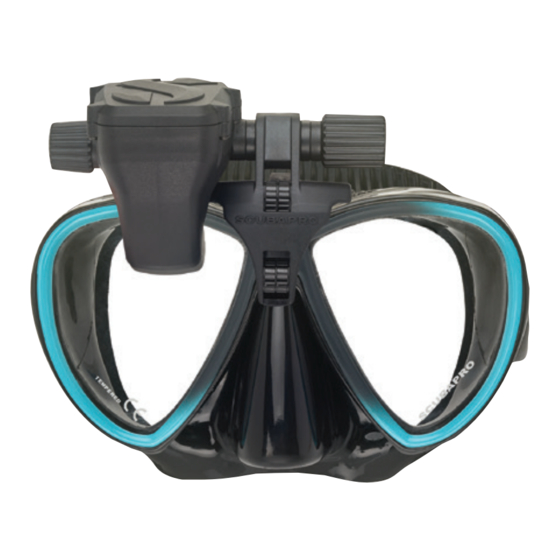
Page 6: Mounting The Hud On Your Mask
The following tools are needed to mount the HUD to your mask. They are not included in your HUD package: 1. SCUBAPRO mask 2. Side cutters 3. Small pair of pliers GALILEO HUD USER MANUAL... - Page 7 Direct one cable tie down the left side of the nose, and one down the right side of the nose. Once completed, double-check that the cable ties are properly routed. GALILEO HUD USER MANUAL...
- Page 8 6. Thread the cable ties through the holder from back to front. Hold the mask and holder in your hand like in the picture below. This hand position will also help you to hold the ball in place if you’re using one. GALILEO HUD USER MANUAL...
- Page 9 9. Use the pliers for the final tightening. Pull in a vertical direction to avoid shifting the head of the cable tie. Check to make sure the holder is strapped tight and is stable and secure. GALILEO HUD USER MANUAL...
-
Page 10: Mounting The Hud To The Holder
This leaves the spacers closest to the holder. 3. Rotate the HUD screen to where it can be viewed through the mask lens. Fix its position by further tightening the hand wheel. GALILEO HUD USER MANUAL... - Page 11 The HUD is designed to be used with all spacers at all times. 7. Replace the compression spring, slide on the standard spacers, then the locking spacer, and finally the hand wheel. GALILEO HUD USER MANUAL...
- Page 12 HUD is there—until it’s time to look up and check your dive data. NOTE: A foggy mask lens limits visibility of the HUD display. Make sure to keep your mask lenses fog-free for maximum readability. GALILEO HUD USER MANUAL...
-
Page 13: Switching On The Hud
HUD by pressing a button. values. Simply leave the HUD charging for at least half an hour. NOTE: Please keep the HUD clean to avoid scratches, dirty contacts or a sticking plug. To switch on the HUD, press-and-release the push-wheel. GALILEO HUD USER MANUAL... -
Page 14: Power Concept And Charging
48 hours. Never start a dive during this time because the decompression information from the previous dive will not be available. If left alone during the charging phase, the HUD will switch to sleep mode. But it is still charging. GALILEO HUD USER MANUAL... -
Page 15: Li-Ion Battery Safety Instructions
• Never completely discharge the Li-ion not using the HUD. This will help maintain the battery. battery and extend its useful life. • After the battery is discharged, don’t leave it discharged. Charge battery as soon as possible GALILEO HUD USER MANUAL... -
Page 16: Operating Modes
4. Dive mode. This mode is activated when the computer reaches a depth of 0.8m/3ft or more. In this mode the HUD monitors depth, time, temperature and wireless sensors. Decompression calculations are performed in this mode. GALILEO HUD USER MANUAL... -
Page 17: 1.10 Hud Push-Wheel Control
“long” arrow indicates the press- and-hold function.) • The HUD’s push-wheel rotation, press-and-release and press-and-hold functions while at the surface and during diving are summarized in the following table. GALILEO HUD USER MANUAL... - Page 18 Change dive screen (limited selection) Main menu Finish session when depth Profile when session is ongoing (limited selection) < 0.1m & while at the surface Main menu Setpoint change when required Change dive screen (limited selection) GALILEO HUD USER MANUAL...
-
Page 19: 1.11 Basic Settings
From the System menu, rotate the push- press-and-release. wheel to toggle down to Time. Press-and- release. From the Settings menu, rotate the push- wheel to toggle down to System, then To set both time and date, select Set Time press-and-release. and press-and-release. GALILEO HUD USER MANUAL... - Page 20 Time menu. Time from GPS With Time from GPS selected, a press-and- release of the push-wheel will give you an at-a-glance status of your GPS reception, with time and date data coming from the GPS satellites. GALILEO HUD USER MANUAL...
- Page 21 Rotate the push-wheel to select your preference, then press-and-release to save your selection and return to the Time Format menu screen. From the Time menu screen, a press-and- hold of the push-wheel takes you back to the System menu screen. GALILEO HUD USER MANUAL...
- Page 22 From the Units menu, rotate the push- wheel to Temperature. Press-and-release. In the Distance menu you have a choice of 4 selections for measuring horizontal distance. Rotate the push-wheel to make your selection. A press-and-release saves GALILEO HUD USER MANUAL...
-
Page 23: 1.12 No-Fly Time
• Do not dive to treat symptoms of decompression sickness. • Do not dive when the computer is in SOS mode. • Going to altitude or flying while the HUD displays the SOS mode can result in serious injury or death. GALILEO HUD USER MANUAL... -
Page 24: Mounting And Pairing The High Pressure Transmitter
1. Mount the first stage regulator with Smart transmitter on a full tank. 2. Turn on the HUD. From the Surface screen press-and-release the push- wheel to get to the Main menu. GALILEO HUD USER MANUAL... - Page 25 5. Rotate the push-wheel to toggle down to Settings. Press-and-release. 6. From the Settings menu rotate the push-wheel to toggle down to Pairing. Press-and-release to enter the pairing menu and select the tank you want to pair with your HUD. GALILEO HUD USER MANUAL...
- Page 26 Also, the pairing of the selected gas will be canceled if the timeout countdown goes to If “---” appears in the lower left hand corner instead of a pressure value, that means the HUD is paired but no signal is available. GALILEO HUD USER MANUAL...
- Page 27 RF sources, can be momentarily interrupted. Strobes used in underwater photography, for example, are known to momentarily affect the communication between the HUD and the wireless transmitter. GALILEO HUD USER MANUAL...
-
Page 28: Scubapro Human Factor Divingtm
Moisten the electrode areas if your skin is dry or when diving using a drysuit. Before the first dive you must pair the heart rate monitor with your HUD. NOTE: monitor should be paired with the HUD before putting GALILEO HUD USER MANUAL... -
Page 29: 1.17 Turning Off The Hud
If “---“ appears in the lower right hand corner instead of a value, that means the heart rate monitor is paired but no signal is available. GALILEO HUD USER MANUAL... -
Page 30: Hud Settings And Menus
HUD opens onto after being turned on) a EXIT press-and-release of the push-wheel takes you to the Main menu. COMMUNICATION By browsing through these menus you can quickly become familiar with them. Following are short descriptions for each selection. GALILEO HUD USER MANUAL... -
Page 31: Gas
WARNING Gas switching to unknown mixtures while diving is extremely dangerous and can lead to convulsions and death by drowning. Never switch to a gas under water that you have not analyzed yourself. GALILEO HUD USER MANUAL... -
Page 32: Navigation
This menu is accessible in all in yellow. By rotating the push-wheel you dive modes. can select the first letter of your bearing’s new name, and confirm with a press-and- release of the push-wheel. GALILEO HUD USER MANUAL... -
Page 33: Gps
HUD’s GPS function. selection, and then enter with a press-and- release of the push-wheel. Let’s look at Similar to storing compass bearings, them one at a time. you have the ability to add up to 32 GPS waypoints. GALILEO HUD USER MANUAL... -
Page 34: Dive Settings
EXIT MB level DOWN GF LOW Calibra�on COMPASS Declina�on EXIT PDIS DOWN GF HIGH RBT TANK RESERVE DOWN DISPLAY Display se�ngs EXIT DIVE DETECTION DOWN SYSTEM System se�ngs EXIT SAFETY STOP PPO2 MAX ALARMS SOUND GALILEO HUD USER MANUAL... - Page 35 SCUBA, Gauge, Apnea and CCR modes. Bühlmann created the Bühlmann ZH-L16C. Rotating the push-wheel toggles you to For over 20 years, UWATEC has been your mode selection. A press-and-release developing this algorithm and constantly of the push-wheel saves your selection and adapting it to be state of the art.
- Page 36 Gradient Factors. As ZHL-ADT is the default algorithm, switching to the GF algorithm requires that you rotate the push-wheel to toggle to that algorithm selection. • GF Low is the numerical setting that represents the percentage of GALILEO HUD USER MANUAL...
- Page 37 100% being the possible when the ZHL-ADT algorithm is maximum (no conservatism at all). selected. NOTE: For more about diving with Microbubble levels, chapter: Diving with MB levels. (Example of a GF High setting) GALILEO HUD USER MANUAL...
- Page 38 Setting a lower value gives you more diving time but increases the risk of running out of gas supply before reaching the surface. Setting the RBT tank reserve is only possible when the ZHL-ADT algorithm is selected. GALILEO HUD USER MANUAL...
- Page 39 2.3.1.7 Safety stop The ppO2max setting defines the limit for oxygen partial pressure. It is the same for all gases. The HUD offers ppO2max settings from 1.3bar to 1.6bar (1.4bar is the factory setting). GALILEO HUD USER MANUAL...
- Page 40 1-120m/3-394ft in 1m/3ft increments. To save the set value and activate the alarm press-and-release the push-wheel. To disable the maximum depth warning alarm, press-and-hold the push-wheel. Either action will return you to the Dive Settings menu screen. GALILEO HUD USER MANUAL...
-
Page 41: Altimeter
A press-and-release of the push-wheel and you enter the Altitude menu. When Sound/Enabled is selected, then alarms and warnings are active and audible. When Sound/Disabled is selected, then the HUD switches into an all-silent mode. GALILEO HUD USER MANUAL... -
Page 42: Pairing
Slowly turn the HUD in random directions and around different center lines. The more different points that can be recorded, the better the calibration. GALILEO HUD USER MANUAL... -
Page 43: Gps
(radios, stereo speakers, flashlights, metal tools, etc.). Declination From the Settings menu, scroll down to GPS and press-and-release the push- wheel to enter the GPS menu’s activation screen. GALILEO HUD USER MANUAL... -
Page 44: Display
GPS coordinates. Also displayed is the True Heading (TH) to the current set waypoint, and the Total Distance (TD) to that waypoint. From the Settings menu, scroll down to Display and press-and-release the push- wheel. GALILEO HUD USER MANUAL... - Page 45 NOTE: To extend battery life until your next recharge, reduce the brightness of the display, activate power save mode and disable GPS whenever not in use. GALILEO HUD USER MANUAL...
-
Page 46: System
The System menu is where you can set the basic parameters of your HUD dive computer. By rotating the push-wheel you can scroll to the following sub-menus. A press-and- release of the push-wheel lets you enter. GALILEO HUD USER MANUAL... - Page 47 HUD is going to be loaned to another diver who has not dived in the last 48 hours. WARNING Resetting desaturation will affect calculations of the algorithm, which may lead to serious injury or death. Do not reset desaturation without a valid purpose. GALILEO HUD USER MANUAL...
- Page 48 HUD you can reset the desaturation which will zero out the no-fly counter. If the memory formatting is successful, this will be quickly followed by the following screen. GALILEO HUD USER MANUAL...
-
Page 49: Dive Planner
Dive planner available. False operations may display faulty information. During a dive this may lead to The HUD’s dive planner can be accessed serious injury or death. from the Main menu. GALILEO HUD USER MANUAL... - Page 50 (increment of 1 min). With depth and time selected, press-and- release GO and the simulation begins. The HUD simulates a 20m/min descent to the entered depth and remains at this depth until the time is finished. GALILEO HUD USER MANUAL...
- Page 51 There is no restriction on updated values. the number of levels you can program. GALILEO HUD USER MANUAL...
-
Page 52: Logbook
The first page shows Date, Time, Depth, Total Dive Time, the Deco Algorithm with either MB Level or the Gradient Factor, and CNS saturation. A press-and-release of the push-wheel takes you to the Profile screen, outlining GALILEO HUD USER MANUAL... -
Page 53: Communication
Introduction to LogTRAK. is displayed on the Surface screen. The computer may fail to function during the dive and this could lead to serious injury or death. WARNING Before each dive, verify that all HUD settings are correct. GALILEO HUD USER MANUAL... -
Page 54: Dive Mode At Surface
The fraction you select is displayed in the screen’s lower-left data box together with the chosen algorithm (MB is the symbol for the ADT algorithm; GF is the symbol for the GF algorithm). GALILEO HUD USER MANUAL... -
Page 55: Ccr
Details on the information displayed on the HUD screen in Dive mode can be found in the following sections. Surface screen just before the dive: 1 Gas (air) is set; Microbubble setting of L3; tank pressure of 231 bar; fully charged battery. GALILEO HUD USER MANUAL... -
Page 56: Standard Display
• Partial Bar/Green = over 100 bar in the logbook. • Partial Bar/Yellow = 50 to 100 bar • Partial Bar Red = 25 to 50 bar • Red Bar (blinking) = less than 25 bar GALILEO HUD USER MANUAL... -
Page 57: Dive Display "Lite
NOTE: When the power save mode is activated the display will be illuminated for 30 seconds by pressing the push wheel. Temperature. The HUD displays water temperature during the dive and air temperature while on the surface. GALILEO HUD USER MANUAL... -
Page 58: Navigation
The HUD allows you to spend up to 3 minutes on the surface during a dive before ending that dive. This means you can surface, switch your HUD to GPS mode, confirm your position, and then continue your dive. GALILEO HUD USER MANUAL... -
Page 59: Deco Stop Table
• When the HUD is set to SOUND OFF mode, all incurring a decompression stop obligation. audible alarms and warnings are switched off. If the no-stop time reaches 0 minutes the color changes to red. GALILEO HUD USER MANUAL... -
Page 60: Cns O2
The pressure reduction that the body can tolerate without significant microbubble GALILEO HUD USER MANUAL... -
Page 61: Mod/Ppo2
The depth starts blinking in red if your current ppO2 is higher than your MAXppO2 plus 0.05bar. The HUD also provides an audible alarm for ascent rates exceeding 110%: the intensity of the alarm increases in direct proportion GALILEO HUD USER MANUAL... -
Page 62: Entering Decompression
This works contrary to the formation of microbubbles and may increase safety. The HUD features 6 microbubble levels (L0- L5). Level L0 corresponds to SCUBAPRO’s GALILEO HUD USER MANUAL... -
Page 63: Comparison Of Dives With Mb Level L0 And Mb Level L5
MB nitrogen from previous dives; hence, setting. PDIS is also repetitive-dive dependent. Switching the MB level at depth works the Conventional deep stops completely ignore same way as setting the MB level on the these facts. GALILEO HUD USER MANUAL... - Page 64 2 dive profiles. Deep stops completely ignore any facts about the dives themselves aside from max depth. GALILEO HUD USER MANUAL...
- Page 65 • If the PDI stop calculated for gas 1 is due to the fact that these compartments is shallower than the switch depth to are only “leading” for very short dives, for gas 2, then the displayed PDI stop is a GALILEO HUD USER MANUAL...
- Page 66 PDIS depth. • You have ascended more than 3m/10ft above the PDIS. The PDIS value and countdown timer disappear and in the deco table the PDIS stop disappears which indicates that PDIS has not been performed. GALILEO HUD USER MANUAL...
-
Page 67: Altitude Diving
If a dive is started during this adaptation time, the HUD considers it a repetitive dive since the body has residual nitrogen. The allowable altitude (beyond which the HUD has computed to be incompatible GALILEO HUD USER MANUAL... -
Page 68: Prohibited Altitude
0.5bar due to repeated and/or long dives. These can Air: 13m/43ft affect the central nervous system and 32%: 6m/20ft cause damage to lungs or to other vital 36%: 4m/13ft organs. Long exposures can be divided GALILEO HUD USER MANUAL... -
Page 69: Technical Diving
The risk may be higher due to differences in an individual’s physical condition, environmental conditions, human errors, etc. If you are not willing to take the risk, don’t dive! GALILEO HUD USER MANUAL... -
Page 70: Diving With Multiple Gas Mixtures
• The ppO2max is the same for all preset gases. • The MOD for tanks 2 through 8 are the switch depths for those gases. This is what the HUD uses for its calculations, warnings and suggested switch points. GALILEO HUD USER MANUAL... - Page 71 WARNING NEVER set a gas mix or breathe a gas mix that you have not mixed or checked yourself. Breathing an incorrect gas mixture can be lethal! NOTE: During diving you cannot pair this gas. GALILEO HUD USER MANUAL...
-
Page 72: Diving With Trimix
This is due to the limitation that a dive must begin with gas 1. To ensure an adequate supply of oxygen to the body, the gas used at the beginning of the dive must contain enough oxygen (you can use a travel mix GALILEO HUD USER MANUAL... - Page 73 (Profile Dependent Intermediate Stop), has been extended to both nitrogen and helium gases. The optimal off-gassing depth will be indicated when PDIS is enabled. PDI stops are not obligatory, but will potentially assist in reducing possible bubble formation. GALILEO HUD USER MANUAL...
-
Page 74: Ccr Mode
You will find a summary of your CCR settings displayed in the lower-left data box on the Surface screen. GALILEO HUD USER MANUAL... - Page 75 CCR dive to and-hold the push-wheel during diving. OC, at which time the first OC gas listed on the gas table will be activated. Usage is identical to SCUBA mode. GALILEO HUD USER MANUAL...
- Page 76 O2 level. For example, with a SP1 of 0.5bar of the air diluent the depth would be approximately 13.8m/45.3ft in salt water. GALILEO HUD USER MANUAL...
-
Page 77: Gauge Mode
GPS after surfacing. When on the surface in Gauge mode, the During a dive in Gauge mode, the HUD HUD will not show no-fly time or maximum displays the average depth in the corner at GALILEO HUD USER MANUAL... -
Page 78: Apnea Mode
Apnea mode if the computer is completely desaturated. NOTE: please keep in mind that the HUD starts displaying the depth at 0.8m/3ft. Also as with Gauge mode, when in Apnea mode, by rotating the push-wheel you can GALILEO HUD USER MANUAL... -
Page 79: Hud Accessories
Pairing the Digital Heart Rate Monitor for instructions on how to do this. After this initial pairing your HUD will stay paired to the heart rate monitor, therefore it is not needed to perform this step before each dive. GALILEO HUD USER MANUAL... -
Page 80: Scubapro Digital Heart Rate Monitor
In the Communication menu screen you Bluetooth stick. can choose from: • DISK MODE • LOG MODE • BLUETOOTH MODE When selecting Disk mode, a press-and- release of the push-wheel will take you to the following screen: GALILEO HUD USER MANUAL... - Page 81 HUD’s display. Log mode is another mode you would use with the USB connection. GALILEO HUD USER MANUAL...
-
Page 82: Interfacing With A Pc/Mac Or Handheld Device
Resources tab. On the drop-down menu select Software & Firmware. From there scroll down to “Galileo HUD Firmware Update” and click on the link to download the firmware package. Next, connect your HUD via USB to your personal computer and copy the file “HUDupgrade.bin,”... -
Page 83: Updating Your Hud
HUD dive computer. 1. Select the position of the new waypoint in the HUD (Position) 2. Enter a name for your waypoint (Name) 3. Enter the coordinates in floating point format (Latitude & Longitude) GALILEO HUD USER MANUAL... -
Page 84: Log And Bluetooth Modes
To start the communication using USB: 1. Connect to your HUD with the USB cable. 2. Use the Log Mode to establish the connection from the HUD. 3. Launch LogTRAK. 4. Check that the HUD is detected by LogTRAK. GALILEO HUD USER MANUAL... -
Page 85: Reading Computer Information
By activating the box, using PC-Time and pressing “write” you can easily update your time and date. Setting units in LogTRAK: You can set your units in your HUD or on your PC by using the following LogTRAK personalization section. GALILEO HUD USER MANUAL... -
Page 86: Taking Care Of Your Hud
Actual battery operation time depends authorized SCUBAPRO dealer. primarily on the operational temperature and brightness settings, but also on many other factors. Bluetooth transceiver: ® Operating frequency 2402-2478 MHz, max power < 3 dBm, connection range approx. 2m. GALILEO HUD USER MANUAL... -
Page 87: Replacing The Battery In Transmitter
6. Close the battery cap 7. Check the heart rate monitor function on your dive computer GALILEO HUD USER MANUAL... -
Page 88: Warranty
The HUD has a 2-year warranty covering defects in workmanship and functioning. EU Radio directive The warranty only covers dive computers Hereby, Uwatec AG, declares that the radio which have been bought from an authorized equipment type PAN1740 is in compliance SCUBAPRO dealer. Repairs or replacements with Directive 2014/53/EU. -
Page 89: Eu Radio Directive
EU Directive 2012/19/UE. Collection points are provided by some distributors of the products and local authorities. Products marked with the recycling symbol on the left must not be disposed of in normal household waste. GALILEO HUD USER MANUAL... -
Page 90: Glossary
1.6bar is considered dangerous. ppO2 max The maximum allowed value for ppO2. Together with the oxygen concentration, it defines the MOD. Predictive Multigas. Lets you carry additional breathing gases in addition to your main breathing gas. GALILEO HUD USER MANUAL... - Page 91 Universal Time Coordinated. This is the primary time standard used worldwide to regulate clocks and time. UTC correlates to your location’s time zone through the use of offsets ranging from -12 to +14 hours. GALILEO HUD USER MANUAL...
- Page 92 ®...
Need help?
Do you have a question about the Galileo HUD and is the answer not in the manual?
Questions and answers