Table of Contents
Advertisement
Quick Links
Advertisement
Table of Contents

Related Manuals for SPECTRO SPECTROMAXx


Summary of Contents for SPECTRO SPECTROMAXx
- Page 1 Das verknüpfte Bild kann nicht angezeigt werden. Möglicherweise wurde die Datei verschoben, umbenannt oder gelöscht. Stellen Sie sicher, dass die Verknüpfung auf die korrekt SPECTROMAXx Stationary metal analyzer Original operating instructions...
-
Page 3: Table Of Contents
Switching off the instrument ....................28 Measuring procedure ......................29 6.4.1 Preparing the measuring procedure ..............30 • iCALising the measuring device (iCAL) ............... 31 • Changing the base (multi-base instruments only) ..........31 6.4.2 Start the measurement ..................32 SPECTROMAXx — 21.02.2020 — 3... - Page 4 Optic air filter ......................50 Replacing the ICALization sample ..................51 Status messages ....................52 Troubleshooting ....................53 Error messages ......................... 55 Diagnosis tool ........................56 Spare parts and consumables ................57 De-commissioning .................... 57 Manufacturer address ..................57 — 4 SPECTROMAXx — 21.02.2020...
-
Page 5: Description Of Instrument
Calibration data are already stored in the unit's memory. The measured values are compared with these data. The measured values are converted into concentrations and then displayed on the screen. SPECTROMAXx — 21.02.2020 — 5... -
Page 6: Overview
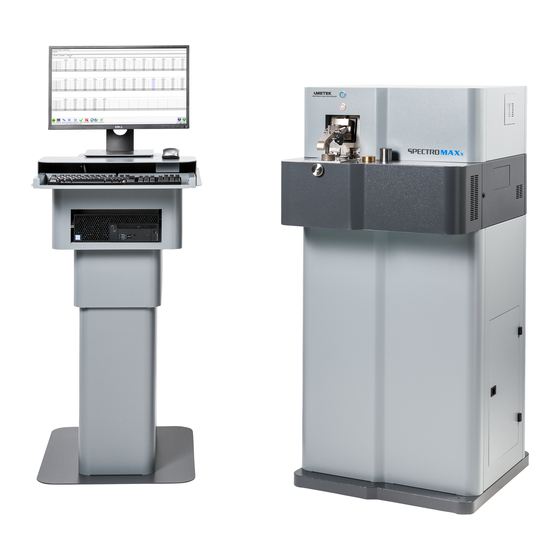
Description of instrument Overview 1.3.1 Instrument (front) Benchtop instrument Floor instrument Fig. 1 Component Component PC data transmission socket Spark stand Argon connection Gas-washing bottle and filter bottle Air filter — 6 SPECTROMAXx — 21.02.2020... -
Page 7: Unit (Left Side)
Description of instrument 1.3.2 Unit (left side) Fig. 2 Component Component Unlocking mechanism for On/Off switch protective cover spark excitation (plasma generator) Display of measuring procedure Sample clamp SPECTROMAXx — 21.02.2020 — 7... -
Page 8: Instrument (Right-Hand Side)
Sample clamp Air optics filter mat Display of measuring procedure Air exit power supply unit On/Off switch spark excitation Access to exhaust filter system (plasma generator) (gas-washing bottle and filter bottle) Unlocking mechanism for protective cover — 8 SPECTROMAXx — 21.02.2020... -
Page 9: Instrument (Back)
Description of instrument 1.3.4 Instrument (back) Fig. 4 Component Component Power connection socket Argon connection PC data transmission connection SPECTROMAXx — 21.02.2020 — 9... -
Page 10: Spark Stand
Holder for fiber-optics to air optics channel to the UV optics) Clamp (swinging) Locking wheel for contact Contact (movable) Outlet to filter system Spacer Electrode holder Spark stand plate Electrode and spark stand insert (below the spark stand plate) — 10 SPECTROMAXx — 21.02.2020... -
Page 11: Spark Stand Insert
Description of instrument 1.3.6 Spark stand insert Fig. 6 Component Component Air optics light channel Electrode Spark stand insert Argon outlet UV optics light channel SPECTROMAXx — 21.02.2020 — 11... -
Page 12: Safety
Warning! Risk of suffocation! Notice! This sign warns of activities or conditions that may adversely affect the function of the instrument. Information Displays information that is important for the correct and safe use of the instrument. — 12 SPECTROMAXx — 21.02.2020... -
Page 13: User Information
Only genuine spare parts must be used when repairing the instrument. If using components other than OME parts, the CE Declaration of Conformity shall be null and void. SPECTROMAXx — 21.02.2020 — 13... -
Page 14: Intended Use
Personal protective equipment must be worn. When preparing samples that could potentially release toxic substances, wearing protective goggles and the use of appropriate respiratory protection equipment is mandatory. — 14 SPECTROMAXx — 21.02.2020... -
Page 15: Sample Material
Compliance with these limits is the sole responsibility of the owner of the spectrometer. If samples with toxic components must be measured, further protective actions such as wearing breathing protection may be necessary. SPECTROMAXx — 21.02.2020 — 15... -
Page 16: Sample Weight
Springs are used to keep the sample clamp in position. However, the clamp may fold down unexpectedly. If your hand is caught underneath the clamp, this may cause injuries. Never place your hand under the sample clamp. — 16 SPECTROMAXx — 21.02.2020... -
Page 17: Gas Supply
Do not operate the instrument if one of the following conditions exists: If the instrument is faulty or damaged. If the ambient conditions do not comply with the specification. If the area where the instrument is used is not a commercial/industrial premise. SPECTROMAXx — 21.02.2020 — 17... -
Page 18: Residual Risks
The instrument is operated with argon. Argon is heavier than air. It can accumulate in a closed room, especially on the floor or lower-lying areas. Ensure that adequate ventilation is provided. If necessary, install oxygen sensors. — 18 SPECTROMAXx — 21.02.2020... - Page 19 pacemakers, defibrillators, EEG, ECG devices, etc.) should not be affected by CE-compliant instruments. For this group of operators, however, it is strongly recommended to contact the manufacturer of the instrument before using the spectrometer! SPECTROMAXx — 21.02.2020 — 19...
-
Page 20: Technical Data
Inside of dry, dust-free rooms up to an altitude of 2000 m above sea level, vibration-free (not subject to impact or vibration load conditions) Air humidity range 20 – 80%, not condensing Sound pressure level 55 dB(A) — 20 SPECTROMAXx — 21.02.2020... - Page 21 227 l/h 213 l/h Storage conditions Ambient temperature -15 – 45°C; +5 – +113°F Protection class / Contamination class IP 20 (DIN 40050), contamination class II (laboratory environment) EMC environment Industrial environment / Laboratory environment SPECTROMAXx — 21.02.2020 — 21...
-
Page 22: Transportation/Setting-Up
In order to disconnect the instrument from the power supply, access to the power cable of the instrument must be ensured at all times. — 22 SPECTROMAXx — 21.02.2020... -
Page 23: Space Requirements
Transportation/Setting-up Space requirements Benchtop instrument Floor instrument Storage Storage conditions: The instrument must be stored in a dry place Room temperature -15°C – +45°C (5°F – 113°F) SPECTROMAXx — 21.02.2020 — 23... -
Page 24: Gas Supply
The pressure reducer must be adjusted so that the maximum permissible inlet pressure of the instrument is not exceeded. A copper tube for the argon supply is provided with the delivery of the SPECTRO: Diameter 6 x 1 mm, length 3 m ... -
Page 25: Initial Start-Up
Set the argon pressure to 4.8 - 5.0 bar (69.6 - 72.5 psi). If the argon pressure is not properly set, turbulences result in the spark stand insert. Thus, correct measuring results cannot be obtained. The instrument is ready for use. SPECTROMAXx — 21.02.2020 — 25... -
Page 26: Operation
Operation Operation Overview of controls Fig. 7 Control element Function Switch Activates and deactivates the plasma generator and the argon flow (see chapter 6.2). Display Is illuminated during the sparking process. — 26 SPECTROMAXx — 21.02.2020... -
Page 27: Switching On The Instrument
When the argon flow is automatically activated again is determined in the "Argon saving module" screen dialog. Immediately thereafter, the instrument is ready for operation. For a detailed description, refer to the online help of the instrument. SPECTROMAXx — 21.02.2020 — 27... -
Page 28: Switching Off The Instrument
Select the dialog item "Shut down" and confirm the dialog field. The program is shut down. The computer is turned off. In order to switch the instrument completely off, remove the power plug. The instrument is switched off. — 28 SPECTROMAXx — 21.02.2020... -
Page 29: Measuring Procedure
Take appropriate protective measures (e.g. wear safety goggles) when the spark stand opening is not fully covered. Information A flawed initial start-up, operation or sample preparation can lead to measurement errors. Therefore, ensure all necessary requirements for a correct measurement are met. SPECTROMAXx — 21.02.2020 — 29... -
Page 30: Preparing The Measuring Procedure
It is important that no moisture is visible on the outside. If necessary, dry the sample. If working with toxic samples, ensure to verify the safety precautions. The measurement is now prepared. — 30 SPECTROMAXx — 21.02.2020... -
Page 31: Icalising The Measuring Device (Ical)
When changing the base, the spark stand must be cleaned in order to avoid memory effects, see page 40. Change the spark stand insert, the electrode, and the electrode brush. Preparation of the instrument for measuring another base is now complete. SPECTROMAXx — 21.02.2020 — 31... -
Page 32: Start The Measurement
Rotate the sample slightly for each further measurement. The respective burn spots must not overlap. Use "Start" or press the respective function key to start the series of measurement. The measurement process is finished. — 32 SPECTROMAXx — 21.02.2020... -
Page 33: Maintenance
To find contact addresses of service organizations authorized by SPECTRO go to www.spectro.com Maintenance Reminder The instrument is equipped with a diagnostic system that will prompt you to proceed with a variety of maintenance tasks. -
Page 34: Maintenance Schedule
(iCAL) See page 31. Replacing the iCALization sample. See page 51 Clean spark stand. See page 40. Clean/replace the filter insert of the filter See page 45. bottle. Replace the filter bottle. As required. — 34 SPECTROMAXx — 21.02.2020... -
Page 35: Cleaning The Uv Optics Light Inlet Window
Remove the light inlet window. Direct contact with the optical surfaces must be avoided. Fig. 8 Unscrew the fixing ring (3) of the light entry window (2) using the auxiliary tool (1). Fig. 9 Fig. 10 SPECTROMAXx — 21.02.2020 — 35... - Page 36 If the light inlet window is too dirty, it must be replaced. Fig. 11 Refit the light inlet window. Cleaning of the UV optics light inlet window is now complete. — 36 SPECTROMAXx — 21.02.2020...
-
Page 37: Cleaning The Uv Optics Light Inlet Window
To clean the light inlet window, proceed as follows: Turn off the Plasma generator (1). Unscrew the 4 fasteners (2) and remove the spark stand plate (3). Fig. 12 Remove the spacer (1) from the spark stand. SPECTROMAXx — 21.02.2020 — 37... - Page 38 Fig. 15 Clean the light inlet window (1), using optical paper or a lint-free soft cloth. If the light inlet window is too dirty, it must be replaced. Fig. 16 — 38 SPECTROMAXx — 21.02.2020...
- Page 39 Fig. 17 11. If necessary, use a grease-free cloth to clean the O-ring (1). Fig. 18 12. Reassemble components in reverse order. Cleaning of the air optics light inlet window is now complete. SPECTROMAXx — 21.02.2020 — 39...
-
Page 40: Cleaning The Spark Stand
Do not vacuum the spark stand. The condensate could ignite an unsuitable vacuum cleaner. The exhaust filter of the vacuum cleaner may not be suitable for the pore size of the condensate. — 40 SPECTROMAXx — 21.02.2020... - Page 41 (3). Fig. 19 Use a dry, grease-free cloth to clean both sides of the spark stand plate (1). Remove and clean the O-ring (2) of the spark stand plate. Fig. 20 SPECTROMAXx — 21.02.2020 — 41...
- Page 42 Remove and clean the Fig. 22 electrode. If the electrode is worn, it must be replaced. Remove the spark stand insert (1). Use a dry, grease-free cloth to clean the insert. Fig. 23 — 42 SPECTROMAXx — 21.02.2020...
- Page 43 Ensure that the spark stand insert is flush with the top edge (2) of the spark stand. Fig. 25 12. Install the spark stand plate (1). 13. Insert the electrode (2) into the spark stand opening. Fig. 26 SPECTROMAXx — 21.02.2020 — 43...
- Page 44 Allen key (AF 2) to tighten the electrode screw. Fig. 27 15. Screw the setting gage (1) back into the spark stand. The spark stand is now cleaned. Fig. 28 — 44 SPECTROMAXx — 21.02.2020...
-
Page 45: Exhaust Filter System - Change Filter Insert
Open the door on the right side of the instrument. Benchtop instrument: Turn the opening of the filter cartridge container to the front. Hold the filter cartridge (1) with both hands and unscrew it. Remove the filter insert (2). Fig. 29 SPECTROMAXx — 21.02.2020 — 45... - Page 46 O- ring. The filter container should only be tightened by hand. The filter bottle screws in easily. If not, the filter insert is not positioned correctly. Now, the filter cartridge is replaced. — 46 SPECTROMAXx — 21.02.2020...
-
Page 47: Exhaust Filter System - Inspecting The Gas-Washing Bottle
(see marking on the gas-washing bottle). The water must be clean. Fig. 30 For refilling, grab the filter cartridge (2) with both hands and unscrew it. Refill water or change it as required. SPECTROMAXx — 21.02.2020 — 47... - Page 48 Make sure that the O-ring (1) sits in the groove and is clean. If necessary, use a clean cloth to clean the O-ring. Screw the gas-washing bottle back manually. The water is checked/changed. Fig. 31 — 48 SPECTROMAXx — 21.02.2020...
-
Page 49: Replacing The Filter Mats
Push both fastening latches (1) to the inside. Remove the cover (2). Fig. 32 Remove the filter mat (1). Fig. 33 Install the new filter mat. Reinstall the cover. The housing of the air filter is replaced. SPECTROMAXx — 21.02.2020 — 49... -
Page 50: Optic Air Filter
Loosen the two cross-head screw (1). Remove the cover (2). Fig. 34 Remove the filter mat (1). Fig. 35 Install the new filter mat. Tighten the screws. Install the cover. The optic air filter is cleaned / replaced. — 50 SPECTROMAXx — 21.02.2020... -
Page 51: Replacing The Icalization Sample
The intensities of the new samples must be matched to those of the old samples. Please contact your Service Center. Information Do not discard the old ICALization sample before the intensities have been matched. Matching is not possible without using the old samples. SPECTROMAXx — 21.02.2020 — 51... -
Page 52: Status Messages
The sample clamp is not folded down or a conductive contact with the sample has not been established. Safety check required The safety circuit is being checked. Briefly lift sample clamp in order to interrupt the contact to the sample. — 52 SPECTROMAXx — 21.02.2020... -
Page 53: Troubleshooting
Clean the electrode and re-adjust the gap using the spacer. Plasma generator faulty. Please contact your Service Center. The samples have not Prepare sample properly, (grind, been prepared properly. turn or mill). The sample surface is not flat enough. SPECTROMAXx — 21.02.2020 — 53... - Page 54 4. Clean light inlet window. 5. ICALize the instrument again and, if necessary, contact the Service Center. Intensities too high. 1. Check the shutter function. 2. Check the plasma generator parameters, contact the Service Center if necessary. — 54 SPECTROMAXx — 21.02.2020...
-
Page 55: Error Messages
Safety circuit not closed. The function circuit "Clamp – spectrometer access (clamp Sample – Spark stand" is up, measurement could not not closed. Ensure electric be started). Check the contact is provided. condition of the spectrometer. SPECTROMAXx — 21.02.2020 — 55... -
Page 56: Diagnosis Tool
When the instrument is ready for operation, the green LED symbol is lit. If an error occurs, the LED symbol changes to red. For a detailed description, refer to the online help of the instrument. — 56 SPECTROMAXx — 21.02.2020... -
Page 57: Spare Parts And Consumables
Spare parts and consumables You can find the spare parts and consumables for this instrument under "Support - Parts Catalogue" (Service – Parts Catalogue) on our website at www.spectro.com. De-commissioning Only organizations or persons authorized by the instrument manufacturer shall be permitted to de-commission the instrument.
Need help?
Do you have a question about the SPECTROMAXx and is the answer not in the manual?
Questions and answers