Table of Contents
Advertisement
Quick Links
Advertisement
Table of Contents

Subscribe to Our Youtube Channel
Related Manuals for Martin ELP WW LED Profile


Summary of Contents for Martin ELP WW LED Profile
- Page 1 ELP WW LED Profile User Guide...
-
Page 2: Table Of Contents
Table of contents Dimensions ....................3 Safety information ..................5 Introduction ....................8 Before using the product for the first time..........8 Fixture overview .................... 9 Physical installation ..................10 Fixture location ..................10 Mounting the fixture ................10 Fastening the fixture to a flat surface ............ 10 Mounting the fixture on a truss .............. -
Page 3: Dimensions
Martin®, RUSH®, HARMAN® and all other trademarks in this document pertaining to services or products by Martin Professional™ or its affiliates and subsidiaries are registered as the property of HARMAN® Professional Denmark. -
Page 5: Safety Information
It can create a fire hazard or a risk of eye injury if the safety precautions below are not followed. Install, operate and service Martin® products only as directed in their user manuals, or you may create a safety hazard or cause damage that is not covered by product warranties. - Page 6 Do not modify the fixture in any way not described in this manual or install other than genuine Martin® parts. Do not stick filters, masks or other materials onto any lens or other optical component. Use only accessories approved by Martin® to modify the light beam.
- Page 7 If an operating problem occurs, stop using the fixture immediately and disconnect it from power. Do not attempt to use a fixture that is obviously damaged. Martin ELP WW Profile user guide...
-
Page 8: Introduction
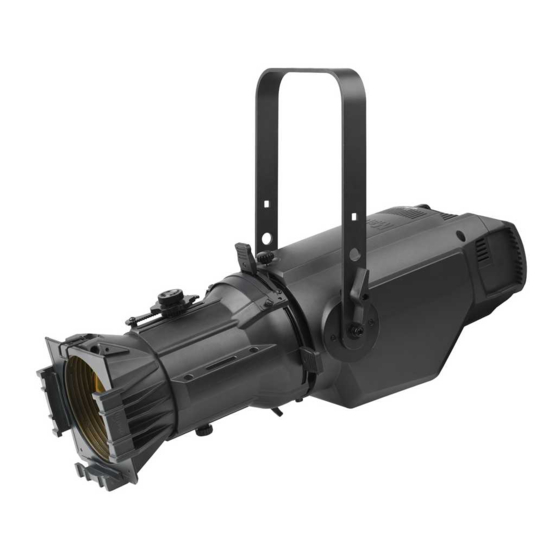
Introduction The ELP WW from Martin® is an ellipsoidal/profile lighting fixture with a 260W warm white LED engine that produces a sharp gobo projection with a flat field The fixture provides a class leading CRI of 97 at a color temperature of 3000K with an output of 7000 lumens and has 16 bit dimming with 4 selectable curves. -
Page 9: Fixture Overview
Please ensure you keep 11 – Safety eye to attach safety bond within the power limits listed in “Linking 12 – Rear handles for positioning fixtures to power in a chain” on page 13. Martin ELP WW Profile user guide... -
Page 10: Physical Installation
All local safety regulations and legal requirements must be observed when installing and connecting the ELP Profile fixture. Installation must be carried out by qualified professionals only. Contact your Martin supplier for assistance if you have any questions about how to install this product safely. Fixture location The ELP Profile fixture is intended for interior use only. -
Page 11: Securing With A Safety Cable
If a safety cable attachment point becomes damaged or deformed, do not use the fixture. Return it to a Martin Service Centre for repair. Changing the lens tube Four different lens tubes with varying beam angles are available for the fixture. To change the lens... - Page 12 5. Replace the thumbwheel screws (2) and (3). For the top screw (2), ensure the focusing knob is in place on the screw with the gear teeth on the underside. Rotate the focusing knob until the gear teeth mesh with the bar on the lens tube housing. 6. Tighten the screws. Martin ELP WW Profile user guide...
-
Page 13: Ac Power Connection
Martin, see ‘Linking fixtures to power in a chain’ on page Using the 14 AWG or 1.5mm cables from Martin™, you can link:... -
Page 14: Data Network Requirements
(-) and pin 5 = data 2 hot (+). To split the link into branches, use an opto-isolated splitter such as the Martin™ DMX 5.3 Splitter. Terminate the link by installing a termination plug in the output socket of the last fixture. The termination plug, which is a male XLR plug with a 120 Ohm, 0.25 W resistor soldered between... - Page 15 • Connect the first fixture’s DMX output to the DMX input of the next fixture and continue connecting fixtures output to input. Terminate the last fixture on the link with a DMX termination plug. Martin ELP WW Profile user guide...
-
Page 16: Fixture Setup
4 channel – 16 bit dimmer with shutter and fade (default) The function of each channel is described in the section “DMX protocol” on page 25. To set the DMX personality: 1. Enter the control menu and select DMX SETUP. Press ENTER. Martin ELP WW Profile user guide... -
Page 17: Other Fixture Settings
Use the UP and DOWN buttons to select: REG FAN – Fan speed will be controlled by heat demand in the fixture. FULL – Fans set to full constant speed. LOW – Fans set to constant low speed Martin ELP WW Profile user guide... -
Page 18: Set All Settings To Factory Default
Once you have selected a function, press ENTER, then use the UP and DOWN buttons to select a value from 0 to 255. Press MENU to go back up and select a different function to control. Martin ELP WW Profile user guide... -
Page 19: Brightness Calibration
LED emitters will gradually reduce, so this function can be useful if you need to match a new fixture with older ones. DIMMER sets the overall maximum brightness of the fixture. Martin ELP WW Profile user guide... -
Page 20: Setting Options By Rdm
PC that is connected to the installation via a DMX data link. To use Martin® M-PC, connect a PC running the application to the data link via a USB- to-DMX interface box such as the Martin® M-DMX. -
Page 21: Rdm
SUPPORTED_PARAMETERS DEVICE_INFO DEVICE_MODEL_DESCRIPTION MANUFACTURER_LABEL DEVICE_LABEL SOFTWARE_VERSION_LABEL BOOT_SOFTWARE_VERSION_ID BOOT_SOFTWARE_VERSION_LABEL DMX_PERSONALITY DMX_START_ADDRESS DEVICE_HOURS IDENTIFY_DEVICE LAST_STATE DIMMER_CURVE Martin ELP WW Profile user guide... -
Page 22: Effects
Using the color filter frame you can add color correction or diffusion filters to the front of the unit. Push the securing clip to one side to release it. Ensure the securing clip is clicked back into place to prevent the color filter frame from falling out. Martin ELP WW Profile user guide... -
Page 23: Maintenance
If one or more of these factors is present, inspect fixtures within their first 100 hours of operation to see whether cleaning is necessary. Check again at frequent intervals. This procedure will allow you to assess cleaning requirements in your particular situation. If in doubt, consult your Martin dealer about a suitable maintenance schedule. - Page 24 The equipment must only be serviced or repaired by an authorized Martin service technician. Installation, on-site service and maintenance can be provided worldwide by the Martin Professional Global Service organization and its approved agents, giving owners access to Martin’s expertise and product knowledge in a partnership that will ensure the highest level of performance throughout the product’s lifetime.
-
Page 25: Dmx Protocol
0-255 Dimmer 0-100% 0-255 Dimmer Fine Shutter 000-031 Blackout 032-063 Open 064-095 Strobe (Slow-Fast) 096-127 Open 128-159 Pulse effect in sequences 160-191 Open 192-223 Random strobe effect (Slow-Fast) 224-255 Open 0-255 Dimmer fade time Martin ELP WW Profile user guide... -
Page 26: Control Menus
Reg fan Cool Mode Fan optimized for light intensity (temperature controlled by regulating fan speed, light output unaffected) Full Fans set to full/low, constant speed, fixture temperature Martin ELP WW Profile user guide... - Page 27 RDM ID Temperature LED / CPU Displays temperature in °C Temp of all PCBs and LED DMX Live Dimmer, 0 - 255 Scroll to see values being Shutter etc … received on each DMX Martin ELP WW Profile user guide...
- Page 28 Length of time scenes are secs) displayed Manual Ctrl Reset Reset fixture Dimmer, 0-255 Manual control of all 4 Dimmer Fine, channels Shutter, Dimmer Fade Service Calibration Dimmer 0-100 % Intensity master, defining maximum intensity Martin ELP WW Profile user guide...
-
Page 29: Troubleshooting
Attempt to control the fixture with another DMX control device. potential interference Move the fixture if it is being operated very from proximity to a high close to an unshielded high-voltage voltage installation. installation. Martin ELP WW Profile user guide... -
Page 30: Specifications
110 V, 60 Hz ......................2.4 A, 270 W 230 V, 50 Hz ......................1.1 A, 260 W Measurements made at nominal voltage with all LEDs at full intensity. Allow for a deviation of +/- 10%.: Martin ELP WW Profile user guide... - Page 31 Martin ELP Lens Tube: 36° in cardboard box ..........P/N 9045107784 Martin ELP Lens Tube: 50° in cardboard box ..........P/N 9045107785 Specifications are subject to change without notice. For the latest product specifications, see www.martin.com Disposing of this product Martin™...
- Page 32 · Harman Professional Solutions · 8500 Balboa Blvd· Northridge CA 91329 · United States...
Need help?
Do you have a question about the ELP WW LED Profile and is the answer not in the manual?
Questions and answers