Table of Contents
Advertisement
Quick Links
Advertisement
Table of Contents

Subscribe to Our Youtube Channel
Related Manuals for Martin Ego X4


Summary of Contents for Martin Ego X4
- Page 1 Ego X4 user manual...
- Page 2 © 2004 Martin Professional A/S, Denmark. All rights reserved. No part of this manual may be reproduced, in any form or by any means, without permission in writing from Martin Professional A/S, Denmark. Printed in Denmark. P/N 35000144, Rev. B...
-
Page 3: Table Of Contents
Focusing the Ego X4 ........ -
Page 5: Introduction
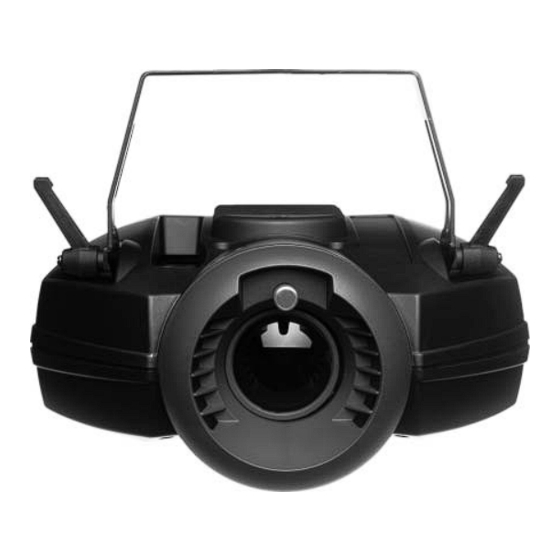
They incorporate a 250-watt halogen lamp and a precise focus adjustment that produces crisp projections. The Ego X4 provides a range of gobos and colors on a single effect wheel and a rotating mirrored dish. It can be controlled using DMX, is able to... -
Page 6: Unpacking
The packing material is carefully designed to protect the fixture during shipment – always use it to transport the fixture. The Ego X4 is supplied with the following: • User manual • 3-meter (10 ft) IEC power cord with Shuko (Euro) mains connector •... -
Page 7: Ac Power
POWER The Ego X4 has an auto-ranging power supply that can operate in the following voltage ranges at 50-60 Hz: • 90-130 volts • 200-250 volts I N S T A L L I N G A P L U G O N T H E M A I N S L E A D The fixture’s mains lead may require a grounding-type cord cap that fits... -
Page 8: Installation
NSTALLATION The Ego X4 can be hung overhead with a clamp (not included), mounted vertically on a wall, or placed on the floor. Warning! Block access below the work area before proceeding. Always use a secure means of secondary attachment. -
Page 9: Operation From The Floor
Verify that the clearance around the air vents is at least 0.1 meters (4 in.). O P E R A T I O N F R O M T H E F L O O R To operate the Ego X4 from the floor: 1 Set the fixture on the floor so that the mounting bracket is under the fixture. -
Page 10: Data Connection
C O N N E C T I O N S The Ego X4’s XLR data sockets are wired with pin 1 to ground, pin 2 to signal - (cold), and pin 3 to signal + (hot). This is compatible with the standard for DMX devices. - Page 11 Connect ing the data link 1 Connect a data cable to the controller’s output. If controller has a 5-pin output, use a 5-pin male to 3-pin female adaptor (P/N 11820005). 2 Lead the data cable from the controller to the first fixture. Plug the cable into the fixture’s data input.
-
Page 12: General Overview
The lamp turns on as soon as power is applied. To achieve optimal results, the use of smoke effects together with your Ego X4 is recommended. F O C U S I N G T H E E G O X 4 Adjust the focus using the thumb screw next to the lens. -
Page 13: Color/Gobo Wheel
C O L O R / G O B O W H E E L The Ego X4 contains an effect wheel with 12 gobo/color combination positions, and a closed position. Position Gobo Color Burst Open (white) Light green 204... -
Page 14: Mirrored Dish
M I R R O R E D D I S H The Ego X4 contains a rotating parabolic reflector with multiple mirrors. When operating the fixture under DMX control: • The reflector can be rotated continuously clockwise, or counter-clockwise at variable speeds. -
Page 15: Stand-Alone Operation
DIP-switch and are described in this chapter. Important! The Ego X4 transmits a signal when DIP-switch pins 1 or 2 and 10 are set to ON. To avoid damage to the electronics, connect no more than 1 transmitting device (master or controller) to the data link. -
Page 16: Master / Slave Operation
Connecti ng unit s f or master / slave oper at ion 1 Connect the output of one Ego X4 to the input of the next Ego X4. 2 Connect additional Ego X4s output to input. Up to 32 may be connected. -
Page 17: Dmx Operation
The Ego X4 uses six control channels. The Ego X4 reads the data on the start channel and the next five channels. If the DMX control address is set to 100, the fixture uses channels 100, 101, 102, 103, 104 and 105. -
Page 18: Dmx Operation
95 127 159 191 223 255 287 319 351 383 415 447 479 511 D M X O P E R A T I O N For detailed information refer to “Ego X4 specifications’ on page 28. Channel 1 controls the strobe, stand-alone auto-triggering and reset. If... - Page 19 automatically set to 100% and all other channels will be disabled until stand-alone is deselected on channel 1. Channel 2 controls the intensity. When the intensity is set to zero, the cooling fan will slow down significantly to reduce power consumption, prolong the life of the product, reduce noise and minimize cleaning.
-
Page 20: Basic Service
C L E A N I N G Regular cleaning of the elements in the optical path, as well as the fans and air vents, is vital to maintaining the operational quality of the Ego X4. Important! Excessive dust, smoke fluid, and particulate buildup degrades performance and causes overheating and damage to the fixture that is not covered by the warranty. -
Page 21: Lamp Maintenance
As a general rule of thumb, the halogen lamps that have the shortest life span provide the greatest intensity. Inst al ling a l amp in t he Ego X4 1 Disconnect the fixture from AC power. If replacing a lamp, allow it to cool for at least 5 minutes before removing the lamp-access cover. -
Page 22: Fuses
The factory installed firmware version is indicated on the serial number label. The latest firmware is available from the support area of the Martin web site at http://www.martin.com. It can be installed using an MP-2, or via a PC serial data link using a hardware interface supported by the Software... - Page 23 • LightJockey 4064 ISA DMX Interface Card (DJ and Club versions) Note: Intermediate control systems such as the Martin Lighting Director (MLD) and the Martin Matrix must be bypassed when updating fixture software via the DMX link. These systems do not relay the update code correctly because it is not a DMX-compliant signal.
-
Page 24: Troubleshooting
Have the defective fixture serviced by a qualified technician. Effect fails to reset The effect requires Contact Martin technician for correctly. mechanical adjustment. service. Ego X4 user manual... -
Page 25: Dmx Protocol
PROTOCOL Channel Value Percent Function Strobe, Music trig, Reset No function 5-68 2-26 Strobe, fast slow 69-100 27-39 Remote stand-alone with auto trigger (disables other channels) 101-249 40-97 Reserved 250-255 98-100 Reset fixture, time > 3 seconds Intensity 0-255 0-100 0-100% Color / Gobo Wheel Continuous Scroll: full color positions:... - Page 26 31-37 Macro 5 96-111 38-43 Macro 6 112-127 44-49 Macro 7 128-143 50-55 Macro 8 144-159 56-62 Macro 9 160-175 63-68 Macro 10 176-191 69-74 Macro 11 192-207 75-81 Macro 12 208-255 82-100 Reserved. No function Ego X4 user manual...
-
Page 27: Pcb Layout
LAYOUT Print overview.eps PCB layout... -
Page 28: Ego X4 Specifications
Input ......... 3-prong IEC male socket AC Power ..... auto-ranging 90-130 V / 200-250 V, 50-60 Hz Ego X4 user manual... - Page 29 Ego X4 ........
Need help?
Do you have a question about the Ego X4 and is the answer not in the manual?
Questions and answers