Table of Contents
Advertisement
Quick Links
Advertisement
Table of Contents

Subscribe to Our Youtube Channel
Related Manuals for Craftex CX407N


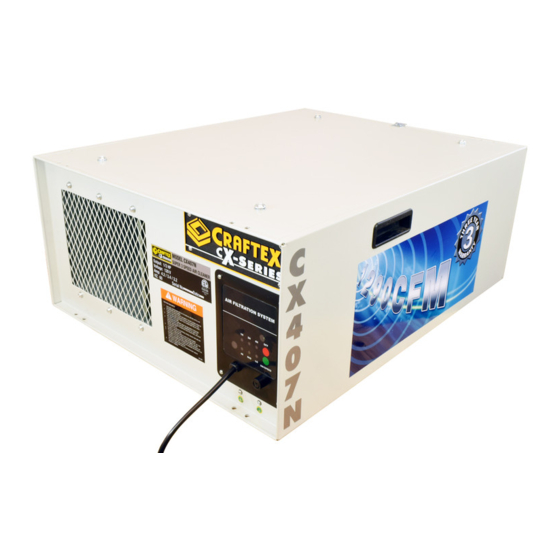
Summary of Contents for Craftex CX407N
- Page 1 CX407N SUPER 3 SPEED AIR CLEANER User Manual Version 1.0...
-
Page 2: Table Of Contents
TABLE OF CONTENTS General Safety Instructions for Machines..............3 Specific Safety Instructions ..................4 CX407N Features ....................5 Un-Packing & Inventory ...................6 Proper Grounding ....................7 Mounting ........................8 Table Top Mount..................... .8 Hanging Mounting....................8 Flush Mount ......................9 Control Panel ...................... -
Page 3: General Safety Instructions For Machines
GENERAL SAFETY INSTRUCTIONS FOR MACHINES Extreme caution should be used when operating all power tools. Know your power tool, be familiar with its operation, read through the user manual and practice safe usage procedures at all times. ALWAYS read and understand the NEVER leave a tool unattended while it user manual before operating the is in operation. -
Page 4: Specific Safety Instructions
CX407N – SUPER 3 SPEED AIR CLEANER SPECIFIC SAFETY INSTRUCTIONS ALWAYS read and understand the DO NOT operate this air cleaner in an user manual before operating the air environment that has volatile fumes cleaner. from fuels, paints, pesticides, smoke, etc. - Page 5 As part of the growing line of Craftex woodworking equipment, we are proud to offer the CX407N, a Super 3 Speed Air Cleaner. By following the instructions and procedures laid out in this user manual, you will receive years of excellent service and satisfaction. The CX407N is a professional tool and like all power tools, proper care and safety procedures should be adhered to.
- Page 6 Open the box and check that the machine and the parts are in good condition. WARNING! Figure-2 Inventory CX407N is a heavy machine, do not over-exert yourself. LIST OF CONTENTS D. Remote Control........ 1 E. AAA Battery ........2 F.
-
Page 7: Proper Grounding
It is strongly recommended not to use resistance for electric current to reduce the extension cords with your CX407N. Always risk of electric shock. try to position your machine close to the power source so that you do not need to Make sure the cord is plugged into a use extension cords. -
Page 8: Mounting
TABLE TOP MOUNT Install four chains, cable or steel strapping lines to the ceiling from the support or joist The CX407N can be used as a portable air capable of holding 105 lbs. filtration system by installing the rubber feet... -
Page 9: Flush Mount
FLUSH MOUNT When the shop is small, the CX407N air WARNING! cleaner can be installed flush to the ceiling of the shop or to the table top using flange Do not fasten the air cleaner onto sheet mounts. -
Page 10: Control Panel
CONTROL PANEL cleaner lip at the mounting hole location and secure it using screws and washers The CX407N control panel allows you turn provided as shown in figure-7. the air cleaner ON and OFF manually and set the fan speed. -
Page 11: Remote Controller
REMOTE CONTROLLER TIME Button: Allows setting the auto shut- off time for the air cleaner in 1 hour, 2 The CX407N is provided with a remote hours, and 4 hours. controller which enables the operator to operate the air cleaner remotely. -
Page 12: Changing / Servicing The Filters
CHANGING / SERVICING THE FILTERS Disconnect the unit from the power source. Move the retainer latch upward and remove the primary filter as shown in figure-10. Remove the secondary filter and wash it with warm water until it is clean. Let it dry. See figure-11. - Page 13 CX407N PARTS BREAKDOWN...
- Page 14 CX407N PARTS LIST PART# ITEM DESCRIPTION PCX407N01 REMOTE CONTROL PCX407N02 LABEL (CONTROLS REMOTE) PCX407N03 REMOTE CONTROL COVER PCX407N04 BATTERY AAA PCX407N05 CIRCUIT BREAKER 4 AMP (RESET) PCX407N06 FUSE 4A PCX407N07 POWER CORD 18 AWG PCX407N08 STRAIN RELIEF PCX407N09 CONTROL PANEL PCX407N10 SCREW - PAN HEAD M4-0.7 X 10...
- Page 15 PCX407N54 SCREW - TAPPING PCX407N55 WASHER - LOCK M6 PCX407N56 SCREW - PAN HD M6-1.0 X 16 PCX407N57 FLAT WASHER 6MM PCX407N62 HOUSING (MAIN BODY) PCX407N65 HARDWARE PACKAGE PCX407N66 PROTECTIVE MESHING...
- Page 16 RETURNS, REPAIRS AND REPLACEMENTS To return, repair, or replace a Craftex Machine, a Machinery Return Form must be filled out by the original purchaser requesting a return. Visit the appropriate Busy Bee Tools showroom or call 1-800-461-BUSY. Craftex is a brand of equipment that is exclusive to Busy Bee Tools.
Need help?
Do you have a question about the CX407N and is the answer not in the manual?
Questions and answers