Table of Contents
Advertisement
Quick Links
Advertisement
Table of Contents

Related Manuals for Craftex CX501


Summary of Contents for Craftex CX501
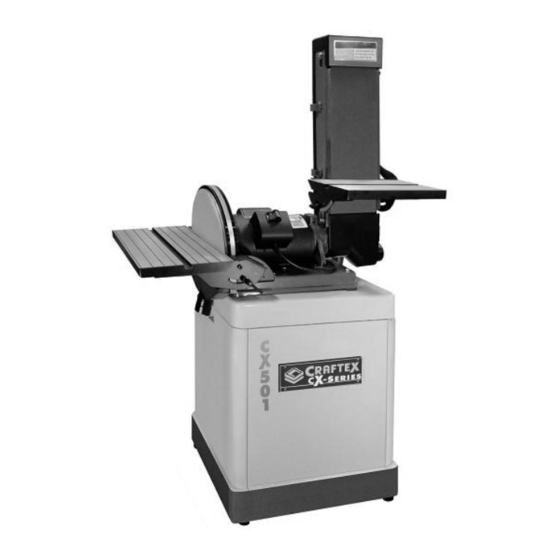
- Page 1 CX501 6” x 48” BELT & 12” DISC SANDER User Manual...
-
Page 2: Table Of Contents
TABLE OF CONTENTS General Safety Instructions ................3 Specific Safety Instructions................4 Features .......................5 Physical Features ..................6 Unpacking ....................7 Proper Grounding ..................7 ON/OFF Power Switch .................8 Horizontal Sanding ..................8 Tilting the Tables ..................9 Removing the Sanding Belt ................9 Installing the New Belt ..................10 Belt Tracking Adjustment................10 Stop Fence ....................10 Dust Collection .....................11... -
Page 3: General Safety Instructions
GENERAL SAFETY INSTRUCTIONS Extreme caution should be used when operating all power tools. Know your power tool, be familiar with its operation, read through the owner’s manual and practice safe usage procedures at all times. ALWAYS read and understand the router bits, shaper heads, blades, user manual before operating the knives or making other adjustments or... -
Page 4: Specific Safety Instructions
CX501 – 6”x48” Belt & 12” Disc Sander SPECIFIC SAFETY INSTRUCTIONS MAKE SURE the sander is connected ALWAYS wear a dust mask and safety to the matched and specific power glasses while operating the sander. The source instructed in the manual. -
Page 5: Features
MODEL CX501 – 6” x 48” BELT & 12” DISC SANDER As part of the growing line of Craftex woodworking equipment, we are proud to offer CX501a 6” x 48” Belt and 12” Disc Sander. The Craftex name guarantees Craft Excellence. By following the instructions and procedures laid out in this user manual, you will receive years of excellent service and satisfaction. -
Page 6: Physical Features
CX501 – 6”x48” Belt & 12” Disc Sander PHYSICAL FEATURES Idler Roller 6” x 48” Guard Sanding Belt On/Off Switch Quick Release Tension Lever 12” Sanding 1 ½”-HP Disc Motor Work Table Work Table Table Tilt Scale Tilting Scale Table Tilt... -
Page 7: Unpacking
Open the crate and check that the machine is in good condition. WARNING CX501 is a very heavy machine, do not over-exert yourself. For safe moving method use fork truck or get the help of Figure-1 120-Volts Outlet for CX501 an assistant or friend. -
Page 8: On/Off Power Switch
ON/OFF POWER SWITCH HORIZONTAL/VERTICAL SANDING CX501 is equipped with a rocker-type power switch which starts and stops the 1. Loosen the screw securing the sander motor and is located on the junction box of frame to the motor bracket using a 6 the motor. -
Page 9: Tilting The Tables
TILTING THE TABLES Both tables on CX501 sander can be tilted from 0° to 45°. To tilt the tables: 1. Loosen the table levers/knobs securing the tables to the sander frame, located under the right and left sides of each table. -
Page 10: Installing The New Belt
INSTALLING NEW BELT After the old belt has been removed proceed as follows: 1. Make sure the arrowheads marked on the back of the sanding belt point to the direction indicator attached on the belt guard. 2. Place and center the new belt on both the rollers. -
Page 11: Dust Collection
DUST COLLECTION CX501 features two dust ports; 2” & 2-3/8” to connect to a dust collector. When connecting to a dust collector, use a proper sized hose and make sure all the connections are sealed tightly. Figure-10 Installing the sand paper... -
Page 12: Test Run
WORK-PIECE INSPECTION switch off and remove the switch key. 3. A build-up of dust in the motor can CX501 is designed to sand wood ONLY. cause motor damage. Periodic cleaning Do not use this machine to sand metals, of the motor is not only recommended, glass or stone etc. -
Page 13: Troubleshooting
TROUBLESHOOTING... -
Page 14: Parts Breakdown
CX501 PARTS BREAKDOWN... - Page 15 CX501 PARTS BREAKDOWN...
-
Page 16: Parts List
CX501 PARTS LIST... - Page 17 CX501 PARTS LIST...
- Page 18 CX501 PARTS LIST...
-
Page 19: Warranty
This warranty shall not apply to consumable products such as blades, bits, belts, cutters, chisels, punches etceteras. Craftex shall in no event be liable for injuries, accidental or otherwise, death to persons or damage to property or for incidental contingent, special or consequential damages arising from the use of our products.
Need help?
Do you have a question about the CX501 and is the answer not in the manual?
Questions and answers