Table of Contents
Advertisement
Quick Links
Advertisement
Table of Contents

Related Manuals for Craftex CX117


Summary of Contents for Craftex CX117
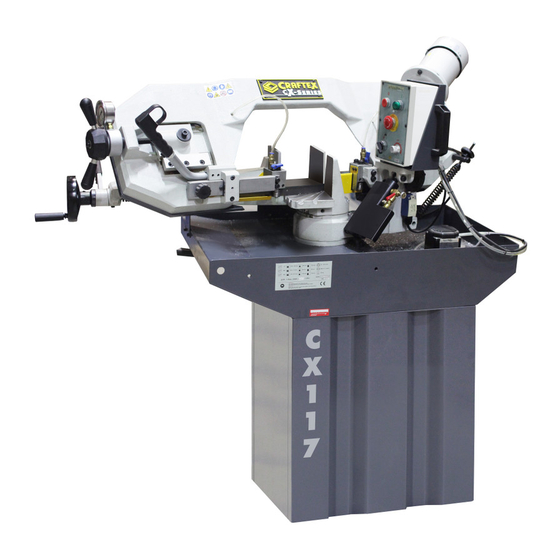
- Page 1 MODEL CX117 2HP METALCUTTING BAND SAW USER MANUAL...
-
Page 2: Table Of Contents
TABLE OF CONTENTS General Safety Instructions ................3 Specific Safety Instructions................4 Features .......................5 Physical Features ..................6 Setup ......................7 Unpacking & Inventory .................7 Proper Grounding ..................7 Cabinet Assembly..................8 Cutting Fluid ....................8 Recommended Adjustments ................9 Test Run .......................9 Cutting Angle ....................10 Work Stop.....................10 Vise ......................11 Blade Selection.....................11 Using Blade Guides..................11... -
Page 3: General Safety Instructions
GENERAL SAFETY INSTRUCTIONS Extreme caution should be used when operating all power tools. Know your power tool, be familiar with its operation, read through the owner’s manual and practice safe usage procedures at all times. ALWAYS read and understand the router bits, shaper heads, blades, user manual before operating the knives or making other adjustments or... -
Page 4: Specific Safety Instructions
CX117. If you fail to do so, serious injury MAKE SURE before making could occur. -
Page 5: Features
FEATURES MODEL CX117 - 2HP METALCUTTING BAND SAW As part of the growing line of Craftex metalworking equipment, we are proud to offer CX117 2HP Metalcutting Band Saw. By following the instructions and procedures laid out in this owner’s manual, you will receive years of excellent service and satisfaction. The CX117 is a professional tool and like all power tools, proper care and safety procedures should be adhered to. -
Page 6: Physical Features
CX117 – 2HP METALCUTTING BAND SAW PHYSICAL FEATURES Control Panel Vise Belt Tension Hand Wheel Band Saw Knob Motor Blade Tension Controls Feed Rate Control Knob Vise Lock Leve Feed ON/OFF Valve Vise Clamp Hand Wheel Cutting Fluid Pump Headstock... -
Page 7: Setup
B. Work Stop Arm ........1 is 12-gauge to prevent motor damage. C. Work Stop Rod ........4 D. Splash Unit.........2 Your CX117 should be wired with a plug E. Wrench ..........2 having 3-prongs to fit a 3 prong grounded F. Torx Key ..........1 receptacle. -
Page 8: Cabinet Assembly
See figure-4. Figure-2 Mounting the band saw to the cabinet WARNING! CX117 is a very heavy machine, do not over-exert yourself. For safe moving method use fork truck. Figure-4 Cutting fluid control valve CUTTING FLUID SYSTEM... -
Page 9: Recommended Adjustments
The adjustments have been performed on and see if the machine powers up and the CX117 at the factory. However, runs properly or not. because of many variables involved with... -
Page 10: Cutting Angle
The cause serious personal injury. cutting angle is not set. CUTTING ANGLE WORKSTOP The CX117 has a locking turret with a The CX117 comes with an adjustable range of 0° to 60°. workstop. TO SET THE ANGLE OF CUT:... -
Page 11: Vise
VISE BLADE SELECTION The vise has a quick tighten/release lever The CX117 uses a 1" wide x 97.5" long x and depending on the cut angle or work- 0.03" thick band saw blade. piece shape, you can remove or install the aluminum vise clamp plate. -
Page 12: Setting Feed Rate
If you get thin powder life silver coloured SETTING FEED RATE chips, increase feed rate, decrease the Feed rate is the speed at which the band blade speed or both. saw blade cuts through the work-piece. The feed rate is set by adjusting the feed rate dial. -
Page 13: Maintenance
MAINTENANCE LUBRICATION During the life of your machine, you will Make sure to wipe the area clean before need practice some regular applying lubricant. maintenance to keep your band saw in peak performance. Lubricate the blade tension lead screw with general purpose grease. See figure- CHECK YOUR BAND SAW DAILY FOR: ... -
Page 14: Blade Change
BLADE CHANGE The blade gets dull or damaged with use and will need to be replaced. You will also need to replace the blade when cutting a material that requires a certain type or tooth count. WARNING! Make sure the switch is in the OFF position and the cord is disconnected Figure-15 Blade guide guards from the power source when removing... -
Page 15: Blade Tension
BLADE TENSION BLADE GUIDES The blade should be tensioned correctly The blade guides are adjusted at the in order to get straight and efficient cuts factory however due to shipping we every time. recommend you to readjust them to ensure proper cuts. The blade is not properly tensioned when: the blade stalls in the cut and slips on the TO ADJUST THE BLADE GUIDES:... -
Page 16: Feed Stop
Loosen the jam nut and adjust the FEED STOP bearings against the sides of the blade. It is necessary to adjust the feed stop See figure-19. before you make blade adjustments. Keep in mind that the blade should never rest or rub onto the vise assembly. You can also adjust the over tilt stop so that the bow stop from being lifted past 40°. -
Page 17: Parts Diagram
CX117 PARTS DIAGRAM... -
Page 18: Parts List
CX117 PARTS LIST... -
Page 20: Warranty
Proof of purchase is necessary. All warranty claims are subject to inspection of such products or part thereof and Craftex reserves the right to inspect any returned item before a refund or replacement may be issued.
Need help?
Do you have a question about the CX117 and is the answer not in the manual?
Questions and answers