Table of Contents
Advertisement
Quick Links
Advertisement
Table of Contents

Related Manuals for Craftex CX614


Summary of Contents for Craftex CX614
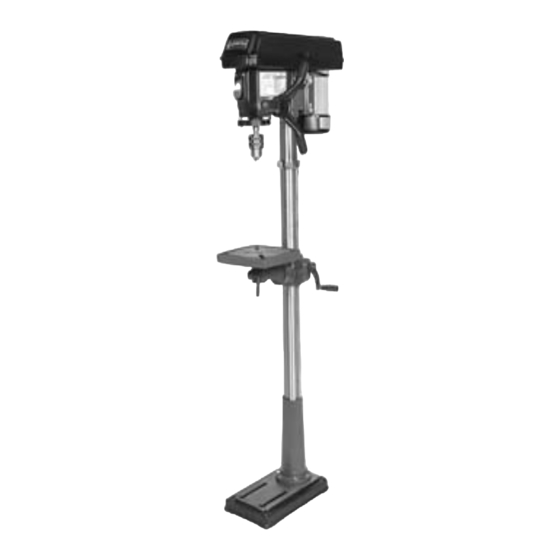
- Page 1 MODEL CX614 14" DRILL PRESS USER MANUAL Version 1.0...
-
Page 2: Table Of Contents
TABLE OF CONTENTS General Safety Instructions PAGE 3 Specific Safety Instructions PAGE 4 Features PAGE 5 Physical Features PAGE 6 Proper Grounding PAGE 7 Set Up PAGE 8 Unpacking PAGE 8 ASSEMBLY Base to Column PAGE 9 Table to Column PAGE 9 Drill Press Head to Column PAGE 10... -
Page 3: General Safety Instructions
GENERAL SAFETY INSTRUCTIONS FOR MACHINES Extreme caution should be used when operating all power tools. Know your power tool, be familiar with its operation, read through the user manual, and practice safe usage procedures at all times. ALWAYS read and understand the NEVER leave a tool unattended while it user manual before operating the is in operation. -
Page 4: Specific Safety Instructions
CX614 – 14" DRILL PRESS SPECIFIC SAFETY INSTRUCTIONS READ AND UNDERSTAND the user SELECT PROPER SPINDLE manual before operating the CX614. SPEED for the type of work and material you are cutting. Let the spindle reach to ALWAYS WEAR safety glasses for its full speed before beginning a cut. -
Page 5: Features
As part of the growing line of Craftex metalworking equipment, we are proud to offer the CX614, a 14" Drill Press. By following the instructions and procedures laid out in this user manual, you will receive years of excellent service and satisfaction. The CX614 is a professional tool and like all power tools, proper care and safety procedures should be adhered to. -
Page 6: Physical Features
CX614 - 14" DRILL PRESS PHYSICAL FEATURES Belt Cover ON/OFF Switch 3/4 HP Motor Drill Chuck Feed Handle Work Table Column Table Height Crank Handle Table Lock Lever Base Mounting Holes... -
Page 7: Proper Grounding
Check with a qualified CX614 is for use on a normal 110 volt electrician if you are in doubt as to circuit. Make sure that the machine is whether the outlet is properly grounded. -
Page 8: Setup
Some of the parts come assembled with the machine for the shipping purposes. WARNING! CX614 is a heavy machine, do not over- exert yourself. Use a fork truck or get the help of an assistant for safe moving. -
Page 9: Assembly
ASSEMBLY BASE TO COLUMN Select the base and the drill press column from the loose parts. Select the four M10 - 1.5 x 25 hex bolts from the parts bag. Align the holes of the post flange to the threaded holes in the base. -
Page 10: Drill Press Head To Column
Attach the elevation handle by tightening the set-screw (2) Thread the column lock into the table bracket (1). Rotate the table and position it directly over and in line with the base. DRILL PRESS HEAD TO COLUMN Lift the drill press head carefully and position it above the column. -
Page 11: Pulley Cover
PULLEY COVER Insert washer and screw through the hole in the pulley cover, thread the knob onto the screw and then tighten. INSTALLING THE ARBOR AND CHUCK Slide the long end of the arbor (1) into the spindle (2) as far as it will go. Slide the chuck (3) onto the arbor and then place a block of wood under the chuck and tap the chuck and arbor with a hammer until... -
Page 12: Adjustments
ADJUSTMENTS CHANGING SPINDLE SPEEDS Disconnect the drill press from the power source. Open the pulley cover. Loosen the slide bar knob (1). Move the motor to the front by using shifter bar to loosen the tension on both belts. Relocate the belts to the pulley steps appropriate to the required spindle speed (2). -
Page 13: Drilling Depth
DRILLING DEPTH Your drill press has been equipped with a new type depth adjustment. To set the depth stop, loosen the depth locking nuts and rotate them to the desired depth as indicated on the scale. SPINDLE RETURN SPRING The spindle is equipped with an auto-return mechanism. -
Page 14: Operation
OPERATION FEEDING DRILLING SPEEDS Be aware of the sound of the drill press The following is intended to be a general motor when drilling. rule-of-thumb, not specific information. Do not rotate the feed handles too quickly Important drilling speed factors are the type as the belts may slip or the motor may stall. -
Page 15: Laser Operation
The laser light may seriously harm your eyes if the beam is aimed directly at them. The CX614 drill press is equipped with a laser to assist in accurate drilling in single or repetitive drilling operations. The laser projector is located under the drill press head, just behind the shaft and chuck. -
Page 16: Maintenance
MAINTENANCE 4. The owner should routinely (once a During the life of your machine, you will month) blow out or vacuum metal shavings need to practice some regular maintenance and sawdust from the motor cover, the to keep your machine in peak performance pulley housing, the drill press table and condition. -
Page 17: Parts Diagram
CX614 PARTS DIAGRAM... -
Page 18: Parts List
CX614 PARTS LIST PART # DESCRIPTION PART # DESCRIPTION Base Spring cap Hex bolt Torsion spring Rack Spring cover Column Switch box Table bracket Screw Handle Screw Setscrew Screw Shaft Clamp cord Body Hex bolt Washer Shifter Hex bolt Slide bar... - Page 19 PART # DESCRIPTION PART # DESCRIPTION Round nut Wrench Washer Wrench Ball bearing Wedge Rubber washer Motor cord Spindle sleeve Label Ball bearing Speed label Spindle Brand label Arbor Bolt Chuck Support plate Chuck key Scale Laser Scale base Bolt Washer Block Switch base...
-
Page 20: Warranty
This warranty shall not apply to consumable products such as blades, bits, belts, cutters, chisels, punches etceteras. Craftex shall in no event be liable for injuries, accidental or otherwise, death to persons or damage to property or for incidental contingent, special, or consequential damages arising from the use of our products.
Need help?
Do you have a question about the CX614 and is the answer not in the manual?
Questions and answers