Table of Contents
Advertisement
Quick Links
Advertisement
Table of Contents

Related Manuals for Craftex CX110


Summary of Contents for Craftex CX110
- Page 1 CX110 12” SLOW SPEED COLD SAW User Manual...
-
Page 2: Table Of Contents
TABLE OF CONTENTS Specific Safety Instructions ------------------------------------------------------------------ 3 Features ------------------------------------------------------------------------------------------ 4 Physical Features ------------------------------------------------------------------------------ 5 Un-packing --------------------------------------------------------------------------------------- 6 Setup ---------------------------------------------------------------------------------------------- 6 Proper Grounding ------------------------------------------------------------------------------ 7 Assembly ----------------------------------------------------------------------------------------- 8 Test Run ------------------------------------------------------------------------------------------ 11 Basic Controls ----------------------------------------------------------------------------------- 11 Cutting Angle------------------------------------------------------------------------------------- 12 Vise------------------------------------------------------------------------------------------------- 12 Work-Stop ---------------------------------------------------------------------------------------- 14 Blade Change------------------------------------------------------------------------------------ 14 Cutting Fluid-------------------------------------------------------------------------------------- 15... -
Page 3: Specific Safety Instructions
CX110, before operating it. Failure Disconnect the power source when to do so, could result serious personal changing blade and / or making injuries and damage to the machine. -
Page 4: Features
MODEL CX110 - 12" SLOW SPEED COLD SAW As part of the growing line of Craftex CX-Series machineries, we are proud to offer the CX110 a 12” Slow Speed Cold Saw. By following the instructions and procedures laid out in this user manual, you will receive years of excellent service and satisfaction. -
Page 5: Physical Features
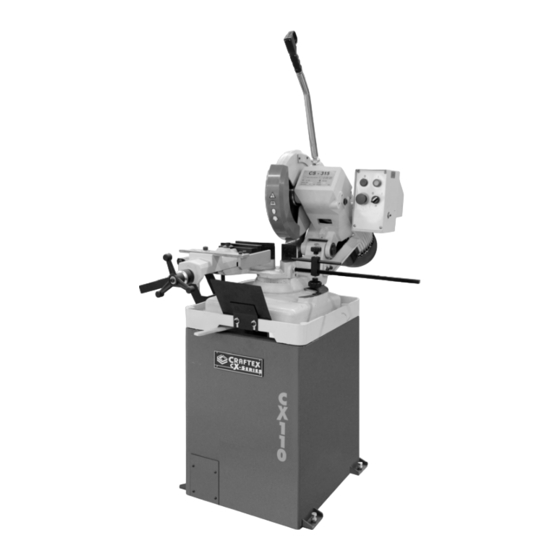
CX110 - 12” SLOW SPEED COLD SAW PHYSICAL FEATURES Trigger Switch Control Handle ON/OFF Button Blade Guard Power Indicator Light Vise Coolant Pump Switch Vise Emergency Hand Wheel Stop Button Vise Quick 2-1/2 HP Release Motor Lever Work-Stop Splash Guard... -
Page 6: Unpacking
To mount the machine: The CX110 is a very heavy machine. Use a Once the stand is completely assembled, forklift truck or other mechanical devices position it in the desired location. -
Page 7: Proper Grounding
It is strongly recommended not to use resistance for electric current to reduce the extension cords with your CX110. Always risk of electric shock. try to position your machine close to the power source so that you do not need to The machine should be wired by a qualified use extension cords. -
Page 8: Assembly
See figure-4. Figure-2 Lifting straps around the motor Figure-4 Installing the coolant tank bracket and the jaw of the CX110 Use a wrench and remove the hex head Once lifting... - Page 9 Attach the control handle to the head Once the support roller is level with the assembly by threading its threaded end into mouth of the vise, tighten the screws to the oil fill hole until it is a tight fit. Make sure secure the support roller in position.
- Page 10 Attach the coolant pump into the coolant Install the rear stand cover and secure it tank and secure it using screws and using washers and screws provided. washers provided. Attach the splash guard to the front side of Connect the flow tube to the coolant pump the machine and secure it using screws and and secure it using a hose clamp provided.
-
Page 11: Test Run
TEST RUN BASIC CONTROLS Once machine completely The basic controls of the CX110 are assembled, test run your machine to make described below. Use the following figures sure it runs properly. and description to get familiar with your saw. To test run the machine:... -
Page 12: Cutting Angle
VISE The vise on CX110 can be adjusted, providing maximum support in different angles. It also features an auxiliary stability bracket for additional support during cutting operation. - Page 13 If the saw blade hits the vise jaw or the VISE QUICK RELEASE LEVER stability bracket, you will to adjust the vise. The vise on the CX110 is equipped with a quick release lever which allows releasing, Loosen the screw securing the jaw. See repositioning and quickly re-clamping very figure-17.
-
Page 14: Work-Stop
WORK-STOP BLADE CHANGE The CX110 is equipped with a work-stop To replace the saw blade: which allows performing consistent length cuts. Disconnect the cord from the power source. To use the work-stop: Remove the cap screw securing the blade guard. See figure-20. -
Page 15: Cutting Fluid
Lower the blade guide and reconnect the are familiar with the basic controls on your blade guard, securing it with the cap screw. CX110, follow the instructions below for safe and efficient cuts. WARNING! Disconnect the cord from the power source. -
Page 16: Maintenance
MAINTENANCE LUBRICATION During the life of your machine, you will Disconnect the cord from the power source. need to practice some regular maintenance to keep your lathe in peak performance Clean the vise lead screw using a rag. condition. Apply multipurpose grease to the vise lead Check your machine daily for the following screw and distribute it by opening the before use:... -
Page 17: Troubleshooting
TROUBLESHOOTING FAULT CAUSE REMEDY Too fast advance Decrease advance, exerting less cutting pressure. Wrong cutting speed Change disk speed and/or diameter. See chapter “ Material classification TOOTH BREAKAGE and choice of disks” and the Table of cutting speed s according to disk Wrong tooth pitch diameter. - Page 18 FAULT CAUSE REMEDY CHIPPED DISK Hardness, shape or flaws in the material Reduce the cutting pressure and/or the (oxides, inclusions, lack of homogeneity, advance. etc…) Wrong cutting speed. Change disk speed and/or diameter. See Chapter ”Material classification and choice of disks” and the Table of cutting speeds according to disk diameter.
- Page 19 FAULT CAUSE REMEDY CUT OFF THE Too fast advance. Decrease advance, exerting less STRAIGHT cutting pressure. Ineffective gripping of the part in the Check the gripping of the part which vise. may be moving sideways. Disk head off the straight. Adjust the head.
-
Page 20: Wiring Diagram
CX110 WIRING DIAGRAM... -
Page 21: Recommended Cutting Parameter
RECOMMENDED CUTTING PARAMETER γ 20° 18° 15° 12° 10° 12° 15° 12° 22° 20° 20° 15° 12° 16° 12° 18° 18° 15° CUTTING ANGLES α 8° 8° 8° 6° 6° 8° 6° 8° 10° 8° 10° 8° 8° 16° 16° 8°... -
Page 22: Parts Diagram And Parts List
CX110 PARTS DIAGRAM AND LIST... -
Page 26: Warranty
This warranty shall not apply to consumable products such as blades, bits, belts, cutters, chisels, punches etceteras. Craftex shall in no event be liable for injuries, accidental or otherwise, death to persons or damage to property or for incidental contingent, special or consequential damages arising from the use of our products.
Need help?
Do you have a question about the CX110 and is the answer not in the manual?
Questions and answers