Carrier UC Open XP Installation And Startup Manual
Hide thumbs
Also See for UC Open XP:
- Installation and startup manual (50 pages) ,
- Installation and start-up instructions manual (24 pages)
Table of Contents
Advertisement
Quick Links
U
C
O
p
e
n
X
U
C
O
p
e
n
X
I
n
s
t
a
l
I
n
s
t
a
CARRIER CORPORATION ©2010
A member of the United Technologies Corporation family · Stock symbol UTX · Catalog No. 11-808-437-01 · 11/19/2010
P
/
U
C
O
p
e
P
/
U
C
O
p
e
l
a
t
i
o
n
a
n
d
l
l
a
t
i
o
n
a
n
d
n
X
P
I
O
n
X
P
I
O
S
t
a
r
t
-
u
p
G
S
t
a
r
t
-
u
p
G
u
i
d
e
u
i
d
e
Advertisement
Table of Contents

Related Manuals for Carrier UC Open XP


Summary of Contents for Carrier UC Open XP
- Page 1 CARRIER CORPORATION ©2010 A member of the United Technologies Corporation family · Stock symbol UTX · Catalog No. 11-808-437-01 · 11/19/2010...
-
Page 3: Table Of Contents
UC Open XP IO specifications ..........................5 Safety considerations............................7 UC Open XP installation .............................. 8 To install the UC Open XP into an i-Vu Open Control System ................ 8 To mount the UC Open XP ........................... 9 Wiring the UC Open XP for power........................10 To wire for power .......................... - Page 4 Table of Contents FCC Compliance ..............................37 CE Compliance ..............................37 BACnet Compliance............................37 UC Open XP/UC Open XP IO...
-
Page 5: Introduction
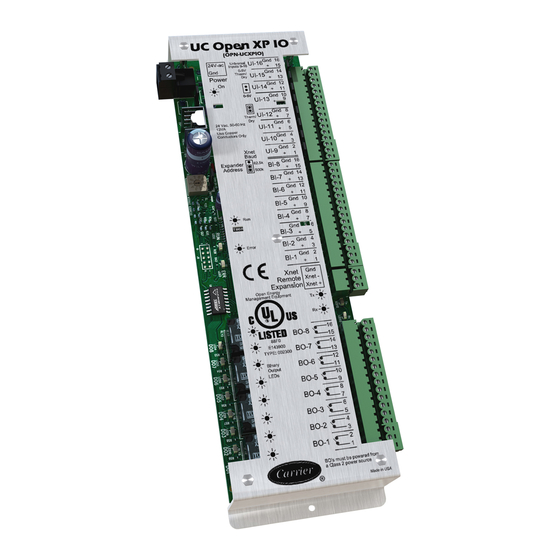
For system start-up and troubleshooting using Field Assistant or BACview (115.2 kbps) Xnet Remote Expansion port For communication with the UC Open XP IO expander. Inputs 12 inputs configurable for 0-10V, RTD Therm Dry, or 0-20mA. Inputs 1 and 2 may be used for pulse counting. - Page 6 0 to 140° F (-18 to 60°C), 0 to 90% relative humidity, non- range condensing Storage temperature range -24 to 140°F (-30 to 60°C), 0 to 90% relative humidity, non- condensing Physical Rugged aluminum housing with removable screw terminals UC Open XP/UC Open XP IO...
- Page 7 Conforms to the Advanced Application Controller (B-AAC) Standard Device Profile as defined in ANSI/ASHRAE Standard 135-2004 (BACnet) Annex L Listed by UL-916, (Canadian Std C22.2 No. 205-M1983), CE, FCC Part 15- Subpart B-Class A UC Open XP/UC Open XP IO...
- Page 8 Introduction UC Open XP/UC Open XP IO...
-
Page 9: Uc Open Xp Io Specifications
0 to 140° F (-18 to 60°C), 0 to 90% relative humidity, non- range condensing Storage temperature range -24 to 140°F (-30 to 60°C), 0 to 90% relative humidity, non- condensing Physical Rugged aluminum housing with removable screw terminals UC Open XP/UC Open XP IO... - Page 10 1-1/2 in. (3.8 cm) 13/64 in. (.5 cm) Panel depth 1-1/2 in. (.8 cm) Weight .73 lbs (.33 kg) Listed by UL-916, (Canadian Std C22.2 No. 205-M1983), CE, FCC Part 15- Subpart B-Class A UC Open XP/UC Open XP IO...
-
Page 11: Safety Considerations
Safety considerations Disconnect electrical power to the UC Open XP before wiring it. Failure to follow this warning could cause electrical shock, personal injury, or damage to the controller. UC Open XP/UC Open XP IO... -
Page 12: Uc Open Xp Installation
To install the UC Open XP into an i-Vu Open Control System You must complete the following procedures to successfully install your UC Open XP into an i-Vu Open Control System. Use the Help in the referenced software for detailed descriptions of these procedures. -
Page 13: To Mount The Uc Open Xp
• Isolate from high voltage or electrostatic discharge. • Ensure that you are properly grounded. Screw the UC Open XP into an enclosed panel using the mounting slots on the cover plate. Leave about 2 in. (5 cm) on each side of the controller for wiring. -
Page 14: Wiring The Uc Open Xp For Power
• Use the power supply only for Carrier Open controllers To wire for power Turn off the UC Open XP's power switch to prevent it from powering up before you can verify the correct voltage. Remove primary power from the 24 Vac transformer. -
Page 15: Wiring The Uc Open Xp To The Ms/Tp Network
Ones (1's) switch to 5. 10's Turn on the UC Open XP's power switch. The controller reads the address each time you apply power to it. NOTE The factory default setting is "00" and must be changed to successfully install your UC Open XP. -
Page 16: To Wire The Controller To The Network
NOTE Use the same polarity throughout the network segment. Verify that the MSTP jumper is set to MSTP. Set DIP switches 1 and 2 to the appropriate baud rate. See the MSTP baud diagram on the UC Open XP. The default baud rate is 76.8 kbps. -
Page 17: Wiring Inputs And Outputs
(30 meters) SPT sensors 500 feet 18 AWG Unshielded (152 meters) Inputs - UC Open XP The UC Open XP has 12 inputs that accept the signal types described below. These Support this inputs... signal type... Description Thermistor Precon type 2 (10 kOhm at 77°F). Input voltages should be from 0.489 Vdc to 3.825 Vdc for thermistors. -
Page 18: Binary Outputs
UC Open XP installation Binary outputs The UC Open XP has 6 binary outputs. Each output is a dry contact that must be powered from a Class 2 power source. To size output wiring, consider the following: • Total loop distance from the power supply to the controller, and then to the controlled device NOTE Include the total distance of actual wire. - Page 19 For an internally-powered 4-20 mA sensor, wire the sensor's positive terminal to the + terminal on ○ the UC Open XP's Aux Power Out port. Wire the sensor's negative terminal to an input's + terminal. UC Open XP/UC Open XP IO...
- Page 20 Set the Select jumper to +5V or +24V as Out port powered required by the sensor. 4-20 mA Connect the binary output wiring to the screw terminals on the UC Open XP and to the controlled device. UC Open XP/UC Open XP IO...
- Page 21 Connect the analog output wiring to the screw terminals on the UC Open XP and to the controlled device. Set the AO Mode Select jumper to the type of device you are wiring the output to. Turn on the UC Open XP's power.
-
Page 22: Uc Open Xp Io Installation
You can mount the UC Open XP IO in one of the following locations: • On top of a UC Open XP, using the two allen cap screws provided. Connect Gnd to Gnd, Xnet- to Xnet-, Xnet+ to Xnet+. UC Open XP/UC Open XP IO... -
Page 23: To Wire For Power
Verify that the Power LED is on and the Run LED is blinking. To set UC Open XP IO's address You must give the UC Open XP IO an address that is unique on the network. You can address the UC Open XP IO before or after you wire it for power. -
Page 24: Wiring Inputs And Outputs
NOTE Do not change the address from the default setting of 1! Turn on the UC Open XP IO's power, then turn on the attached UC Open XP's power. TheUC Open XP reads the powered UC Open XP IO's address each time you turn on the UC Open XP. -
Page 25: Binary Outputs
Binary outputs The UC Open XP IO has 8 binary outputs. Each output is a dry contact that must be powered from a Class 2 power source. To size output wiring, consider the following: • Total loop distance from the power supply to the expander, and then to the controlled device NOTE Include the total distance of actual wire. - Page 26 Set each input's Universal Input Mode Select jumper to indicate the type of input. WARNING Do not apply 24 Vac to these universal inputs. Connect binary output wiring to the BO screw terminals on the UC Open XP IO and to the controlled device.
-
Page 27: Wiring An Spt Sensor
Wiring an SPT sensor The UC Open XP is connected to a wall-mounted space temperature sensor to monitor room temperature. An i-Vu Open Control System offers the following SPT sensors: Sensor Part # Features • Local access port SPT Standard •... -
Page 28: To Wire The Spt Sensor To The Controller
.25 in. Inner insulation (.6 cm) Wire each terminal on the sensor to the same terminal on the controller. See diagram below. NOTE Carrier recommends that you use the following Rnet wiring scheme: Connect this wire... To this terminal... +12V... -
Page 29: Local Access To The Uc Open Xp
NOTE At the present time, Field Assistant is the required local access user interface for UC Open XP start-up, commissioning, operation, and troubleshooting. The 3 versions of BACview only provide rudimentary driver information. -
Page 30: Troubleshooting
Troubleshooting Troubleshooting If you have problems mounting, wiring, or addressing the UC Open XP or the UC Open XP IO, contact Carrier Technical Support. Communication LED's The LED’s indicate if the controller is speaking to the devices on the network. The LED’s should reflect communication traffic based on the baud rate set. -
Page 31: Restore Factory Defaults
Turn on the UC Open XP's power switch. Remove the format jumper. Serial number If you need the UC Open XP's serial number when troubleshooting, the number is on: • a sticker on the back of the main controller board •... -
Page 32: Replacing The Uc Open Xp's Battery
The UC Open XP's 10-year Lithium CR2032 battery provides a minimum of 10,000 hours of data retention during power outages. CAUTION Power must be ON to the UC Open XP when replacing the battery, or your date, time, and trend data will be lost. -
Page 33: Appendix A: Uc Open Xp And Uc Open Xp Io Wire Lists
Appendix A: UC Open XP and UC Open XP IO wire lists These wire lists represent all the possible points for this application. The points that are actually used in your application depend on the equipment options you select in ApplicationBuilder. - Page 34 Appendix A: UC Open XP and UC Open XP IO wire lists 0-10 Upper UI-9 Other Middle 4-20 Lower 0-10 Upper UI-10 Other Middle 4-20 Lower 0-10 Upper UI-11 Other Middle 4-20 Lower 0-10 Upper UI-12 Other Middle 4-20 Lower...
-
Page 35: Uc Open Xp Io Wire List
UC Open XP IO wire list Open System Network UC Open XP IO Universal Controller Expander Project Name: Controller: Location: Network Number: MAC Address: Point/ Inputs Input Jumper Sensor Equipment Point Cable# Type Position code Name Name of Pins BI-1... - Page 36 Appendix A: UC Open XP and UC Open XP IO wire lists N.O. BO-4 N.O. BO-5 N.O. BO-6 N.O. BO-7 N.O. BO-8 NOTE All inputs can be pulse inputs. UC Open XP/UC Open XP IO...
-
Page 37: Appendix B: Ahu Vav Input And Output Points List
These wire lists represent all the possible points for this application. The points that are actually used in your application depend on the equipment options you select in ApplicationBuilder. AHU VAV inputs and outputs on the UC Open XP Type... -
Page 38: Ahu Vav Inputs And Outputs On The Uc Open Xp Io
Appendix B: AHU VAV input and output points list AHU VAV inputs and outputs on the UC Open XP IO Type Input Point Name/ Hardware/ Jumper position of Terminal Terminal Function Signal terminals BI-1 Return/Exhaust Fan Status Dry Contact Middle... -
Page 39: Appendix C: Ahu Cv Open Input And Output Points List
These wire lists represent all the possible points for this application. The points that are actually used in your application depend on the equipment options you select in ApplicationBuilder. AHU CV Open inputs and outputs on the UC Open XP Type... -
Page 40: Ahu Cv Open Inputs And Outputs On The Uc Open Xp Io
Appendix C: AHU CV Open input and output points list AHU CV Open inputs and outputs on the UC Open XP IO Type Input Point Name/ Hardware/ Jumper position of Terminal Terminal Function Signal terminals BI-1 Return/Exhaust Fan Status Dry Contact... -
Page 41: Compliance
ASHRAE. ASHRAE does not endorse, approve or test products for compliance with ASHRAE standards. Compliance of listed products to requirements of ASHRAE Standard 135 is the responsibility of the BACnet manufacturers Association (BMA). BTL ® is a registered trademark of the BMA. UC Open XP/UC Open XP IO... - Page 44 CARRIER CORPORATION ©2010 A member of the United Technologies Corporation family · Stock symbol UTX · Catalog No. 11-808-437-01 · 11/19/2010...
Need help?
Do you have a question about the UC Open XP and is the answer not in the manual?
Questions and answers