Table of Contents
Advertisement
M
P
C
O
p
e
M
P
C
O
p
e
M
P
C
O
M
P
C
O
I
n
s
t
a
l
l
a
I
n
s
t
a
l
l
a
CARRIER CORPORATION ©2019
A member of the United Technologies Corporation family · Stock symbol UTX · Catalog No. 11-808-431-01 · 1/24/2019
n
X
P
n
X
P
p
e
n
X
P
I
O
4
p
e
n
X
P
I
O
4
t
i
o
n
a
n
d
S
t
i
o
n
a
n
d
S
8
/
8
1
6
8
/
8
1
6
t
a
r
t
-
u
p
G
u
t
a
r
t
-
u
p
G
u
i
d
e
i
d
e
Advertisement
Table of Contents

Related Manuals for Carrier MPC Open XP Series


Summary of Contents for Carrier MPC Open XP Series
- Page 1 CARRIER CORPORATION ©2019 A member of the United Technologies Corporation family · Stock symbol UTX · Catalog No. 11-808-431-01 · 1/24/2019...
- Page 2 Verify that you have the most current version of this document from www.hvacpartners.com or your local Carrier office. Important changes are listed in Document revision history at the end of this document. CARRIER CORPORATION ©2019. All rights reserved throughout the world. i-Vu is a registered trademark of Carrier...
-
Page 3: Table Of Contents
Contents Introduction .................................. 1 What are the MPC Open XP and MPC Open XPIO expanders? ..............1 MPC Open XP specifications ..........................3 MPC Open XPIO48 and MPC Open XPIO816 specifications ................5 Safety considerations............................6 Installing the MPC Open XP ............................7 Mounting the MPC Open XP .......................... -
Page 5: Introduction
HVAC system applications. The MPC Open XP supports multiple I/O configurations for both common and custom HVAC control and connects to up to 20 field points directly (8 outputs and 12 inputs). MPC Open XP MPC Open XPIO48/816 CARRIER CORPORATION ©2019 Installation and Start-up Guide All rights reserved... - Page 6 MPC Open XP, you can attach up to 3 expanders, using any combination of MPC Open XPIO48 and/or MPC Open XPIO816 expanders connected to the Xnet. MPC Open XP MPC Open XPIO48/816 CARRIER CORPORATION ©2019 Installation and Start-up Guide All rights reserved...
-
Page 7: Mpc Open Xp Specifications
16 MB non-volatile battery-backed RAM (with 12 MB available for use), 8 MB Flash memory, 32-bit memory bus Real-time clock Battery-backed real-time clock keeps track of time in event of power failure MPC Open XP MPC Open XPIO48/816 CARRIER CORPORATION ©2019 Installation and Start-up Guide All rights reserved... - Page 8 Storage temperature range -24 to 140°F (-30 to 60°C), 0 to 90% relative humidity, non-condensing Physical Rugged aluminum cover, removable screw-type terminal blocks MPC Open XP MPC Open XPIO48/816 CARRIER CORPORATION ©2019 Installation and Start-up Guide All rights reserved...
-
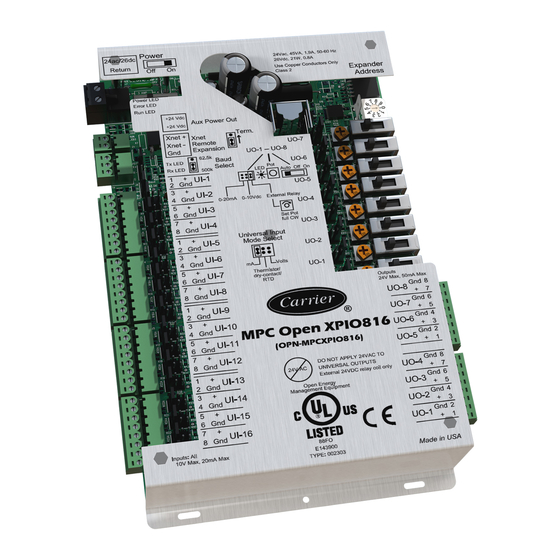
Page 9: Mpc Open Xpio48 And Mpc Open Xpio816 Specifications
8 outputs for 24 Vdc relay driver, 0–10 Vdc, or 0-20 mA Output resolution 12 bit D/A Microprocessor 8-bit microprocessor with 60 kB Flash memory, 2 kB SRAM, and CAN controller MPC Open XP MPC Open XPIO48/816 CARRIER CORPORATION ©2019 Installation and Start-up Guide All rights reserved... -
Page 10: Safety Considerations
WARNING Disconnect electrical power to the MPC Open XP before wiring it. Failure to follow this warning could cause electrical shock, personal injury, or damage to the controller. MPC Open XP MPC Open XPIO48/816 CARRIER CORPORATION ©2019 Installation and Start-up Guide All rights reserved... -
Page 11: Installing The Mpc Open Xp
The MPC Open XP is powered by a Class 2 power source. Take appropriate isolation measures when mounting it in a control panel where non-Class 2 circuits are present. • Carrier controllers can share a power supply as long as you: • Maintain the same polarity. -
Page 12: To Wire For Power
Installing the MPC Open XP • Use the power supply only for Carrier controllers. To wire for power Turn off the MPC Open XP's power switch to prevent it from powering up before you can verify the correct voltage. Remove primary power from the 24 Vac transformer. -
Page 13: Wiring For Communications
NOTE Use the same baud rate for all controllers on the network segment. Wire the controllers on a BACnet MS/TP or BACnet ARC156 network segment in a daisy-chain configuration. MPC Open XP MPC Open XPIO48/816 CARRIER CORPORATION ©2019 Installation and Start-up Guide All rights reserved... -
Page 14: Installing An Mpc Open Xpio Expander
Mount the expander (page 11). Wire the expander for power (page 12). Attach the expander (page 13). Address the expander (page 13). Wire inputs and outputs (page 14). MPC Open XP MPC Open XPIO48/816 CARRIER CORPORATION ©2019 Installation and Start-up Guide All rights reserved... -
Page 15: To Mount An Expander
On top of a MPC Open XP, using the two allen cap screws provided. Connect Gnd to Gnd, Xnet- to Xnet-, Xnet+ to Xnet+. MPC Open XP MPC Open XPIO48/816 CARRIER CORPORATION ©2019 Installation and Start-up Guide All rights reserved... -
Page 16: To Wire The Expander For Power
Turn on the expander's power switch. Verify that the expander's Power LED is on and the Run LED is blinking. MPC Open XP MPC Open XPIO48/816 CARRIER CORPORATION ©2019 Installation and Start-up Guide All rights reserved... -
Page 17: To Attach Mpc Open Xpio Expanders
During that time, the red Error LED and the green Run LED on the expander(s) flash in sequence. This process may take several minutes to complete. Do not disconnect power or communications wiring during this download. MPC Open XP MPC Open XPIO48/816 CARRIER CORPORATION ©2019 Installation and Start-up Guide All rights reserved... -
Page 18: Wiring Inputs And Outputs
Balco TS8000 - 1 kOhm at 70°F (21°C) Input voltages should be from 0.6–1.2 V NOTE For improved accuracy, Carrier recommends using an external current transducer- type RTD, when RTD's are required with the MPC Open XP. Be aware that milliamp-type sensors require different jumper settings and different wiring arrangements. -
Page 19: Input Wiring Specifications
500 mA at 115°F 300 mA at 140°F For temperatures above 115°F, use the following equation to calculate the total current at 8 mA per degree: MPC Open XP MPC Open XPIO48/816 CARRIER CORPORATION ©2019 Installation and Start-up Guide All rights reserved... -
Page 20: Output Wiring Specifications
The following applies to the inputs and outputs on the MPC Open XP and expanders. Verify that the MPC Open XP's power and communications connections work properly. Turn off the MPC Open XP's power. MPC Open XP MPC Open XPIO48/816 CARRIER CORPORATION ©2019 Installation and Start-up Guide All rights reserved... - Page 21 For a loop-powered 4-20 mA sensor, wire the sensor's positive terminal to the + terminal on the MPC ○ Open XP's Aux Power Out connector. Wire the sensor's negative terminal to an input's + terminal. MPC Open XP MPC Open XPIO48/816 CARRIER CORPORATION ©2019 Installation and Start-up Guide All rights reserved...
- Page 22 Set each output's jumper to the type of device wired to the output. For each digital output, turn the output's potentiometer clockwise until it stops (maximum output). Turn on the MPC Open XP's power. MPC Open XP MPC Open XPIO48/816 CARRIER CORPORATION ©2019 Installation and Start-up Guide All rights reserved...
-
Page 23: To Use The Auto-Off-On Switches
ZS sensors, a Wireless Adapter, and an Equipment Touch can share the Rnet, but not SPT sensors. • The Wireless Adapter, Equipment Touch, or TruVu™ ET Display must be powered by an external power source. MPC Open XP MPC Open XPIO48/816 CARRIER CORPORATION ©2019 Installation and Start-up Guide All rights reserved... -
Page 24: Rnet Wiring Specifications
SPT sensors cannot share the Rnet with other devices. • For detailed instructions, see the ZS Sensor Installation Guide. Remove power from the MPC Open XP. MPC Open XP MPC Open XPIO48/816 CARRIER CORPORATION ©2019 Installation and Start-up Guide All rights reserved... -
Page 25: To Wire The Wireless Adapter For Wireless Sensors
To wire the Wireless Adapter for wireless sensors WARNING Do not apply line voltage (mains voltage) to the Wireless Adapter. The Carrier wireless sensors are available in 868, 902, and 928 MHz radio frequency. The sensors are thermistor- based temperature sensors that may optionally sense humidity. - Page 26 Apply power to the external power supply. Verify that the LED on top of the Wireless Adapter is blinking. See "LED" below. Turn on the controller's power. MPC Open XP MPC Open XPIO48/816 CARRIER CORPORATION ©2019 Installation and Start-up Guide All rights reserved...
-
Page 27: To Wire An Equipment Touch To The Mpc Open Xp
For complete Equipment Touch installation instructions including wiring diagrams, see the Equipment Touch Installation and Setup Guide. CAUTION The MPC Open XP can share a power supply with the Carrier controller as long as: • The power supply is AC power. -
Page 28: To Wire The Truvu™ Et Display
Wire the TruVu™ ET Display 24V DC connector to the 24 Vdc power supply using 2-conductor 18 AWG wire. Maximum distance 100 feet (30 meters). CAUTION The TruVu™ ET Display can share a power supply with the Carrier controller as long as: •... -
Page 29: Installing The Mpc Open Xp Into An I-Vu® Control System
Use the wire list and the following installation procedures to install and wire I/O points to your MPC Open XP and expanders, if applicable. MPC Open XP MPC Open XPIO48/816 CARRIER CORPORATION ©2019 Installation and Start-up Guide All rights reserved... - Page 30 Properties page > I/O Points tab. 13 Configure the controller on the Properties page > Control Program tab. 14 Check out and commission the equipment. MPC Open XP MPC Open XPIO48/816 CARRIER CORPORATION ©2019 Installation and Start-up Guide All rights reserved...
-
Page 31: Local Access To The Mpc Open Xp
If you are not sure of the wiring polarity, use a USB isolator between the computer and the USB Link. Purchase a USB isolator online from a third-party manufacturer. These are accessory items that do not come with the controller. MPC Open XP MPC Open XPIO48/816 CARRIER CORPORATION ©2019 Installation and Start-up Guide All rights reserved... -
Page 32: Troubleshooting
Troubleshooting Troubleshooting If you have problems mounting, wiring, or addressing the MPC Open XP or the expander, contact Carrier Control Systems Support. NOTE To help you troubleshoot, obtain a Module Status (Modstat) from the controller and review the System Error and Warning details. -
Page 33: Expander Led's
The Run and Error LED's indicate expander and network status. If Run LED shows... And Error LED shows... Status is.. 2 flashes per second Normal MPC Open XP MPC Open XPIO48/816 CARRIER CORPORATION ©2019 Installation and Start-up Guide All rights reserved... -
Page 34: To Restore Factory Defaults
To restore factory defaults CAUTION This erases all archived information and user-configuration settings. You will have to reconfigure all custom settings. It is recommended to restore the factory defaults only under the guidance of Carrier Control Systems Support. To erase volatile memory data and restore factory default configuration settings: Turn off the MPC Open XP's power switch. -
Page 35: To Replace The Mpc Open Xp's Battery
If you turn on the MPC Open XP's power switch and the Power LED is not lit, use a multimeter to see if one of the 3 Amp Pico fuses that protects the incoming power is blown. Controller Power 24ac/26dc Return Fuse Expander Fuses MPC Open XP MPC Open XPIO48/816 CARRIER CORPORATION ©2019 Installation and Start-up Guide All rights reserved... - Page 36 Grip the other wire end of the fuse and push into the other fuse socket. If working on an expander, replace the coverplate. Turn on the power and verify that the Power LED is lit. MPC Open XP MPC Open XPIO48/816 CARRIER CORPORATION ©2019 Installation and Start-up Guide All rights reserved...
-
Page 37: Compliance
Compliance of listed products to requirements of ASHRAE Standard 135 is the responsibility of BACnet International. BTL ® is a registered trademark of BACnet International. MPC Open XP MPC Open XPIO48/816 CARRIER CORPORATION ©2019 Installation and Start-up Guide All rights reserved... -
Page 38: Appendix A: Mpc Open Xp Wire Lists
These cautions pertain ONLY to using 39m AHU applications in the MPC Open XP. UC library applications and Snap applications come with the channel numbers set to 0:0 and you set them to match the application. No special steps are required. MPC Open XP MPC Open XPIO48/816 CARRIER CORPORATION ©2019 Installation and Start-up Guide All rights reserved... -
Page 39: Mpc Open Xp Wire List
0-10 V Right 0-20 mA Left UI-6 Thermistor Middle Dry contact 0-10 V Right 0-20 mA Left UI-7 Thermistor Middle Dry contact 0-10 V Right MPC Open XP MPC Open XPIO48/816 CARRIER CORPORATION ©2019 Installation and Start-up Guide All rights reserved... - Page 40 UO-4 0-10 Vdc Middle Relay Right 0-20 mA Left UO-5 0-10 Vdc Middle Relay Right 0-20 mA Left UO-6 0-10 Vdc Middle Relay Right MPC Open XP MPC Open XPIO48/816 CARRIER CORPORATION ©2019 Installation and Start-up Guide All rights reserved...
-
Page 41: Mpc Open Xpio48 Wire List
Dry contact 0-10 V Right 0-20 mA Left UI-3 Thermistor Middle Dry contact 0-10 V Right 0-20 mA Left UI-4 Thermistor Middle Dry contact MPC Open XP MPC Open XPIO48/816 CARRIER CORPORATION ©2019 Installation and Start-up Guide All rights reserved... - Page 42 UO-2 0-10 Vdc Middle Relay Right 0-20 mA Left UO-3 0-10 Vdc Middle Relay Right 0-20 mA Left UO-4 0-10 Vdc Middle Relay Right MPC Open XP MPC Open XPIO48/816 CARRIER CORPORATION ©2019 Installation and Start-up Guide All rights reserved...
-
Page 43: Mpc Open Xpio816 Wire List
Dry contact 0-10 V Right 0-20 mA Left UI-6 Thermistor Middle Dry contact 0-10 V Right 0-20 mA Left UI-7 Thermistor Middle Dry contact MPC Open XP MPC Open XPIO48/816 CARRIER CORPORATION ©2019 Installation and Start-up Guide All rights reserved... - Page 44 Right Point/ Universal Output Jumper Sensor Equipment Point Outs Position Cable# Type code Name Name of Pins 0-20 mA Left UO-1 0-10 Vdc Middle MPC Open XP MPC Open XPIO48/816 CARRIER CORPORATION ©2019 Installation and Start-up Guide All rights reserved...
- Page 45 UO-6 0-10 Vdc Middle Relay Right 0-20 mA Left UO-7 0-10 Vdc Middle Relay Right 0-20 mA Left UO-8 0-10 Vdc Middle Relay Right MPC Open XP MPC Open XPIO48/816 CARRIER CORPORATION ©2019 Installation and Start-up Guide All rights reserved...
-
Page 46: Document Revision History
Corrected instructions from the wrong battery to the correct one. MPC Open XPIO48 and MPC Open Power rating corrected from 45VA to 40VA, as listed on the 11/18/14 C-D-LJ-O-BR XPIO816 silkscreen MPC Open XP MPC Open XPIO48/816 CARRIER CORPORATION ©2019 Installation and Start-up Guide All rights reserved... - Page 47 To wire the Equipment Touch to the Added Caution to maintain polarity and use the power supply only C-TS-RD-E MPC Open XP for Carrier controllers Restore factory defaults Corrected from using a jumper to holding the Format button C-D-LJ * For internal use only...
- Page 50 CARRIER CORPORATION ©2019 A member of the United Technologies Corporation family · Stock symbol UTX · Catalog No. 11-808-431-01 · 1/24/2019...
Need help?
Do you have a question about the MPC Open XP Series and is the answer not in the manual?
Questions and answers