Table of Contents
Advertisement
Quick Links
Instruction Manual
REV
All-In-One DJ System
XDJ-RX3
pioneerdj.com/support/
rekordbox.com
serato.com
For FAQs and other support information for this product, visit the websites above.
TRANS
REVERB
SPIRAL
PING PONG
ECHO
DELAY
CUE
CUE
CUE
LINK
REV
FILTER
FLANGER
PHASER
PITCH
SLIP ROLL
ROLL
VINYL BRAKE
HELIX
Advertisement
Table of Contents

Related Manuals for PIONEER DJ Serato XDJ-RX3


Summary of Contents for PIONEER DJ Serato XDJ-RX3
- Page 1 Instruction Manual FILTER FLANGER TRANS PHASER REVERB PITCH SPIRAL SLIP ROLL PING PONG ROLL ECHO VINYL BRAKE DELAY HELIX LINK All-In-One DJ System XDJ-RX3 pioneerdj.com/support/ rekordbox.com serato.com For FAQs and other support information for this product, visit the websites above.
-
Page 2: Table Of Contents
Contents Before you start ................... 7 How to read this manual .................7 What’s in the box..................7 User guides .....................8 Product overview................. 9 System requirements ................9 rekordbox ....................11 PRO DJ LINK ..................12 Serato DJ Pro..................12 PC/Mac setup ..................13 Setting Utility ..................16 Part names .................. - Page 3 Sorting tracks ..................37 Searching for a track ................38 Monitoring sound before loading a track (Touch Preview) ....42 Loading a track to a deck ..............42 Using History..................44 Using the Tag List .................45 Displaying the playlist screen ..............49 Playback ..................... 52 Deck section..................52 Play/pause ....................53 Playing a track from the touched point on the overall waveform...54 Reverse playback..................54...
- Page 4 Deleting a saved cue point ..............64 Setting Auto Cue ...................64 Looping....................65 Setting a loop ..................65 Fine-adjusting loop points ..............66 Adjusting the length of a loop..............66 Returning to a loop-in point to start loop playback (Retrigger) ....67 Using Active Loop .................67 Canceling loop playback ...............67 Emergency Loop ...................68 Saving a loop ..................68...
- Page 5 Audio output ..................85 Channel section/master section ............85 Outputting sound...................87 Adjusting the sound................88 Setting the faders ..................89 Monitoring sound ................90 Headphones section ................90 Monitoring with headphones ..............90 Booth section ..................91 Using a booth monitor ................91 Microphone ..................92 MIC section ...................92 Using a microphone ................93 AUX .....................
- Page 6 Settings..................... 112 Changing the settings .................112 Utility settings ..................113 Changing the settings on the Shortcut screen ........118 Setting items on the Shortcut screen ..........119 Calling up My Settings saved on a storage device (USB)....121 Specifications .................. 122 Additional information ..............124 Troubleshooting ..................124 LCD display ..................125 Trademarks and registered trademarks ..........126...
-
Page 7: Before You Start
Before you start How to read this manual • Thank you for choosing this Pioneer DJ product. Be sure to read this manual, the “Quick Start Guide” and the “Precautions for Use” which are also included with this product. These documents include important information that you should understand before using the unit. -
Page 8: User Guides
Before you start User guides rekordbox Introduction, Instruction Manual Refer to the “rekordbox Introduction” to find out how to set up rekordbox, and see the “Instruction Manual” to find out how to use rekordbox. Visit the URL below to find these user guides. rekordbox.com/manual Serato DJ Pro software manual Refer to the following Serato DJ site. -
Page 9: Product Overview
Product overview System requirements Supported audio sources This unit supports the following sources. – USB device – PC/Mac (page 13) USB devices Use USB devices that support the following specifications. Up to 8 levels (Files in the lower levels can’t be played with Folder hierarchy the unit.) Unlimited (Up to 10,000 folders in a folder can be... - Page 10 Product overview If you still can’t restore the unit to a normal condition (i.e. if the unit doesn’t communicate with a connected USB device), turn the unit off and on. • If USB devices have multiple partitions, only the first partition can be used (or if there is a partition including rekordbox library, the partition is used instead).
-
Page 11: Rekordbox
Product overview Artwork of audio files You can add an artwork image in JPEG format (extensions: “jpg”, “jpeg”) to each audio file. Images larger than 800 x 800 pixels can’t be displayed on this unit. Display language If you want to display characters (track names, etc.) in local codes other than Unicode, change the [LANGUAGE] setting (page 116). -
Page 12: Pro Dj Link
Product overview Using mobile devices If you connect mobile devices running rekordbox for iOS to the unit, you can play audio files managed in rekordbox for iOS. • For information on the connection with rekordbox for iOS, refer to the FAQ at the URL below. -
Page 13: Pc/Mac Setup
PC/Mac setup To input your PC/Mac’s audio to the unit, install the following software on your computer. – Dedicated audio driver software: Driver software used for inputting the PC/Mac audio to the unit. If you install the audio driver software, Setting Utility will also be installed with the driver software (page 15). - Page 14 PC/Mac setup Installation of the dedicated audio driver software Notes on installation • Turn the unit off and disconnect the USB cable connected to the unit and the PC/Mac before installation. • Close all applications running on the PC/Mac before installation. •...
- Page 15 PC/Mac setup Installing the dedicated audio driver software 1 Unzip the downloaded audio driver software. • Unzip “XDJRX3####exe.zip” if you’re using a PC (Windows), or “XDJRX3M###dmg.zip” if you’re using a Mac (# indicates the version number of the software). 2 Double-click the downloaded installation file. •...
-
Page 16: Setting Utility
PC/Mac setup Setting Utility Once you’ve installed the driver software on your PC/Mac, you can use the Setting Utility for the following. – Adjusting the buffer size (for Windows ASIO) (page 17) – Checking the software versions (page 18) Launching Setting Utility For Mac 1 Open the [Applications] folder in Finder. - Page 17 PC/Mac setup Adjusting the buffer size (for Windows ASIO) • Close any running applications (DJ applications, etc.) which use the unit as the default audio device before adjusting the buffer size. Read more: Launching Setting Utility (page 16) 1 Click the [ASIO] tab. 2 Adjust the buffer size with the slider.
- Page 18 PC/Mac setup Checking the software versions Read more: Launching Setting Utility (page 16) 1 Click the [About] tab.
-
Page 19: Part Names
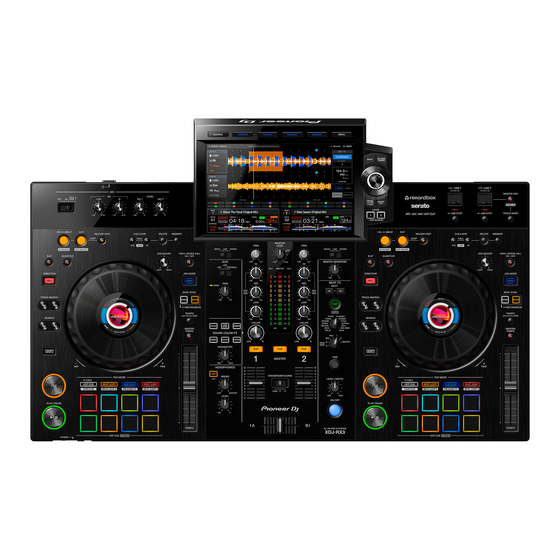
Part names Top panel FILTER FLANGER TRANS PHASER REVERB PITCH SPIRAL SLIP ROLL PING PONG ROLL ECHO VINYL BRAKE DELAY HELIX LINK MIC section (page 92) Browse section, Touch screen (pages 22, 35) USB section (page 33) Deck section (page 52) Performance Pad section (page 76) Jog wheel section (pages 29, 58) AUX section (page 94) -
Page 20: Front Panel
Part names Front panel PHONES terminals (page 90) Connect headphones to one of the terminals (1/4” stereo phone jack or 3.5 mm stereo mini-jack). Using both terminals at the same time may lower the sound quality or volume level. Rear panel 8 9 10 11 button Turns the unit on or puts it in standby mode. - Page 21 Part names BOOTH terminals (1/4”/6.35 mm, TRS) (page 91) Connect a booth monitor. • Use the terminals for balanced output only. Connecting the terminals to unbalanced inputs results in unwanted noises and/or poor sound quality. Kensington security slot Connect a cable lock. USB port (page 31) Connect a PC/Mac.
-
Page 22: Touch Screen
Part names Touch screen SOURCE screen Press the [SOURCE] button to display the source selection screen. Device icon Displays the connected device. • If [BACKGROUND COLOR] is set for the device, the icon’s background is displayed in the chosen color. Device name Device information Displays the information for the highlighted device in the list. - Page 23 Part names Browse screen Press the [BROWSE], [TAG LIST], [PLAYLIST], or [SEARCH] button to display the browse screen (track list). You can browse the rekordbox library on a storage device (USB) or on a connected PC/Mac. • If you browse a storage device (USB) that doesn’t contain a rekordbox library on the Browse screen, the folder and track lists are displayed in a hierarchical structure.
- Page 24 Part names Countdown timer Displays the countdown timer. The timer display turns from white to red when the remaining time becomes less than 5 minutes. Master Rec timer Displays the recording time when using Master Rec (page 57). INFO Touch to display or hide the detailed information for the track highlighted in the list (page 41).
- Page 25 Part names Playback screen (waveform screen) Countdown timer Displays the countdown timer. The timer display turns from white to red when the remaining time becomes less than 5 minutes. Touch to display the timer settings screen. You can change the settings and start/stop the timer on the screen.
- Page 26 Part names • Touch [DECK 1] or [DECK 2] to switch the active deck. Pad mode status/Beat FX controls Displays the pad mode being used on the deck, or Beat FX controls (Beat FX Bank and X-PAD). Enlarged waveform Displays the enlarged waveform, cue points, loop points, and Hot Cue points, etc. that have been analyzed by rekordbox.
- Page 27 Part names 13. STATUS/BEAT FX indicator Touch [STATUS]/[BEAT FX] to switch between the pad mode status display and Beat FX controls. • Touch [BEAT FX] to register Beat FX to Beat FX Bank, or use X-PAD (page 101). 14. Track number Displays the number (01-999) of the loaded track.
- Page 28 Part names 25. BPM (for Deck) Displays BPM (beats per minute, i.e. tempo) for the track playing. • The measured value may differ from that measured by our DJ mixers due to differences in the measurement methods. This isn’t a malfunction. 26.
-
Page 29: Jog Display
Part names Jog display SLIP indicator Lights up when Slip mode is turned on. Artwork /number of beats for loop/number of beats for Beat Jump Displays artwork of the loaded track. Displays the number of beats for the loop when a loop is playing. Displays the jump direction and the number of beats for 1 second when the playback point is moved (Beat Jump). - Page 30 Part names Basic operations on the touch screen Use the rotary selector or touch the screen to operate it. Using the rotary selector 1 Turn the rotary selector to move the cursor and highlight an item. 2 Press the rotary selector to confirm your selection. •...
-
Page 31: Connections (Basic Styles)
Connections (basic styles) Turn the unit off and disconnect the power cord before connecting other units. Connect the power cord after all the connections are complete. • Use the supplied power cord. • For the best performance, connect the unit directly to your PC/Mac with the supplied power cord. - Page 32 Connections (basic styles) rekordbox Link Export You can directly select and play tracks in rekordbox with this unit when the unit is connected via a USB cable to a PC/Mac running rekordbox. You can play tracks with cues, loops, and Hot Cues previously set in rekordbox.
-
Page 33: Connecting Storage Devices (Usb)
Connecting storage devices (USB) USB section USB 1, USB 2 ports MASTER REC (WAKE UP) button (page 57) USB 1, USB 2 indicators Each indicator blinks when the unit is communicating with a USB device connected to the corresponding port. TRACK MARK button (page 57) USB 1, USB 2 STOP buttons... -
Page 34: Usb Device
Connecting storage devices (USB) USB device • Do not disconnect a USB device from the unit or turn the unit off while the USB device indicator is blinking. The unit’s management data may be deleted or the USB device may become unreadable. -
Page 35: Track Selection
Track selection Browse section Touch screen (page 22) SOURCE button Displays the [SOURCE] screen. BROWSE button Displays the Browse screen. TAG LIST button Displays the Tag List screen. PLAYLIST button Displays the Playlist screen. SEARCH button Displays the Search screen. MENU/UTILITY button Displays menu items for the current screen (the function being used) or the Utility settings (page 112). -
Page 36: Selecting A Source
Track selection TAG TRACK/REMOVE button Adds tracks to, or deletes them from, the tag list (page 45). 10. Rotary selector 11. TRACK FILTER/EDIT button Narrows down tracks by tag information, BPM, or key, etc. set in rekordbox (page 40). 12. SHORTCUT button (page 119) 13. -
Page 37: Sorting Tracks
Track selection Sorting tracks This feature is only available when browsing the rekordbox library. 1 Press the [MENU/UTILITY] button when a track list is displayed. The sorting menu appears. 2 Select a sorting item. • You can change sorting items displayed in the sorting menu via rekordbox. To reflect the changed setting to the rekordbox library saved on a storage device (USB), export it to the device again. -
Page 38: Searching For A Track
Track selection Searching for a track Using the Search feature This feature is only available when browsing the rekordbox library. 1 Press the [SEARCH] button. The Search screen appears. 2 Enter a keyword using the keyboard. Tracks including the keyword are displayed in the list. •... - Page 39 Track selection Using the Jump feature The unit supports 2 jump modes. Alphabet Jump 1 Press and hold the rotary selector when the alphabetical order list is displayed. Alphabet Jump mode turns on, and the first character of the highlighted track or category is displayed on the screen.
- Page 40 Track selection Using Track Filter You can narrow down tracks by BPM, key, or the tag information added by rekordbox, etc. This feature is only available when browsing the rekordbox library. Narrowing down tracks 1 Press the [TRACK FILTER/EDIT] button. Tracks are narrowed down by the currently set conditions.
- Page 41 Track selection Searching with Information Jump You can search for tracks of the same genre or BPM as the track whose details are displayed on the touch screen. 1 Touch [INFO] on the waveform screen. The information screen appears. Read more: Playback screen (waveform screen) (page 25) Deck information : Touch [DECK 1] or [DECK 2] to switch the decks and display the information of the track loaded on the relevant deck.
-
Page 42: Monitoring Sound Before Loading A Track (Touch Preview)
Track selection • If a rekordbox library isn’t saved on the storage device (USB), you can only select a track – there’s no option to select detailed information. Monitoring sound before loading a track (Touch Preview) You can monitor the sound of a track before loading the track. 1 Connect headphones to the unit. - Page 43 Track selection • You can’t load another track while a track is playing when [LOAD LOCK] is set to [LOCK] in the Utility settings or on the [SHORTCUT] screen (pages 113, 119). Set it to [UNLOCK], or press the [PLAY/PAUSE ] button to pause playback, and then load another track.
-
Page 44: Using History
Track selection Using History Tracks played for approximately 1 minute are recorded in the History (playback list) (up to 999 tracks). • A new History is automatically created on a storage device (USB) when it’s connected to the unit. • If you play a track more than once in succession, it may not be recorded in History. •... -
Page 45: Using The Tag List
Track selection • If you create a playlist from the History using rekordbox, the HISTORY is deleted from the storage device (USB). Using the Tag List You can tag a track you want to play next or tracks you think will work well in your performance and review them via the Tag List. - Page 46 Track selection Serial number Tag list Displays the details of the tag list. Countdown timer Displays the countdown timer. The time display turns from white to red when the remaining time becomes less than 5 minutes. Master Rec timer Displays the recording time when using Master Rec (page 57). INFO Touch to display or hide the detailed information for the track highlighted in the list.
- Page 47 Track selection • If you add tracks by selecting a folder, the file name is registered as the track name for any track whose ID3, etc. hasn’t been read (the artist name won’t be registered). When the track (added to the Tag List) is displayed on the browse screen or the ID3 etc.
- Page 48 Track selection Deleting all tracks at once 1 Press the [TAG LIST] button. The Tag List screen appears. 2 Press the [MENU/UTILITY] button. The List Menu is displayed. 3 Select [REMOVE ALL TRACKS] in [TAGLIST MENU]. All tracks in the Tag List are deleted. •...
-
Page 49: Displaying The Playlist Screen
Track selection Displaying the playlist screen Playlist screen Press the [PLAYLIST] button to display the [PLAYLIST] screen. You can also display the [PLAYLIST] screen from the browse screen (page 23). Playlist Bank Displays the playlist when a playlist is registered to a Playlist Bank (page 51). With Playlist Banks, you can find a playlist without browsing the folder hierarchy. - Page 50 Track selection Track list Displays playlists or tracks in a playlist. Countdown timer Displays the countdown timer. The time display turns from white to red when the remaining time becomes less than 5 minutes. 10. Master Rec timer Displays the recording time when using Master Rec (page 57). 11.
- Page 51 Track selection Deleting a playlist 1 Press the [MENU/UTILITY] button on the Playlist screen. The deletion menu appears. 2 Select [DELETE] or [ALL DELETE]. — [DELETE] : Deletes the selected playlist. — [ALL DELETE] : Deletes all playlists. Registering a playlist to a Playlist Bank 1 Highlight a playlist on the Playlist screen.
-
Page 52: Playback
Playback Deck section LOOP IN/4 BEAT (IN ADJUST) button (pages 62, 65) LOOP OUT (OUT ADJUST) button (page 65) RELOOP/EXIT button (pages 67, 81) CUE/LOOP CALL (LOOP 1/2X), (LOOP 2X) button (pages 63, 66, 68) DELETE button (pages 64, 69) MEMORY button (pages 63, 68) QUANTIZE button (page 70) SLIP button (page 71) -
Page 53: Play/Pause
Playback DIRECTION (REV) button Lights up during reverse playback or Slip Reverse (page 71) . 10. TRACK SEARCH button Jumps to the beginning of a track. 11. SEARCH button Fast forward or fast reverse a track. 12. SHIFT button 13. CUE button (page 62) 14. -
Page 54: Playing A Track From The Touched Point On The Overall Waveform
Playback Playing a track from the touched point on the overall waveform 1 Touch the overall waveform. The loaded track plays from the touched point. • When [NEEDLE LOCK] is set to [LOCK] in the Utility settings (page 113), playback starts from the touched point only when you touch the overall waveform during pause or while touching the top of the jog wheel in Vinyl mode. -
Page 55: Basic Operations During Playback
Playback Basic operations during playback Function Description Press the [SEARCH ] or [SEARCH ] button to fast- forward or fast-reverse. Fast-forward/fast-reverse • Fast-forward or fast-reverse from one track to the next isn’t possible when [PLAY MODE] is set to [SINGLE] or [REPEAT] in the Utility settings (page 114). -
Page 56: Adjusting The Playback Speed Without Changing The Pitch (Master Tempo)
Playback Adjusting the playback speed without changing the pitch (Master Tempo) If you turn Master Tempo on, you can change the playback speed of a track using the [TEMPO] slider without changing the pitch. 1 Press the [MASTER TEMPO] button to turn Master Tempo on. The button lights up when Master Tempo is turned on. -
Page 57: Recording
Recording You can record the same audio as the output from the [MASTER 1] and [MASTER 2] terminals into a WAV file on a storage device (USB). • The recorded file name will be “REC***.WAV” (*** is a 3-digit number). •... -
Page 58: Using The Jog Wheel
Using the jog wheel Jog wheel section Jog display (page 29) Jog wheel (–REV/+FWD) • A sensor is built into the top of the jog wheel. Do not place anything on it or apply strong force. JOG ADJUST knob Adjusts the ‘weight’ of the jog wheel. VINYL SPEED ADJ. -
Page 59: Setting The Jog Wheel Mode
Using the jog wheel Setting the jog wheel mode 1 Press the [JOG MODE (VINYL)] button. Each press switches between the following modes. The button lights up in Vinyl mode. — Vinyl mode : Stops playback with a touch on the top (metal part) of the jog wheel and scratches a track by turning the jog wheel while touching the top. -
Page 60: Adjusting The 'Weight' Of The Jog Wheel
Using the jog wheel Adjusting the ‘weight’ of the jog wheel 1 Turn the [JOG ADJUST] knob. Turn clockwise: Increases the weight. Turn counterclockwise: Decreases the weight. Adjusting the playback starting and stopping speeds (for Vinyl mode) You can adjust the following speeds. –... - Page 61 Using the jog wheel 5 Touch [ON] in [VINYL SPEED ADJUST], or press the [VINYL SPEED ADJ. ON/OFF] button on the deck. The [VINYL SPEED ADJUST] setting on the [SHORTCUT] screen is enabled.
-
Page 62: Cueing
Cueing You can quickly call up a cue point you have set previously. Setting a cue point During pause 1 Press the [CUE] button. A cue point is set. • Press the [ SEARCH ] or [ SEARCH ] button or turn the jog wheel during pause to fine-adjust (0.5 frame unit) the pause position. -
Page 63: Checking A Cue Point (Cue Point Sampler)
Cueing Checking a cue point (Cue Point Sampler) 1 Jump to a cue point. Read more: Jumping to a cue point (page 62) 2 Press and hold the [CUE] button. Playback continues until you release the [CUE] button. • Press the [PLAY/PAUSE ] button to continue playback even if you release the [CUE] button. -
Page 64: Deleting A Saved Cue Point
Cueing Deleting a saved cue point 1 Call up a saved cue point. Read more: Calling up a saved cue point (page 63) 2 Press the [DELETE] button. Setting Auto Cue When loading a track or performing Track Search, a cue point can be automatically set to the position immediately before the first sound in the track (skipping any silence at the beginning). -
Page 65: Looping
Looping You can choose a section of a track to play repeatedly. Setting a loop Manual setting 1 While the track is playing, press the [LOOP IN/4 BEAT (IN ADJUST)] button at the point where you want to start the loop (loop-in point). -
Page 66: Fine-Adjusting Loop Points
Looping Fine-adjusting loop points 1 Press the [LOOP IN/4 BEAT (IN ADJUST)] or [LOOP OUT (OUT ADJUST)] button during loop playback. The unit switches to loop adjusting mode. — [LOOP IN/4 BEST (IN ADJUST)]: Adjusts the loop-in point. — [LOOP OUT (OUT ADJUST)]: Adjusts the loop-out point. 2 Press the [SEARCH ] or [SEARCH ] button or turn the... -
Page 67: Returning To A Loop-In Point To Start Loop Playback (Retrigger)
Looping Doubling a loop in length 1 Press the [CUE/LOOP CALL (LOOP 2X)] button during loop playback. The loop length is doubled each time you press the button. Returning to a loop-in point to start loop playback (Retrigger) 1 Press the [LOOP IN/4 BEAT (IN ADJUST)] button while pressing the [SHIFT] button during loop playback. -
Page 68: Emergency Loop
Looping Emergency Loop The unit automatically plays a Beat Loop if it can’t start playing the next track when the end of the current track is reached. This prevents situations where your performance is interrupted by silence. • You can’t DJ during Emergency Loop playback. •... -
Page 69: Deleting A Saved Loop
Looping Deleting a saved loop 1 Call up a saved loop. 2 Press the [DELETE] button. • If you delete a loop set as an Active Loop, the Active Loop is also deleted (page 67). -
Page 70: Quantize (For Deck)
Quantize (for deck) Cue points, loop-in points, loop-out points, and Hot Cue points are automatically set to the closest beat position even if your timing is off the beat when you set them. You can use Hot Cues, loop, reverse playback, and Slip without breaking the rhythm of the track you are playing. -
Page 71: Slip
Slip If you turn Slip mode on, normal playback continues in the background (but you can’t hear it) when you perform the following operations. When you end the operation, Slip is canceled and normal playback starts from the exact point the track would have reached by then. -
Page 72: Turning Slip Mode On
Slip Turning Slip mode on 1 Press the [SLIP] button. Slip mode turns on and the [SLIP] button lights up. • The [SLIP] button blinks while Slip is in use. • The current playback point in Slip mode is indicated by a yellow line on the overall and enlarged waveforms on the waveform screen. -
Page 73: Beat Sync
Beat Sync If you turn Beat Sync on, tempo (BPM) and beat position of tracks on DECK 1 and DECK 2 of the unit automatically synchronize. • Beat Sync can’t be used with tracks that haven’t been analyzed by rekordbox. Using Beat Sync 1 Play a track analyzed by rekordbox on the deck (DECK 1 or DECK 2) you want to set as the sync master. -
Page 74: Using Instant Doubles
Beat Sync Using Instant Doubles You can duplicate a track loaded on DECK 1 or DECK 2 so it plays on the other deck from exactly the same point. 1 Press and hold the [BEAT SYNC/INST.DOUBLES] button on the deck where you want the duplicate track to start playing. •... -
Page 75: Beatgrid
Beatgrid You can adjust the beatgrid. • You can’t adjust the beatgrid for tracks that haven’t been analyzed by rekordbox. Adjusting the beatgrid 1 Press and hold the rotary selector on the waveform screen, or touch and hold [ZOOM]/[GRID] on the screen. Grid Adjust mode turns on. -
Page 76: Using The Performance Pads
Using the Performance Pads You can trigger various functions with the Performance Pads. Performance Pad section PAD MODE buttons – HOT CUE/CALL (GATE CUE) button : Switches to Hot Cue mode or Gate Cue mode. – BEAT LOOP (BEAT LOOP 2) button : Switches to Beat Loop mode. –... -
Page 77: Hot Cue/Gate Cue
Using the Performance Pads Hot Cue/Gate Cue You can call up a Hot Cue quickly and start playback by pressing a Performance Pad. Setting a Hot Cue 1 Press the [HOT CUE/CALL (GATE CUE)] button. The unit switches to Hot Cue mode. 2 Press a Performance Pad at the point where you want to set a Hot Cue during playback or pause. - Page 78 Using the Performance Pads Starting playback from a Hot Cue point 1 Press the [HOT CUE/CALL (GATE CUE)] button. The unit switches to Hot Cue mode. 2 Press one of the Performance Pads that have a Hot Cue set during playback or pause. Playback starts from the Hot Cue point.
- Page 79 Using the Performance Pads Deleting a Hot Cue 1 Press the [HOT CUE/CALL (GATE CUE)] button. The unit switches to Hot Cue mode. 2 Press one of the Performance Pads while pressing the [SHIFT] button. The Hot Cue set to the pad is deleted. Calling up Hot Cues Automatic call-up You can automatically call up Hot Cues saved on a storage device (USB) when a track is...
- Page 80 Using the Performance Pads Manual call-up You can call up a Hot Cue manually when [HOT CUE AUTO LOAD] is set to [OFF] in the Utility settings or on the [SHORTCUT] screen, or when the conditions for the automatic call- up aren’t met by [ rekordbox SETTING ].
-
Page 81: Beat Loop
Using the Performance Pads Beat Loop If you press a Performance Pad, a loop is set with the number of beats or bars assigned to the Performance Pad. Using Beat Loop 1 Press the [BEAT LOOP (BEAT LOOP 2)] button. The unit switches to Beat Loop mode. -
Page 82: Slip Loop
Using the Performance Pads Slip Loop Slip loop playback continues while pressing a Performance Pad regardless of whether Slip is turned on or off. Using Slip Loop 1 Press the [SLIP LOOP (RELEASE FX)] button. The unit switches to Slip Loop mode. 2 Press a Performance Pad. -
Page 83: Release Fx
Using the Performance Pads Release FX Release FX are applied while pressing Performance Pads. Using Release FX 1 Press the [SLIP LOOP (RELEASE FX)] button. The unit switches to Release FX mode. 2 Press a Performance Pad. The Release FX is applied until you release the Performance Pad. •... -
Page 84: Beat Jump/Loop Move
Using the Performance Pads Beat Jump/Loop Move You can instantly move the playback point without changing the rhythm of a track that’s playing. Using Beat Jump/Loop Move 1 Press the [BEAT JUMP (BEAT JUMP 2)] button. The unit switches to Beat Jump mode. 2 Press a Performance Pad. -
Page 85: Audio Output
Audio output Follow the procedures below to output and adjust sound. – Outputting sound (page 87) – Adjusting the sound (page 88) – Setting the faders (page 89) To output sound to the [BOOTH] terminals, see Using a booth monitor (page 91). Channel section/master section FILTER FLANGER... - Page 86 Audio output Channel section Input selector switch Selects an input sound source. — [DECK 1, DECK 2] : Selects a deck on the unit. — [LINE] : Selects a multi player, etc. connected to the [LINE] terminals. — [PHONO] : Selects a turntable connected to the [PHONO] terminals. TRIM knob Adjusts the volume for the channel input sound.
-
Page 87: Outputting Sound
Audio output Crossfader Adjusts the volume balance between the channel output sounds according to the crossfader curve specified with the [CROSSFADER CURVE] switch. Moving it to the [<A] side outputs the sound of DECK 1, and to the [B>] side outputs the sound of DECK 2. Master section 10. -
Page 88: Adjusting The Sound
Audio output Adjusting the channel output volume 1 Move the channel fader to adjust the volume for the output sound. 2 Move the crossfader to adjust the volume balance of the two channels. • You don’t need to adjust the crossfader when the [CROSSFADER CURVE] switch is set to [THRU]. -
Page 89: Setting The Faders
Audio output Setting the faders Set the channel fader and crossfader. Setting the channel fader 1 Press and hold the [MENU/UTILITY] button, or press the [SHORTCUT] button. The [UTILITY] or [SHORTCUT] screen appears. 2 Set the channel fader curve in [CHANNEL FADER CURVE]. Read more: (pages 115, 120). -
Page 90: Monitoring Sound
Monitoring sound Headphones section LINK CUE (LINK) button (page 42) MIXING knob Adjusts the volume balance between the master sound and the channel selected with the [CUE] button. • Set the knob to [CUE] to monitor only the channel sound, and to [MASTER] to monitor only the master sound. -
Page 91: Booth Section
Monitoring sound • You can set the sound output (MONO SPLIT or STEREO) in [HEADPHONES MONO SPLIT/STEREO] in the Utility settings or on the [SHORTCUT] screen (pages 116, 120). 3 Turn the [MIXING] knob to adjust the volume balance between the channel sound and the master sound. -
Page 92: Microphone
Microphone MIC section OFF, ON, TALK OVER selector switch Sets the microphone sound output. — [ OFF ]: Turns the microphone off. — [ ON ]: Turns the microphone on. — [ TALK OVER ]: Turns microphone talkover on. When sound of -10 dB or more is input to the microphone, the volume other than the microphone channel is attenuated by -24 dB. -
Page 93: Using A Microphone
Microphone Using a microphone 1 Connect a microphone to the [MIC 1] or [MIC 2] terminal. Read more: Rear panel (page 20) 2 Slide the [OFF, ON, TALK OVER] selector switch to set the microphone sound output. 3 Turn [LEVEL MIC 1] or [LEVEL MIC 2] knob to adjust the microphone volume level. -
Page 94: Aux
AUX section AUX (OFF, LINE, PORTABLE) switch — [OFF] : Mutes the input sound. — [LINE] : Sound is input from the device connected to the [AUX LINE] terminals. — [PORTABLE] : Sound is input from the device connected to the [AUX PORTABLE ] terminal. -
Page 95: Using Aux
Using AUX 1 Connect an external device to the [AUX LINE] terminals or the [AUX PORTABLE] terminal. Read more: Rear panel (page 20) 2 Slide the [AUX (OFF, LINE, PORTABLE)] switch to select an external device to use. 3 Turn the [TRIM] knob to adjust the volume of the input sound. -
Page 96: Sound Color Fx
Sound Color FX You can apply a filter or an effect to the sound on any channel. Sound Color FX section FILTER FLANGER TRANS PHASER REVERB PITCH SPIRAL SLIP ROLL PING PONG ROLL ECHO VINYL BRAKE DELAY HELIX EQ/ISO (HI, MID, LOW) knobs (page 85) SOUND COLOR FX buttons Select a SOUND COLOR FX. -
Page 97: Using Sound Color Fx
Sound Color FX Using Sound Color FX Read more: Sound Color FX types and settings (page 98) 1 Press the [SOUND COLOR FX] button. The selected button blinks. • The effect is applied to CH 1 and CH 2. 2 Turn the [COLOR] knob to adjust the effect. The effect on the channel you turned the knob for is adjusted. -
Page 98: Sound Color Fx Types And Settings
Sound Color FX Sound Color FX types and settings You can adjust the following settings with the knobs. Effect/operation Description SPACE Adds reverberation to the original sound. • COLOR: Turn counterclockwise to add reverberation to the middle frequency range and high frequency range. Turn clockwise to add reverberation to the middle frequency range and low frequency range. - Page 99 Sound Color FX Effect/operation Description Outputs filtered white noise mixed with the sound of the NOISE channel. • COLOR: Turn counterclockwise to lower the cut-off frequency for the filter which passes white noise through. Turn clockwise to raise the cut-off frequency for the filter which passes white noise through.
-
Page 100: Beat Fx
Beat FX You can add various effects according to the BPM of the track that’s playing. Beat FX section FILTER FLANGER TRANS PHASER REVERB PITCH SPIRAL SLIP ROLL PING PONG ROLL ECHO VINYL BRAKE DELAY HELIX BEAT button Sets the number of beats for Beat FX. TAP (AUTO) button Sets BPM. -
Page 101: Using Beat Fx
Beat FX TIME knob Adjusts the time parameter for Beat FX. LEVEL/DEPTH knob • Turn the knob all the way counterclockwise to output the original sound. ON/OFF button Turns Beat FX on and off. The button blinks when the effect is turned on. Using Beat FX Read more: Beat FX types and settings (page 104) 1 Turn the Beat FX selector switch to select a Beat FX. -
Page 102: Setting Bpm Manually (Tap Mode)
Beat FX • To use the X-PAD, touch [BEAT FX] on the waveform screen to display the Beat FX controls. BEAT FX X-PAD : Touch to turn an effect on and off. You can adjust the time and quantitative parameters when you touch or slide your finger on X-PAD. Setting BPM manually (Tap mode) 1 Tap the [TAP (AUTO)] button more than twice in time with the beat of the track. -
Page 103: Using Quantize (For Beat Fx)
Beat FX Using Quantize (for Beat FX) If you use Quantize, the unit adds an effect by automatically synchronizing it with the beat according to the track’s grid information analyzed by rekordbox. This happens even if you operate the [ON/OFF] button of Beat FX or X-PAD roughly. •... -
Page 104: Beat Fx Types And Settings
Beat FX Beat FX types and settings You can adjust the following settings with the buttons and knobs. Beat FX/operation Description Outputs a delay sound once according to the beat. DELAY • BEAT Delay time with respect to 1 beat of the BPM (beat fraction): 1/16 to 16 beats •... - Page 105 Beat FX Beat FX/operation Description Adds reverberation to the input sound. SPIRAL • BEAT Delay time with respect to 1 beat of the BPM (beat fraction): 1/16 to 16 beats • TIME : Delay time: 10 to 4000 (ms) • LEVEL/DEPTH: Balance between the original sound and the effected sound, and feedback •...
- Page 106 Beat FX Beat FX/operation Description FILTER Cyclically changes the cut-off frequency according to the beat. • BEAT Moving cycle of the effect with respect to 1 beat of the BPM (beat fraction): 1/16 to 64 beats • TIME : Moving cycle of the effect: 10 to 32000 (ms) •...
- Page 107 Beat FX Beat FX/operation Description PITCH Changes the pitch of the original sound. • BEAT Pitch of the effect sound: -50 to 100 • TIME : Pitch of the effect sound: -50 to 100 • LEVEL/DEPTH: Pitch of the effect sound •...
- Page 108 Beat FX Beat FX/operation Description Cyclically slows down the playback speed of the input sound VINYL BRAKE gradually according to the beat and then stops playback. • BEAT Cycle of the effect with respect to 1 beat of the BPM (beat fraction): 1/16 to 16 beats •...
-
Page 109: Registering Beat Fx To Beat Fx Bank
Beat FX Registering Beat FX to Beat FX Bank You can register up to 4 Beat FX to Beat FX Bank. The registration is saved even if the unit is turned off. 1 Turn the Beat FX selector switch to select a Beat FX to register to Beat FX Bank. -
Page 110: Using Dj Software
Using DJ software If you connect a PC/Mac with MIDI software installed, to the unit via a USB cable, you can control the DJ software via the unit. • To play tracks stored on a PC/Mac with the unit, install the dedicated audio driver software (page 13). - Page 111 Using DJ software • Some buttons on the unit can’t be used for controlling a DJ application. • Control mode turns off when a track is loaded to the unit from a device other than the currently communicating device that’s running the DJ software. •...
-
Page 112: Settings
Settings You can change the settings of the unit from the Utility menu or on the [SHORTCUT] screen. If you save [MY SETTINGS] (function settings of the unit) to a storage device (USB), you can load them to the unit immediately when you arrive in the booth or take over from another DJ, etc. -
Page 113: Utility Settings
Settings Utility settings DECK category *: Factory setting Setting item Description Determines whether or not you can load another track during playback. LOAD LOCK • Setting values: UNLOCK , LOCK Determines whether or not you can start playback from the point touched on the waveform during playback. - Page 114 Settings Setting item Description Determines whether or not the indicators blink for buttons that can be used for Slip when you press the [SLIP] button. SLIP FLASHING • Setting values: OFF, ON* Determines whether or not to display On Air Display on the waveform screen (page 25).
- Page 115 Settings Setting item Description Sets an image to display on the artwork display on the jog wheel. • Setting values: ARTWORK*, CUSTOM IMAGE IMAGE ON JOG DISPLAY • [ARTWORK]: Displays the artwork of the loaded track. • [CUSTOM IMAGE]: Displays a JPEG saved in the root directory of the storage device (USB) that the loaded track is saved on.
- Page 116 Settings Setting item Description Determines whether or not to output the microphone sound to Master Rec (recording sound). MIC OUT TO MASTER REC • Setting values: ON*, OFF Sets the output method (monaural or stereo) for the HEADPHONES MONO headphones monitor sound. SPLIT/STEREO •...
- Page 117 Settings Setting item Description Adjusts the touch display calibration with a touch of [+] displayed on the screen. TOUCH DISPLAY • If [+] doesn’t move, touch it for a little longer. CALIBRATION • Do not use sharp-pointed objects such as a ballpoint pen to make the setting.
-
Page 118: Changing The Settings On The Shortcut Screen
Settings Changing the settings on the Shortcut screen 1 Press the [SHORTCUT] button. The [SHORTCUT] screen appears. 1. DECK SETTING 2. LCD BRIGHTNESS 3. VINYL SPEED ADJUST 4. Device information 5. Device settings 6. MIXER SETTINGS 2 Select a setting value. Read more: Setting items on the Shortcut screen (page 119) •... -
Page 119: Setting Items On The Shortcut Screen
Settings Setting items on the Shortcut screen Setting item Description DECK SETTING Sets the time display ([TIME] (elapsed time) or [REMAIN] TIME (remaining time)) on both decks. AUTO CUE Turns Auto Cue on and off on both decks. LOAD LOCK QUANTIZE BEAT Same as the Utility settings (page 113) VALUE... - Page 120 Settings Setting item Description HEADPHONES MONO SPLIT/ STEREO Same as the Utility settings (page 113) MIXER MODE CHANNEL FADER CURVE...
-
Page 121: Calling Up My Settings Saved On A Storage Device (Usb)
Settings Calling up My Settings saved on a storage device (USB) You can call up My Settings from a storage device (USB). • You can call up My Settings from rekordbox connected in the PRO DJ LINK network. 1 Connect a storage device (USB) to the unit. Read more: Connecting storage devices (USB) (page 33) 2 Press the [SOURCE] button. -
Page 122: Specifications
Specifications Power requirements.............AC 110 V – 240 V, 50 Hz / 60 Hz Power consumption ......................54 W Power consumption (standby) ..................0.3 W Main unit weight .................... 9.3 kg / 20.5 lbs. Max. external dimensions ..(W x H x D) 728.1 x 118.4 x 469.5 mm / 28.7″ x 4.7″ x 18.5″ Tolerable operating temperature .........+5 °C –... - Page 123 Specifications Rated output level / Load impedance MASTER1 ....................+25 dBu / 10 kΩ MASTER2 ....................+21 dBu / 10 kΩ Crosstalk LINE ........................87 dB PHONO ........................74 dB Channel equalizer characteristics HI....................-∞ dB – +6 dB (20 kHz) MID....................-∞ dB – +6 dB (1 kHz) LOW .....................
-
Page 124: Additional Information
Additional information Troubleshooting If you think something is wrong with the unit, check the information below and refer to the [FAQ] for the XDJ-RX3 at the URL below. pioneerdj.com/support/ • Inspect devices connected with the unit. • The unit may restore proper operation after you turn it off and on. If the problems continue, read the “Precautions for Use”... -
Page 125: Lcd Display
Additional information LCD display • Small black or shining points may appear on the LCD display. This is a phenomenon inherent to LCD displays and not a malfunction. • When using the unit in cold places, the LCD display may be dark for a while after the power is turned on. -
Page 126: Trademarks And Registered Trademarks
Additional information Trademarks and registered trademarks • rekordbox™ is a trademark or registered trademark of AlphaTheta Corporation. • PRO DJ LINK™ is a trademark or registered trademark of AlphaTheta Corporation. • Mac, macOS and Finder are trademarks of Apple Inc., registered in the U.S. and other countries. -
Page 127: Cautions On Copyrights
Additional information Cautions on copyrights rekordbox restricts playback and duplication of copyright-protected music contents. • When coded data, etc., for protecting the copyright is embedded in the music contents, it may not be possible to operate the program normally. • When rekordbox detects that coded data, etc., for protecting the copyright is embedded in the music contents, processing (playback, reading, etc.) may stop.
Need help?
Do you have a question about the Serato XDJ-RX3 and is the answer not in the manual?
Questions and answers