CARDIOSTRONG CST-TR20-2 Assembly And Operating Instructions Manual
For more information, please visit cardiostrong.com, sport-tiedje.com
Table of Contents
Advertisement
Advertisement
Table of Contents

Related Manuals for CARDIOSTRONG CST-TR20-2


Summary of Contents for CARDIOSTRONG CST-TR20-2
- Page 1 Assembly and operating instructions Art. No. CST-TR20-2 Treadmill TR20...
- Page 2 TR20...
- Page 3 Dear Customer, Thank you for deciding for a high-quality training equipment of the brand cardiostrong, the brand that makes athlete‘s hearts beat faster. cardiostrong offers a wide range of home fitness equipment like elliptical cross trainers, ergometers, treadmills and rowing machines. cardiostrong equipment is the optimal equipment for all those who want to train at home independent of goals and fitness level.
-
Page 4: Table Of Contents
CONTENTS GENERAL INFORMATION 1.1 Technical data 1.2 Personal safety 1.3 Electrical safety 1.4 Set-up place ASSEMBLY INSTRUCTIONS, MAINTENANCE AND CARE 2.1 General instructions 2.2 Errors and error diagnosis 2.3 Error codes and troubleshooting 2.4 Care and maintenance 2.5 Maintenance and service calendar ASSEMBLY 3.1 Package contents 3.2 Assembly instructions... - Page 5 DISPOSAL ORDERING ACCESSORIES ORDERING SPARE PARTS 9.1 Service hotline 9.2 Serial number and model name 9.3 Parts list 9.4 Exploded drawing...
-
Page 6: General Information
GENERAL INFORMATION Technical data LED display of speed in km/h training time in min training distance in km calories burnt in kcal heart rate (when using the hand sensors or a chest strap) incline in % Motor power: 1.75 HP continuous output (DC - motor) Speed range: 1 - 16 km/h Speed hot keys: 4... -
Page 7: Personal Safety
Personal safety Before you start using the equipment, you should consult your physician that this type of exercise is suitable for you from a health perspective. Particularly affected are persons who: have a hereditary disposition to high blood pressure or heart disease, are over the age of 45, smoke, have high cholesterol values, are overweight and/or have not exercised regularly in the past year. -
Page 8: Electrical Safety
Safety Key The equipment has an EMERGENCY STOP mechanism for your safety. The equipment may only be operated when the safety key is properly attached to the contact point of the cockpit. The equipment will automatically stop immediately if the safety key is no longer on the contact point. That is why you should attach the safety key string with the clip to your clothing before training. -
Page 9: Set-Up Place
Set-up place The equipment should only be used indoors, in a sufficiently heated and dry area (ambient temperature between 10°C and 35°C). The equipment should not be used outdoors or in rooms with high humidity (over 70%) like swimming pools. The equipment should only be stored in surroundings with an ambient temperature between 5°C and 45°C. -
Page 10: Assembly Instructions, Maintenance And Care
Please contact your contract partner in such a case. The equipment should no longer be used until it has been repaired. When needed, only use original cardiostrong spare parts. Check the tightness of all screw connections once a month. -
Page 11: Errors And Error Diagnosis
In order to be able to guarantee the constructively defined safety level of this equipment, we recommend having the equipment regularly maintained (at least once a year) by specialists (contract partner service technicians). The equipment may be cleaned of dust, dirt and sweat using a damp cloth. The use of solvents should be strictly avoided. -
Page 12: Error Codes And Troubleshooting
Error codes and troubleshooting The electronic system from the treadmill does tests continuously. If there are deviations, an error code is displayed and the normal operation will be stopped for your safety. Please contact Sport-Tiedje for technical customer service. Error codes description: E1 - speed error E2 - error reading memory E6/E7 - incline error... -
Page 13: Care And Maintenance
Error Troubleshooting code The LED on the start button glows faintly, other LEDs are not on: The machine is in power saving mode. Hold the START button for one second. The console display is fluctuating or does not light up: Check if the treadmill is correctly connected to the power supply. - Page 14 Adjustment of the running mat During training, the running belt should run as centered and straight as possible. The alignment of the running belt may change depending on the stress and load. Another reason can be the positioning of the equipment on an uneven surface. While adjusting the belt, let the equipment run with a speed of approximately 5km/h.
- Page 15 While tightening the belt, let the equipment run at a speed of 5km/h. Turn the left and right setting screws directly after each other a max. 1/4 clockwise rotation. Then check if the running belt is still slipping. If this is the case, you must repeat the described process.
-
Page 16: Maintenance And Service Calendar
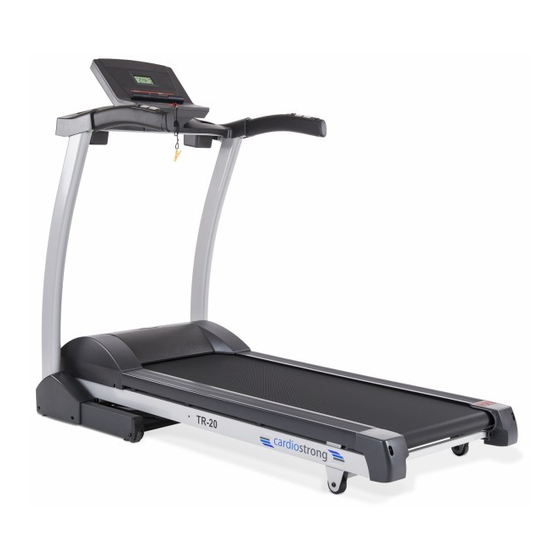
The spraying tube should be held sideways in order to guarantee a moistening of the entire underside of the belt. Continue to rotate the belt by hand so that the entire area between the endless belt and running deck is lubricated. Wipe off the excess lubricant. - Page 17 Hot key (speed) (13) (1) Console (2) Bottle holder Pulse Handle (12) Safety key (11) (3) Handle Console mast right (5) (4) Hot key (incline) (5) Console mast left (6) Motor cover (7) Height compensation (hidden) Rear cover (10) (8) Frame Rear transport wheel (9) Console Frame...
-
Page 18: Assembly Instructions
Tool and screw sets Included in the hardware bag: Multi key Allen key 6 mm Allen key 5 mm Preassembled screws: (Screws must be removed & attached again during assembly.) 2 pieces 4 pieces 4 pieces 8 pieces 6 pieces 4 pieces 4 pieces Assembly instructions... - Page 19 Step 1: Assembly of the console masts 1. Fold up the console mast (1-1). 2. Mount the two M10x60L screws with nuts (1-2). 3. Mount the two M10x60L screws with nuts (1-3). 4. Place the cover on and mount it with four M4x10L screws (1-4). Multi key Allen key 6 mm Allen key 5 mm...
- Page 20 Step 2: Mounting the handrails 1. Align the handrails. 2. Mount the handrails with two M8x70L screws. Allen key 5 mm 2 pcs TR20...
- Page 21 Step 3: Connect the console 1. Connect the plugs from the console with those from the console mast. 2. Carefully place the excess cable in the crossbar of the console mast.
- Page 22 Step 4: Mounting the consoles 1. Place the bottle holders on the main console (4-1). 2. Place the entire cockpit on the designated shelf, softly press the covering on the sides so that it sits correctly (4-2). 3. Take the screws 6x #8x0.625‘‘L and 4x M4x10L and screw them into the designated holes (4-3).
- Page 23 Transport and storage The treadmill is foldable and thus saves space when it is stored. It also makes it easier to transport. Folding up the treadmill 1. Turn off the on/off switch and remove the plug from the outlet. 2. Make sure that nothing is on or next to the equipment that can be spilled or knocked over or that makes it impossible to fold up the treadmill.
- Page 24 Unfolding the treadmill 1. Make sure there is enough space to set up the treadmill: at least 1 m on both sides and to the front and at least 2 m behind the equipment for safety reasons. If the user starts to fall, there is enough space to leave the treadmill.
-
Page 25: Operating Instructions
OPERATING INSTRUCTIONS Console display CALORIES Approximate calorie consumption since the beginning of training TIME Training time INCLINE Incline in % PULSE Heart rate SPEED Speed in km/h DISTANCE Training distance in km PROG. Indicates preset program on P01 to P17, U01 to U02, H01 toH02. Age for the HR programs WEIGHT Weight for exact calorie calculation... -
Page 26: Button Functions
Button functions With MODE/ENTER, you can select any value that you need to set the program, e. g., program, level, MODE time and your weight (for more exact calculation of burnt calories). MODE serves to change between the training display. ·... -
Page 27: Programs
Programs Advanced programs Remember if you train daily with the same speed and duration, your physical fitness will only improve within this scope. In order to get the most out of your training time, this treadmill has a wide selection of training programs. All programs are available under “Speed”... - Page 28 P-03: Moderate interval (30-minute default) As soon as you train on a regular basis and have an improved fitness level, you are ready to train with moderate intensity in intervals. Please note that this training includes a change between a simple recovery and high intensity interval.
- Page 29 P-07: Fartlek (30-minute default) Varied training intensity with constantly changing interval training, that starts with an easy speed & increases to a moderate/intense speed, offers variety and offers great fitness benefits. Constantly varying intensities have a very positive effect on the improvement of brain fitness according to brain research.
- Page 30 P-11: Ladder (30-minute default) Some of the best benefits are the direct, positive effects on the heart and the cardiovascular system. It is specifically developed to supply your heart and cardiovascular system with a series of increasingly difficult training intensities, which improves your aerobic endurance and also stimulates anaerobic endurance.
- Page 31 P-15: Cardio run (20-minute default) Training with a constant speed, however, with higher intensity than with “long slow distance”. It is an advanced training program to motivate you to achieve a challenging, constant speed and to maintain your speed throughout the entire training. It is great to prepare for a certain event.
-
Page 32: Man. - Manual Program (Pre-Set And User-Defined)
4.3.2 MAN. - Manual program Press START to begin training as quickly as possible. To do this, select the manual program & the time counts up from 00:00. You can also press ENTER in order to select the manual program. With ENTER, set a certain duration and your weight (for more exact calorie calculation). -
Page 33: Heart-Rate Controlled Training
4.3.3 Heart rate controlled training In this program, you have to set a heart rate that the console will maintain during training. For the interval, you must enter a LOW and a HIGH heart rate. You either have to hold on to the pulse handles with both hands or wear a chest strap during training. HRC - constant 1. -
Page 34: Equipment Settings
Equipment settings Information on the Personal settings display Hold MODE/ENTER and then press SPEED up in order to get to the technical mode. The first display shows the 100 Eng software version. Then press MODE/ENTER to get to the MODE next display for personal settings or to show the factory settings. -
Page 35: Workout Instructions
WORKOUT INSTRUCTIONS Heart rate measuring Pulse measurement through hand sensors The hand sensors integrated in the handles allow you to determine your heart rate. You can measure your heart rate by lightly grasping the sensors with both hands at the same time. - Page 36 while exercising. The transmitter turns on automatically once it is put on. In order to allow for a precise measuring, you should moisten the rubber electrodes. This is best done with a special chest strap contact gel, which is also used for ultrasound scans. Note: If you have not been active in doing sports for a longer period of time, you should first go to your physician in order to discuss your training with them.
- Page 37 Example: For a 45-year-old man or woman, the maximum heart rate is 175 (220 - 45 = 175). • The fat burning target zone (55%) is at approximately 96 beats/min. = (220 - age) x 0.55. • The cardio target zone (75%) is at approximately 131 beats/min. = (220 - age) x 0.75.
-
Page 38: 10 Tips For Effective Running Training
10 tips for effective running training 1. Set goals What would you like to achieve with your training? Weight regulation, improved endurance, prevent risk of disease, more mobility, cardiovascular training, etc. In order to achieve your long-term training goal, set individual partial goals, e. g., weekly or monthly goals. -
Page 39: Designing A Workout
9. Workout journal Keep a record of your training sessions. Note the date, resting pulse, active pulse, recovery pulse, resistance level, time, distance, calories burnt and fitness level. 10. Reward yourself Do something good for you and your body after training or after achieving a partial goal. Go to the sauna or a swimming pool. - Page 40 25 min. After every 10 min. run for 35 min. Running at a moderate 1 min. speed In the fourth week, run for two minutes after In the fourth week, increase the speed every 10 minutes. Maintain your heart rate. for one minute each.
-
Page 41: Stretching Exercises For Leg & Chest Muscles
Stretching exercises for leg & chest muscles 1. Exercise: Stretching of front thigh / leg extension (quadriceps) • Stable position, grab arches of feet • Pull heel towards buttocks, knee points downwards (no abduction) • Straight upper body, avoid tilting the pelvic forward (hollow back) by tensing the abdominal muscles •... - Page 42 3. Exercise: Stretching the calf muscles (gastrocnemius) • Place feet parallel to each other pointing forward, the heels touch the floor • Support yourself on a chair coming from a lunge • Move your body weight to the front leg, press your heel from the rear leg towards the floor and hold the contact •...
-
Page 43: Workout Journal
Workout journal Date Time (min.) Training weight Calories burnt Body weight Ø Pulse Distance Resistance level I feel ... -
Page 44: Warranty Information
GUARANTEE INFORMATION cardiostrong‘s fitness equipment is subject to strict quality controls. However, if a fitness equipment purchased from us does not work perfectly, we take it very seriously and ask you to contact our customer service as indicated. We are happy to help you by phone via our service hotline. - Page 45 The terms of use are defined as follows: • Home use: solely for private use in private households up to 3 hours per day • Semi-professional use: up to 6 hours per day (e. g. rehabilitation centers, hotels, clubs, company gyms) •...
-
Page 46: Disposal
Service outside of the warranty period We are also happy to issue an individual cost estimate if there is a problem with your fitness equipment after the warranty has expired, or in cases which do not fall under the terms of the warranty, e. g. normal wear and tear. Please contact our customer service team to find a quick and cost-effective solution to your problem. -
Page 47: Ordering Accessories
ORDERING ACCESSORIES Sport-Tiedje floor mat size XXL Art. No. ST-FM-XXL Polar transmitter chest strap T34 non-coded Art. No. T34 Togu Senso Walking Trainer Art. No. TOGU-470501 Chest strap Sport-Tiedje contact gel silicone spray 250ml Art. No. ST-1003 Art. No. BK-250 Fitness equipment care set Art. -
Page 48: Ordering Spare Parts
9:00 am - 6:00 pm Serial number and model name Before assembling your equipment, find the serial number on the white sticker and enter it in the appropriate space. Serial number: Brand / category: Model name: cardiostrong treadmill TR20-2 TR20... -
Page 49: Parts List
Parts list Part number Description (01) 8000001200 Main Frame (02) 81TB31100201A21 Frame Base (03) 80TA11100401 Incline Bracket Set 1 81TA11250040A04 Incline Bracket 2 205112081806001 Sleeve 3 511212006200134 Hexagonal socket screw 4 541113026200114 Washer 5 531212001200114 Nylon Nut (04) 80TA11100301 Incline Base Set 1 81TA11250030A04 Incline Base 2 205112081806001... - Page 50 Part number Description (08) 80TA11100701A07 Folding shock set 1 201TA8125010A07 Folding fixed tube 2 210130007134502 Folding Shock 3 203TA0150030B04 Ball Screw 4 550140260410115 Twin Spring 5 511208007500114 Hexagonal socket screw 6 541108016150114 Washer 7 531208000800114 (09) 8000001202 Running deck set 1 2000000985 Running deck 2 511408002500114...
- Page 51 Part number Description 8 541108016150114 Washer 9 531208000800114 10 311TA1125110004 Incline bottom cover 11 521204101000114 Socket 12 592400000000001 Power Cord Buckle 13 592200000000002 Wire clipper 14 362710002501000 Separate cover 15 541108030200114 Washer (13) 80TA11109002004 Base Attachment Set 1 341306402601001 Space Pad 2 521205501200114 Screw 3 351706403001101...
- Page 52 Part number Description 9 531210001000114 Nylon Nut 10 511208001500115 Hexagonal socket screw 11 544182016200115 Spring Washer 12 541108016150114 Washer 13 541110026200114 Washer 14 512607913000111 Screw 15 532207900800111 Nylon Nut (16) 80TA11101601000 Sensor Set 1 592400000000009 Speed sensor bracket 2 405503470210001 SENSOR 3 521204101000114 Socket...
- Page 53 Part number Description 1 6000000493 console overlay 2 6000000494 keypad overylay (20) 83T200101007 Safety key (21) 8000001296 Cable set 1 405117061324501 Cable 2 592400000000001 Power Cord Buckle 3 592200000000002 Wire clipper 4 205234620812701 Core (22) 83T220600001 Roller Set 1 207117060005502 Roller,Front 2 207215050005501 Rear roller set...
-
Page 54: Exploded Drawing
Part number Description (31) 405402130318501 AC power cord (32) 2000000488 Drive Belt Exploded drawing TR20... - Page 56 DISCLAIMER ©2009 cardiostrong is a registered brand of the company Sport-Tiedje GmbH. All rights reserved. Any use of this trademark without the explicit written permission of Sport-Tiedje is prohibited. Product and manual are subject to change. Technical data can be changed without advance notice.
- Page 58 TR20...
- Page 60 Treadmill TR20...
Need help?
Do you have a question about the CST-TR20-2 and is the answer not in the manual?
Questions and answers