
Related Manuals for adept technology SmartMotion

Summary of Contents for adept technology SmartMotion
- Page 1 sales@artisantg.com artisantg.com (217) 352-9330 | Visit our website - Click HERE...
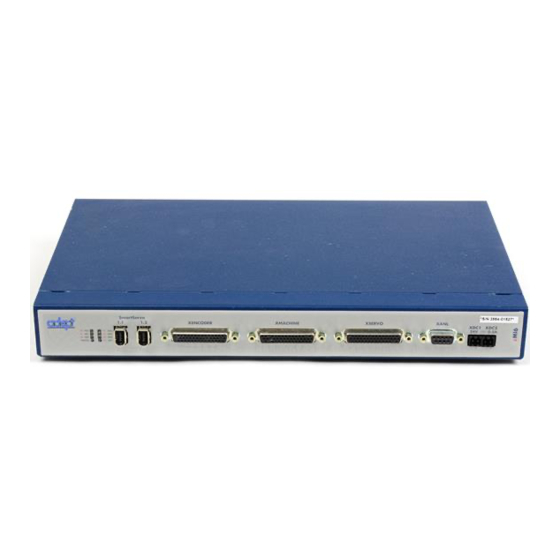
- Page 2 Adept SmartMotion Installation Guide SmartServo *S/N 3564-XXXXX* XENCODER XMACHINE XSERVO XANL XDC1 XDC2 F2 DE2 F6 DE6 0.5A F1 DE1 F5 DE5 ES HPE F4 DE4 STATUS F3 DE3 *S/N 3561-XXXXX* SmartServo Device Net Eth 10/100 RS-232/TERM RS-422/485 1 2 3 4...
- Page 4 Adept SmartMotion Installation Guide SmartServo *S/N 3564-XXXXX* XENCODER XMACHINE XSERVO XANL XDC1 XDC2 0.5A F2 DE2 F6 DE6 F1 DE1 F5 DE5 ES HPE F4 DE4 F3 DE3 STATUS *S/N 3561-XXXXX* SmartServo Device Net Eth 10/100 RS-232/TERM RS-422/485 1 2 3 4...
- Page 5 The information contained herein is the property of Adept Technology, Inc., and shall not be repro- duced in whole or in part without prior written approval of Adept Technology, Inc. The informa- tion herein is subject to change without notice and should not be construed as a commitment by Adept Technology, Inc.
-
Page 6: Table Of Contents
System Overview ..........11 Adept SmartMotion Hardware Overview ......11 Adept sMI6 Motion Interface Module . - Page 7 ..........50 Adept SmartMotion Installation Guide, Rev. B...
- Page 8 Index ............57 Adept SmartMotion Installation Guide, Rev. B...
- Page 10 Adept sMI6 Module Front Panel ........19 Figure 2-3. Adept SmartMotion System Cable Diagram ......20 Figure 2-4.
-
Page 12: Introduction
Figure 1-1. Adept sMI6 Module System Overview Adept SmartMotion has been designed to function as an integral part of Adept’s control system. Typical components include an Adept SmartController (CS or CX model), one or more sMI6 modules, MP6 panels, a manual control pendant, a desktop or laptop PC, and a user-supplied mechanism with servomotors, encoders, and amplifiers. -
Page 13: Adept Smi6 Motion Interface Module
The Adept sMI6 Motion Interface module is a six-channel unit that runs the Adept SmartMotion product. The sMI6 module is a stand-alone unit designed to control a total of six motion axes or external encoders. Each sMI6 module has six servo drive outputs, six incremental encoder inputs, and digital I/O for machine and amplifier control. -
Page 14: System Safeguards
The program controlling these other devices may cause them to operate unexpectedly. Make sure that safeguards are in place to prevent personnel from entering the workcell when a program is running. Adept SmartMotion Installation Guide, Rev. B... -
Page 15: Program Security
Chapter 1 - Introduction Adept Technology highly recommends the use of additional safety features such as light curtains, safety gates, or safety floor mats to prevent entry to the workcell while HIGH is enabled. These devices can be connected using the emergency stop circuitry. -
Page 16: Warnings, Cautions, And Notes
This indicates a situation which, if not avoided, could result in minor injury or damage to the equipment. NOTE: This provides supplementary information, emphasizes a point or procedure, or gives a tip for easier operation. Adept SmartMotion Installation Guide, Rev. B... -
Page 17: How Can I Get Help
Additionally, you can access information sources on Adept’s corporate Web site: http://www.adept.com Related Manuals This manual covers the installation of an Adept SmartMotion system. There are additional manuals that cover software configuration, programming the system, reconfiguring installed components, and adding other optional components. Refer to the following manuals for additional information your Adept system. -
Page 18: System Installation
When the above process is complete, the next step is to use the CONFIG_C and SPEC utility programs to configure the software for your system. An overview for this process is located in Chapter Adept SmartMotion Installation Guide, Rev. B... -
Page 19: Adept Smi6 Connectors And Indicators
Triggered by utility for identifying a node on the 1394 network Short blink red, long blink If this pattern appears at boot-up, it means the red, off, then repeat SDRAM has failed and the unit must be returned to Adept. Adept SmartMotion Installation Guide, Rev. B... -
Page 20: Adept Smi6 Connectors
5. XANL connector Reserved for future use. 6. 24VDC connectors Connects user-supplied 24VDC power from the SmartController to the sMI6 connector. The XDC1 and XDC2 connectors are interchangeable - you can use either one. Adept SmartMotion Installation Guide, Rev. B... -
Page 21: System Cable Diagram
MCP Adapter Cable Installed Controller (XFP) to Front Panel (XFP) STOP Front Panel 24VDC Power from User-Supplied Power Supply to Controller (XDC1) Desktop or Laptop PC User-Supplied Power Supply Figure 2-3. Adept SmartMotion System Cable Diagram Adept SmartMotion Installation Guide, Rev. B... -
Page 22: Adept Smi6 Hardware Configuration
2. Remove the cover of the chassis by removing three screws at the back of the chassis. See Figure 2-4. 3. Install jumpers for each channel that you are using. See Figure 2-5 on page 4. Reinstall the cover on the chassis. Figure 2-4. Opening the sMI6 Chassis Adept SmartMotion Installation Guide, Rev. B... -
Page 23: Figure 2-5. Location Of Jumpers On Main Pca
Jumpers for Drive Fault signals, channels 1 to 6 Digital Input Logic Voltage Configuration No jumper = 12/24 V logic (factory default) Jumper installed = 5 V logic Figure 2-5. Location of Jumpers on Main PCA Adept SmartMotion Installation Guide, Rev. B... -
Page 24: Proper Wiring And Electrical Design Practices
Proper Wiring and Electrical Design Practices Designing a high-performance servo system requires attention to electrical design. Adept SmartMotion is designed to respond to high-resolution encoder inputs, up to 32 MHz count rate. Most drive amplifiers, DC power supplies, and brush-type motors are potential sources of high-frequency electrical noise. -
Page 25: Enclosure For Smartcontroller And Smi6
DIN mounting rails, wiring terminal strips, etc. Make sure to keep low-voltage control signal wiring away from high-voltage wiring to avoid interference and noise problems. Adept SmartMotion Installation Guide, Rev. B... -
Page 26: Installing The Adept Smartcontroller
The ground wire must be less than 3 meters long. 4. Connect a 24VDC cable from the SmartController to the sMI6. The DC power cable must be less than 10 meters long. Adept SmartMotion Installation Guide, Rev. B... -
Page 27: Installing Mp6 Panels
A variety of other DIN-rail mountable hardware is available from the vendors listed above, including terminal blocks, end brackets, opto-isolation systems (for voltage-level shifting and additional current drive) and power supplies. Adept SmartMotion Installation Guide, Rev. B... -
Page 28: Panel Mounting The Mp6 Panels
The mounting panels are supplied from Adept without I/O modules so you can choose the type of modules (AC, DC, voltage range) which best suit your particular application. Section 2.10 for more detailed information on the opto modules. Adept SmartMotion Installation Guide, Rev. B... -
Page 29: Figure 2-6. Mp6-S Panel - Layout And Dimensions
108mm CHAN2 CHAN4 CHAN6 RESVD (4.25") ENC PWR CHAN1 CHAN3 CHAN5 112mm (4.4") 1 PWR 2 RTN 3 SHD 4 GND ENC PWR CHAN1 to 6 Figure 2-7. MP6-E Panel – Layout and Dimensions Adept SmartMotion Installation Guide, Rev. B... -
Page 30: Figure 2-8. Mp6-M Panel - Layout And Dimensions
5 HM+ 5 HM+ BRAKE-BR5 4 OT– 6 HM– OVERTRAVEL 7 BR+ 8 BR– CHAN3 BRAKE-BR3 CHAN6 1 OT+ OVERTRAVEL 9 SHD HOME HOME BRAKE-BR6 OVERTRAVEL Figure 2-8. MP6-M Panel – Layout and Dimensions Adept SmartMotion Installation Guide, Rev. B... -
Page 31: Figure 2-9. Typical System Wiring For One Axis Of Motion
A – B – Pin numbers I – typical for encoder channels 1 to 6 – User – Power Supply for Encoders User-Supplied Jumper Figure 2-9. Typical System Wiring for One Axis of Motion Adept SmartMotion Installation Guide, Rev. B... -
Page 32: 2.10 Mp6 Machine (Mp6-M) Panel Wiring
Turn off response time (hardware 5 µsec maximum The input current specifications are provided for reference; voltage sources are typically used to drive the inputs. The software scan rate depends on Servo software, and is currently 1 ms. Adept SmartMotion Installation Guide, Rev. B... -
Page 33: Input Voltage Configuration
For example: 5V logic voltage Opto 22 requires a 5V logic user-supplied power supply. Use of shielded, twisted-pair cable is recommended. Allow 12mA per output channel (a total 0.1A for 7 modules) for each MP6-M. Adept SmartMotion Installation Guide, Rev. B... -
Page 34: Overtravel Limit Switches (Input)
The input polarity of the Home input is configurable using the SPEC program. You should design the home switch so that it remains active all the way through one of the overtravel limits, then Adept SmartMotion will always be able to calibrate the axis. Brake Release (Output) The Brake Release (BR) signals are provided to control external safety brakes. - Page 35 Abbrev. Description +PWR If using Opto-22 G4ODC5 or G4OAC5 series modules: 5V. Common (return) for the above voltage Shield for power cable Ground for all MP6-M shield connections. Connect this to your ground point. Adept SmartMotion Installation Guide, Rev. B...
-
Page 36: 2.11 Mp6 Servo (Mp6-S) Panel Wiring
The Adept SmartMotion control system is compatible with most industry-standard motor drives that accept a ±10 Volt analog input signal for current (torque) or velocity commands. In addition, Adept SmartMotion provides two discrete I/O signals that are dedicated to specific functions supported by most commercially available motor drives. In summary, each motion channel supports the following drive signals: •... -
Page 37: Connecting The Drives
DAC Command (return) return Shield shield —— Not connected Not connected If two separate cables are used for Command signals and Drive signals, then their shields should be tied together at Pin 3 SHD. Adept SmartMotion Installation Guide, Rev. B... -
Page 38: Drive Enable (Output)
Separate + and – outputs are provided for each of the six CD (Command Drive) outputs. You should use a separate twisted-pair wire for each CD pair. Do not use a “common” wire to connect the negative outputs as this will seriously reduce the noise-immunity of the system. Adept SmartMotion Installation Guide, Rev. B... -
Page 39: 2.12 Mp6 Encoder (Mp6-E) Panel Wiring
If separate power is desired for any of the encoder channels (for example, if any of your encoders require different supply voltages), power connections must be made directly to that encoder. The encoder input circuitry on the MP6-E does not require power from an external supply. Adept SmartMotion Installation Guide, Rev. B... -
Page 40: Encoder Power Grounding
Adept to specify a maximum cable length. However, it is good practice to keep the encoder cable length to a minimum. This practice helps to improve noise immunity and reduces the risk of encoder signal problems. Adept SmartMotion Installation Guide, Rev. B... -
Page 41: Connecting The Encoders
Using differential encoders also enables the Encoder failure detection system to function. However, Adept SmartMotion hardware is compatible with single-ended and open-collector outputs. Schematics to connect these types of encoders are located in... -
Page 42: Figure 2-10. Encoder Input Circuitry
R379 R382 R0603 1/D8 ENC_B1- R415 R0603 1K ENCODER INDEX DIFFERENTIAL INPUT W/BIDIRECTIONAL COMM CAPABILITY FOR SERIAL ABSOLUTE ENCODERS 1/D7 ENC_Z1+ ENC_Z1 10/C5 ENC_DIR_Z1 10/C3 SN75176B 1/D7 ENC_Z1- R0603 Figure 2-11. Encoder Input Schematic Adept SmartMotion Installation Guide, Rev. B... -
Page 43: Single-Ended Encoders
1 to 6 *Note: this configuration leads to inversion of the encoder channel signals. Remember this when using the SPEC program to specify the Zero-Index configuration. Figure 2-13. Single-Ended Encoder Wiring Using Non-Inverted Outputs Adept SmartMotion Installation Guide, Rev. B... -
Page 44: Software Configuration
Software Configuration Introduction After the Adept SmartMotion system hardware has been installed (see Figure 3-1), and the wiring completed, you will be ready to start the software configuration process. This chapter provides an overview of this process. For complete information on the process, refer to the Adept SmartMotion Developer’s... -
Page 45: Phase 1 - Preparation For Software Configuration
Chapter 3 - Software Configuration Phase 1 - Preparation for Software Configuration To prepare for the software configuration process, you should read the SmartMotion Developer’s Guide for the following topics: • Adept SmartMotion: Key Concepts • Introduction to Servo Parameters •... -
Page 46: Phase 5 - Testing The System
SmartMotion Developer's Guide. Phase 5 - Testing the System Adept SmartMotion software provides diagnostic tools and tests that you can use to adjust the tuning and optimize the performance of your SmartMotion system. For details on the Test and Troubleshooting process, see the topic... - Page 47 Chapter 3 - Software Configuration Adept SmartMotion Installation Guide, Rev. B...
-
Page 48: Technical Specifications
*S/N 3564-XXXXX* XENCODER XMACHINE XSERVO XANL XDC1 XDC2 F2 DE2 F6 DE6 0.5A F1 DE1 F5 DE5 41.6 ES HPE F4 DE4 STATUS F3 DE3 186.5 3.29 .118 .094 Figure 4-1. Dimensions for sMI6 Module Adept SmartMotion Installation Guide, Rev. B... -
Page 49: Dimensions For Mounting Smi6 Module
R 3.6 16.0 43.9 31.8 14.0 14.2 462.0 482.8 TYP. Figure 4-2. Rack Mounting 186.5 14.0 2X 40356-00000 27.6 273.9 10.0 18.0 4X M3 x 6MM R 3.6 16.0 346.4 359.6 Figure 4-3. Panel Mounting Adept SmartMotion Installation Guide, Rev. B... -
Page 50: Figure 4-4. Table Mounting
Dimensions for Mounting sMI6 Module 4X 40356-00001 R 3.6 12.1 29.5 24.1 121.0 24.9 378.6 391.8 4X M3 x 6MM BOTH SIDES 14.3 21.6 16.0 121.0 Figure 4-4. Table Mounting Adept SmartMotion Installation Guide, Rev. B... -
Page 51: Mp6 To Smi6 Cables
DE2– DE5+ DF2+ DE5– DF2– DF5+ CD2+ DF5– CD2– CD5+ DE3+ CD5– DE3– DE6+ DF3+ DE6– DF3– DF6+ CD3+ DF6– CD3– CD6+ CD6– not used not used SP1+ not used SP1– Shell Shell Shield Adept SmartMotion Installation Guide, Rev. B... - Page 52 BR1+ BR4– BR1– OT2+ OT2– HM2+ OT5+ HM2– OT5– BR2+ HM5+ BR2– HM5– OT3+ BR5+ OT3– BR5– HM3+ OT6+ HM3– OT6– BR3+ HM6+ BR3– HM6– BR6+ BR6– HPE+ SP2+ HPE– SP2– Shell Shell Shield Adept SmartMotion Installation Guide, Rev. B...
- Page 53 A2– B2– A5– Z2– B5– Z5– A6– A3– B6– B3– Z6– Z3– Serial I/O_3 EPWR Serial I/O_4 EPWR Serial I/O_1 Serial I/O_2 Shell Shell Shield Serial I/O functionality to be added in future release. Adept SmartMotion Installation Guide, Rev. B...
-
Page 54: Figure 4-5. Typical Input Circuit In Smi6
Category 3 E-Stop circuit that can be created using a PILZ PNOZ1 relay. • Figure 4-8 on page 55 shows a Category 1 E-Stop circuit that can be created to cut off power to the user amplifier. Adept SmartMotion Installation Guide, Rev. B... -
Page 55: Figure 4-7. Category 3 E-Stop Circuit
Chapter 4 - Technical Specifications Figure 4-7. Category 3 E-Stop Circuit Adept SmartMotion Installation Guide, Rev. B... -
Page 56: Figure 4-8. Category 1 E-Stop Circuit
Emergency Stop Circuits Figure 4-8. Category 1 E-Stop Circuit Adept SmartMotion Installation Guide, Rev. B... - Page 57 Chapter 4 - Technical Specifications Adept SmartMotion Installation Guide, Rev. B...
- Page 58 MP6-E Overtravel Limit switches, installation with input circuitry sMI6 input schematic power grounding single-ended panel mounting E-Stop circuits, for sMI6 MP6 panels sMI6 plug-in opto modules on MP6-M High Power Enable, output with sMI6 Adept SmartMotion Installation Guide Rev B...
- Page 59 38–42 installation LED functions logic voltage jumpers on PCA mounting dimensions opening the chassis proper wiring practices system wiring diagram Adept SmartMotion Installation Guide Rev B...
- Page 61 3011 Triad Drive Livermore, CA 94551 925•245•3400 P/N: 02170-000, Rev. B...
Need help?
Do you have a question about the SmartMotion and is the answer not in the manual?
Questions and answers