
Related Manuals for TESTO Sensor LD pro


Summary of Contents for TESTO Sensor LD pro
- Page 1 EN- English Instruction manual Leak meter with camera Testo Sensor LD pro Testo Sensor LD pro - V2.00 Page 1 of 48...
-
Page 2: Table Of Contents
Assembly with focus tube with focus tip ............................12 Assembly with Gosseneck ................................13 7.10 Assembly with Parabolic mirror ..............................13 Commissioning / Application Testo Sensor LD pro ................14 Switch on ......................................14 Headphone Volume Up / Volume Down ............................14 Sensitivity level ....................................14 Operation ............................ -
Page 3: Table Of Content
Table of Content 11 Basic settings menu Testo Sensor LD pro ................... 24 11.1 Configuration ....................................24 11.2 Export/Import ....................................25 11.2.1 Export ....................................26 11.2.1.1 Export „Journal Data“ ....................26 11.2.1.2 Export of System-settings ....................27 11.2.2 Import ....................................28 11.2.2.1 Import of system settings .................... -
Page 4: Foreword
Thank you for purchasing our leak meter with camera Testo Sensor LD pro. The new leak meter Testo Sensor LD pro with integrated camera and leakage calculation is an ideal measuring instrument which helps to find and document even smallest leakages (0.1 l/min corresponds to approx. -
Page 5: Safety Instructions
(observe local regulations) or return the product to Testo Sensor GmbH for disposal. Testo Sensor GmbH assumes no warranty as to its suitability for any particular purpose and assumes no liability for any errors contained in this manual. Nor for consequential damages in connection with the delivery, performance or use of this device. -
Page 6: General Function Description
When gases escape from leaks in piping systems (leaking screw connections, corrosion, etc.), noises are generated in the ultrasonic range. With the Testo Sensor LD pro even the smallest leaks, which are inaudible to the human ear and not visible due to their size, can be located several meters away. -
Page 7: Technical Data Testo Sensor Ld Pro
Technical data Testo Sensor LD pro 5 Technical data Testo Sensor LD pro 263 x 96 x 280 mm (incl. Preamplifier-module and acoustic Dimensions trumpet) 0.55 kg incl. Preamplifier-module and acoustic trumpet , Weigts complete set with transportation case approx. 3.5 kg 40kHz ... -
Page 8: Procedure Leak Detection / Measurement
Save measurement Auto Leaktag Issue/ attach strong noise levels Continue leak search ? existing? Sensivity level to manual Data export to USB Stick – 90dB Testo Sensor LD pro Switch off Testo Sensor LD pro - V2.00 Page 8 of 48... -
Page 9: Device Components And Controls
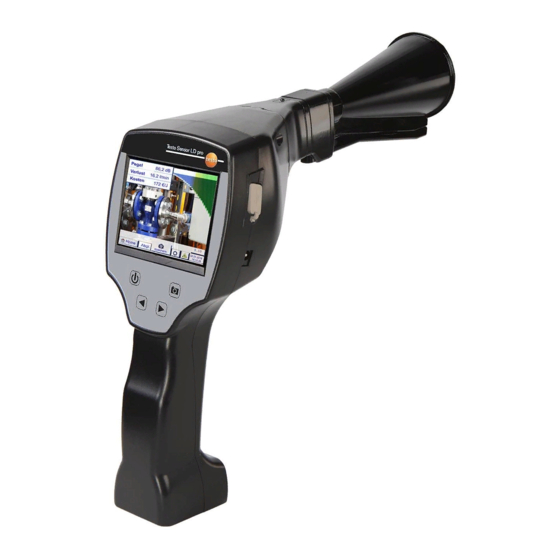
Camera .5“ TFT-Color Display with Touchpanel Pre Amplifier module USB connection Foil keypad (4 buttons) Battery charging socket Power on/off button Store button Headphone volume buttons (+/-) Picture 1 Testo Sensor LD pro V2.00 Page 9 of 48... -
Page 10: Pre Amplifier Module
3.5mm jack for the headphone Picture 2 Pre Amplifier module Ultrasonic microphone Laser module Camera connection Picture 3 Acoustic trumpet with camera Ultrasonic microphone opening Opening of the laser pointer Camera connection Picture 4 Testo Sensor LD pro V2.00 Page 10 of 48... -
Page 11: Focus Tube With Focus Tip
Device components and controls Focus tube with focus tip Picture 5 Gooseneck (Optional) Picture 6 Parabolic mirror Picture 7 Testo Sensor LD pro V2.00 Page 11 of 48... -
Page 12: Assembly With Acoustic Trumpet
Just like the acoustic trumpet, the tube can be plugged into the preamplifier with ultrasonic receiver. The use of the camera is no longer possible. The components are removed in reverse order, for unlocking the preamplifier module, the release button must be pressed too. Picture 9 Testo Sensor LD pro V2.00 Page 12 of 48... -
Page 13: Assembly With Gosseneck
Due to its flexibility, the gooseneck tool is used for punctual measurements in hard-to-reach areas. Connection to the Testo Sensor LD pro is via the supplied spiral cable, see Figure 10. It is no longer possible to use the camera. -
Page 14: Commissioning / Application Testo Sensor Ld Pro
Commissioning 8 Commissioning / Application Testo Sensor LD pro Please first observe the safety instructions in section 3 Switch on Press the power button for about 1 second, the power will turn on, and a start-up sequence will appear on the display. Pressing the button again switches the device off again. -
Page 15: Operation
The foil can be damaged! Inputs or changes can be made within all white text fields Initialization After switching on the Testo Sensor LD pro, the initialization takes place and then switch to leakage display Testo Sensor LD pro - V2.00... -
Page 16: Screen Leckage Measurment
Home Menu Store button for button Laser „On/Off“ button Measurement Mode switch button Auto or manual (HiSn) Date / Time: Battery condition indicator Battery condition: Power supply connected and battery is charging: Testo Sensor LD pro V2.00 Page 16 of 48... -
Page 17: Settings
Note: The measuring tools "Parabolic mirror" must be activated / loaded during initial commissioning, see chapter "Import/Export". Use the key e o obtain further information such as the serial number. Testo Sensor LD pro - V2.00 Page 17 of 48... -
Page 18: Parameter For The Measurement
Permissible input range for the acoustic trumpet is 1m to 6m, for the parabolic mirror 3m to 12m. Pressure input range is 0.3bar to max. 10bar, for vacuum leakages -0.1bar to -1bar. Testo Sensor LD pro V2.00 Page 18 of 48... -
Page 19: Configuration
The inputs „Parameter“ and „Meas. Point“ Follow the same procedure as described in chapter 10.2. Acceptance of the values and return to the basic settings menu is done by pressing the „Home“. Button. Testo Sensor LD pro V2.00 Page 19 of 48... -
Page 20: Sensitivity Settings
The„Auto“ setting allows you to automatically switch to the preferred sensitivity level for the Testo Sensor LD pro. However, this requires a min. measuring time of 2 seconds. 10.5 Laser On/Off The laser pointer can only be switched on or off via the laser on / off button in the display (not via the membrane keypad). -
Page 21: Storing Of The Measurement
All data are stored on to the internal SD card. The measurement data, the measurement point and the image of the measurement point are saved as a journal, which can be exported later and a report can be created with the Testo Leak Reporter (Order- no.: 8900 0510). -
Page 22: Measuring Point Designation / Selection
At this point, it is again possible to check and correct the parameters „Pressure" and „Distance". Changing the parameters gives new values for leakage and cost. Execution of the corrections see description chapter 10.2 Testo Sensor LD pro V2.00 Page 22 of 48... -
Page 23: Comment
Storage is done with the „Yes“ key. Storage is done with the „Yes“ key. The „No“ key returns to the previous menu. The „No“ key returns to the previous menu. Testo Sensor LD pro V2.00 Page 23 of 48... -
Page 24: Basic Settings Menu Testo Sensor Ld Pro
Operation 11 Basic settings menu Testo Sensor LD pro Home With the button „Home“ you access the basic menu of the Testo Sensor LD pro. Return to measurement by pressing „Leakage“ –button. 11.1 Configuration Home Configuration See also chapter 10.3 Testo Sensor LD pro V2.00... -
Page 25: Export/Import
system settings can be exported as well as imported measuring points (company, building and location data) can be exported as well as imported. Non-activated optional measurement tools can be activated/loaded. Testo Sensor LD pro V2.00 Page 25 of 48... -
Page 26: Export
With „ERASE Journal Data“ the Journal Database is deleted. For verification is still a security question. With „Back“ you return to the main menu. Attention: With „ERASE Journal Data“ all journal data are deleted. Testo Sensor LD pro V2.00 Page 26 of 48... -
Page 27: Export Of System-Settings
Saving a system file with a new name takes place analogously, then the key „new File“ must be pressed Entries are to be confirmed with „OK“. With „Cancel“ you return to the previous menu. Testo Sensor LD pro V2.00 Page 27 of 48... -
Page 28: Import
„goto“ button, then select corresponding system file. Selection to be confirmed with „OK“. Since system-relevant changes are made here, a confirmation prompt is issued, which must be confirmed with „OK“. Testo Sensor LD pro V2.00 Page 28 of 48... -
Page 29: Import New Measurement Tool
"goto" key and then the corresponding system file. Confirm your entries witht „OK“. Since system relevant changes are made here, a security query is made which must be confirmed with "Yes". Testo Sensor LD pro V2.00 Page 29 of 48... -
Page 30: Export / Import Customer Database
These functions allow the stored measuring point descriptions (companies, buildings and location) to be exported as an XML file or to be imported from another Testo Sensor LD pro exported database. That means it is also possible to create and import the database externally, but the prerequisite is the correct format of the XML file. -
Page 31: View Bitmaps
= Year xx = calendar week The selection of the desired folder is made by selecting and activating with the „goto“ button. Select the desired image and then display with „OK“. Testo Sensor LD pro - V2.00 Page 31 of 48... -
Page 32: Device Settings
If you can’t remember the password, please use Master password in order to enter a new password. Remark: The master password is supplied together with the instrument’s documentation. Testo Sensor LD pro - V2.00 Page 32 of 48... -
Page 33: Device Settings
Settings Device settings Overview of Device settings 11.4.2.1 Language Settings Device settings Set language Here you can select one of 11 languages for the Testo Sensor LD pro. Testo Sensor LD pro V2.00 Page 33 of 48... -
Page 34: Date & Time
By pressing Reset Logger Database all actual stored data on SD-Card will be blocked for use in Testo Sensor LD pro. Nevertheless all data are still stored and available for external use only. By pressing Erase SdCard all Data on the SD-Card will be deleted. -
Page 35: System Update
11.4.2.4 System update If required, there is the possibility for the Testo Sensor LD pro to download a firmware update to the device via the USB stick. You receive the software update from your supplier. The received file must then be stored on the USB stick and transferred to your device as described below. -
Page 36: Factory Reset
„Yes“. Note: Saved measurement data will not be deleted or overwritten. If needed with „Reboot System“ the Testo Sensor LD pro could be restarted(reboot) here. 11.4.2.5.2 Unique USB ID For connections with the PC, a status and therefore a unique USB ID can be defined here. -
Page 37: Calibration Of Touchpanel
If the calibration finished positive a message “Calibration successful” appears and have to be confirmed with OK. Is this not the case, so you can repeat the calibration with the help of the Cancel Calibrate buttons. Testo Sensor LD pro V2.00 Page 37 of 48... -
Page 38: Set Backlight Brightness
39%, after that a "normal" function operation is possible. Important: If the Backlight dimming after button is not activated, then the Backlight stays permanently on, in the currently set brightness. Testo Sensor LD pro V2.00 Page 38 of 48... -
Page 39: Cleaning
Version, as well as the Serial Serial Num be r: 05186 002 Hardw are Ve rsion: 1.00 Number of the Testo Sensor LD pro. Softwa re Version: 1 .10 Contact: www.testo-sensor.com Back Testo Sensor LD pro - V2.00 Page 39 of 48... -
Page 40: Charging The Batteries
Connect external power charging. supply to the charging socket. The Testo Sensor LD pro checks the charging status of the battery and starts the charging process automatically if necessary. Protection of exhaustive discharge ! To protect the Li-ION accumulator of exhaustive discharge the device is switching off automatically if a cell voltage of 6,4V will be reached. -
Page 41: Scope Of Delivery
Scope of delivery 13 Scope of delivery The Testo Sensor LD pro is available either as a single unit or in a set. The set contains all the components and accessories that are protected in a a rugged and shock-resistant transport case. -
Page 42: Appendix
Appendix 14 Appendix In the appendix on the following pages you will find the Test Report of the Li-ion batteries used. Testo Sensor LD pro - V2.00 Page 42 of 48... - Page 43 Appendix Testo Sensor LD pro - V2.00 Page 43 of 48...
- Page 44 Appendix Testo Sensor LD pro V2.00 Page 44 of 48...
- Page 45 Notes Testo Sensor LD pro - V2.00 Page 45 of 48...
- Page 46 Notes Testo Sensor LD pro V2.00 Page 46 of 48...
- Page 47 Notes Testo Sensor LD pro V2.00 Page 47 of 48...
- Page 48 Contact Testo Sensor GmbH Testo-Strasse 1 D-79853 Lenzkirch Mail: info@testo-sensor.de Web: www.testo-sensor.com Testo Sensor LD pro - V2.00 Page 48 of 48...
Need help?
Do you have a question about the Sensor LD pro and is the answer not in the manual?
Questions and answers