
Related Manuals for Lightware DP-OPT-TX150


Summary of Contents for Lightware DP-OPT-TX150
- Page 1 User’s Manual DP-OPT-TX150 DP-OPT-RX150 Fiber Optical Multimedia Extender v3.1 05-01-2021 ...
- Page 2 DP-OPT-TX150, DP-OPT-RX150 – User's Manual Important Safety Instructions Waste Electrical & Electronic Equipment Common Safety Symbols WEEE To disconnect the equipment safely from power, remove the power Symbol Description cord from the rear of the equipment, or from the power source. The...
- Page 3 The following symbols and markings are used in the document: All presented functions refer to the indicated products. The Lightware Visual Engineering supports green technologies and descriptions have been made during testing these functions in Eco-friend mentality. Thus, this document is made for digital usage...
-
Page 4: Table Of Contents
3.6. USB Modes ..................14 3.6.1. Changing the USB Mode ..............14 3.7. HDCP Setting ................14 3.8. DP Mode and HDMI Mode ............15 4. SOFTWARE CONTROL - LIGHTWARE DEVICE CONTOLLER ..16 4.1. Install and Upgrade ..............17 4.2. Connecting to a Device (Device Discovery Window) ....17 4.3. Control menu ................18 4.3.1. Video and Link Panel .............. -
Page 5: Introduction
1. Introduction DP-OPT-TX150, DP-OPT-RX150 – User's Manual I ntroduction Thank You for choosing Lightware’s DisplayPort Fiber Optical extender devices. In the first chapter we would like to introduce the device highlighting the most important features in the below listed sections: ç... -
Page 6: Dp-Opt-Tx150
Plug & Play. PSU2x20-400-5V rack DP-OPT-TX150 has 2 extra local USB ports with a built-in HUB and can be connected to the PC/Mac with a mountable power supply single USB cable. - Page 7 DP-OPT-TX150, DP-OPT-RX150 – User's Manual 1.6. Typical Applications USB 2.0 HUB DP-OPT-TX150 connected to a computer via USB can be used as a local USB HUB with two USB 2.0 ports. Thunderbolt Sources with Thunderbolt port are also supported – just connect a miniDP-DP cable between the source and DP-OPT-TX150.
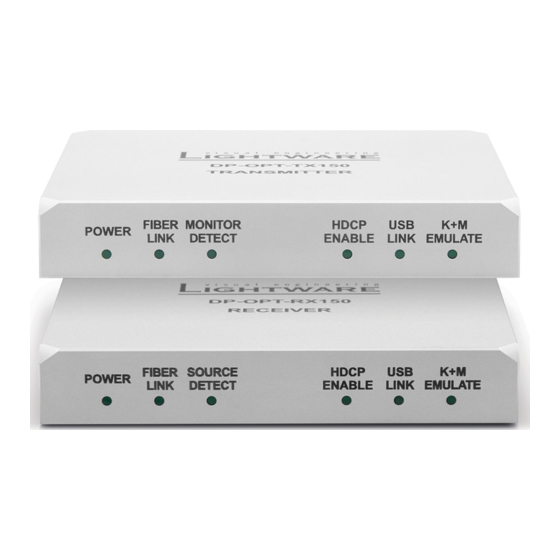
- Page 8 2. Product Overview DP-OPT-TX150, DP-OPT-RX150 – User's Manual P roduct Overview The following sections are about the physical structure of the device, input/output ports and connectors: ç DP-OPT-TX150 ç DP-OPT-RX150 Applied firmware package: v1.1.13 | LDC software: v2.5.1b5...
- Page 9 ▪ ON: the unit is powered on. DC connector Connect the output of the supplied +5 V power adaptor. Lightware’s rack ▪ BLINKING: an error has occurred and device is out of normal operation, or it is in bootload mode mountable power supply can also be used (PSUx10-200 or PSUx20-400).
-
Page 10: Dp-Opt-Rx150
▪ ON: the unit is powered on. DC connector Connect the output of the supplied +5 V power adaptor. Lightware’s rack ▪ BLINKING: an error has occurred and device is out of normal operation, or it is in bootload mode mountable power supply can also be used (PSU2x10-200 or PSU2x20-400). -
Page 11: Installation
3. Installation DP-OPT-TX150, DP-OPT-RX150 – User's Manual I nstallation The chapter is about the installation of the device and connecting to other appliances, presenting also the mounting options. ç Mounting Options ç Electrical Connections ç Security slot ç... -
Page 12: Mounting Options
The extenders are assembled with standard SC receptacles. INFO: In order to get the necessary mounting accessory please contact sales@lightware.com. 3.2.2. DP Input and Output Ports INFO: More details about the accessories and the mounting can be found in the Mounting Assembly Guide DP-OPT-TX150 and DP-OPT-RX150 provides DisplayPort connectors with Dual-mode support. -
Page 13: Connecting Steps
ATTENTION! If the power LED does not light up upon power-up, the unit is most likely damaged and further use is not advised. Please contact support@lightware.com. INFO: The laser becomes enabled any time the transmitter is powered on. This is done to avoid accidental laser loss problems. -
Page 14: Usb Modes
Configuration USB mode is an option where the USB settings of the extenders can be configured by using extender (either on TX150 or RX150). the Lightware Device Controller. One channel (A1) is available for a USB HID device, the other channel (A2) Step 2. Press and keep pressed the hidden function button by a thin tool is reserved for communication. -
Page 15: Dp Mode And Hdmi Mode
3. Installation DP-OPT-TX150, DP-OPT-RX150 – User's Manual 3.8. DP Mode and HDMI Mode The extenders work in two modes according to the connected display device: DisplayPort Mode (DP-DP cable) When the DP output port of the transmitter is connected to the DP input port of the display device, the extenders are in DP mode. -
Page 16: Software Control - Lightware Device Contoller
S oftware Control - Lightware Device Contoller The extenders can be controlled by a computer through the USB port using Lightware Device Controller (LDC). The software can be installed on a Windows PC or macOS. The application can be downloaded from www.lightware.com. -
Page 17: Install And Upgrade
The Device Discovery window appears automatically and the program checks the available updates on Lightware’s website and opens the update window if the LDC found updates. The current and the update version number can be seen at the top of the window and they are shown in this window even with the snapshot install. -
Page 18: Control Menu
4. Software Control - Lightware Device Contoller DP-OPT-TX150, DP-OPT-RX150 – User's Manual 4.3. Control menu 4.3.2. Transmitter Panel The Control menu shows basic information about the extender(s) in three panels. The Connected text is displayed in the extender’s title that is connected to the computer directly. -
Page 19: Receiver Panel
4. Software Control - Lightware Device Contoller DP-OPT-TX150, DP-OPT-RX150 – User's Manual 4.3.3. Receiver Panel However USB HUBs are supported by the receiver, only two devices are active at the same time in transparent mode: the devices which are closest to the root address. If an active device is disconnected, the next valid The panel consists of the lists that are showing connected and blocked USB devices. -
Page 20: Real-Life Examples (Usb Devices And Modes)
4. Software Control - Lightware Device Contoller DP-OPT-TX150, DP-OPT-RX150 – User's Manual 4.4. Real-life examples (USB devices and modes) Example 2: Connecting Two USB HID Devices via an USB HUB The background of the USB modes, connected USB devices, displayed information can be understood easier by presenting examples. - Page 21 4. Software Control - Lightware Device Contoller DP-OPT-TX150, DP-OPT-RX150 – User's Manual Example 3: Connecting three USB HID devices and a HUB Example 4: Using an Apple LED cinema display Shown in LDC: Shown in LDC: On the third example three USB devices can be seen.
-
Page 22: Terminal Menu
4. Software Control - Lightware Device Contoller DP-OPT-TX150, DP-OPT-RX150 – User's Manual 4.5. Terminal Menu 4.6. Settings menu The general purpose of this serial terminal is intended mainly for testing and debugging purposes. 4.6.1. Device information Nevertheless, when the window is open, the automatically executed commands can be followed on the Basic information about the extender, such as type, serial number, firmware and hardware revisions are screen. -
Page 23: Log Tab
Generate Report Device Controller is able to send a custom command file to the extender. The command file can be generated by Lightware support. This is needed when some special commands has to be used for configuring or troubleshooting. The Log tab LDC is able to collect information from the extender and save it to a report file. -
Page 24: Firmware Upgrade
5. Firmware Upgrade DP-OPT-TX150, DP-OPT-RX150 – User's Manual F irmware Upgrade The extenders can be upgraded by using Lightware Device Updater (LDU) software via the USB port. The application and the User's manual can be downloaded from www.lightware.com. In order to get the firmware pack with the necessary components (*.lfp file) for your specific product, please contact support@lightware.com. -
Page 25: Install And Upgrade
About window will appear. Click on the Check now button. The program checks the available updates 5.2. Short Instructions on Lightware website and shows its version. Step 1. Get the firmware pack and the Lightware Device Updater (LDU) application. Step 2. Set the desired update settings in the Options section. Step 2. Install the LDU application. -
Page 26: Detailed Instructions
5. Firmware Upgrade DP-OPT-TX150, DP-OPT-RX150 – User's Manual 5.4. Detailed Instructions Step 1. Select the Package. Click on the Browse button and select the .lfp file that will be used for the upgrade. 5.4.1. Establish the Connection Package information is displayed: Make sure that the computer and the device are connected via USB. - Page 27 5. Firmware Upgrade DP-OPT-TX150, DP-OPT-RX150 – User's Manual Step 2. Select the Device. Firmware Components The following step is to select the desired device(s). The available and supported devices are searched and The firmware components of the selected devices are listed on the following screen: installed and update listed automatically.
- Page 28 5. Firmware Upgrade DP-OPT-TX150, DP-OPT-RX150 – User's Manual Step 3. Upgrade the device. Click on the Start button to continue. Details button opens a new window where the process is logged. A window will pop up before starting upgrading the device; confirm by the OK button or Cancel to stop the process.
- Page 29 5. Firmware Upgrade DP-OPT-TX150, DP-OPT-RX150 – User's Manual Step 4. Finish. If the upgrade of a device is finished, the log can be opened by the View button on the right When all the tasks are finished, a window appears.
-
Page 30: Troubleshooting
6. Troubleshooting DP-OPT-TX150, DP-OPT-RX150 – User's Manual T roubleshooting Usually, if the system seems not to transport the signal as expected, the best strategy for troubleshooting is to check signal integrity through the whole signal chain starting from source side and moving forward to receiver end. - Page 31 The more of the above information you can give us the better. Please send these information to the Lightware Local USB device does The USB device is not Check the device by plugging in the computer Support Team (support@lightware.com) to speed up the troubleshooting process.
-
Page 32: Technologies
7. Technologies DP-OPT-TX150, DP-OPT-RX150 – User's Manual T echnologies The following sections contain descriptions and useful technical information how the devices work in the background. The content is based on experiences and cases we met in the practice. These sections help to understand features and technical standards like the followings: ç... -
Page 33: Hdcp Management
To avoid unnecessary HDCP encryption, Lightware introduced the HDCP enabling/disabling function: the Not HDCP-compliant Sink 2. HDCP capability can be disabled in the Lightware device. If HDCP is disabled, the connected source will The layout is the same as in the previous case: non-HDCP compliant display device is connected to the detect that the sink is not HDCP capable, and turn off authentication. -
Page 34: Displayport
VGA or DVI. Lightware’s DP-OPT extenders are designed according to DisplayPort standard 1.1a. The maximum allowed bandwidth is 10.8 Gbps, which means e.g. 2560x1600 pixel resolution at 60 Hz or 4096x2400 pixels at 30 Hz. -
Page 35: Appendix
8. Appendix DP-OPT-TX150, DP-OPT-RX150 – User's Manual A ppendix Tables, drawings, guides, hashtag keyword list and technical details as follows: ç Specifications ç Mechanical Drawings ç Maximum Cable Extensions ç Release Notes of the Firmware Packages ç... - Page 36 8. Appendix DP-OPT-TX150, DP-OPT-RX150 – User's Manual 8.1. Specifications Video Input DisplayPort Input (DP-OPT-TX150) General Connector type ....................20-pole DisplayPort receptacle Compliance ..............................CE Standard ......................DisplayPort 1.1a (Dual-mode) EMC (emission).......................... EN 55032:2015 Color depth ......................24, 30, 36, 48 bits deep color EMC (immunity) .........................
- Page 37 8. Appendix DP-OPT-TX150, DP-OPT-RX150 – User's Manual 8.2. Mechanical Drawings Receiver OMA* sensitivity ..................-14.25 dBm (worst case) Transmission distance ................1100 meters (using OM4 50/125 fiber) The dimensions are in mm.........................800 meters (using OM3 50/125 fiber) Front View Rear View ........................350 meters (using OM2 50/125 fiber)
- Page 38 8. Appendix DP-OPT-TX150, DP-OPT-RX150 – User's Manual 8.3. Maximum Cable Extensions 8.4. Release Notes of the Firmware Packages Valid for the following models: ▪ DP-OPT-TX150 (62.5/125) (50/125) (50/125) (50/125) ▪ DP-OPT-RX150 1080p@60Hz 24 bpp 250 m 600 m...
-
Page 39: Further Information
3.0 17-12-2020 and minor updates Forgacs 1.4. Product failures from six (6) months to the end of the warranty period will either be repaired or replaced at the discretion of Lightware. Added Maximum cable extensions Tamas 3.1 05-01-2021 If Lightware chooses to replace the product then the replacement will...
Need help?
Do you have a question about the DP-OPT-TX150 and is the answer not in the manual?
Questions and answers