Table of Contents
Advertisement
Quick Links
Advertisement
Table of Contents

Related Manuals for Lightware DVIDL-OPT-TX200


Summary of Contents for Lightware DVIDL-OPT-TX200
- Page 1 User’s Manual DVIDL-OPT-TX200 DVIDL-OPT-RX100 Fiber Optical Multimedia Extender...
- Page 2 DVIDL-OPT series – User's Manual Important Safety Instructions Waste Electrical & Electronic Equipment Common Safety Symbols WEEE Class II apparatus construction. This marking shown on the product or its literature, Symbol Description The equipment should be operated only from the power source indicates that it should not be disposed with other indicated on the product.
- Page 3 The following symbols and markings are used in the document: All presented functions refer to the indicated products. The descriptions Lightware Visual Engineering supports green technologies and have been made during testing these functions in accordance with the Eco-friend mentality. Thus, this document is made for digital usage...
-
Page 4: Table Of Contents
4.3.3. Deleting EDID ................... 12 9. TECHNOLOGIES ................31 4.3.4. EDID status LED ................12 9.1. EDID Management ...............31 5. SOFTWARE CONTROL – LIGHTWARE DEVICE CONTROLLER ...13 9.1.1. Understanding the EDID ..............31 9.1.2. Advanced EDID Management ............31 5.1. Install and Upgrade ..............13 9.2. Pixel Accurate Reclocking ............32 5.2. Connecting to a Device (Device Discovery Window) ....14... -
Page 5: Introduction
DVIDL-OPT series – User's Manual 1.1. Description 1.2. Box Contents Lightware DVIDL-OPT-TX200 is a Dual-Link DVI optical transmitter and DVIDL-OPT-RX100 is a Dual-Link DVI optical receiver. The appliances are suitable to extend single- or dual-link video signals through a single multimode fiber optical cable. The appliances are assembled... -
Page 6: Features Of The Extenders
Zero Frame Delay TMDS Reclocking (Receiver) Input/output status, EDID Management, and hardware DVIDL-OPT-TX200 add no frame noticeable delay to the information can be accessed with Lightware Device Removes jitter caused by long cables; the output has switched signal. There is no frame or line period delays Controller software via USB connection. -
Page 7: Installation
This chapter is about the installation of the device and connecting to other Power Power appliances, presenting also the mounting options and further assembly steps. INFO: 1U high rack shelf can be ordered at Lightware, please contact sales@lightware.com. ç Rack Shelf Mounting Mounting Steps ç... -
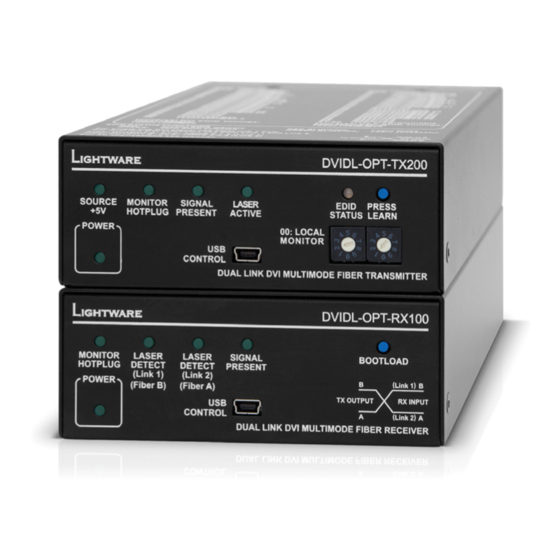
Page 8: Product Overview
3. Product Overview DVIDL-OPT series – User's Manual 3.1. Front View (Transmitter) 2 3 4 P roduct Overview The following sections are about the physical structure of the device, input/ output ports and connectors. Source +5V LED The LED indicates if a DVI source is connected to the unit, it is powered ç... -
Page 9: Rear View (Transmitter)
3. Product Overview DVIDL-OPT series – User's Manual 3.2. Rear View (Transmitter) 3.3. Front View (Receiver) 3.4. Rear View (Receiver) 29 pole DVI-I connector, however only digital DVI input Monitor LED The LED indicates if a display device 5V DC input 5V DC input for local powering. -
Page 10: Electrical Connections
Do not forget to turn the connector counterclockwise before trying to disconnect the power adaptor. WARNING! Always use the supplied 5V power adaptor or Lightware's rack mountable power supply units. Warranty is void if damage occurs due to use of a different power source. 3.5.2. DVI Inputs and Outputs... -
Page 11: Operation
D01 - D02 EDID (local monitor) (ON - green) The selected EDID memory is valid. INFO: DVIDL-OPT-TX200 can handle both 128 Byte EDID and 256 The selected EDID memory is invalid (ON - red) Byte extended EDID structures. (wrong address / empty user memory). -
Page 12: Learning Edid
Step 2. Push the LEARN button on the front side of DVIDL-OPT-TX200 and hold it down for approximately two seconds. If the teaching is successful, the Status LED blinks four times green, if the teaching is unsuccessful, the Status LED blinks four times red. -
Page 13: Software Control - Lightware Device Controller
The device can be controlled by a computer through the USB port using Available for Windows Available for Windows Lightware Device Controller (LDC). The software can be installed on a Windows and Mac OS PC or Mac OS X. The application and the User’s manual can be downloaded... -
Page 14: Connecting To A Device (Device Discovery Window)
▪ Favorite devices: You can add any Lightware device that is connected via Ethernet and no need to browse all the available devices. All devices: The Lightware devices are listed which are available in the network. ▪ Further Tools The Tools menu contains the following options: Log viewer: The tool can be used for reviewing previously saved log files. -
Page 15: I/O Parameters Menu - Transmitter
5. Software Control – Lightware Device Controller DVIDL-OPT series – User's Manual 5.3. I/O Parameters Menu - Transmitter The menu displays the current state of the device. The input port of the device is on the right top, the output ports are on the right bottom side. -
Page 16: I/O Parameters Menu - Receiver
5. Software Control – Lightware Device Controller DVIDL-OPT series – User's Manual 5.4. I/O Parameters Menu - Receiver The menu displays the current state of the device. The input port of the device is on the right top, the output ports are on the right bottom side. -
Page 17: The Edid Menu
5. Software Control – Lightware Device Controller DVIDL-OPT series – User's Manual 5.5. The EDID Menu The Advanced EDID Management is available in the EDID menu. There are two panels: left one contains Source EDIDs, right one contains Destination places where the EDIDs can be emulated or copied. -
Page 18: Edid Operations
5. Software Control – Lightware Device Controller DVIDL-OPT series – User's Manual 5.5.1. EDID Operations 5.5.2. EDID Summary Window Select an EDID from Source panel and press Info button to display EDID summary window. Changing the Emulated EDID Step 1. -
Page 19: Editing An Edid
5.6. Editing an EDID 5.6.1. Creating an EDID Since above mentioned Advanced EDID Editor needs more complex knowledge about EDID, Lightware Select an EDID from Source panel and press Edit button to display Advanced EDID Editor window. The editor introduced a wizard-like interface for fast and easy EDID creation. With Easy EDID Creator it is possible to can read and write all descriptors, which are defined in the standards, including the additional CEA extension. -
Page 20: Settings Menu
LDC is able to collect information from Download report the device and save it to a report file. This information package can be sent to Lightware when a problem may arise with the device. ATTENTION! When a report is necessary to generate, always let the devices be connected to the device, do not disconnect them. -
Page 21: Terminal Window
5. Software Control – Lightware Device Controller DVIDL-OPT series – User's Manual 5.8. Terminal Window This general purpose terminal is intended mainly for testing and debugging purposes. When a successful connection is established with a router this terminal can be used either via the USB connection. All... -
Page 22: Programmer's Reference
DVIDL-OPT series – User's Manual INFO: The extenders support LW2 command protocol set only. LW3 command set is not supported. Lightware extenders have a special protocol, but to interoperate with third-party devices, a secondary protocol is also provided. 6.1. Protocol Description The protocol description hereinafter stands for Lightware protocol. -
Page 23: View Firmware Version
Description: The device can be restarted without unplugging the power source. Format Example Explanation: The device reboots without any response. Command {IS} {is} Format Example Response (SL#•0•<MB_DESC>)CrLf (SL# SL# 0 DVIDL-OPT-TX200 SCH_1.0 PCB_1.0) Command {RST} {rst} (SL•END)CrLf (SL END) Response ... -
Page 24: Edid Router Commands
DVIDL-OPT series – User's Manual 6.3. EDID Router Commands Each number represents the EDID validity state for the corresponding memory location. Value Description ATTENTION! EDID router commands are available in the DVIDL-OPT-TX200 transmitter only. ‘0’ invalid EDID 6.3.1. Save EDID to User Memory ‘1’... -
Page 25: Delete Edid From Memory
6. Programmer's Reference DVIDL-OPT series – User's Manual 6.3.5. Delete EDID from Memory 6.3.7. Upload EDID Content to the Router Description: Clear EDID from memory location <loc>. Description: EDID hex bytes can be written directly to the user programmable memory locations. The sequence is the following: Format Example... -
Page 26: Commands - Quick Summary
6. Programmer's Reference DVIDL-OPT series – User's Manual 6.4. Commands – Quick Summary Status Commands Operation See in section Command View Product Type 6.2.1 View Serial Number 6.2.2 View Firmware Version 6.2.3 Compile Time 6.2.4 {CT} View Installed Board 6.2.5 {IS} View Board Information... -
Page 27: Firmware Upgrade
Step 1. Installing the Lightware Bootloader Software. Step 2. Downloading and saving all the firmware files that you want to upgrade. Step 3. Connecting the Lightware device and the computer via USB port and launch the application. Step 4. Establishing the connection with the device. -
Page 28: Detailed Instructions
Download the firmware from www.lightware.com; if you have a zipped archive, extract it. Step 3: Connecting the Lightware device and the computer via USB port and launch the application The extender can only be upgraded via USB. Connect the device directly to the computer by an USB cable. - Page 29 7. Firmware Upgrade DVIDL-OPT series – User's Manual Step 5: Selecting Firmware to Upgrade Step 6: Start the Upgrade Process Click the corresponding cell in the Browse New Firmware column. A dialog pops up, to confirm if you really Press the Upgrade selected firmwares button.
-
Page 30: Troubleshooting
8. Troubleshooting DVIDL-OPT series – User's Manual At first, check front panel LEDs and take the necessary steps according to their states. For more information about status, LEDs refer to the Front View (Transmitter) Front View (Receiver) sections. -
Page 31: Technologies
(dynamic EDID emulation). information about additional Detailed Timings, audio capabilities, For example, the Lightware device can be set up to emulate a sink speaker allocation and HDMI capabilities. It is important to know that device, which is connected to one of the outputs. -
Page 32: Pixel Accurate Reclocking
For higher pixel clock frequencies (up to 330 MHz), Dual-Link mode is selected. It is important to know that pixel clock frequency is not the Lightware’s sophisticated Pixel Accurate Reclocking technology same as TMDS clock frequency when it comes to Dual-Link DVI. - Page 33 9. Technologies DVIDL-OPT series – User's Manual In Dual-Link cables, 6 wire pairs carry the color information next to the TMDS clock signal. One color component is carried by two wire pairs, where one wire pair carries the odd pixels and the other wire pair carries the even pixels.
-
Page 34: Appendix
10. Appendix DVIDL-OPT series – User's Manual 10.1. Specifications Maximum data rates ....9.9 Gbps (1.65 Gbps /TMDS channel) Video delay .................. 0 frame General Resolution ..............up to 4096x2400 Compliance ..................CE Reclocking (RX) ............TMDS Reclocking EMC (Emission) ............. -
Page 35: Mechanical Drawings
1920 x 1080p @ 30.0 1280 x 1024p @ 50.0 1920 x 1080p @ 50.0 1280 x 1024p @ 60.1 DVIDL-OPT-TX200 1920 x 1080p @ 59.93 Hz 1280 x 1024p @ 75.1 1920 x 1080p @ 60.0 1400 x 1050p @ 49.99 Hz... -
Page 36: Further Information
1.4. Product failures from six (6) months to the end of the warranty period will either be repaired or replaced at the discretion of Lightware. If Lightware chooses to replace the product then the replacement will be warranted for the remainder of the original unit’s warranty period.
Need help?
Do you have a question about the DVIDL-OPT-TX200 and is the answer not in the manual?
Questions and answers