Pitney Bowes SendPro C Operator's Manual
Postage meters
Hide thumbs
Also See for SendPro C:
- Operator's manual (226 pages) ,
- User manual (129 pages) ,
- Quick reference manual (18 pages)

Related Manuals for Pitney Bowes SendPro C


Summary of Contents for Pitney Bowes SendPro C
- Page 1 Shipping & Mailing Postage Meters SendPro® C, SendPro®+ Operator Guide UK English Edition SV63242-gb RevA July 2019...
- Page 2 Except as provided in writing, duly signed by an officer of Pitney Bowes, no license either express or implied, under any Pitney Bowes or third party’s patent, copyright or other intellectual property rights is...
-
Page 3: Table Of Contents
Creating or disabling the security PIN Navigating the Home screen on the SendPro C, SendPro+ Installing a scale Printing postage on envelopes Managing your Pitney Bowes Royal Mail Postage Funds Using accounts to charge back Envelope Printing postage costs Uploading system logs... - Page 4 Avoiding envelope sealing issues Uploading Envelope Printing transactions How to properly feed envelopes Clearing or resetting the number of mailpieces Moving your SendPro C, SendPro+ meter you've sent in Envelope Printing Performing Royal Mail postal inspections for Envelope Printing 10 - Supplies...
- Page 5 Setting up a proxy server Specifications 12 - Safety Lithium ion battery Agency compliance information Scale Safety 13 - Technical Support Contacting Pitney Bowes 14 - Third party software Third party software Pitney Bowes Operator Guide July 2019...
-
Page 6: Quick Start Guide
1 - Quick start guide In this section Navigating the Home screen on the SendPro C, SendPro+ Printing postage on envelopes Using accounts to charge back Envelope Printing postage costs Creating an Envelope Printing account Sending a First Class letter envelope... -
Page 7: Navigating The Home Screen On The Sendpro C, Sendpro
The application drawer (2) at the bottom of the screen provides access to a variety of applications to support and enhance your SendPro C, SendPro+ device. For example, you can check your postage refill history, download software update and even check your network connection (Check Network). - Page 8 Settings - View or change your machine and application settings. For your machine, this includes adjusting the screen brightness, setting sound notification levels, and viewing wireless or Ethernet connection information. Profile - Lock your SendPro C, SendPro+ device. Pitney Bowes Operator Guide...
-
Page 9: Printing Postage On Envelopes
8. Tap Print Mode to access the Print mode screen. This provides you with different printing modes such as adding graphics to your envelope or adding more postage. You can also choose to only seal envelopes without printing any postage. Pitney Bowes Operator Guide July 2019... -
Page 10: Using Accounts To Charge Back Envelope Printing Postage Costs
2. Tap on the account you want to use for your mail. Creating an Envelope Printing account 1. Tap Envelope Printing on the Home screen. 2. Tap Account on the left side of the screen. A list of all available accounts is displayed. Pitney Bowes Operator Guide July 2019... -
Page 11: Sending A First Class Letter Envelope
8. Place the envelope on the scale. The weight appears in the weight button on the screen. 9. Place the envelope on the feed deck; the machine automatically feeds the envelope and prints the postage. Pitney Bowes Operator Guide July 2019... -
Page 12: Adding A Graphic To Your Envelope In Envelope Printing
Adding a graphic to your envelope in Envelope Printing The SendPro C, SendPro+ meter comes with a set of standard graphic images that you can add to your envelopes or tapes when you print your postage. Graphic ads are also known as ads, slogans or logos. -
Page 13: Sealing Envelopes
2. When feeding an envelope, be sure to slide the envelope flap under the edge of the feed deck, so the moistener can wet the flap. Note: If the moistener tank is full and your envelopes do not seal correctly, clean the moistener brush and wick. Pitney Bowes Operator Guide July 2019... -
Page 14: Sealing The Envelope Only, Bypass All Printing
2. Scroll down and tap Mail Printer Maintenance or Envelope Printer Maintenance. 3. Tap Install Ink. 4. Lift the cover. The ink cartridge moves to the front position. 5. Remove the ink cartridge, as shown on the label next to the cartridge holder. Pitney Bowes Operator Guide July 2019... -
Page 15: Printing A Test Pattern
7. Perform a print test to ensure you get a good test print pattern. Important: Only use genuine Pitney Bowes ink cartridges. Non-Pitney Bowes cartridges can damage your meter. When your meter shows the low ink warning an ink cartridge will be ordered for you automatically. -
Page 16: Supplies
Pitney Bowes® Envelopes DL+ Gummed Window White 90gsm - pk1000 PBENV15 Pitney Bowes® Envelopes DL+ Gummed Plain White 90gsm - pk1000 PBENV16 Pitney Bowes® Envelopes C5+ Gummed Standard Window White 90gsm - pk500 PBENV8 Pitney Bowes® Envelopes C5+ Gummed Plain White 90gsm - pk500 PBENV5 Pitney Bowes®... - Page 17 Optional Accessories Description Part Code Number (PCN) Integrated scale MP81 External USB platform scale 15 kg MT30 External USB platform scale 35 kg MT70 USB Hub 1E85026 Report Printer 1E50 Envelope drop stacker HZ80001 Pitney Bowes Operator Guide July 2019...
- Page 18 2 - Connectivity information In this section Setting up a wired network connection Setting up a wireless (WiFi) network connection Connecting to a hidden Wi-Fi network Deleting a Wi-Fi network Checking your network connection Checking the MAC address for wired and wireless networks Setting up a proxy server...
-
Page 19: Connectivity Information
5. If it fails to connect, remove the network cable from the back of the meter. 6. Tap the Connect button. Wait for the attempted connection to fail. 7. Plug the network cable back in. Pitney Bowes Operator Guide July 2019... -
Page 20: Setting Up A Wireless (Wifi) Network Connection
Setting up a wireless (WiFi) network connection For information about the connection settings required on your network, contact your IT department. Refer to the SendPro C, SendPro+ connectivity guide for additional information. 1. Tap the Settings (gear) icon in the global toolbar. -
Page 21: Connecting To A Hidden Wi-Fi Network
4. Tap the down arrow next in the Security field and select the security method. 5. Tap Advanced Options to enter a static IP or set up a proxy. 6. Tap Connect when done. Pitney Bowes Operator Guide July 2019... -
Page 22: Deleting A Wi-Fi Network
3. Tap on the network you want to delete. Note that you can only delete a network to which you have previously connected. The network details display. 4. Tap the Forget button to delete the network connection. Pitney Bowes Operator Guide July 2019... -
Page 23: Checking Your Network Connection
1. Tap the Settings (gear) icon in the global toolbar. 2. Tap Wi-Fi. 3. The MAC address appears above the list of wireless networks. Wired: 1. Tap the Settings (gear) icon in the global toolbar. 2. Tap Wired (Ethernet). Pitney Bowes Operator Guide July 2019... - Page 24 1. Tap the Settings (gear) icon in the global toolbar. 2. Scroll down to the "Advanced Device Options" section and tap About This C-Series. 3. Scroll down to the "Base Network Info" section and locate the Mac Address field. This contains the Pitney Bowes Operator Guide July 2019...
-
Page 25: Setting Up A Proxy Server
Refer to the SendPro C, SendPro+ Connectivity Guide for additional information. You can view or download the guide at the Pitney Bowes support site. - Page 26 3 - Managing your machine In this section Adjusting display brightness Adjusting time zone and location code Creating or disabling the security PIN Installing a scale Managing your Pitney Bowes Royal Mail Postage Funds Uploading system logs...
-
Page 27: Managing Your Machine
To change or disable the security PIN: 1. Tap the Settings (gear) icon in the global toolbar. (gear) icon in the global toolbar. 2. Tap the Security PIN option in the Device & Network section of the screen. Pitney Bowes Operator Guide July 2019... -
Page 28: Installing A Scale
If you forget your Security PIN, tap on the Forgot PIN? link to get help. Installing a scale If you did not install a scale when you installed your SendPro C, SendPro+ meter you can do it at any time later. -
Page 29: Managing Your Pitney Bowes Royal Mail Postage Funds
The Envelope Printing funds are managed in an account on the SendPro® C, SendPro®+. Pitney Bowes offers two ways to fund postage for mailing (Envelope Printing) on your SendPro C, SendPro+: A prepaid account with Pitney Bowes or a credit account with Pitney Bowes called Purchase Power. - Page 30 6. Once the upload completes, an upload message bar appears at the bottom of the screen. 7. Tap OK in the message bar. 8. Select another log to upload, or swipe down from the top of the screen and then tap on the Home icon to exit. Pitney Bowes Operator Guide July 2019...
- Page 31 This page intentionally left blank.
-
Page 32: Managing Trackable Labels
4 - Managing Trackable Labels In this section Use SendPro Online to print Trackable Labels. -
Page 33: Use Sendpro Online To Print Trackable Labels
Use SendPro Online to print Trackable Labels. At present, please use your browser on your PC to print Trackable Labels using SendPro® Online. The ability to print Trackable Labels on your SendPro C, SendPro+ device is coming soon. Please visit https://login.pitneybowes.com/sendpro For help or support with SendPro®... - Page 34 5 - Using Envelope Printing In this section Printing postage on envelopes Checking your available Envelope Printing postage Refilling postage for your Envelope Printing balance Sending a First Class letter envelope Printing a future date Entering weight manually for Envelope Printing Using the weighing platform for Envelope Printing Sealing envelopes Sealing the envelope only, bypass all printing...
-
Page 35: Using Envelope Printing
8. Tap Print Mode to access the Print mode screen. This provides you with different printing modes such as adding graphics to your envelope or adding more postage. You can also choose to only seal envelopes without printing any postage. Pitney Bowes Operator Guide July 2019... -
Page 36: Checking Your Available Envelope Printing Postage
View the amount available for postage in your Postage account: Tap Envelope Printing on the Home screen. Tap Postage Balance. Tap Refill Settings. Refilling postage for your Envelope Printing balance Before you begin: Make sure your device is connected to the internet. Pitney Bowes Operator Guide July 2019... -
Page 37: Sending A First Class Letter Envelope
Note: If you have previously printed any envelopes, you may get a message that transactions are being uploaded. Once the upload completes, you see the message "Transaction upload status, Upload success" with a tick. Tap the tick. Pitney Bowes Operator Guide July 2019... -
Page 38: Printing A Future Date
7. Tap Class on the Envelope Printing screen. If necessary, select Start Over to display all of the class options. 8. Select the class. 9. Select the type of package or envelope. 10. Select any special services required. 11. Tap Apply. 12. Feed the envelope through the machine. Pitney Bowes Operator Guide July 2019... -
Page 39: Using The Weighing Platform For Envelope Printing
9. Tap Apply. 10. Feed the envelope through the machine. Sealing envelopes This procedure describes how to seal envelopes whether you are printing postage on the envelopes or only sealing the envelopes (no postage). Pitney Bowes Operator Guide July 2019... -
Page 40: Sealing The Envelope Only, Bypass All Printing
1. Tap Envelope Printing on the Home screen. 2. Tap Print Mode on the lower left side of the Envelope Printing mail screen. You may have to swipe up on the screen to see this option. Pitney Bowes Operator Guide July 2019... -
Page 41: Zeroing The Scale
All the impressions must be clear and readable and made within six months of the franked date. You will receive a cheque refund for the value of the unused impressions minus a 15% administration fee. Pitney Bowes Operator Guide July 2019... -
Page 42: Adding A Graphic To Your Envelope In Envelope Printing
Adding a graphic to your envelope in Envelope Printing The SendPro C, SendPro+ meter comes with a set of standard graphic images that you can add to your envelopes or tapes when you print your postage. Graphic ads are also known as ads, slogans or logos. - Page 43 Using Envelope Printing 4. Tap Apply. 5. Feed the envelope through the machine. Pitney Bowes Operator Guide July 2019...
-
Page 44: Presets
6 - Presets In this section Creating Presets Selecting Presets Renaming Presets Deleting Presets... -
Page 45: Creating Presets
5. Enter a name for the preset. You can enter up to 32 characters. 6. Tap the green tick when done. Note: When your SendPro C, SendPro+ device enters sleep mode or is switched off it also retains your last used settings. -
Page 46: Deleting Presets
2. Tap the Preset button. 3. Tap the three dots on the preset you want to delete. 4. Tap Delete. 5. Tap Delete Preset. 6. Tap the < button to return to the Home screen. Pitney Bowes Operator Guide July 2019... - Page 47 This page intentionally left blank.
- Page 48 7 - Managing Envelope Printing In this section Changing the default refill amounts in Envelope Printing Uploading Envelope Printing transactions Clearing or resetting the number of mailpieces you've sent in Envelope Printing Performing Royal Mail postal inspections for Envelope Printing Performing postal rate updates or software updates for Envelope Printing (2H20) Viewing the total Envelope Printing postage spent Viewing the Envelope Printing postage refill history...
-
Page 49: Managing Envelope Printing
If you lock your meter or turn it off for any extended period of time, your meter automatically uploads your transactions when you power it up again. If you see the message "Sync your data", it means that your transactions need to be uploaded. Pitney Bowes Operator Guide July 2019... - Page 50 If the meter prompts you to upload more than three times, please contact technical support. Manual upload of your Envelope Printing transactions: 1. Tap the Settings (gear) icon in the global toolbar. 2. Scroll down to the Envelope Printer Settings section. Pitney Bowes Operator Guide July 2019...
- Page 51 3. Tap the Sync Transaction Data button. A series of messages appears on your display, starting with "Preparing Transaction Data" followed by "Sending Transaction Data". The message "No Sync Required" appears if there are no new transactions to upload. Pitney Bowes Operator Guide July 2019...
-
Page 52: Clearing Or Resetting The Number Of Mailpieces You've Sent In Envelope Printing
Performing postal rate updates or software updates for Envelope Printing (2H20) Automatic updates: SendPro C, SendPro+ meter updates postal rates and software automatically. Keep your meter turned on and connected to your network to get your automatic updates, as updates are downloaded during the evening hours. - Page 53 1. Tap Rates and Updates on the bottom of the Home screen. Swipe the screen up to access the second row of buttons. 2. If an update is available, the meter displays a progress bar showing the status of the download and installation. Pitney Bowes Operator Guide July 2019...
-
Page 54: Viewing The Total Envelope Printing Postage Spent
2. Tap the History & Reports icon. 3. Tap the Refill History report in the Envelope Printing Reports section. 4. Tap on a postage refill to open a Refill Receipt. Note: At this time, you can only view the report. Pitney Bowes Operator Guide July 2019... -
Page 55: Running Envelope Printing Account Reports
Setting the Envelope Printing account report period 1. Tap Envelope Printing on the Home screen. 2. Tap Account on the left side of the screen. 3. Tap the menu icon in the upper right corner of the screen. Pitney Bowes Operator Guide July 2019... -
Page 56: Setting The Envelope Printing Low Funds Warning
5. Tap the back key to remove the existing amount. You may need to tap the key multiple times to clear the amount. 6. Enter your threshold amount. 7. Tap Apply. 8. Tap the back arrow button to return to the Envelope Printing screen. Pitney Bowes Operator Guide July 2019... - Page 57 This page intentionally left blank.
-
Page 58: View Print Reports
8 - View Print Reports In this section Printing a receipt when refilling postage for Envelope Printing Viewing the total Envelope Printing postage spent Viewing the Envelope Printing postage refill history Printing a report for the number of mailpieces sent in Envelope Printing Printing Envelope Printing funds report... -
Page 59: Printing A Receipt When Refilling Postage For Envelope Printing
2. Tap the History & Reports icon. 3. Tap the Refill History report in the Envelope Printing Reports section. 4. Tap on a postage refill to open a Refill Receipt. Note: At this time, you can only view the report. Pitney Bowes Operator Guide July 2019... -
Page 60: Printing A Report For The Number Of Mailpieces Sent In Envelope Printing
1. Tap Envelope Printing on the Home screen. 2. Tap the Pieces button in the Mail screen. 3. Tap Print Report. 4. Tap SendPro C Envelope Printer. 5. Feed the envelope through the machine. 6. A funds report prints showing the total number of pieces sent. - Page 61 This page intentionally left blank.
- Page 62 In this section Printing a test pattern Cleaning the print head Installing the ink cartridge Cleaning the moistener brush and wick assembly Filling the moistener tank Avoiding envelope sealing issues How to properly feed envelopes Moving your SendPro C, SendPro+ meter...
-
Page 63: Mail Machine Maintenance
5. Once the cleaning operation completes, you are prompted to print another test pattern. If the new pattern still has broken or missing lines, you may need to replace the ink cartridge or print head. Pitney Bowes Operator Guide July 2019... -
Page 64: Installing The Ink Cartridge
7. Perform a print test to ensure you get a good test print pattern. Important: Only use genuine Pitney Bowes ink cartridges. Non-Pitney Bowes cartridges can damage your meter. When your meter shows the low ink warning an ink cartridge will be ordered for you automatically. - Page 65 Mail Machine Maintenance 2. Lift the moistener brush assembly off the top of the moistener base. 3. Turn the assembly over and slide the moistener brush out of the holder. Pitney Bowes Operator Guide July 2019...
- Page 66 6. Clean the brush and wick with water and rinse thoroughly. 7. Place the wick back in the metal grate, and replace the grate in the moistener base. 8. Slide the moistener brush back into the holder. Pitney Bowes Operator Guide July 2019...
-
Page 67: Filling The Moistener Tank
Sealing issues can be caused by: not enough sealant in the moistener tank not placing the envelope correctly on the feed deck problems with the moistener brush or wick Use this checklist to avoid envelope sealing issues: Pitney Bowes Operator Guide July 2019... -
Page 68: How To Properly Feed Envelopes
2. Slide the envelope into the feeder until you feel it touch the rollers. You will hear the feeder motor begin. Do not release the envelope until the feeder grabs it to pull it through the machine. Pitney Bowes Operator Guide... -
Page 69: Moving Your Sendpro C, Sendpro+ Meter
Use a can of non-flammable compressed air and blow on the feed deck on the left side and work toward the transport deck on the right side. Make sure and remove all the dust and debris. Moving your SendPro C, SendPro+ meter Follow these steps and precautions to move your SendPro® C, SendPro®+ meter safely. These apply whether you are moving your meter across the room or to a new facility. - Page 70 6. Unplug the power cable and pack it with the meter. 7. Once in the new location, re-install any USB cables and peripherals. 8. Plug the power cord into the meter and power outlet. 9. Re-install the ink cartridge. 10. Re-install the moistener assembly. Pitney Bowes Operator Guide July 2019...
- Page 71 This page intentionally left blank.
- Page 72 10 - Supplies In this section Supplies...
-
Page 73: Supplies
Pitney Bowes® Envelopes DL+ Gummed Window White 90gsm - pk1000 PBENV15 Pitney Bowes® Envelopes DL+ Gummed Plain White 90gsm - pk1000 PBENV16 Pitney Bowes® Envelopes C5+ Gummed Standard Window White 90gsm - pk500 PBENV8 Pitney Bowes® Envelopes C5+ Gummed Plain White 90gsm - pk500 PBENV5 Pitney Bowes®... - Page 74 Optional Accessories Description Part Code Number (PCN) Integrated scale MP81 External USB platform scale 15 kg MT30 External USB platform scale 35 kg MT70 USB Hub 1E85026 Report Printer 1E50 Envelope drop stacker HZ80001 Pitney Bowes Operator Guide July 2019...
- Page 75 This page intentionally left blank.
-
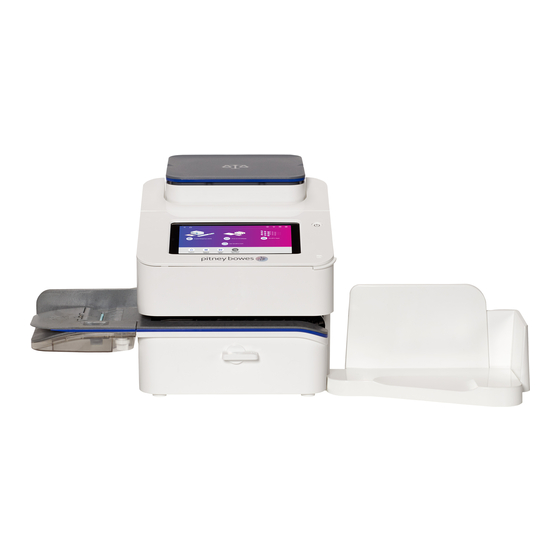
Page 76: Machine Information
11 - Machine Information In this section Royal Mail requirements Sections of the meter impression Postal Security Device Parts of the machine Connections on the back of the machine Setting up a wired network connection Setting up a wireless (WiFi) network connection Connecting to a hidden Wi-Fi network Deleting a Wi-Fi network Checking your network connection... -
Page 77: Royal Mail Requirements
Sections of the meter impression 1. Datamatrix barcode - contains postage and tracking information 2. Meter serial number 3. Postage amount 4. Date 5. Class of mail selected 6. Optional Envelope Messaging Pitney Bowes Operator Guide July 2019... -
Page 78: Postal Security Device
4. Ink access cover - Opens to allow access to the ink cartridges for the mail postage printer (find the model and serial numbers inside) 5. Semi-automatic feeder - Feeds and seals envelopes. Also feeds postcards and tape strips. 6. Envelope moistener - moistens the flap on the envelope. Pitney Bowes Operator Guide July 2019... -
Page 79: Connections On The Back Of The Machine
8. Envelope stacker - This is where mail is deposited after the postage is applied to the piece of mail. Connections on the back of the machine All SendPro C, SendPro+ models have these connection options: 1. USB port type A host - use for:... -
Page 80: Setting Up A Wired Network Connection
5. If it fails to connect, remove the network cable from the back of the meter. 6. Tap the Connect button. Wait for the attempted connection to fail. 7. Plug the network cable back in. Pitney Bowes Operator Guide July 2019... -
Page 81: Setting Up A Wireless (Wifi) Network Connection
Setting up a wireless (WiFi) network connection For information about the connection settings required on your network, contact your IT department. Refer to the SendPro C, SendPro+ connectivity guide for additional information. 1. Tap the Settings (gear) icon in the global toolbar. -
Page 82: Connecting To A Hidden Wi-Fi Network
4. Tap the down arrow next in the Security field and select the security method. 5. Tap Advanced Options to enter a static IP or set up a proxy. 6. Tap Connect when done. Pitney Bowes Operator Guide July 2019... -
Page 83: Deleting A Wi-Fi Network
3. Tap on the network you want to delete. Note that you can only delete a network to which you have previously connected. The network details display. 4. Tap the Forget button to delete the network connection. Pitney Bowes Operator Guide July 2019... -
Page 84: Checking Your Network Connection
1. Tap the Settings (gear) icon in the global toolbar. 2. Tap Wi-Fi. 3. The MAC address appears above the list of wireless networks. Wired: 1. Tap the Settings (gear) icon in the global toolbar. 2. Tap Wired (Ethernet). Pitney Bowes Operator Guide July 2019... - Page 85 1. Tap the Settings (gear) icon in the global toolbar. 2. Scroll down to the "Advanced Device Options" section and tap About This C-Series. 3. Scroll down to the "Base Network Info" section and locate the Mac Address field. This contains the Pitney Bowes Operator Guide July 2019...
-
Page 86: Setting Up A Proxy Server
Refer to the SendPro C, SendPro+ Connectivity Guide for additional information. You can view or download the guide at the Pitney Bowes support site. -
Page 87: Specifications
2 USB port type A host connectors for external peripherals (scale, barcode scanner, report or label printer, HUB, mouse, keyboard) 1 USB peripheral port type B committed port 1 RJ45 (LAN connector) Display: 7" tablet (169 pixels/inch) Print Resolution: Pitney Bowes Operator Guide July 2019... - Page 88 25.4 mm x 180 mm Tapes and Strips: Self-adhesive, dual tape strip for use on mailpieces that are too thick/large to run in the machine. Ideal for adding postage to oversized envelopes and packages. Pitney Bowes Operator Guide July 2019...
- Page 89 This page intentionally left blank.
-
Page 90: 12 - Safety
12 - Safety In this section Lithium ion battery Agency compliance information Scale Safety... - Page 91 This product contains a lithium ion battery. The battery must be recycled or disposed of properly. If you are leasing this product, you must return it to Pitney Bowes. Alternatively, contact your local waste disposal or recycle facility for instructions on how to dispose of it properly.
- Page 92 Use this equipment only for its intended purpose. Always follow the specific occupational safety and health standards for your workplace. Use only Pitney Bowes approved direct thermal label media. Always follow the specific occupational safety and health standards prescribed for your workplace.
- Page 93 Caution: In case of an ink spill, leaking ink or excessive ink accumulation, immediately disconnect the power cord from the wall plug and contact Pitney Bowes. Customer Service Representatives are available Monday through Friday, 9:00am - 5:00pm. It is certified that the system complies with all applicable Directives of the European Union.
-
Page 94: 13 - Technical Support
13 - Technical Support In this section Contacting Pitney Bowes... -
Page 95: Contacting Pitney Bowes
Contacting Pitney Bowes Your system information Be sure to have the following information available before contacting Pitney Bowes Technical Support: Product Name: SendPro® C, SendPro®+ Digital Postage Meter PCN and serial number: check the label under the front cover of the machine. -
Page 96: Third Party Software
14 - Third party software In this section Third party software... -
Page 97: Third Party Software
Third party software Third party software Third party software may have been incorporated into this product by Pitney Bowes Inc. (“PBI”) under permission from PBI’s licensors. Any special terms and conditions that apply to such software are provided below: This product contains the following software: Okhttp3 which is licensed under the Apache License, Version number 2.0. - Page 98 The source code for this software is available from https://github.com/JamesNK/Newtonsoft.Json. MaterialChips which is licensed under the Apache License, Version number 2.0. The license can be downloaded from: http://www.apache.org/licenses/LICENSE-2.0.html. The source code for this software is available from https://github.com/DoodleScheduling/android-material-chips. Pitney Bowes Operator Guide July 2019...
- Page 99 Linux kernel under the terms of the GPL, without charge except for the cost of the media, shipping, and handling, upon written request to PBI. Such requests should be sent by e-mail to iptl@pb.com. Pitney Bowes Operator Guide July 2019...
Need help?
Do you have a question about the SendPro C and is the answer not in the manual?
Questions and answers