Pitney Bowes SendPro C User Manual
Hide thumbs
Also See for SendPro C:
- Operator's manual (226 pages) ,
- User manual (124 pages) ,
- Quick reference manual (18 pages)

Related Manuals for Pitney Bowes SendPro C


Summary of Contents for Pitney Bowes SendPro C
- Page 1 Shipping & Mailing Postage Meters SendPro® C User Guide Australian Edition SV63242-au Rev. E 03 November 2021...
- Page 2 However, we cannot assume responsibility for errors or omissions or liability for the misuse or misapplication of our products. Except as provided in writing, duly signed by an officer of Pitney Bowes, no license either express or implied, under any Pitney Bowes or third party’s patent, copyright or other intellectual property rights is granted by providing this information.
-
Page 3: Table Of Contents
Table of Contents 1 - Installation Installing the SendPro C Installing the printhead Installing a scale 2 - Connectivity Setting up a wired network connection Setting up a wireless (Wi-Fi) network connection Connecting to a hidden Wi-Fi network Forgetting a Wi-Fi network... - Page 4 Printing a custom or standard graphic Printing a graphic without printing postage Printing postage on a label Adding a custom text message Editing or deleting a custom text message Printing only the date and time Printing a test pattern Pitney Bowes User Guide November 2021...
- Page 5 Adjusting time zone and scale location code Advancing the date Creating or disabling the security PIN Setting up the Energy Saver Uploading postage transactions Clearing or resetting the number of mailpieces sent Uploading system logs Pitney Bowes User Guide November 2021...
- Page 6 Moving your device Ordering supplies 15 - Product Information Finding the Product Code Number (PCN) and serial number Parts of the SendPro C Connections on the back Familiarize Navigating the Home screen Navigating the Envelope Printing app Australia Post requirements...
- Page 7 Third party software Pitney Bowes User Guide November 2021...
-
Page 8: Installation
1 - Installation In this section Installing the SendPro C Installing the printhead Installing a scale... -
Page 9: Installing The Sendpro C
Watch this video or follow the instructions below to learn how to install your device. Before you being installing your new SendPro C, decide how you are going to pay for postage and what type of connection (wired or wireless) you want to use. - Page 10 1 • Installation Open the box In the box you will find: Pitney Bowes User Guide November 2021...
- Page 11 1 • Installation Unpack the device 1. Remove the device and all items from the box. Pitney Bowes User Guide November 2021...
- Page 12 2. Important: Be sure to grab hold of the entire feeder, not just the moistener flap when lifting the device out of the box. 3. Do not connect your device to a power source yet. 4. Remove all packing materials from the device. Pitney Bowes User Guide November 2021...
- Page 13 1 • Installation Install the printhead 1. Open the cover to access the ink carriage. 2. Remove the packing tape from the ink carriage. 3. Open the ink carriage guard. Pitney Bowes User Guide November 2021...
- Page 14 1 • Installation 4. Unwrap the printhead and remove the protective strip. 5. Squeeze the tabs and slide the printhead pegs into the lower set of grooves. Important: This step is critical to prevent device damage. Pitney Bowes User Guide November 2021...
- Page 15 6. Keep squeezing the tabs and push the printhead flush against the wall. The tabs snap outward when you place the printhead correctly. Install the ink cartridge 1. Unwrap the ink cartridge and remove the silver foil strip from the ink cartridge. Pitney Bowes User Guide November 2021...
- Page 16 1 • Installation 2. Install the ink cartridge and close the guard. 3. Close the cover. Connect the device to a power source Pitney Bowes User Guide November 2021...
- Page 17 1. Wait for the device to start up. 2. Tap Get Started on the touchscreen and continue the installation steps on the screen. 3. Tap Got it when you see the message "You're ready to start sending." Pitney Bowes User Guide November 2021...
-
Page 18: Installing The Printhead
2. Scroll down and tap Envelope Printer Maintenance. 3. Tap Install Printhead. 4. Lift the cover. The ink cartridge moves to the front position. 5. Flip the ink cartridge cover open. 6. Remove the ink cartridge. Pitney Bowes User Guide November 2021... - Page 19 1 • Installation 7. Squeeze the two gray tabs on either side of the printhead. 8. While squeezing, lift and tilt the printhead to the right. The printhead should come up out of the device. Pitney Bowes User Guide November 2021...
- Page 20 9. Unwrap the new printhead and remove the protective strip. 10. Squeeze the tabs and slide the printhead pegs into the lower set of grooves. Warning: If you do not seat the printhead correctly it can damage the device. Pitney Bowes User Guide November 2021...
- Page 21 1 • Installation 11. Keep squeezing the tabs and push the printhead flush against the wall. Tabs will snap outward when placed correctly. 12. Install the ink cartridge and close the guard. Pitney Bowes User Guide November 2021...
-
Page 22: Installing A Scale
Install a scale if you did not install one when you installed your device. Your device contains step-by- step installation instructions for compatible scales. 1. Tap Settings. 2. Scroll to the Advanced Device Options section at the bottom of the Settings screen, then tap Scale Installation Guides. Pitney Bowes User Guide November 2021... - Page 23 3. To view all the available scales, swipe to the left on the screen. 4. Tap to select the appropriate scale, then tap Continue. 5. Follow the instructions on the screen. To advance to the next step, swipe the screen to the left. Pitney Bowes User Guide November 2021...
- Page 24 2 - Connectivity In this section Setting up a wired network connection Setting up a wireless (Wi-Fi) network connection Connecting to a hidden Wi-Fi network Forgetting a Wi-Fi network Checking your network connection Finding the MAC address for wired and wireless networks Setting up a Proxy server...
-
Page 25: Connectivity
2 • Connectivity Setting up a wired network connection Use a network cable to connect your SendPro C to the Pitney Bowes Data Center. Choose the connection type SendPro C supports 2 connection types: DHCP Static IP DHCP is the most common connection type. Choose DHCP if you are unsure which connection protocol to use or contact your IT department for advice. - Page 26 1. Tap Settings. 2. Tap Wired. 3. Select Static. 4. Contact your IT department to obtain the settings you will need to enter for your device. The values needed are: IP Address Netmask Gateway DNS Address. Pitney Bowes User Guide November 2021...
-
Page 27: Setting Up A Wireless (Wi-Fi) Network Connection
Address in the corresponding fields. 6. Tap Connect. 7. If SendPro C fails to connect, remove the network cable from the back of the device. 8. Tap Connect. Wait for the attempted connection to fail. 9. Plug the network cable back in. - Page 28 Tap the down arrow in the Security field and select the security method. b. Tap Advanced Options to enter a static IP or set up a proxy. 5. Tap Connect when done. Pitney Bowes User Guide November 2021...
-
Page 29: Forgetting A Wi-Fi Network
Forget a Wi-Fi network if: You do not want your device to automatically connect to that network or You need to resolve a wireless network issue. 1. Tap Settings. 2. Tap Wi-Fi in the Device & Network section. Pitney Bowes User Guide November 2021... - Page 30 3. Tap the network you want to forget. Note that you can only forget a network to which you have previously connected. The network details appear. 4. Tap Forget to forget the network connection. Pitney Bowes User Guide November 2021...
-
Page 31: Checking Your Network Connection
3. Tap Close twice to return to the Home screen. If you are unable to connect to the internet, ask your IT department or internet provider to check the internet settings before you contact Pitney Bowes. Finding the MAC address for wired and wireless networks The MAC address is the network identifier for the device. - Page 32 2 • Connectivity 3. The MAC address appears above the list of wireless networks. Locating the MAC address for wired connections 1. Tap Settings. Pitney Bowes User Guide November 2021...
- Page 33 2. Tap Wired (Ethernet). The MAC address is present at the top of the screen. If the MAC address does not appear, try these steps: 1. Tap Settings. 2. Scroll down to the Advanced Device Options section and tap About this C-Series. Pitney Bowes User Guide November 2021...
-
Page 34: Setting Up A Proxy Server
Wi-Fi network connection Wired network connection Setting up a Proxy server using a Wi-Fi network connection 1. Tap Settings. 2. Tap Wi-Fi in the Device & Network section. 3. Select the network from the list. Pitney Bowes User Guide November 2021... - Page 35 Enter the Proxy password in the Proxy Password field. This is case sensitive for proxy servers. Setting up a Proxy server using a Wired network connection 1. Tap Settings. 2. Tap Wired (Ethernet) in the Device & Network section. 3. Select either DHCP or Static IP. Pitney Bowes User Guide November 2021...
- Page 36 Enter the Proxy username in the Proxy Username field. This may be case sensitive for some proxy servers. b. Enter the Proxy password in the Proxy Password field. This is case sensitive for proxy servers. Pitney Bowes User Guide November 2021...
-
Page 37: Scales And Weighing
3 - Scales and Weighing In this section Using the scale when printing postage Entering the weight manually when printing postage Zeroing the scale... -
Page 38: Using The Scale When Printing Postage
11. Insert the envelope into the device. The device prints the postage. Entering the weight manually when printing postage Enter the weight of a mailpiece when you know its weight and are not using the scale. Pitney Bowes User Guide November 2021... -
Page 39: Zeroing The Scale
10. Insert the envelope into the device. The device prints the postage. Zeroing the scale Zero the scale to set the weight to zero. Make sure there is nothing on the scale when you zero it. Pitney Bowes User Guide November 2021... - Page 40 3 • Scales and Weighing 1. Tap Envelope Printing on the Home screen. 2. Tap Weight. 3. Tap Scale on the weighing method screen. 4. Tap Zero Scale. 5. Tap Cancel to return to the Envelope Printing screen. Pitney Bowes User Guide November 2021...
- Page 41 4 - Accounting In this section What is Accounting Adding an account Selecting an account Turning account passwords on or off for printing postage Editing an account Making an account inactive Deleting an account...
-
Page 42: Accounting
Account with sub accounts Engineering; Sub account - Software; Engineering; Sub account - Hardware; Account with sub sub accounts Engineering; Sub account - Software; Sub sub account - Graphics and Layout; Sub sub account - Design Pitney Bowes User Guide November 2021... -
Page 43: Adding An Account
Password - Tap Password to add a password for an account. Passwords are case sensitive, can be alphanumeric, and must be four characters in length. If you do set a password, you need to enter it to print mail. Pitney Bowes User Guide November 2021... -
Page 44: Selecting An Account
Editing an account Edit an account when you want to change the account name, code, description, status or password. Important: Once you charge postage to an account, you cannot change the account name or code. Pitney Bowes User Guide November 2021... -
Page 45: Making An Account Inactive
2. Tap Delete account. The list of available accounts appears. 3. Tap the account you want to delete. 4. Tap OK. 5. Tap Yes, delete account to confirm. 6. Tap OK. 7. Tap the back arrow to return to the Home screen. Pitney Bowes User Guide November 2021... - Page 46 5 - Postage Funding In this section Checking the available funds for printing postage Refilling postage funds for printing postage Changing the default refill amount for printing postage Setting the low funds warning for printing postage Viewing the postage refill history Getting an Australia Post refund for damaged or incorrectly printed mail in Envelope Printing Performing Australia Post postal inspections for postage...
-
Page 47: Postage Funding
1. Tap Envelope Printing on the Home screen. 2. The Postage Balance shows the available funds in your device. Viewing the amount available in your postage account at Pitney Bowes 1. Tap Envelope Printing on the Home screen. 2. Tap Postage Balance. -
Page 48: Refilling Postage Funds For Printing Postage
Check that your device is connecting to the internet. For wired network connections, you will see the following connection image in the toolbar: If you have a wireless connection, you will see the following connection image in the toolbar: To refill postage: Pitney Bowes User Guide November 2021... -
Page 49: Changing The Default Refill Amount For Printing Postage
5. Tap the back key to remove the existing amount. You may need to tap the key multiple times to clear the amount. 6. Enter the new amount. 7. Tap Apply. 8. Tap the back arrow to return to the Envelope Printing app. Pitney Bowes User Guide November 2021... -
Page 50: Setting The Low Funds Warning For Printing Postage
For up-to-date refund guidelines, refer to the Australia Post website. To request a refund via Australia Post you should: Collect all envelopes, wrappers and labels affected. Envelopes and wrappers must be presented intact (although the contents may be removed). Pitney Bowes User Guide November 2021... -
Page 51: Performing Australia Post Postal Inspections For Postage Printing
Envelope Printing app. 1. If accounting is enabled, you must first tap Account and select an account. 2. Tap Balance Inquiry or Refill Postage to complete the inspection. Pitney Bowes User Guide November 2021... -
Page 52: Mailing
6 - Mailing In this section Sending a Domestic Letter Sending a Regular Large Letter... -
Page 53: Sending A Domestic Letter
5. Tap Domestic Letter. 6. Tap Metered Letter Regular. 7. Tap Large. 8. Tap Apply. 9. Place the envelope on the scale. The weight appears. 10. Insert the envelope into the device. The device prints the postage. Pitney Bowes User Guide November 2021... - Page 54 7 - Sealing In this section Filling the moistener tank Sealing envelopes when you print postage Sealing envelopes without printing postage Avoiding envelope sealing issues...
-
Page 55: Sealing
3. If the tank is empty, allow 30 minutes for the moistener brush and wick to get completely wet. Sealing envelopes when you print postage You can seal envelopes and print postage at the same time with your SendPro C. Pitney Bowes... - Page 56 2. Slide the envelope flap under the edge of the feed deck so the moistener can wet the flap. 3. Tap Envelope Printing on the Home screen. 4. Tap Account and select an account if accounting is enabled on your device. Pitney Bowes User Guide November 2021...
-
Page 57: Sealing Envelopes Without Printing Postage
Use Seal Only mode to seal envelopes without printing anything. 1. Tap Envelope Printing on the Home screen. 2. Tap Print Mode. You may need to swipe up on the screen to see this option. 3. Select Seal Only. 4. Tap Apply. Pitney Bowes User Guide November 2021... -
Page 58: Avoiding Envelope Sealing Issues
6. Insert the envelope into the device. The device seals the envelope. Avoiding envelope sealing issues Prevent sealing issues by: Having enough sealant in the moistener tank. Placing the envelope correctly on the feed deck. Maintaining the wick or brush in the moistener. Pitney Bowes User Guide November 2021... - Page 59 2. Slide the envelope flap under the edge of the feed deck when inserting an envelope. Otherwise, the moistener cannot wet the flap. 3. If the moistener tank is full, and your envelopes are still not sealing correctly, clean your moistener brush and wick. Pitney Bowes User Guide November 2021...
- Page 60 8 - Printing In this section What are print modes Printing a custom or standard graphic Printing a graphic without printing postage Printing postage on a label Adding a custom text message Editing or deleting a custom text message Printing only the date and time Printing a test pattern...
-
Page 61: Printing
Customise your mail by adding a custom logo or standard graphic. Uploading Custom graphics Please contact your local Pitney Bowes office to arrange uploading a graphic. Downloading Custom Graphics 1. Tap Rates and Updates at the bottom of the Home screen. Your graphic downloads, then will be available for printing. - Page 62 Your device has a set of standard graphic images that you can add when you print postage. Printing a custom or standard graphic 1. Tap Envelope Printing on the Home screen. 2. Tap Account and select an account if accounting is enabled on your device. Pitney Bowes User Guide November 2021...
- Page 63 5. Place the envelope on the scale. You must do this before the next step or else the Apply button remains inactive. 6. Tap Class then select the class of mail you want. 7. Tap Graphic. Pitney Bowes User Guide November 2021...
-
Page 64: Printing A Graphic Without Printing Postage
Add a text message to print a return address or to print your own personalised message. Your message must comply with the postal rules for your country. Your message can be up to five lines, with 20 characters per line. The message prints on the left side of the envelope. Pitney Bowes User Guide November 2021... -
Page 65: Editing Or Deleting A Custom Text Message
11. Insert the envelope into the device. The device prints the postage. Editing or deleting a custom text message Your SendPro C allows you to add a custom text message to your mail. You can edit or delete messages you no longer need. - Page 66 8 • Printing 2. Tap Custom Text. 3. Tap on the custom message you wish to edit or delete, then tap Edit. Pitney Bowes User Guide November 2021...
-
Page 67: Printing Only The Date And Time
4. Select the appropriate option. You can edit the text message, rename it, or delete it. 5. Tap Apply. Printing only the date and time Print the date and time to keep a record of when you receive incoming mail. Pitney Bowes User Guide November 2021... -
Page 68: Printing A Test Pattern
Print a test pattern to see if the printhead is working properly or if you have enough ink in the cartridge. 1. Tap Settings. 2. Scroll down and tap Envelope Printer Maintenance. 3. Tap Print Test Pattern. 4. Insert the envelope into the device when the message "Print a Test Pattern?" appears. Pitney Bowes User Guide November 2021... - Page 69 If this new pattern still has broken or missing lines, you may need to replace the ink cartridge or clean or replace the printhead. If you see no improvement in print quality, do not repeat the cleaning, as cleaning the print nozzles consumes ink. Good Test Pattern Bad Test Pattern Pitney Bowes User Guide November 2021...
-
Page 70: Feeding And Jamming
9 - Feeding and Jamming In this section Preventing envelope feeding problems... -
Page 71: Preventing Envelope Feeding Problems
9 • Feeding and Jamming Preventing envelope feeding problems Ensure you feed envelopes correctly to help prevent feeding problems. Pitney Bowes User Guide November 2021... - Page 72 Using a can of non-flammable compressed air, blow on the feed deck on the left side and work toward the transport deck on the right side of the device. Make sure to remove all the dust and debris. Pitney Bowes User Guide...
-
Page 73: 10 - Ink
10 - Ink In this section Checking the ink level Ordering ink cartridges Replacing the ink cartridge... -
Page 74: Checking The Ink Level
Use postal approved ink cartridges. Non-postal approved ink cartridges can damage your device. Visit https://www.pitneybowesdirect.com.au to order ink cartridges for your device. Replacing the ink cartridge Replace the ink cartridge when the low ink warning appears. This ensures your device is in optimal working condition. Pitney Bowes User Guide November 2021... - Page 75 2. Scroll down and tap Envelope Printer Maintenance. 3. Tap Install Ink. 4. Lift the top cover. The ink cartridge moves to the front position. 5. Remove the ink cartridge, as shown on the label next to the cartridge holder. Pitney Bowes User Guide November 2021...
- Page 76 6. Insert the new ink cartridge, then close the ink cartridge guard. 7. Close the top cover. 8. The cartridge repositions itself and the Envelope Printer Maintenance screen appears. 9. Print a test pattern to ensure that your ink cartridge installs properly. Pitney Bowes User Guide November 2021...
- Page 77 11 - History and Reports In this section Viewing a refill receipt Viewing the total spent on printing postage Printing a funds report Running account reports Setting the report period for an account Setting the account report preferences Emailing an account report...
-
Page 78: History And Reports
PBP Serial No: The serial number of the device. The date and time the report was printed. To print a funds report: 1. Tap Envelope Printing on the Home screen. 2. Tap the piece count in the upper right. Pitney Bowes User Guide November 2021... -
Page 79: Running Account Reports
11 • History and Reports 3. Tap Print Report. 4. Tap SendPro C Envelope Printer. 5. Insert an envelope into the device. The device prints the report. 6. Tap the back arrow to return to the Envelope Printing app. Running account reports Run account reports to show how you spent your postage for a specific account or for all accounts over various time periods. -
Page 80: Setting The Account Report Preferences
You can also choose how you want to identify accounts: by Name or by Code. 1. Tap Manage Accounts on the Home screen. 2. Tap Reports. 3. Tap Preferences. 4. Tap to select how you want to identify accounts: by Name or by Code. Pitney Bowes User Guide November 2021... -
Page 81: Emailing An Account Report
2. Tap Reports. 3. Tap View & print reports. 4. Tap the report to select it. 5. Tap Next. 6. Tap Actions or View Reports at the bottom of the screen. 7. Tap Email Report. Pitney Bowes User Guide November 2021... - Page 82 8. Enter the recipient's email address. The email address you enter will remain until you turn off and then turn on the device. 9. Tap the file type you wish to send: xlsx (Excel), csv (comma-separated values), pdf (Portable Data Format). 10. Tap Send. The report appears from no-reply@pb.com. Pitney Bowes User Guide November 2021...
- Page 83 12 - Settings In this section What are presets Adding presets for printing postage Selecting a preset for printing postage Modifying presets for printing postage Setting the default preset reset timer Adjusting display brightness Adjusting time zone and scale location code Advancing the date Creating or disabling the security PIN Setting up the Energy Saver...
-
Page 84: 12 • Settings
Your device adds a default preset automatically once the installation is complete. You can edit the default preset to suit your own settings. When your SendPro C enters sleep mode or when you switch it off, it also reverts to the default preset. Adding presets for printing postage Add presets to store a group of commonly-used settings. -
Page 85: Selecting A Preset For Printing Postage
The same is true when you switch your device off or it enters sleep mode Modifying presets for printing postage Modify a preset to rename a preset, replace the default preset or delete a preset. Pitney Bowes User Guide November 2021... -
Page 86: Setting The Default Preset Reset Timer
You can change this time if necessary. 1. Tap Settings. 2. Scroll down to the Envelope Printer Settings section. 3. Tap Postage Refills. 4. Tap Default Preset Timer. Pitney Bowes User Guide November 2021... -
Page 87: Adjusting Display Brightness
4. Tap the back arrow or Home image to exit the Settings screen. Adjusting time zone and scale location code When you move your device to a new location or install a new scale, you must modify the location code and time zone value. Pitney Bowes User Guide November 2021... -
Page 88: Advancing The Date
If you created a security PIN when you installed your device, you must enter it when you turn your device on or after it enters sleep mode. Create a security pin 1. Tap Settings. 2. Tap Security PIN in the Device & Network section. Pitney Bowes User Guide November 2021... - Page 89 1. Tap the user profile image. 2. Tap Lock this device. The screen saver displays shortly after the Device is Locked screen appears. If you forget your Security PIN, tap on the Forgot PIN? link to get help. Pitney Bowes User Guide November 2021...
-
Page 90: Setting Up The Energy Saver
Uploading postage transactions Automatic upload of your postage transactions Your device automatically uploads your postage transactions to the Pitney Bowes Data Center. This occurs at least once during the day and once after hours. If you lock your device or turn it off for any extended period, it automatically uploads your transactions when you turn it on again. -
Page 91: Clearing Or Resetting The Number Of Mailpieces Sent
Uploading system logs Your device creates system logs that monitor operations on your device. If you need to upload system logs to a Pitney Bowes support representative, you can find them in the Advanced Device Options section under Settings. 1. Tap Settings. - Page 92 5. Tap Upload Selected Logs. 6. Once the upload completes, an upload message bar appears at the bottom of the screen. 7. Tap OK or Got It in the message bar. 8. Tap Home to exit. Pitney Bowes User Guide November 2021...
-
Page 93: 13 - Rate Change
13 - Rate Change In this section Updating postal rates or software... -
Page 94: Updating Postal Rates Or Software
Even though your device checks for updates automatically, you can check for rate and software updates at any time. 1. Tap Rates and Updates on the bottom of the Home screen. 2. If new rates are available, your device downloads and installs the updates. Pitney Bowes User Guide November 2021... - Page 95 13 • Rate Change 3. Once the download and install process completes, the message "Updates successful" appears. Pitney Bowes User Guide November 2021...
- Page 96 14 - Maintenance In this section Cleaning the printhead Cleaning the moistener brush and wick assembly Moving your device Ordering supplies...
-
Page 97: Maintenance
2. Scroll down and tap Envelope Printer Maintenance. 3. Tap Install Printhead. 4. Lift the cover. The ink cartridge moves to the front position. 5. Flip the ink cartridge cover open. 6. Remove the ink cartridge. Pitney Bowes User Guide November 2021... - Page 98 8. While squeezing, lift and tilt to the printhead to the right. The printhead should come up out of the device. 9. Clean off the printhead by wiping surface of the printhead with a dry, lint-free cloth or a foam swab. Pitney Bowes User Guide November 2021...
- Page 99 Warning: If you do not seat the printhead correctly it can damage the device. 11. Keep squeezing the tabs and push the printhead flush against the wall. Tabs will snap outward when placed correctly. Pitney Bowes User Guide November 2021...
-
Page 100: Cleaning The Moistener Brush And Wick Assembly
16. If the test pattern looks good, tap Done. Cleaning the moistener brush and wick assembly Clean the moistener brush and wick if the moistener tank is full and your envelopes are not sealing properly. Pitney Bowes User Guide November 2021... - Page 101 14 • Maintenance 1. Unscrew the plastic thumbscrew under the moistener base. 2. Lift the moistener brush assembly off the top of the moistener base. Pitney Bowes User Guide November 2021...
- Page 102 14 • Maintenance 3. Turn the assembly over and slide the moistener brush out of the holder. 4. Locate the wick on the moistener base. Pitney Bowes User Guide November 2021...
- Page 103 14 • Maintenance 5. Remove the metal grate and wick from the moistener base. 6. Clean the brush and wick with water and rinse thoroughly. Pitney Bowes User Guide November 2021...
-
Page 104: Moving Your Device
6. Unplug the power cord and pack it with the device. 7. Once in the new location, re-install all USB cables and devices. 8. Plug the power cord into the device and power outlet. 9. Re-install the ink cartridge. 10. Re-install the moistener assembly. Pitney Bowes User Guide November 2021... -
Page 105: Ordering Supplies
14 • Maintenance Ordering supplies Visit our supplies website to order supplies for your device. Pitney Bowes User Guide November 2021... - Page 106 15 - Product Information In this section Finding the Product Code Number (PCN) and serial number 107 Parts of the SendPro C Connections on the back Familiarize Navigating the Home screen Navigating the Envelope Printing app Australia Post requirements Sections of the meter stamp...
-
Page 107: Product Information
To locate the (1) Product Code Number (PCN) and the (2) 7-digit serial number, check the label on the rear of the device or under the display cover. The serial number appears as zeros here for security reasons. Pitney Bowes User Guide November 2021... -
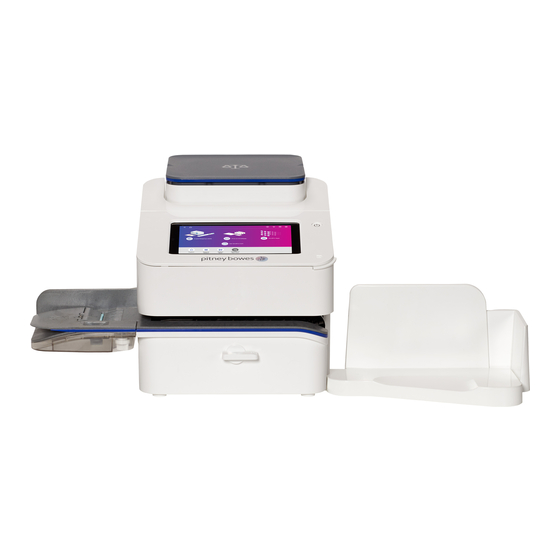
Page 108: Parts Of The Sendpro C
15 • Product Information Parts of the SendPro C Familiarise yourself with the parts of your SendPro C. 1. Integrated scale - Weigh envelopes and parcels. 2. Colour touchscreen display - Process envelopes and packages. 3. Ink access cover - Allows access to the ink cartridges. Find the model and serial numbers inside. -
Page 109: Connections On The Back Familiarize
3. RJ45 - Use for a wired network connection. Navigating the Home screen The Home screen on the SendPro C provides the starting point for printing postage. Tap Envelope Printing to print postage for envelopes and post cards. The bottom of the Home screen provides additional apps to support your device. For example, you can: Check your postage refill history (Print Refill Receipt). -
Page 110: Navigating The Envelope Printing App
The Envelope Printing app is the starting point for printing postage on an envelope or tape. It also allows you to change what you print. Tap Envelope Printing to open the Envelope Printing app. Pitney Bowes User Guide November 2021... -
Page 111: Australia Post Requirements
Australia Post requirements Your device (Postal Security Device) has a license with the Australia Post. Therefore you must follow a few basic requirements. Pitney Bowes User Guide November 2021... -
Page 112: Sections Of The Meter Stamp
15 • Product Information Mail must show the correct amount of postage. If you move to another location, you must update Pitney Bowes. If you have an Australia Post Business Credit account you must also contact the Australia Post Credit Management team. -
Page 113: Specifications
4. Total piece count. 5. Date. Optional parts 1. Optional advertisement. Specifications Review the specifications of your SendPro C including the throughput, ink cartridge yield and other component details. Power requirements 100-240 VAC, 50/60 Hz, 1.0 A Pitney Bowes User Guide... - Page 114 Less than or equal to 70 dBA re 20 micro Pascal in accordance with ISO 7779, ISO 3744, or ISO 3741. Dimensions 419 mm L x 394 mm W x 286 mm H Weight 8 kg Pitney Bowes User Guide November 2021...
- Page 115 2. USB port, type B host - Service personnel use only. 3. RJ45 - Use for a wired network connection. Display 7-inch tablet (169 pixels/inch) Print Resolution 300 H x 600 V dpi Print Image Area 25.4 mm x 180 mm Pitney Bowes User Guide November 2021...
-
Page 116: Material Specifications
76.2 mm – This is the height of the inner edge of the side guide Envelope Weight Minimum: 1 g Maximum: 450 g Tape Size Minimum: 44.2 x 100 mm Maximum: 44.7 x 200 mm Pitney Bowes User Guide November 2021... - Page 117 For envelopes with a flap length from 25-60 mm, the minimum flap angle is 18 degrees. For envelopes with a flap length greater than 60 mm to the maximum flap length for the particular model, the minimum flap angle is 21 degrees. Pitney Bowes User Guide November 2021...
-
Page 118: Postal Security Device
It includes the latest technology approved by Australia Post. This technology eliminates the need for Australia Post to perform physical inspections, thereby making your device easier and more convenient for you to use. Pitney Bowes User Guide November 2021... -
Page 119: 16 - Safety
16 - Safety In this section Lithium ion battery Agency compliance information Scale Safety... -
Page 120: Lithium Ion Battery
This product contains a lithium ion battery. The battery must be recycled or disposed of properly. If you are leasing this product, you must return it to Pitney Bowes. Alternatively, contact your local waste disposal or recycle facility for instructions on how to dispose of it properly. - Page 121 Caution: In case of an ink spill, leaking ink or excessive ink accumulation, immediately disconnect the power cord from the wall plug and contact Pitney Bowes. Customer Service Representatives are available Monday through Friday, 9:00 am - 5:00 pm. It is certified that the system complies with all applicable Directives of the European Union.
-
Page 122: Scale Safety
Use only 9-volt Alkaline battery if needed Remove battery if scale is not going to be used for long periods of time or if the scale is powered through the USB cable. Dispose of old batteries properly. Pitney Bowes User Guide November 2021... -
Page 123: Contacting Pitney Bowes
17 - Contacting Pitney Bowes In this section Contacting Pitney Bowes... -
Page 124: 17 • Contacting Pitney Bowes
17 • Contacting Pitney Bowes Contacting Pitney Bowes Your device information Be sure to have the following information available before contacting Pitney Bowes Technical Support: Product Name: SendPro C device PCN and serial number: check the label under the front cover of the machine. -
Page 125: Third Party Software
18 - Third party software In this section Third party software... - Page 126 18 • Third party software Third party software Third party software may have been incorporated into this product by Pitney Bowes Inc. (“PBI”) under permission from PBI’s licensors. Any special terms and conditions that apply to such software are provided below: This product contains the following software: Okhttp3 which is licensed under the Apache License, Version number 2.0.
- Page 127 Linux kernel under the terms of the GPL, without charge except for the cost of the media, shipping, and handling, upon written request to PBI. Such requests should be sent by e-mail to iptl@pb.com. Pitney Bowes User Guide November 2021...
- Page 128 This product contains Paho.mqtt.java, which is licensed under the Eclipse Public License - v 2.0 and the Eclipse Distribution License - v 1.0. The licenses can be downloaded from https://www.eclipse.org/legal/epl-2.0/ and https://www.eclipse.org/org/documents/edl-v10.php, respectively. The modified source code can be downloaded from: https://github.com/PitneyBowes. Pitney Bowes User Guide November 2021...
- Page 129 3001 Summer Street Stamford, Connecticut 06926 www.pitneybowes.com PB Form SV63242-au Rev. E © Pitney Bowes Limited, 2021 We have made every reasonable effort to assure the accuracy and usefulness of this guide, however we cannot assume responsibility for errors or omissions or liability for the misuse or misapplication of our products.
Need help?
Do you have a question about the SendPro C and is the answer not in the manual?
Questions and answers