Dräger Oxylog 3000 plus Pocket Manual
Software version 1.n
Hide thumbs
Also See for Oxylog 3000 plus:
- Instructions for use manual (176 pages) ,
- Supplement manual (65 pages) ,
- Supplement to the instructions for use (12 pages)
Table of Contents
Advertisement
Pocket Guide
®
Oxylog
Software version 1.n
3000 plus
®
The Oxylog
3000 plus Pocket Guide is not a replace-
ment or substitute for the Instructions for Use, strict ob-
servation of the Instructions for Use is required.
Shown options are at extra cost.
There will be no exchange of the Pocket Guide when
the product is updated/upgraded.
Advertisement
Table of Contents

Related Manuals for Dräger Oxylog 3000 plus


Summary of Contents for Dräger Oxylog 3000 plus
- Page 1 ® Pocket Guide The Oxylog 3000 plus Pocket Guide is not a replace- ment or substitute for the Instructions for Use, strict ob- ® Oxylog 3000 plus servation of the Instructions for Use is required. Shown options are at extra cost. Software version 1.n There will be no exchange of the Pocket Guide when the product is updated/upgraded.
- Page 2 This page intentionally left blank. Pocket Guide Oxylog 3000 plus...
-
Page 3: Table Of Contents
Operation ....... Ventilation functions of the Oxylog 3000 plus .. - Page 4 This page intentionally left blank. Pocket Guide Oxylog 3000 plus...
-
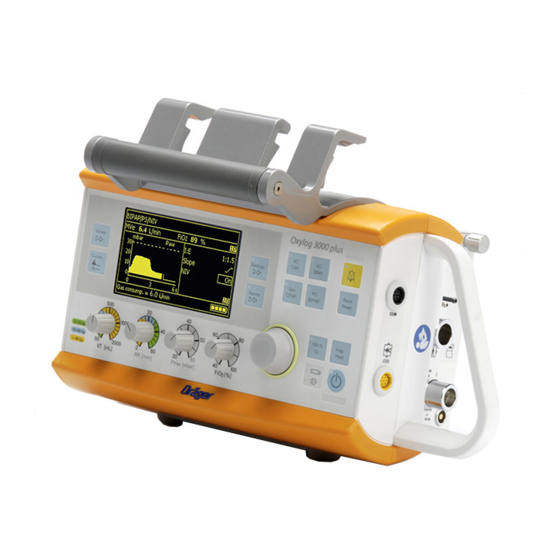
Page 5: System Overview
System Overview NOTE The Oxylog 3000 plus Pocket Guide is not a replacement or substitute for the Instructions for Use. Any use of the device requires full understanding and strict observation of the Instructions for Use. B C D E F G A Screen with screen pages for the specific application L Key Insp. -
Page 6: Side View, Right
C Connectors for flow measuring hoses C Protection bracket D Gas outlet for ventilation hose E Connector for O supply F Connector for power supply G Connector for CO sensor H Connector for data communication cable Pocket Guide Oxylog 3000 plus... -
Page 7: Adult Hose System, Reusable
A Angled connector A Angled connector B Flow sensor B Flow sensor C Breathing valve C Breathing valve D Ventilation hose D Ventilation hose E Flow and pressure measuring hoses E Flow and pressure measuring hoses Pocket Guide Oxylog 3000 plus... -
Page 8: Pediatric Hose System, Disposable
System Overview Pediatric hose system, disposable A Angled connector B Flow sensor C Breathing valve D Ventilation hose E Flow and pressure measuring hoses Pocket Guide Oxylog 3000 plus... -
Page 9: Assembly
Assembly Assembly NOTE The Oxylog 3000 plus Pocket Guide is not a replacement or substitute for the Instructions for Use. Any use of the device requires full understanding and strict observation of the Instructions for Use. Power supply The Oxylog 3000 plus is designed to operate on power supplies with different voltages: –... -
Page 10: Connecting The Gas Supply
The DC/DC converter must be used to connect the Oxylog 3000 plus to onboard DC power supply sys- tems, e. g. in ambulances. It can be used with the follo- wing voltages: 12 VDC, 24 VDC or 28 VDC. The onboard power supply shall have a fuse of 10 to 16 A. - Page 11 The amount of gas from the high-pressure supply, which is currently being consumed, is indicated by the Oxylog 3000 plus in the lower left section of the informa- tion window in L/min. This display is overwritten when a higher priority message is activated.
-
Page 12: Assembling The Adult Reusable Hose System
Connect the flow measuring hoses (G) to the Push the flow sensor (D) onto the breathing valve Oxylog 3000 plus. Correct alignment is indicated by (C). Note the correct alignment of the parts by the a notch on the connector, which must point away groove in the flow sensor (D) and the notch on the from the ventilation hose. -
Page 13: Connecting The Adult Disposable Hose System
Connect the flow measuring hoses (A) to the Oxylog 3000 plus. Correct alignment is indicated by a notch on the connector, which must point away from the ventilation hose. Otherwise, the set will not fit and the measured values will be incorrect. -
Page 14: Connecting The Bacterial Filter Or Hme
Plug the CO sensor into the connector of the Oxylog 3000 plus. For the connector location, refer to the section "Side view, right" on page 6. Insert the CO sensor cable in the cable clips on the hose. -
Page 15: Getting Started
Getting started NOTE The Oxylog 3000 plus Pocket Guide is not a replacement or substitute for the Instructions for Use. Any use of the device requires full understanding and strict observation of the Instructions for Use. Switch the device ON... -
Page 16: Perform Device Check
Ensure that the test lung has been connected. The Switch the device ON Oxylog 3000 plus automatically checks if a test lung has been connected. The device check is interrup- ted if a test lung is not detected within one minute. - Page 17 Detected hose differs from se- The hose that is detected differs Connect a different hose or change lected hose from the selected hose type, or the hose setting. flow measuring hoses are incorrect- ly positioned. Pocket Guide Oxylog 3000 plus...
-
Page 18: Co 2 Zero Calibration And Filter Check Before Ventilation (Optional)
Select CO Zero Calibration and Filter Check in the start-up menu and confirm. NOTE The CO zero calibration and filter check can be dis- continued at any time by pressing the Alarm Reset key. Pocket Guide Oxylog 3000 plus... -
Page 19: Selecting The Ventilation Mode
I:E will be shown in the information window when Ti is selected, and vice versa. Selecting the ventilation mode Display operating controls Oxylog 3000 plus Oxylog 3000 plus Press the appropriate ventilation mode key (A) for approximately 3 seconds. Pocket Guide Oxylog 3000 plus... -
Page 20: Cardio-Pulmonary Resuscitation (Cpr)
To switch between the values: cause of chest compressions. Press the Values key: the next value pair is The Oxylog 3000 plus will try to limit the airway pressu- displayed on the screen. re Paw to the set Pmax, without ending the inspiration prematurely. -
Page 21: Operation
Operation Operation NOTE The Oxylog 3000 plus Pocket Guide is not a replacement or substitute for the Instructions for Use. Any use of the device requires full understanding and strict observation of the Instructions for Use. Ventilation functions of the... - Page 22 VC-AC to PC-BIPAP or SpnCPAP. NOTE When the Oxylog 3000 plus is in the ventilation mode VC-CMV and the trigger is set to a value, the ventilati- on mode changes to VC-AC. Pocket Guide Oxylog 3000 plus...
-
Page 23: Vc-Simv, Vc-Simv/Ps
Positive end expiratory pressure PEEP. Δ – Pressure support Psupp above PEEP. – Sensitivity Trigger. – Ventilation time ratio I:E or inspiration time Ti. – Plateau time Tplat %, in % of the inspiration time. – AutoFlow (optional). Pocket Guide Oxylog 3000 plus... - Page 24 Psupp is set above 0 mbar, the pressure rise time Slope can be set. Flat slope = long pressure rise time Medium slope = medium pressure rise time Steep slope = short pressure rise time. Pocket Guide Oxylog 3000 plus...
-
Page 25: Pc-Bipap, Pc-Bipap/Ps
Pinsp, PEEP and venti- not be guaranteed. lation respiratory rate RR. – Cuvette type (optional) Set the ventilation pattern with the controls below the display: – Respiratory rate RR. – Maximum airway pressure Pmax. – concentration FiO Pocket Guide Oxylog 3000 plus... -
Page 26: Spncpap, Spncpap/Ps
SpnCPAP: – Sensitivity Trigger. Successful patient triggering is indicated by an aste- risk (*) on the left side of the curves window. – Pressure rise time Slope (effective for pressure Δ support Psupp). Pocket Guide Oxylog 3000 plus... -
Page 27: Apnoea Ventilation
PC-BIPAP (/PS), VC-CMV / AF, VC-AC / AF, and Set Tapn with the rotary knob to a value between 15 VC-SIMV / AF. The Oxylog 3000 plus automatically ad- and 60 seconds. justs to the requirements of mask ventilation. Mask lea- kages are detected by the device and compensated for. -
Page 28: Special Functions
Briefly press key 100 % O (B). Its indicator lights up for 3 minutes. The set value is resumed by the ventilator upon expiry of these 3 minutes, or when the 100 % O is pressed again. The indicator dims. Pocket Guide Oxylog 3000 plus... -
Page 29: Setting Hme Correction
Select and activate the line Cuvette type. Press the Settings key. Set the cuvette type and confirm. Select and activate the line CO2 Zero Calib - Run. The screen displays the text Remove the sensor from cuvette then press rotary knob. Pocket Guide Oxylog 3000 plus... - Page 30 Confirm. The zero calibration starts and the line dis- If the check was not successful: plays Busy. The Oxylog 3000 plus displays the alarm !!! CO2 Filter Note the possible warm-up time. During zero calib- check failed. The test value is outside the permissible ration, ventilation settings can be changed.
-
Page 31: Alarms
Alarms NOTE The Oxylog 3000 plus Pocket Guide is not a replacement or substitute for the Instructions for Use. Any use of the device requires full understanding and strict observation of the Instructions for Use. In the event of an alarm... - Page 32 Alarms Lower alarm limit for Paw The auto alarm limits are based on the actual measured values as follows: The Oxylog 3000 plus automatically generates an Alarm Setting alarm when it no longer detects a pressure difference of more than 5 mbar between the inspiratory and expirato- Current value –20 %, with a minimum...
-
Page 33: Problem Solving
Problem solving NOTE The Oxylog 3000 plus Pocket Guide is not a replacement or substitute for the Instructions for Use. Any use of the device requires full understanding and strict observation of the Instructions for Use. The Oxylog 3000 plus classifies alarm messages ac-... - Page 34 Check breathing valve and hose system. Increased expiratory Check bacterial/HME filter. resistance. Replace it if necessary. Technical defect. Disconnect the patient from the device and continue ventilation without delay using another ventilator. Call DrägerService. Pocket Guide Oxylog 3000 plus...
- Page 35 DC supply has not been connected. supply or a fully charged bat- tery must be installed. Pocket Guide Oxylog 3000 plus...
- Page 36 MVe has been check ventilation pattern, exceeded. adjust alarm limits if necessary. Faulty flow sensor. Replace flow sensor. Technical defect. Disconnect the patient from the device and continue ventilation without delay using another ventilator. Call DrägerService. Pocket Guide Oxylog 3000 plus...
- Page 37 Inflate cuff and check for leaks. achieved or no pressure differ- ence >5 mbar between inspira- tion and expiration. Leak in cuff. Leakage or disconnection. Check hose system for leaking connections. Ensure that the breathing valve has been installed correctly. Pocket Guide Oxylog 3000 plus...
- Page 38 Use another hose. VT low, pressure During AutoFlow additional Check patient condition. limit pressure is necessary to Check ventilation settings achieve the set tidal volume VT. (Pressure is limited to Pmax - 5 mbar.) Pocket Guide Oxylog 3000 plus...
- Page 39 This page intentionally left blank. Pocket Guide Oxylog 3000 plus...
- Page 40 HEADQUARTERS Dräger Medical GmbH Moislinger Allee 53–55 23558 Lübeck, Germany www.draeger.com REGION EUROPE CENTRAL REGION ASIA / PACIFIC AND EUROPE NORTH Draeger Medical South East Asia Pte Ltd Dräger Medical GmbH 25 International Business Park Moislinger Allee 53–55 #04-27/29 German Centre 23558 Lübeck, Germany Singapore 609916 Tel +49 451 882 0...
Need help?
Do you have a question about the Oxylog 3000 plus and is the answer not in the manual?
Questions and answers