SMART Board Installation Manual
For flat-panel displays
Hide thumbs
Also See for Board:
- Quick reference (4 pages) ,
- Quick reference (2 pages) ,
- Quick reference (2 pages)
Table of Contents
Advertisement
Quick Links
Advertisement
Table of Contents

Related Manuals for SMART Board


Summary of Contents for SMART Board
- Page 1 Installation Guide SMART Board Interactive Whiteboards...
- Page 2 SMART. Information in this guide is subject to change without notice and does not represent a commitment on the part of SMART.
-
Page 3: Important Information
Important Information Please read this manual carefully before setting up and using the SMART Board™ for Flat-Panel Displays interactive whiteboard (SBFPD). With proper care, your interactive whiteboard will provide years of trouble-free service. WARNING Make sure an AC socket outlet is near the SBFPD and remains easily accessible during use. - Page 4 Le SBFPD doit être utilisé uniquement avec les systèmes de distribution AVERTISSEMENT pour les clients d’alimentation européens TN et TT. européens Le SBFPD ne convient pas aux systèmes de distribution d’alimentation plus anciens de type IP utilisés dans certains pays européens. “Ce système (type IT) est largement utilisé...
-
Page 5: Other Precautions
• If you require replacement parts, ensure the service technician uses the replacement parts specified by SMART Technologies Inc., or parts with the same characteristics as the original. Important Information... - Page 6 Important Information...
-
Page 7: Table Of Contents
Interactive Whiteboard Technology ..................1 About This Guide ........................ 1 Components of the Interactive Whiteboard ................ 2 Unpacking and Checking Components of the SMART Board for Flat-Panel Displays Interactive Whiteboard ......................... 4 Important Information about Compatibility ............5 Installing SMART Board Software ............... 6 Installing the Interactive Whiteboard .............. - Page 8 Contents...
-
Page 9: Introduction
The SMART Board for Flat-Panel Displays interactive whiteboard includes an overlay, SMART Board software and a pen tray equipped with an eraser and color pens. With these tools, you can write over the on-screen image by simply picking up a pen and writing on the overlay. -
Page 10: Components Of The Interactive Whiteboard
Components of the Interactive Whiteboard There are several configurations of the SMART Board for Flat-Panel Displays interactive whiteboard. All configurations include an overlay and SMART Board software, but some configurations also include components such as a pen tray and a Display Control icon strip. - Page 11 SMART Board Software SMART Board software includes all the tools you need to write notes over any computer application, and then to save these notes. The software features include: • Notebook™ software – an application that you can use to organize, save and share your notes.
-
Page 12: Unpacking And Checking Components Of The Smart Board For Flat-Panel Displays Interactive Whiteboard
Unpacking and Checking Components of the SMART Board for Flat-Panel Displays Interactive Whiteboard The included items vary depending on which brackets are appropriate for your flat-panel display. Unpack the shipping container and check each item against the appropriate list below. -
Page 13: Important Information About Compatibility
DViT technology, you cannot use the SMART USB adapter cable. You must either upgrade your operating system to Mac OS X v10.2 (or higher), or order the original SMART USB adapter cable (P/N USB-FRU) from SMART Technologies Inc. -
Page 14: Installing Smart Board Software
For the SMART Board for Flat-Panel Displays interactive whiteboard to function properly, you must have SMART Board software running on a connected computer. NOTE: You must install version 8.1.3 (or later) of SMART Board software before you connect the cable to your computer. -
Page 15: Installing The Interactive Whiteboard
• a mounting bracket • four corner brackets To install your SMART Board for Flat-Panel Displays interactive whiteboard, you’ll have to: 1. prepare the overlay for installation (page 8) 2. mount the overlay on the flat-panel display: –... - Page 16 To prepare the overlay for installation During the installation, you will need sufficient room on flat surfaces for both a facedown flat-panel display and a facedown overlay. Clear sufficient space for yourself before you begin the installation. 1. If your flat-panel display is already installed, check that the flat-panel display and its wall mount or stand still have all of their hardware, including their screws and bolts.
- Page 17 5. Connect the power supply connector to the overlay. Power Port Power Supply Power Connector NOTE: The power supply connector does not go all the way in. 6. To continue the installation, complete the following procedures: – mount the overlay by using a mounting bracket (page 9) or four corner brackets (page 19) –...
- Page 18 1. Place the center section of the mounting bracket on a flat surface with the arrows pointing upwards and the text ‘Install Left Hanger Here’ on your left. Mounting Bracket Centre Section Text Up Arrow 2. Attach the left hanger bracket to the left side of the center section of the mounting bracket using t-handles, washers and carriage bolts.
- Page 19 4. With the assistance of another person, carefully remove the flat-panel display from the wall mount or the stand, and place it facedown on a flat surface. Adapter Plate Flat-Panel Display Adapter Plate Bolts NOTE: The appearance of your flat-panel display and its adapter plate may vary from the diagrams shown in this section.
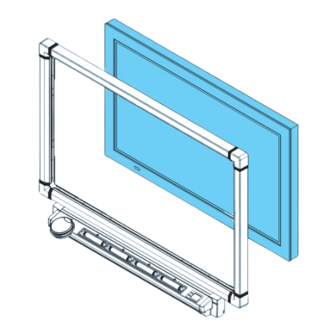
- Page 20 7. Place the mounting bracket over the flat-panel display with the left hanger bracket on your right side (the left bracket goes on your right because you are looking at the back of the flat-panel display). The hanger brackets should face towards the table surface so that the horizontal section of each bracket makes a U-shape, as shown in the figure below.
- Page 21 9. Add a supplied washer to each of the exposed adapter plate bolt holes (except for the two holes covered by the mounting bracket). This is to compensate for the thickness of the mounting bracket. Washers Adapter plate bolt holes 10.
- Page 22 11. Loosen the t-handles on the hanger brackets. Push these brackets towards the table surface and then tighten the t-handles. T-handles Hanger Bracket Optional Security Procedure If you want an additional level of security, you can install two security cables. Loop the cable through the hole in the center section of the mounting bracket.
- Page 23 12. With the assistance of another person, mount the flat-panel display onto a wall mount or onto a stand. Wall Mount NOTE: Your wall mount may appear different from the one illustrated. Flat-Panel Display CAUTION Do not lift the flat-panel display by the mounting bracket. 13.
- Page 24 15. Attach a washer and an adjustment handle to the overlay’s two mounting plates, leaving approximately 1/4" (0.6 cm) of space between the washer and the mounting plate. Adjustment Handle Washer Mounting Plate 16. With the assistance of another person, mount the overlay onto the flat-panel display by sliding it onto the hanger brackets.
- Page 25 NOTE: The adjustment handle and the washer must slide behind the hanger brackets. Ensure the handles are aligned with the U-shape slots of the hanger brackets and temporarily tighten the handles. NOTE: For clarity, the t-handle Handle and the hanger bracket are shown without the overlay, flat-panel display or the other Washer...
- Page 26 18. With the assistance of another person, and while supporting the overlay, loosen the t-handles on the hanger brackets, carefully slide the overlay toward the flat-panel display so that the glass rests against the flat-panel display, and then tighten the t-handles.
- Page 27 Optional Security Procedure If you installed two security cables to the mounting bracket, complete the procedure by doing the following. Fasten the security cable to the corner of the overlay with a security screw using the provided security hex key. Security Screw Fasten the second security cable in the same way.
- Page 28 3. Align the top two corner brackets with the threaded posts on the overlay, and then loosely attach thumbscrews to hold the brackets in place. You’ll need one bracket from each set. Put the corner bracket with the triangular notch in the top-right corner (when you’re looking at the back of the overlay), and the bracket without the notch in the top-left corner.
- Page 29 4. With the assistance of another person, carefully place the overlay over the flat-panel display, and then maneuver the corner brackets until they fit around the corners of the flat-panel display. There will be a slight gap on each side. CAUTION Be careful not to step on any of the cables attached to the overlay.
- Page 30 Supply and install a security screw in each corner NOTE: These screws aren’t supplied by SMART Technologies Inc. 7. To continue the installation, complete the following procedures: – attach either a pen tray (page 23) or a controller (page 25) –...
- Page 31 You attach the pen tray to threaded posts on the overlay. You then attach the MOD8 cable that you have already attached to the overlay and attach either a SMART USB adapter cable, a DB9-to-DB9 serial cable, or a WC2 Wireless Serial Adapter, depending upon what you ordered.
- Page 32 5. Connect the DB9 end of the SMART USB adapter cable to the pen tray. You’ll connect the other end of this cable to your computer when you complete the installation.
- Page 33 SMART Board software. For more information, see page 6. If you purchased the SMART Board for Flat-Panel Displays interactive whiteboard without the pen tray, you must install a controller unit. While you lose the convenience of the pen tray and the pen tray tools with this configuration, you’ll still have access to the many writing features of...
- Page 34 Controller MOD8 Cable 5. Connect the DB9 end of the SMART USB adapter cable to the controller. You’ll connect the other end of this cable to your computer when you complete the installation.
- Page 35 2. Connect the SMART USB adapter cable to a USB port on your computer. Earlier, you connected the other end of this cable to either the pen tray or the controller.
- Page 36 Position this strip as close to the bottom of the frame as you can (in the black border), and center it on the interactive whiteboard, as shown. You can’t position the strip at any other location. Centered at Bottom of Overlay For information on using the Display Control icon strip, see page 34.
-
Page 37: Preparing The Interactive Whiteboard For Use
SMART Video Player, the SMART Keyboard and the Floating Tools. You’ll know the SMART Board tools are open if you see the SMART Board icon in your system tray (Windows computers) or in the Dock (Macintosh computers). Press this icon to view a menu of all available software tools. -
Page 38: Orienting Smart Board Software
Fine, 20-point orientation level. You may also use the Quick, 4-point orientation level. To orient your interactive whiteboard (default Standard orientation) 1. Press the SMART Board icon in the system tray (Windows computers) or in the Dock (Macintosh computers), and select Orient. The orientation screen appears. -
Page 39: Setting Up The On-Screen Display Control
To configure a COM port 1. Press the SMART Board icon in the system tray (Windows computers) or in the Dock (Macintosh computers), and select Control Panel. 2. Select SMART Board Settings. The SMART Board Settings dialog box appears. 3. Press the Add SMART Board arrow button and select Manually choose COM port. - Page 40 1. If you haven’t already done so, connect the flat-panel display to your computer. (See the previous procedure.) 2. Press the SMART Board icon in the system tray and select Control Panel. 3. Press SMART Board Settings. 4. From the Hardware Info & Settings drop-down list, select Display Control Settings.
-
Page 41: Using The Smart Bulb Saver
NOTE: Even if you have a screen saver installed, you can still use SMART Bulb Saver as an alternative. -
Page 42: Configuring The Display Control Icon Strip
1. Connect the flat-panel display to a serial port on your computer (page 27). 2. Configure the On-Screen Display Control for the flat-panel display (page 32). 3. Press the SMART Board icon in the system tray, and select Control Panel. 4. Select SMART Board Settings. - Page 43 To disable and remove the Display Control icon strip 1. Press the SMART Board icon in the system tray, and select Control Panel. 2. Select SMART Board Settings. 3. From the Hardware Info & Settings drop-down list, select Set Up Icon Strips.
-
Page 44: Cleaning And Troubleshooting
On the pen tray, a Ready Light (LED) glows red when the pen tray has power and green when the SMART Board driver is running (indicating that the pen tray is active). Each pen tray tool has an LED above its holder. When you pick up a tool, the LED illuminates green, and when you replace that tool, the LED stops glowing. -
Page 45: Calibrating The Cameras
Fortunately, this problem is easily fixed by performing a simple calibration procedure, as described below. To calibrate the cameras 1. Press the SMART Board icon in the system tray (Windows computers) or in the Dock (Macintosh computers), and select Control Panel. 2. Press SMART Board Settings. - Page 46 Cleaning and Troubleshooting...
-
Page 47: Customer Support
Customer Support Contacting SMART Technical Support SMART’s Technical Support team welcomes your call. However, you may first want to contact your local reseller if you experience any difficulty with your interactive whiteboard, as they may be able to solve the problem without delay. -
Page 48: Registration
Registration A User Registration card was included with your interactive whiteboard. To help us serve you, fill in and mail this card to SMART Technologies Inc. or register online at www.smarttech.com/ registration. Sending Feedback You can help us improve our technical documentation by e-mailing your comments to TechnicalDocumentation@smarttech.com. -
Page 49: Index
Using 34 DViT Technology 1 Bad Orientation Point 30 Brackets Corner Brackets 19 Mounting Bracket 9 Feedback 40 Bulb Saver see SMART Bulb Saver Fine Orientation 30 Floating Tools 3 Calibrating the Cameras 37 Cameras General Enquiries 39 Calibrating the 37... - Page 50 Mounting the Overlay 9 Screen Saver 31 Security Procedure 14, 19, 22 Setting Up On-Screen Display Controller 31 Notebook Software 3 SMART Board for Flat-Panel Displays Interactive Whiteboard see Interactive Whiteboard SMART Board Software Checking Components 4 On-Screen Display Controller Control Panel 3...
- Page 51 Unpacking Components 4 Using Display Control Icon Strip 34 On-Screen Display Controller 33 SMART Bulb Saver 33 Video Player SMART Board Software 3 Index...
- Page 52 Index...
- Page 53 Suite 300, 1207 – 11th Avenue SW Calgary, AB CANADA T3C 0M5 Main Switchboard: 1.888.42.SMART (Canada/U.S.) or +1.403.245.0333 (all other countries) Support Tel.: 1.866.518.6791 (Canada/U.S.) or +1.403.228.5940 (all other countries) Support Fax: +1.403.806.1256 support@smarttech.com www.smarttech.com 99-00435-02 REV A0...
Need help?
Do you have a question about the Board and is the answer not in the manual?
Questions and answers