
Related Manuals for Texi Catenaccio


Summary of Contents for Texi Catenaccio
- Page 1 TEXI Catenaccio operation manual Operation manual High speed bartack sewing machine Catenaccio...
- Page 2 TEXI Catenaccio operation manual...
-
Page 3: Table Of Contents
TEXI Catenaccio operation manual CONTENTS SAFETY REGULATIONS …………………………………………………………………………………………………………... [1] SPECIFICATIONS ……………………………………………………………………………………………………………... [2] CONFIGURATION ............................... 1. Names of main unit ............................2. Names and explanation of switches on the operation panel ................[3] INSTALLATION ................................1. Installing the electrical box .......................... - Page 4 TEXI Catenaccio operation manual 11. Debugging Mode .............................. 11-1. CP-1 (Input Signal Test) ........................11-2. CP-2 (Check X/Y Motor/Origin Sensor) ....................11-3. CP-3 (Continuous Running) ........................ 11-4. CP-4 (Test Main Motor Speed) ......................11-5. CP-5 (Adjustment on Thread-trimming) ....................11-6. CP-6 (Test Presser Origin Sensor) ......................
-
Page 5: Safety Regulations
10. Repair, remodeling and adjustment works must only be done by appropriately trained technicians or specially skilled personnel. Only spare parts designated by Texi can be used for repairs. 11. General maintenance and inspection works have to be done by appropriately trained personnel. - Page 6 TEXI Catenaccio operation manual Danger of injury to operator or service staff Items requiring special attention 1 There is the possibility that slight to serious injury or death may be caused. There is the possibility that injury may be caused by touching moving part.
-
Page 7: Specifications
TEXI Catenaccio operation manual EXPLANATION OF TEXI COMPUTER-CONTROLLED HIGHSPEED BARTACKING MACHINE [1]SPECIFICATIONS 1. Sewing area: X (lateral) direction 40 mm Y (longitudinal) direction30 mm 2. Max. sewing speed: 3000 rpm (when sewing pitches are less than 5mm in X-direction and 3.5mm in Y-direction) 3. -
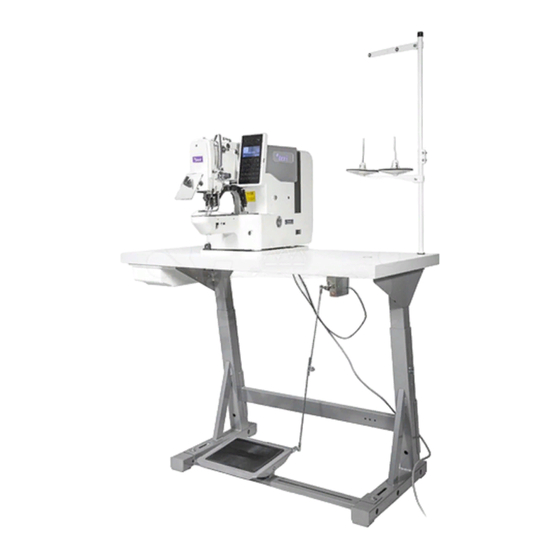
Page 8: Configuration
TEXI Catenaccio operation manual [2]CONFIGURATION 1. Names of main unit Machine head Work clamp feet Thread stand Operation panel Power switch Control box Pedal switch... -
Page 9: Names And Explanation Of Switches On The Operation Panel
Store the pattern. The stored pattern can be put into sewing as long as user presses this key. The changes in scale rate, sewing position and so on can also be stored. NOTE:Texi set to needle thread clamp prohibited with memory switch. No35 at the time of standard delivery. -
Page 10: Installation
TEXI Catenaccio operation manual [3]INSTALLATION 1. Installing the electrical box Install the electrical box on the underside of the table at the location illustrated using round-head bolt (1), plain washer (2), spring washer (3) and nut (4) supplied with the machine 2. -
Page 11: Installation Of The Sewing Machine Head
TEXI Catenaccio operation manual 5. Installation of the sewing machine head WARNING: To prevent possible accidents caused by the full of the sewing machine, perform the work by two persons or more when the machine is moved. 1). Fit hinge rubber ① to the hinge shaft, and fix the sewing machine main unit. -
Page 12: Safety Switch
TEXI Catenaccio operation manual 7. Safety switch Cut off the safety switches cable ties which be fixed under the machine , safety switches will be installed in the machine as shown here, with screw lock, overturning the head, checking the suitability of the safety switch mounting position, heads up is required, Table board to open the safety switch top picks, picks of safety switches and safety switches do not touch, otherwise the error E302. -
Page 13: Connecting The Cord
TEXI Catenaccio operation manual 10. Connecting the cord Please let the motor cable, the signal line of the machine head connect with the electronic control box according to online identity, make sure the connection is correct, there is no omission. -
Page 14: Installing The Thread Stand
TEXI Catenaccio operation manual 13. Managing the cord The line frame in the accessory box should be installed in Table. [4]OPERATION OF THE SEWING MACHINE 1. Lubrication Turn of the power before starting the work so as to prevent accidents caused by... -
Page 15: Attaching The Needle
TEXI Catenaccio operation manual 2. Attaching the needle Turn of the power before starting the work so as to prevent accidents caused by abrupt start of the sewing machine Loosen setscrew (1) and hold needle (2) with the long groove facing toward you.Then fully insert it into the hole in the needle bar, and tighten setscrew (1). -
Page 16: Installing And Removing The Bobbin Case
TEXI Catenaccio operation manual 4. Installing and removing the bobbin case Turn of the power before starting the work so as to prevent accidents caused by abrupt start of the sewing machine 1). Open hook cover (1) 2). Raise latch (3) of bobbin case (2),and remove the bobbin case. -
Page 17: Adjusting The Thread Take-Up Spring
TEXI Catenaccio operation manual 7. Adjusting the thread take-up spring The standard stroke of thread take-up spring (1) is 8 to 10 mm, and the pressure at the start is 0.1 to 0.3N. 1). Adjusting the stroke Loosen setscrew (2), and turn thread tension asm. (3). - Page 18 TEXI Catenaccio operation manual (4). Setting of Scale Rate in Y scale 1.Press , and then the LED of will be displayed. 2.Press & to display 100 at Data Display LED. (The Scale Rate in Y Direction is set as 100%)
-
Page 19: Checking The Contour Of A Sewing Pattern
TEXI Catenaccio operation manual When turning OFF the power without pressing key, the set values of pattern No., X/Y scale, number of max. rotation, and thread tension are not memorized. 2. Confirmation of Pattern Shape After selecting the pattern, user shall confirm the shape of the pattern. -
Page 20: Change To The Other Sewing Pattern
TEXI Catenaccio operation manual Attention 1:When depressing the pedal to level 1 and lowering the presser, the user can press & to change the sewing position of pattern. Then the user could start sewing at the selected position by depressing the pedal to level 2. During the sewing, for the problems like thread-breakage, user can use this method for mending after releasing the malfunction Attention 2:... -
Page 21: Independent Thread-Trimming Device
TEXI Catenaccio operation manual 6. Independent Thread-trimming Device Independent thread-trimming, different from the general presser transmission and main-shaft transmission thread-trimming mechanisms, has the independent control unit, which can control the whole process of thread-trimming better, If the storage parameter No.35 is set as 1 (Thread-trimming Forbidden), the machine will not perform the thread-trimming. -
Page 22: Bottom Thread Counter
TEXI Catenaccio operation manual 8. Bottom Thread Counter The counters are set as Production Counter (Adding method) at the time of delivery. However, if it is used as the Bottom Thread Counter (subtracting method), the value of parameter No.18 shall be set at 1. -
Page 23: Set P Pattern & C Pattern
TEXI Catenaccio operation manual 10. Set P Pattern & C Pattern 10-1. Use Pattern Key( )for Sewing The saved patterns (No.1~200) can be registered on P1~P50. It is possible to change and register the scale rate, Max speed limitation and sewing position. With the rolling window of pattern, user can also register patterns and has access to the pattern from P1~P25 at a time. - Page 24 TEXI Catenaccio operation manual 6. Press and use & to set the X scale rate at “50”% and the Y scale rate “80%”, as well as Max Speed limitation at “2000” rpm. 7. Press to activate X scale rate ,which is displayed at 0.0.
-
Page 25: Sewing With Combination Functions
TEXI Catenaccio operation manual 1. Turn on the power. 2. Press 3. Press to turn on the Sewing LED, and then the presser will go up. 4. Confirm the pattern shape. 5. If the pattern shape is correct, the machine will be able to carry out the sewing. - Page 26 TEXI Catenaccio operation manual 6. Press to set the P3 as the third pattern in C1. User can select P pattern from P1~P50 with & Press to end the storage. 8. Press to end the storage mode of combined pattern.
-
Page 27: Debugging Mode
TEXI Catenaccio operation manual 11. Debugging Mode Via this mode, user can perform the operations of maintenance and checking. 1) When the Sewing LED is off, press to call the display of . Then press same time. After the ring of buzzer, the system will have access to the debugging mode via the user level setting mode of memory switch. - Page 28 TEXI Catenaccio operation manual...
-
Page 29: Input Signal Test
TEXI Catenaccio operation manual Function Test Code Function Content Test input signal LED hint switch, sensor input X/ Y Motor Origin Sensor Display the statuses of the X/Y motor step motion Test operation, origin searching operation and X/Y origin sensor. -
Page 30: Check X/Y Motor/Origin Sensor
TEXI Catenaccio operation manual The display content for each inputted No. Presser Input Pattern X Scale Y Scale Speed Counter Winding Solenoid -lowering N0. LED Pedal Pedal Pedal Level 0 Level 1 Level 2 Presser Thread- Y motor X motor... -
Page 31: Continuous Running
TEXI Catenaccio operation manual 11-3. CP-3 Continuous Running When the screen displays the “CP-3”, user can press to have access to the Continuous Running Mode. After setting the conditions for continuous running, user can start the continuous running mode; for quitting the continuous running mode, please turn off the power. - Page 32 TEXI Catenaccio operation manual “S”: set speed Display of main-shaft motor speed “F”: actual speed (2). Operations User can use & to change the setting on the main-shaft speed. Then the machine will run in the set speed just after user presses .
-
Page 33: Adjustment On Thread-Trimming
TEXI Catenaccio operation manual 11-5. CP-5 Adjustment on Thread-trimming Display the step motion of thread-trimming motor and the thread-trimming actions of moving to thread-curving position, thread-trimming, knife return, and return-to-origin. (1). Preparation Press to have access to CP-5. (2). Operation 1. -
Page 34: Test Presser Origin Sensor
TEXI Catenaccio operation manual 11-6. CP-6 Test Presser Origin Sensor Display the step motion operation of presser motor, operation of origin search and status of presser origin sensor. (1). Operation 1. Preparation Firstly, user can press to have access to CP-6. Then user can press to search the origin of thread- catching;... -
Page 35: Test Thread-Catching Motor/ Origin Sensor
TEXI Catenaccio operation manual 11-7. CP-7(Test Thread-catching Motor/ Origin Sensor) Display the step operation of thread-catching motor, the statuses of thread-catching motor origin sensor and thread-catching sensor and operation of origin search. 1. Preparation Firstly, user shall press to have access to CP-7; then press to turn on the Sewing LED. -
Page 36: Parameter Setting
TEXI Catenaccio operation manual 12. Parameter Setting 12-1. Specific Operations on Setting Parameters 1) When Sewing LED is off, user can press to set the parameters. (After user presses , the displayed 1.30 means that the Max speed of the No.1 parameter is 3000rpm) 2) User can use &... - Page 37 TEXI Catenaccio operation manual (2). Setting of Soft-start Speed at Sewing Start The speed of stitches from the first one to the fifth one can be set in the unit of 100rpm. User can also set the validity of thread-catching on these stitches.
- Page 38 TEXI Catenaccio operation manual 8. By using & , user can input “2000” in the screen Press to return to default setting. If user presses , the existing operations will be cancelled and system will return to the status in step 6).
- Page 39 TEXI Catenaccio operation manual (4). Setting of Counter Action The production counter can be used as the Bottom Thread Counter. In repetition sewing, if a bobbin finishes the sewing time as set in parameter, the sewing machine will stop sewing. The Bottom Thread Counter uses the subtracting method.
- Page 40 TEXI Catenaccio operation manual 12-3. Table for Parameter Setting Adjustment Default Functions Remarks Range Value Max Speed of Sewing 1.30 3000 400~3000 (it can be set in step of 1000rpm) Sewing speed of 1 Stitch (thread-catching) 2.15 1500 400~1500 (It can be set in step of 100rpm)
- Page 41 TEXI Catenaccio operation manual Adjustment Default Functions Remarks Range Value 0:invalid 31. 0 Use keyboard (Clear Key) to stop sewing machine 1:Reset Key 0:no voice 32. 1 Buzzer forbidden 1:panel opera- tion voice 33. 1 Set number of stitches that thread-catching release 1~7...
-
Page 42: Maintenance
TEXI Catenaccio operation manual [6]MAINTENANCE 1. Adjusting the height of the needle bar Turn OFF the power before starting the work so as to prevent accidents cause by abrupt start of the sewing machine. Bring needle bar (1) to the lowest position of its stroke. Loosen needle bar connection screw (2) and adjust so that upper marker line (4) engraved on the needle bar aligns with the bottom end of needle bar bushing, lower (3). -
Page 43: Adjusting The Lift Of The Work Clamp Foot
TEXI Catenaccio operation manual 3. Adjust so that the blade point of inner hook (4) aligns with the center of needle (5), and that a clearance of 0 mm is provided between the front end of the driver and the needle as the front end face of driver (6) receives the needle to prevent the needle from being bent. -
Page 44: The Moving Knife And Counter Knife
TEXI Catenaccio operation manual 4. The moving knife and counter knife Turn OFF the power before starting the work so as to prevent accidents cause by abrupt start of the sewing machine. 1. Loosen adjusting screw (3) so that a clearance of 18.5... -
Page 45: Adjustment Of The Wiper
TEXI Catenaccio operation manual 6. Adjustment of the wiper Turn OFF the power before starting the work so as to prevent accidents cause by abrupt start of the sewing machine. Loosen screw (1) to adjust so that a clearance of 1.5 mm or more is provided between the wiper and the needle. -
Page 46: Replenishing The Designated Places With Grease
TEXI Catenaccio operation manual 9. Replenishing the designated places with grease When the sewing machine has been used for a certain number of times of sewing, error code No. E220 is displayed on the operation panel at the time of turning ON the power. This display informs the operator of the time of replenishing the designated places with grease. -
Page 47: Table Of The Standard Patterns And The Standard Patterns
TEXI Catenaccio operation manual [7]Table of the standard patterns and the standard patterns 1. List of Standard Figure Size Size Stitch Stitch Sewing Pattern Sewing Pattern number number (mm) (mm) 16×2 10×2 16×2.5 24×3 10×2 16×2.5 10×2 16×2.5 24×3 24×3 6×2.5... - Page 48 TEXI Catenaccio operation manual 10×6 12×6 7×10 7×10 24×3 8×2 12×12 12×12 2.5×20 2.5×25 2.5×25 2.5×4.4 2.5×4.4 2.5×4.4 8×8 8×8 8×8 8×8 40×30 40×30 40×30 30×30...
- Page 49 TEXI Catenaccio operation manual 30×30 30×30 40×30 40×30 40×30 30×30 30×30 30×30 40×30 40×30 40×30 30×30 30×30 30×30 40×30 40×30 40×30 30×30 30×30 30×30 30×30 30×29.9...
- Page 50 TEXI Catenaccio operation manual 30×29.8 30×25 30×25 30×25 20×30 20×30 30×20 30×20 20×24.1 20×24.1 40×5 40×5 5×30 5×30 20×20 20×20 20×20 25×20 25×20 25×20 25×20 25×20 25×20 30×25...
-
Page 51: Table Of The Standard Patterns
TEXI Catenaccio operation manual 2. Table of the work clamp foot Left:10011508 Right:10011505 10011687、10011691 10011758、10011759 Work clamp foot 10011565 10012300 10012279 10011751 10011755 With knurl Without knurl Without knurl With knurl With knurl Feed plate Sewing specification Finer guard 10011527... -
Page 52: Table Of The Optional Parts
TEXI Catenaccio operation manual [8]Table of the optional parts Name of parts Type Part No. Remarks Without knurl/processed Feed plate blank Sewing area lengthwise 20X cross- wise 40 With knurl/processed Sewing area lengthwise 20X cross- wise 40 Without knurl/processed t=1.2 t=0.8... -
Page 53: List Of Error Information
TEXI Catenaccio operation manual List of Error Information Display Error Name Content of Error Solution The main-shaft of sewing Machine Lock Error machine can’t rotate due to Turn off power and release the trouble some problem. The prepared pattern number is Press RESET switch to confirm the Pattern NO. -
Page 54: Troubles And Corrective Measures (Sewing Conditions)
TEXI Catenaccio operation manual Turn off power and check the Y Origin Search Error Y origin sensor doesn’t change. connections of CZ022 on head signal circuit board and X9 on control box. Turn off power and check the Presser Origin Search Presser origin sensor doesn’t... - Page 55 TEXI Catenaccio operation manual Trouble Cause Corrective measures Replace the bent needle. (1) The needle is bent. Correct the position of the work clamp foot. (2) The needle hits the work clamp foot. (3) The needle is too thin for the material.
-
Page 56: The System Diagram Of The Electricity Controls
TEXI Catenaccio operation manual System Diagram... - Page 57 TEXI Catenaccio operation manual Notes...
- Page 58 TEXI Catenaccio operation manual CE DECLARATION OF CONFORMITY Distributor: Strima Sp. z o.o. Swadzim, ul. Poznańska 54 62-080 Tarnowo Podgórne, Poland We declare, that the following product: High speed bartack sewing machine model Catenaccio (ZJ1900BSS) With this declaration relates, complies with following directives:...
- Page 59 TEXI Catenaccio operation manual...
- Page 60 TEXI Catenaccio operation manual Dealer:...
Need help?
Do you have a question about the Catenaccio and is the answer not in the manual?
Questions and answers