Table of Contents
Advertisement
Quick Links
Advertisement
Table of Contents

Summary of Contents for adept technology T2
- Page 1 Artisan Technology Group is your source for quality new and certified-used/pre-owned equipment SERVICE CENTER REPAIRS WE BUY USED EQUIPMENT • FAST SHIPPING AND DELIVERY Experienced engineers and technicians on staff Sell your excess, underutilized, and idle used equipment at our full-service, in-house repair center We also offer credit for buy-backs and trade-ins •...
- Page 2 Adept T2 Pendant User’s Guide P/N: 09017-000, Rev D June, 2013 5960 Inglewood Drive • Pleasanton, CA 94588 • USA • Phone 925.245.3400 • Fax 925.960.0452 Otto-Hahn-Strasse 23 • 44227 Dortmund • Germany • Phone +49.231.75.89.40 • Fax +49.231.75.89.450 Block 5000 Ang Mo Kio Avnue 5 • #05-12 Techplace II • Singapore 569870 • Phone +65.6755.2258 • Fax +65.6755.0598...
- Page 3 The information contained herein is the property of Adept Technology, Inc., and shall not be reproduced in whole or in part without prior written approval of Adept Technology, Inc. The information herein is subject to change without notice and should not be construed as a commitment by Adept Technology, Inc.
-
Page 4: Table Of Contents
Turning Power On After Enable Switch is Released ....24 4.3 Calibrating a Robot from the T2 Pendant ......24 Typical Calibration Process . - Page 5 Index ............47 Adept T2 Pendant User’s Guide, Rev D...
-
Page 6: Introduction
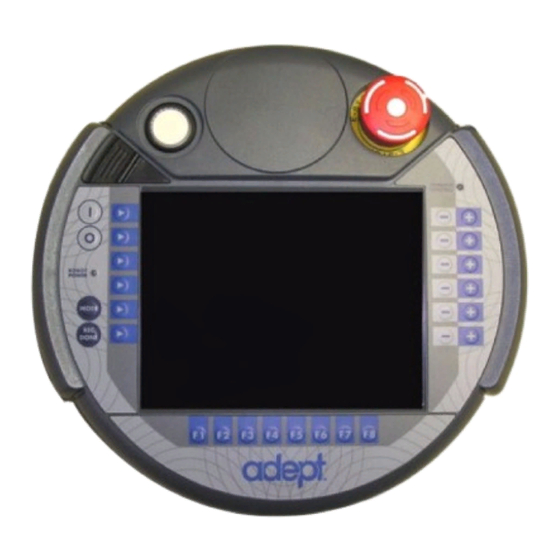
Introduction Product Description The Adept T2 pendant provides a user interface and teach pendant in an ergonomic and rugged package. The T2 pendant is designed for right- and left-handed use. All gripping and holding positions enable comfortable and fatigue-free operation. -
Page 7: System Compatibility
• Adept Viper robots • Adept SmartMotion systems with the sMI6 • AdeptOne robot on SmartController The T2 pendant is also designed to be compatible with robots that do not use the SmartController, including: • Adept Cobra i600/i800 robots Hardware Specifications Table 1-1. -
Page 8: Dimensions
Figure 1-2. T2 Pendant Dimensions Safety The T2 pendant was developed, manufactured, tested, and documented in accordance with applicable safety standards. If you follow the instructions regarding safety and use as described in this manual, the product will, in the normal case, neither cause personal injury nor damage to machinery and equipment. -
Page 9: Dangers, Warnings, Cautions, And Notes In Manual
NOTE: Notes provide supplementary information, emphasize a point or procedure, or give tips for easier operation. Adept T2 Pendant User’s Guide, Rev D Artisan Technology Group - Quality Instrumentation ... Guaranteed | (888) 88-SOURCE | www.artisantg.com... -
Page 10: Emergency Stop Switch
• Do not squeeze or pinch the cable. • Do not lay the cable over sharp edges to avoid damaging the cable sheath. • When you are not using the T2 pendant, hang it on the optional wall bracket, if purchased, for storage. -
Page 11: How Can I Get Help
Introduction • Never clean the T2 pendant touchscreen or other surfaces with solvents, abrasive cleaners or scrubbing sponges. For cleaning the T2 pendant, use a soft cloth and a small amount of water or a mild cleaning agent. • Make sure that no foreign objects or liquids can penetrate into the T2 pendant. -
Page 12: Adept Document Library
(The MCP4 pendant sends the speed whenever the Speed Pot is pressed.) In addition, the T2 pendant sends the setting of the Speed Bar if it is pressed along with the STEP button. In that case, the T2 pendant continues sending the Speed Bar value even after STEP button is released, until the Speed Bar is released. - Page 13 • One of the 6 Joint/Axis control buttons (J1/X - J6/RZ) and a Speed Pot input • A STEP button press and a Speed Pot input Adept T2 Pendant User’s Guide, Rev D Artisan Technology Group - Quality Instrumentation ... Guaranteed | (888) 88-SOURCE | www.artisantg.com...
-
Page 14: Installation
If the E-stop circuit is opened by removing one of the cables, or the bypass plug, then high power is turned off. When the T2 pendand is plugged in, no bypass plug is needed. -
Page 15: Installation In A Smartcontroller System
Installation in a SmartController System 1. Plug the pendant cable connector into the matching adapter cable connector. NOTE: The T2 pendant uses push-pull connectors. Line up the red dots to insert the connectors, pull back on the outer sleeve to remove. -
Page 16: Installation In An Adept Cobra I-Series Robot System
1. Plug the pendant cable connector into the matching connector on the adapter cable. See the following figure. NOTE: The T2 pendant uses push-pull style connectors. Line up the red dots as you insert the connectors. To remove the connector, pull back on the outer sleeve. -
Page 17: Mounting Optional Wall Bracket
Installation Mounting Optional Wall Bracket The optional wall bracket can be used for stationary operation or for safe storage of the T2 pendant between uses. See the following figure for mounting dimensions. The wall bracket is p/n 05003-000. 201.4 56.2... -
Page 18: Identification Of
Pressing the - button selects a joint (1 - 6), and moves the joint in the negative direction. Adept T2 Pendant User’s Guide, Rev D Artisan Technology Group - Quality Instrumentation ... Guaranteed | (888) 88-SOURCE | www.artisantg.com... - Page 19 USB Connector Provides a connection for a USB memory stick, which is used to transfer software updates to the T2 pendant. Adept T2 Pendant User’s Guide, Rev D Artisan Technology Group - Quality Instrumentation ... Guaranteed | (888) 88-SOURCE | www.artisantg.com...
-
Page 20: Enable Switches
Enable Switches Enable Switches The T2 pendant is equipped with two 3-position enable switches, one at the left and one at the right side of the device. This allows both left- and right-hand operation of the enable switch. Both enable switches are equivalent and parallel switched. So for enabling power, only one of the two switches must be activated. - Page 21 Artisan Technology Group - Quality Instrumentation ... Guaranteed | (888) 88-SOURCE | www.artisantg.com...
-
Page 22: Operation
Operation Main Menu Overview The main menu is displayed when the T2 pendant is powered on. To choose one of the functions: • Press one of the function-select buttons, which are located to the left of the touchscreen. • Press one of the menu buttons, such as COMP/PWR or PROG SET. - Page 23 When User indicator blinks, indicates an application program is suspended. Press Rec/Done to resume program operation. Adept T2 Pendant User’s Guide, Rev D Artisan Technology Group - Quality Instrumentation ... Guaranteed | (888) 88-SOURCE | www.artisantg.com...
-
Page 24: Turning Power On And Off
NOTE: The T2 pendant has been designed for use with a CAT-3 SmartController. If the T2 pendant is used in a system with a non-CAT-3 SmartController, then the Enable switch must be pressed while in Auto mode, as well as in Manual mode. See the Adept SmartController User’s... -
Page 25: Turning Power On After An E-Stop
SmartModules system with a PDU2. You have to press the blinking High Power button on the external Front Panel. Calibrating a Robot from the T2 Pendant A robot must be calibrated after high power has been turned on. The calibration process can vary depending on what type of robot is being used. -
Page 26: Special Calibration Process
(the labels are defined by the program using the buttons), they are referred to as soft buttons. Adept T2 Pendant User’s Guide, Rev D Artisan Technology Group - Quality Instrumentation ... Guaranteed | (888) 88-SOURCE | www.artisantg.com... -
Page 27: Computer (Comp) Mode
When the Background state is enabled, a V+ program can attach the pendant. When this occurs, the V+ program is in control and the USER indicator is lit. Adept T2 Pendant User’s Guide, Rev D Artisan Technology Group - Quality Instrumentation ... Guaranteed | (888) 88-SOURCE | www.artisantg.com... -
Page 28: Pendant Control Modes
T2 Pendant Joint/Axis Control Buttons X direction Y direction Z direction RZ Rotation +RZ (CCW) Figure 4-3. World Mode (Four-Axis SCARA) Adept T2 Pendant User’s Guide, Rev D Artisan Technology Group - Quality Instrumentation ... Guaranteed | (888) 88-SOURCE | www.artisantg.com... -
Page 29: Tool Mode
T2 Pendant Joint/Axis Control Buttons X direction Y direction Z direction Rotation about Tool Z axis Figure 4-4. Tool Mode (Four-Axis SCARA) Adept T2 Pendant User’s Guide, Rev D Artisan Technology Group - Quality Instrumentation ... Guaranteed | (888) 88-SOURCE | www.artisantg.com... -
Page 30: Joint Mode
Joint 1 Joint 2 Joint 1 Joint 3 Joint 4 Joint 3 Joint 4 Figure 4-5. Joint Mode (Four-Axis SCARA) Adept T2 Pendant User’s Guide, Rev D Artisan Technology Group - Quality Instrumentation ... Guaranteed | (888) 88-SOURCE | www.artisantg.com... -
Page 31: Free Mode
REAL Press the REAL soft button and the pendant displays: SELECT REAL VARIABLE TO EDIT var1 var2 var3 var4 <MORE> Adept T2 Pendant User’s Guide, Rev D Artisan Technology Group - Quality Instrumentation ... Guaranteed | (888) 88-SOURCE | www.artisantg.com... - Page 32 Press the HERE soft button to record the current robot location in the variable being edited. Adept T2 Pendant User’s Guide, Rev D Artisan Technology Group - Quality Instrumentation ... Guaranteed | (888) 88-SOURCE | www.artisantg.com...
-
Page 33: Display Function
STATUS & ID When this button is pressed, the display shows: Status SOFTWARE CNTRLR ROBOT The Status button displays: program.name Program Speed Cycle Left Adept T2 Pendant User’s Guide, Rev D Artisan Technology Group - Quality Instrumentation ... Guaranteed | (888) 88-SOURCE | www.artisantg.com... -
Page 34: Clear Error (Clr Err) Function
The CMD function button displays the options AUTO START, CALIB, STORE ALL, CMD1, and CMD2, as shown in Figure 4-8. Adept T2 Pendant User’s Guide, Rev D Artisan Technology Group - Quality Instrumentation ... Guaranteed | (888) 88-SOURCE | www.artisantg.com... - Page 35 “11”, the file AUTO11.V2 would be created, and all programs and global variables in system memory would be stored to that file. Adept T2 Pendant User’s Guide, Rev D Artisan Technology Group - Quality Instrumentation ... Guaranteed | (888) 88-SOURCE | www.artisantg.com...
-
Page 36: Run/Hold Function
Figure 4-9. Program Set Function Adept T2 Pendant User’s Guide, Rev D Artisan Technology Group - Quality Instrumentation ... Guaranteed | (888) 88-SOURCE | www.artisantg.com... -
Page 37: Step Function
As an additional safeguard, when high power is enabled and the keyswitch is set to Manual, the pendant is set to Off mode, not COMP mode or a Pendant Control mode. Adept T2 Pendant User’s Guide, Rev D Artisan Technology Group - Quality Instrumentation ... Guaranteed | (888) 88-SOURCE | www.artisantg.com... -
Page 38: Mcp.no.pot System Switch
4.15 Controlling More Than One Robot Like the monitor and each program task, the T2 pendant can also have a robot attached. When moving a robot from the pendant or displaying joint values or World locations by pressing the Display button, only the currently selected robot is affected. -
Page 39: System Menu
• Force On - toggles the SLOW mode button so that slow mode is enabled • Force Off - toggles the SLOW mode button so that slow mode is disabled Adept T2 Pendant User’s Guide, Rev D Artisan Technology Group - Quality Instrumentation ... Guaranteed | (888) 88-SOURCE | www.artisantg.com... -
Page 40: Setting The Screen Saver
When the desired mode is displayed, press OK to save your setting. Setting the Screen Saver The Screen Saver button allows you to enable and disable the T2 pendant screen saver. The Screen Saver button has two modes: •... - Page 41 Artisan Technology Group - Quality Instrumentation ... Guaranteed | (888) 88-SOURCE | www.artisantg.com...
-
Page 42: Maintenance
See the procedure on the following page for the details on installing the USB memory stick. 4. With the USB memory stick installed, connect the T2 pendant to the controller. 5. From the main screen on the T2 pendant, press the SYS MENU button. - Page 43 1. Pull the USB memory stick from the 2. Push down on the protective cover until USB connector: it is fully seated: Adept T2 Pendant User’s Guide, Rev D Artisan Technology Group - Quality Instrumentation ... Guaranteed | (888) 88-SOURCE | www.artisantg.com...
-
Page 44: Calibrating The Touchscreen
Calibrating the Touchscreen Calibrating the Touchscreen This section describes the process for calibrating the T2 pendant touchscreen. 1. From the main menu, press SYS MENU to display the system menu. 2. Select Touchscreen Calibration. The touchscreen calibration window opens. Figure 5-1. Touchscreen Calibration Window NOTE: Once the calibration process is started, it cannot be canceled. -
Page 45: Cleaning The Touchscreen
3. Wipe the touchscreen with a soft cloth. You can dampen the cloth with a small amount of water or mild cleaning solution, if needed. Do not use scrubbing sponges, solvents or abrasive cleaners on the touchscreen or other parts of the T2 pendant. -
Page 46: Troubleshooting
System Menu, then use this process. Press these four buttons at the same time: Robot Power On, Robot Power Off, J1+, and J1-. This puts the T2 pendant back into the Touchscreen Calibration screen. Perform the calibration carefully, to make sure the screen is responsive to the stylus. - Page 47 Artisan Technology Group - Quality Instrumentation ... Guaranteed | (888) 88-SOURCE | www.artisantg.com...
-
Page 48: Index
LCD screen DISP (Display) button brightness Display function screen saver Document Library location variables, editing location, displaying current robot Adept T2 Pendant User’s Guide, Rev D Artisan Technology Group - Quality Instrumentation ... Guaranteed | (888) 88-SOURCE | www.artisantg.com... - Page 49 Robot Power LED mounting robot, select from multiple World mode ROBOT: display box RUN/HOLD button Run/Hold function YES/NO buttons Adept T2 Pendant User’s Guide, Rev D Artisan Technology Group - Quality Instrumentation ... Guaranteed | (888) 88-SOURCE | www.artisantg.com...
- Page 50 Artisan Technology Group - Quality Instrumentation ... Guaranteed | (888) 88-SOURCE | www.artisantg.com...
- Page 51 5960 Inglewood Dr. Pleasanton, CA 94588 P/N: 09017-000, Rev D 925•245•3400 Artisan Technology Group - Quality Instrumentation ... Guaranteed | (888) 88-SOURCE | www.artisantg.com...
- Page 52 Artisan Technology Group is your source for quality new and certified-used/pre-owned equipment SERVICE CENTER REPAIRS WE BUY USED EQUIPMENT • FAST SHIPPING AND DELIVERY Experienced engineers and technicians on staff Sell your excess, underutilized, and idle used equipment at our full-service, in-house repair center We also offer credit for buy-backs and trade-ins •...
Need help?
Do you have a question about the T2 and is the answer not in the manual?
Questions and answers