Table of Contents
Advertisement
OPERATOR'S MANUAL
TRAILED DISC MOWER
KDC 260
KDC 260 S
KDC 260 SL
KDC 260 S T
KDC 260 SL T - 8' 6"
KDC 300
KDC 300 S
KDC 300 SL
KDC 300 S T
KDC 300 SL T - 9' 10"
Serial no.:
- 8' 6"
- 8' 6"
- 8' 6"
- 8' 6"
- 9' 10"
- 9' 10"
- 9' 10"
- 9' 10"
Original manual
SaMASZ Sp. z o.o.
Poland, 16-060 Zabłudów, ul. Trawiasta 1
e-mail: samasz@samasz.pl
KDC 301 W
KDC 301 W T
KDC 340
KDC 340 S
KDC 340 SL
KDC 340 S T
KDC 340 SL T - 11' 2"
KDC 341
KDC 341 W
KDC 341 W T
KDC 390
KDC 430
W – Roller conditioner
S – Tine conditioner
SL – Lightweight tine conditioner
T – Belt conveyor
Established – 1984
NIP PL-966-159-29-76
tel. (+48) (85) 664 70 31
fax (+48) (85) 664 70 41
www.samasz.pl
- 9' 10"
- 9' 10"
- 11' 2"
- 11' 2"
- 11' 2"
- 11' 2"
- 11' 2"
- 11' 2"
- 11' 2"
- 13'
- 14'
IN236USA003
30.05.2017
EDITION NO. 2
Advertisement
Table of Contents

Subscribe to Our Youtube Channel
Related Manuals for SaMASZ KDC 260


Summary of Contents for SaMASZ KDC 260
- Page 1 KDC 340 - 11' 2" KDC 260 S T - 8' 6" KDC 340 S - 11' 2" KDC 260 SL T - 8' 6" KDC 340 SL - 11' 2" KDC 300 - 9' 10" KDC 340 S T - 11' 2"...
- Page 2 IT IS IN OPERATING POSITION DO NOT OPERATE THE MOWER WITH UNAUTHORIZED PERSONNEL PRESENT WITHIN 50 M OR LESS ATTENTION: Keep this manual for future reference. Design and high quality of materials ensure high reliability and durability of SaMASZ machinery.
-
Page 3: Table Of Contents
Trailed disc mowers Operator's manual Table of contents ............................page IDENTIFYING THE MACHINE ......................3 INTRODUCTION ............................ 3 PROPER AND INTENDED USE ......................4 3.1. Technical data ............................5 3.2. Design and working principle........................ 8 3.3. Standard equipment and spare parts ....................10 SAFETY PRECAUTIONS ........................ - Page 4 Trailed disc mowers Operator's manual LUBRICATION ............................40 7.1. Cutterbar .............................. 40 7.2. Intersecting axis gears .......................... 41 7.3. Roller conditioner’s gearbox ....................... 42 7.4. Bearings and joints ..........................42 7.5. Risks present when lubricating ......................43 MALFUNCTIONS AND THEIR REPAIRS ..................44 DISASSEMBLY AND WITHDRAWAL FROM USE ................
-
Page 5: Identifying The Machine
Trailed disc mowers Operator's manual 1. IDENTIFYING THE MACHINE Data plate is mounted to the mower's main frame in the place shown in Fig. 1. Fig. 1. Data plate placement Data plate includes: - name and adress of the manufacturer, - model year, - CE marking means, that the produce - version number,... -
Page 6: Proper And Intended Use
Trailed disc mowers Operator's manual 3. PROPER AND INTENDED USE 1. Mower is equipped with Perfect Cut cutterbar. The mowing height differences, depending on the inclination angle of the cutterbar are shown in Tab. 1. Tab. 1. Mowing heights depending on cutter bar’s inclination angle. „Perfect Cut”... -
Page 7: Technical Data
Unauthorized modifications to the mower will lead to voiding the warranty. 3.1. Technical data Tab. 2. Specification of trailed disc mowers Mower type KDC 260 KDC 300 KDC 340 KDC 341 KDC 390 KDC 430 Working width 8' 6" 9' 10"... - Page 8 Trailed disc mowers Operator's manual swath Tab. 3. Specification of trailed disc mowers with conditioner KDC 260 S / KDC 300 S / KDC 340 S / Mower type KDC 260 SL KDC 300 SL KDC 340 SL Working width 8' 6"...
- Page 9 Trailed disc mowers Operator's manual swath tine conditioner and conveyor Tab. 5. Specification of trailed disc mowers with KDC 260 S T / KDC 300 S T / KDC 340 S T / Mower type KDC 260 SL T KDC 300 SL T...
-
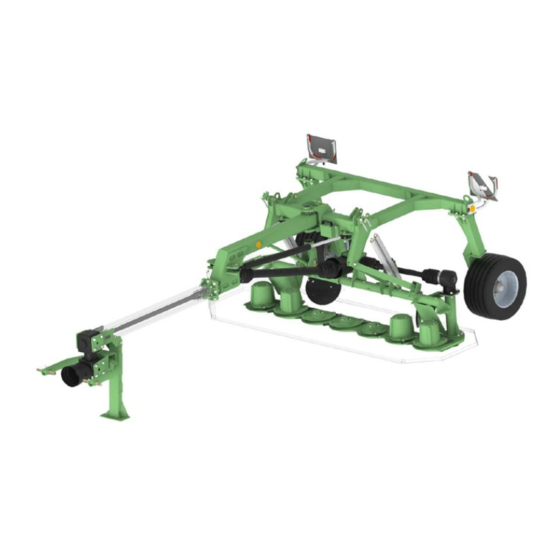
Page 10: Design And Working Principle
Fig. 2a. Overview of disk mower KDC 1 – Linkage 12 – Turning hydraulic cylinders 2 - Lifting hydraulic cylinders 13 – Tiller 3a – Swath conditioner, 3b - Swath rollers 14 – Hitch 4 – Cutterbar 15 – Adjustment link 5 –... - Page 11 Trailed disc mowers Operator's manual 22 15 Fig. 2b. Design of the trailed disc mower with swath conditioner rollers Fig. 2c. Design of the trailed disc mower with swath Hitch (14) enables attachment of the mower to a tractor. Drive onto cutterbar (4) is transmitted from the tractor's rpm through PTO shaft onto intersecting axis gear (19), drive shaft located on tiller (13), wide-angle PTO shaft (6) onto intersecting axis gear (20), cutterbar drive shaft (5) and intersecting axis gear (7).
-
Page 12: Standard Equipment And Spare Parts
Tab. 6. Recommended PTO shafts for KDC mowers - Bondioli & Pavesi Moment Mower Power Length Symbol Clutch Remarks KDC 260 S (T) KDC 300 S/W (T) Friction clutch = 1200 KDC 301 W(T) 650-885 8G7T065CE007003 1000 rpm KDC 340 S/W (T) -
Page 13: Safety Precautions
Trailed disc mowers Operator's manual 4. SAFETY PRECAUTIONS The following precautions are for your safety. They must be read carefully and followed by every person who operates or maintains the machine. Failure to follow these safety precautions could result in serious injury or death to the operator, maintenance person or bystanders and property damage to the machine and surrounding property. - Page 14 In the event of an accident involving this mower in a field or on a road, follow all applicable first aid procedures and contact SaMASZ technical service. Mower should be kept clean, so as to avoid danger of fire.
-
Page 15: Qualifications Of Operator
Trailed disc mowers Operator's manual 4.2. Qualifications of operator To provide safe machine operation each person being the machine operator must meet the following requirements: Operator should hold driving license, have ability to drive vehicles safely and know road traffic rules. -
Page 16: Putting The Mower Onto Another Vehicle For Transport
Trailed disc mowers Operator's manual NOTE: It is forbidden to drive on public roads, if the mower's transport width is more than 3 m (for: KDC 340, KDC 340 S/SL (T), KDC 341, KDC 341 W (T), KDC 390, KDC 430). 4.4.1. -
Page 17: Working Parts
Trailed disc mowers Operator's manual Fig. 5. Location of centre of gravity Tab. 7. Location of centre of gravity Mower type Dimension [mm] KDC 260 KDC 260 S KDC 260 SL KDC 260 ST KDC 260 SLT 4150 4420 4415 4720... -
Page 18: Safety Curtains
Useful life for hydraulic hoses is 5 years from their production date. 4.8. Safety curtains SaMASZ mowers feature standard safety curtains (1) for self-fitting. In order to put the curtain properly put it on the mower and secure with catches (2) and with front guard (3) Fig. 6. Examine condition of curtains and their mounting on a regular basis. -
Page 19: Danger Of Machine Entanglement
Trailed disc mowers Operator's manual 4.9.1. Danger of machine entanglement This risk occurs when (1) changing position of a mower, (2) operating near rotating parts, and (3) working without safety guards. During operation, maintenance and adjustment, always wear protective gloves, shoes and clothes without loose parts, belts and so on. Always comply with safety labels placed on the mower. -
Page 20: Safety Labels And Their Meaning
Trailed disc mowers Operator's manual 4.10. Safety labels and their meaning Safety labels are critical to safe use of this mower. They must be read, understood and followed. Also, be sure that: All warning decals are clean and legible, All lost or damaged decals are replaced by ordering new decals from your dealer or supplier, All persons using this mower have read the section of this manual explaining the meanings of these labels, All spare part used for repair of the mower should have all safety labels provided by the... - Page 21 Trailed disc mowers Operator's manual N-40 N-48 N-49 N-50 Transport holder for Stay away from mower’s Never stand near tractor’s Do not remain in the moving the mower inclination area 3-point linkage while mower swinging area steering tractor’s lift N-55 N-77 Tightening of conveyor's belt...
- Page 22 Recommended tire Recommended tire pressure mower pressure mower pressure mower pressure mower KDC 260, KDC 260 S/SL, KDC 260 S/SL T, KDC 300 S/SL (T), KDC 301 W T, KDC 300, KDC 340, KDC 301 W, KDC 390, KDC 341 W...
- Page 23 Trailed disc mowers Operator's manual N-202 N-196 N-197 N-198 N-199 N-55 N-02; N-03; N-04; N-06 N-07; N-14; N-15; N-23 N-01; N-28 N-48; N-49; N-50; N-52 N-29; N-52 N-63; N-117; N-162 N-167; N-168; N-224 Fig. 7. Placement points of warning signs on trailed disc mowers N-05 N-175 N-212...
-
Page 24: Operation
Trailed disc mowers Operator's manual 5. OPERATION WARNING: Before beginning to use this machine, do the following: - Read manual, especially safety precautions in section 4. - Make sure you are familiar with all controls and functions. - Make sure all safety devices are in place and working. Fix or replace if not working or damaged. - Page 25 Trailed disc mowers Operator's manual NOTE: When transporting the machine, levers of cut-off valves must be closed. Thanks to it, the mower is protected from accidental dismantling on unexpected motion of both the tractor and the mower – in worst case, it might cause cracks to hydraulic hose and lead to an accident.
-
Page 26: Preparing The Mower For Transport
Trailed disc mowers Operator's manual 5.3. Preparing the mower for transport To meet safety precautions concerning transport the mower should be equipped with warning triangle, attached at the mower's rear (the plates are standard-delivered with the machine). To improve safety during the transport the machine should be fitted with a warning triangle – to be purchased at the manufacturer. -
Page 27: Preparing The Mower For Operation
PTO shaft. 5.5. Preparing the mower for operation NOTE: SaMASZ protects the cylinders with special grease against weather which may cause premature wear. Before operating the mower, remove the excess grease from the cylinder piston. -
Page 28: Operation (Mowing)
Trailed disc mowers Operator's manual Swath guides Fig. 15. Swath guides 5.6. Operation (mowing) WARNING: The operator must be seated in the tractor’s driver’s seat when the machine is operating since only from that position is he able safely and properly operate the mower. -
Page 29: Essential Information Concerning Mowing
Trailed disc mowers Operator's manual Fig. 16a. Mower in operating position Fig. 16b. Mower in operating position 5.6.1. Essential information concerning mowing Optimum work parameters 1. Inclination towards the front 0-5 degrees which equates to 1.8" - 2.8" of mowing height. 2. -
Page 30: Mower Clogging And Jams
Trailed disc mowers Operator's manual In contrast with 2-drum mowers, straight mounting of the mower and full speed are not always possible. Adjust inclination of the mower, PTO rpm, speed and correctness of knife-mounting to get the best results. In case of mowing soft meadows, the pressure of the cutterbar on the ground should be reduced by adjusting support springs. -
Page 31: Unmounting The Machine From Tractor
Trailed disc mowers Operator's manual 5.7. Unmounting the machine from tractor WARNING: When dismounting, make sure there is no person in between the machine and the tractor. To dismount the machine from the tractor: Set the machine onto an even, stable ground, deactivate cutterbar drive, ignition of tractor and removing the key of the tractor’s ignition lock, reduce the pressure in the tractor's hydraulics,... -
Page 32: Controlling Condition Of Knives And Holder Pins
Trailed disc mowers Operator's manual 6.2. Controlling condition of knives and holder pins All knives should be of the same length and weight. Replace them, if necessary, only in sets of the same length and weight. Knife holder pin cannot be worn more than provided in Fig. 19. Too big a pin wearing is enough for a knife holder to be replaced. - Page 33 Trailed disc mowers Operator's manual Fig. 21. Disc rotation directions on mower's cutterbar with cutting width of 8' 6" Fig. 22. Disc rotation directions on mower's cutterbar with cutting width of 9' 10" Fig. 23. Disc rotation directions on mower's cutterbar with cutting width of 11' 2" Fig.
-
Page 34: Swath Width Adjustment
Trailed disc mowers Operator's manual NOTE: Due to various swath widths in offered mowers (and therefore various turns of discs), before mounting the knives first check turns of each disc (Fig. 21– Fig. 26). NOTE: Improper mounting of knives will lead the mower to choke. When mounting pay particular attention to knife rotating freely on the holder's pin. -
Page 35: Adjusting Space Between Tine Conditioner's Mask And Its Shaft
Trailed disc mowers Operator's manual Fig. 28. Adjusting of swath guides: 1- swath guide, 2 - adjustment bolt 6.5. Adjusting space between tine conditioner’s mask and its shaft (Models: KDC S) Depending on size and thickness of the mowing grass, it may be necessary to adjust the tine conditioner’s mask. -
Page 36: Adjusting Force Of The Pressure Of Roller Conditioner
Trailed disc mowers Operator's manual 1. Conditioner roller 2. Welded flail 3. Bolt M16x60 gal. cl. 10.9 4. Nut M16 self-protecting gal. cl. 8 5. Key 12x8x45 Fig. 30. Replacement of welded flails in conditioner roller 1. Conditioner roller 2. Plastic flail 3. -
Page 37: Adjusting Speed Of Conveyor Belt
Trailed disc mowers Operator's manual Fig. 33. Adjustment of impact force of rollers 6.8. Adjusting speed of conveyor belt Speed adjustment is possible by means of manual adjusted throttle valve. Throttle valve is located by EURO plug of hydraulic section for hydraulic drive. Direct adjustment is possible by means of a graduated knob. -
Page 38: Daily Maintenance
Trailed disc mowers Operator's manual Procedure for tensioning the cogbelt: 1. Loosen nuts and bolts (A). 2. Tighten cogbelt by means of tightening bolt (B) and check the belt deflection as per label N175. 3. Tighten nuts and bolts (A). 6.9.2. -
Page 39: Conveyor Control And Adjustment
Trailed disc mowers Operator's manual After storage period, before the machine is used: check the mower's technical condition, and the transmission in particular, supplement the paint where missing, make sure that all nuts and screws are tightened properly, make sure that all guards are in place, protect all moving parts with grease in order to prevent their baking and creating any sources of corrosion, which significantly influences mower's proper operation, check oil level in axis gears and cutterbar. -
Page 40: Conveyor Belt Replacement And Adjustment Instruction
Trailed disc mowers Operator's manual Bulges Fig. 35. Cleaning conveyor rollers 2. Impurities inside belt are removed once conveyor is in vertical position. Belt is deflected with hand and then impurities are removed with a hook wire. Fig. 36. Removing impurities from inside belt 6.10.2. - Page 41 Trailed disc mowers Operator's manual measure Driving roller hydraulic engine 0.1" (do not adjust) Fig. 37. Steps to be taken when transporting in vertical position. Mower shall be leaned to the front so the distance between conveyor and the ground is approx. 3' 3". 1.
-
Page 42: Lubrication
Trailed disc mowers Operator's manual 1. Mark two lines on newly mounted belt in intervals of l = 3.9" (Fig. 41). 2. With adjustment screws S tighten the roller so the distance on belt between marked lines is l = 3' 4" - 3' 4.2" (lines on measures from item I. 1 may prove to be helpful). The distance between the lines may differ on both edges of conveyor's belt. -
Page 43: Intersecting Axis Gears
Trailed disc mowers Operator's manual Tab. 9. Amount of oil to be filled in cutterbar Oil volume Mower type Oil type Replacement frequency [US gal lqd] KDC – 2,60 m KDC - 3,00 m Once every 3 seasons KDC – 3,40 m 80W90 (with intensive operation) KDC –... -
Page 44: Roller Conditioner's Gearbox
Trailed disc mowers Operator's manual 7.3. Roller conditioner’s gearbox Before you check the lubrication of the gearbox, remove the safety guard. Every day before starting work, check the oil level and, if needed, refill after having removed the vent A (Fig. 44) on the top of the gearbox. -
Page 45: Risks Present When Lubricating
Trailed disc mowers Operator's manual Conditioner lubrication points: Lubrication Lubrication points point Fig. 46.Non-locating bearing lubrication point Fig. 47. Non-locating bearing lubrication point Lubrication point Fig. 48. Non-locating bearing lubrication point on conditioner and shafts to be lubricated with grease ŁT 43 7.5. -
Page 46: Malfunctions And Their Repairs
Trailed disc mowers Operator's manual 8. MALFUNCTIONS AND THEIR REPAIRS Tab. 12. Malfunctions and their repairs Malfunction Reason Repair Lack of knives Put on knives Worn knives Replace knives Improperly mounted knives Put on knives strictly according to (left – right) instructions Too high tractor's engine rpm Reduce rpm... -
Page 47: Disassembly And Withdrawal From Use
Trailed disc mowers Operator's manual 9. DISASSEMBLY AND WITHDRAWAL FROM USE 9.1. Scrapping If the mower cannot be repaired anymore, it should be withdrawn from use To do so, oil from intersecting axis gear and cutterbar should be drained and delivered to a proper waste treatment company. -
Page 48: Hydraulic Scheme
Trailed disc mowers Operator's manual 10. HYDRAULIC SCHEME Hydraulic motor Hydraulic cylinder lifting conveyor Throttle valve Ball valve Ball valve Flow divider Rotary hydraulic cylinder Hydraulic cylinder lifting cutting unit - 46 -... -
Page 49: Warranty Card
2. Warranty period is for two years from the date of sale to the purchaser, stated above. 3. Any repair which is subject to warranty should be carried out by an authorised SaMASZ dealer. Upon completion of the repair, the dealer must submit a warranty claim within 14 days. -
Page 50: Warranty Repairs Record
SaMASZ, e) negligent maintenance, f) use of non-genuine spare or replacement parts that are not specifically designed for the...
Need help?
Do you have a question about the KDC 260 and is the answer not in the manual?
Questions and answers