SaMASZ KDT 180 Operator's Manual
Rear disc mower
Hide thumbs
Also See for KDT 180:
- Operator's manual (44 pages) ,
- Operator's manual (37 pages) ,
- Operator's manual (52 pages)
Table of Contents
Advertisement
OPERATOR'S MANUAL
REAR DISC MOWER
KDT 180
KDT 220
KDT 260
KDT 300
KDT 340
KDT 341
The original operator's manual
ENGLISH
SaMASZ Sp. z o.o.
ul. Trawiasta 1
16-060 Zabłudów
Polska
KDT 220 S/SL/W
KDT 260 S/SL/W
Serial No:
tel. (+48) (85) 664 70 31
fax (+48) (85) 664 70 41
e-mail: samasz@samasz.pl
www.samasz.pl
IN221EN011
22.10.2019
EDITION No 11
Advertisement
Table of Contents

Related Manuals for SaMASZ KDT 180


Summary of Contents for SaMASZ KDT 180
- Page 1 SaMASZ Sp. z o.o. tel. (+48) (85) 664 70 31 ul. Trawiasta 1 fax (+48) (85) 664 70 41 16-060 Zabłudów e-mail: samasz@samasz.pl Polska www.samasz.pl OPERATOR’S MANUAL REAR DISC MOWER KDT 180 KDT 220 KDT 220 S/SL/W KDT 260 KDT 260 S/SL/W...
- Page 2 Well-proven design with thousands of machines in regular use in many countries and quality materials ensure high durability and reliability of SaMASZ mowers. We congratulate you on the purchase of your new SaMASZ mower and wish you much pleasure and the very best work results through the years to come.
-
Page 3: Table Of Contents
OPERATOR’S MANUAL DISC MOWER Table of contents Page IDENTIFYING THE MACHINE ..................... 5 INTRODUCTION ........................5 PROPER USE ......................... 6 3.1. Technical data ..........................7 3.2. Design and working principle ......................8 3.2.1. Rear disk mower ........................... 8 3.2.2. Rear disk mower with tine condioner ..................... 8 3.2.3. - Page 4 DISC MOWER OPERATOR’S MANUAL LUBRICATION ........................40 7.1. Cutterbar ............................40 7.2. Axis gear ............................41 7.3. Roller conditioner’s gearbox ......................42 7.4. Lubrication points ........................... 42 DEFECTS AND THEIR REPAIRS ....................44 DISASSEMBLY AND WITHDRAWAL FROM USE ................45 9.1.
-
Page 5: Identifying The Machine
OPERATOR’S MANUAL DISC MOWER 1. IDENTIFYING THE MACHINE Data plate is mounted to the mower’s main frame in the place shown below (Fig. 1). Fig. 1. Data plate place Fig. 2. Data plate Data plate includes: name and adress of the manufacturer, model year, ❑... -
Page 6: Proper Use
DISC MOWER OPERATOR’S MANUAL 3. PROPER USE Mower KDT is equipped with "Perfect Cut" cutterbar. Table 1 shows the differences in mowing height depending on angle at which cutterbars are set and what kind of skids are applied. Tab. 1. Mowing height depending on the kind of the cutting bar and its tilt angle „Perfect Cut”... -
Page 7: Technical Data
Wilful changes of the mower will lead to revoking of the warranty. 3.1. Technical data Tab. 2. Specification of the mowers Model: KDT 180 KDT 220 KDT 260 KDT 300 KDT 340 KDT 341 Working width 1.8 m/5'11"... -
Page 8: Design And Working Principle
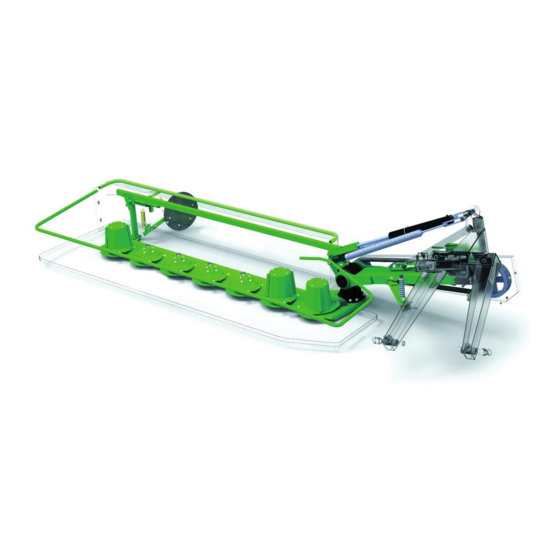
DISC MOWER OPERATOR’S MANUAL 3.2. Design and working principle 3.2.1. Rear disk mower Fig. 3a. Parts of KDT rear disc mower 1 – 3-point linkage frame 4 – Cutterbar 2 – Hydraulic cylinder with support springs 5 – Swath discs 3 –... -
Page 9: Rear Disk Mower With Roller Condioner
(4) is situated, is supported by the springs (2). Swath guides (5) are mounted on the safety curtain (6). 3.2.3. Rear disk mower with roller condioner Fig. 3c. Parts of SaMASZ rear disc mower with tine conditioner 1 – 3-point linakge frame 6 – Roller condioner safety guard 2 –... - Page 10 – To be mounted on with overrunning the tractor’s side. clutch – To be mounted on mower’s side. 7G2N086CE007096MA 7G4N091CE007096MA Fig. 4. PTO shaft lubrication points. Mounting directions PTO shafts of other brands with equivalent parameters could be used afer first obtaining SaMASZ permission.
-
Page 11: Safety Advice
OPERATOR’S MANUAL DISC MOWER 4. SAFETY ADVICE 4.1. Safety rules and regulations During operation of the mower the Regulation of the Farm Ministry and Food Economy from 12-01- ❑ 1998 dealing with safety and hygiene during the operation of tractors, machinery, tools and equipment used for farming (Dz. - Page 12 DISC MOWER OPERATOR’S MANUAL Never start the mower when it is lifted. ❑ Never start the mower, when people or animals are near the machine. ❑ Never lift safety guard before rotating parts have come to complete standstill. Tractor’s engine ❑...
-
Page 13: Qualifications Of Operator
In the event of a serious fault, stop the machine's drive, turn off the tractor's engine and take out ❑ the ignition key. Then contact SaMASZ technical service, and if an accident (here road accident) occurs, follow all applicable first aid procedures and contact responsible authorities. -
Page 14: Putting The Mower Onto Another Vehicle For Transport
DISC MOWER OPERATOR’S MANUAL 4.4.1. Putting the mower onto another vehicle for transport The driver and the carrier are responsible for mower’s transport safety. Equipment and parts must be secured during transport. To put the mower onto another vehicle in a safe way, please obey the following rules: seize the mower by any lifting devices only in the places indicated by the hook sign (Fig. -
Page 15: Working Parts
Tab. 4. Location of centre of gravity Model Dimension [mm] KDT 220 KDT 220 KDT 260 KDT 260 KDT 180 KDT 220 KDT 260 KDT 300 KDT 340 KDT 341 [ft. in] 260 SL 2′ 5″ 2′ 4″ 2′ 9″... -
Page 16: Residual Risk
❑ 4.8. Residual risk Despite the fact, that SaMASZ Sp. z o.o. company – the manufacturer of the mower takes the responsibility for the mower design and manufacturing, in order to eliminate hazard, certain risk when operating the mower is unavoidable. -
Page 17: Bans
OPERATOR’S MANUAL DISC MOWER WARNING! Residual risk always results from incorrect behaviour of mower’s operator. 4.8.4. Bans Please bear in mind the following bans during mower’s operation: never unblock the mower, make any regulations or repairs of the mower while it is in motion, ❑... -
Page 18: Warning Decals And Their Meaning
DISC MOWER OPERATOR’S MANUAL 4.9. Warning decals and their meaning NOTICE: all warning decals should be clean and legible, lost or damaged decals must be replaced, please order new decals from your dealer or supplier. N-01 N-02 N-03 N-04 Be extremely careful when CAUTION: cutting knives. - Page 19 OPERATOR’S MANUAL DISC MOWER N-32 N-35 N-40 Cutting height – Cutterbar „Perfect CUT” N-48 N-49 N-50 N-55 Stay a way from mower’s Never stand near tractor’s Do not stay in the swinging inclination area 3-point linkage while area of mower’s parts steering tractor’s lift N-63 N-162...
- Page 20 DISC MOWER OPERATOR’S MANUAL N-102 N-103 N-104 Head protection Hearing protection Foot protection must be worn must be worn must be worn N-52; N-100; N-101 N-01; N-02; N-03 N-102 N-103; N-104 N-04; N-05; N-06 N-07; N-23; N-48 N-14; N-15; N-49; N-50; N-117 N-63;...
-
Page 21: Operation
OPERATOR’S MANUAL DISC MOWER 5. OPERATION 5.1. Attaching the mower to the tractor WARNING! When mounting and dismounting the mower, there should be no persons in between the machine and the tractor. Any accidental maneuvering with the set may cause to crushing of unauthorized personnel. WARNING! The machine should be mounted on a level ground. -
Page 22: Mounting Pto Shaft
DISC MOWER OPERATOR’S MANUAL Fig. 9. Proper pin locking during the mower mounting After the mower has been attached to tractor, check the balance and steerability of tractor-mower set. To do this, calculate to formulas given in the appendix or weigh the set, and then drive on the scales only with front axis of the tractor (the mower must be in transport position –... -
Page 23: Preparing The Mower For Transport
OPERATOR’S MANUAL DISC MOWER Fig. 11. Instruction of PTO shaft shortening WARNING! The PTO shaft should be mounted only during operation time and disconnected from tractor PTO for transport and service. WARNING! When changing the tractor, with which the machine operates, control the length of PTO shaft again, as otherwise the machine can be damaged. -
Page 24: Preparing The Mower For Transport On Public Roads
DISC MOWER OPERATOR’S MANUAL WARNING! During transport the shut-off valve of mower hydraulic lift should always be closed – the valve lever in Z position (Fig. 12). It protects the mower against incidental falling in case of hydraulic failure. Fig. 12. Shut-off valve position: a) open O (work), b) closed Z (transport) Fig. -
Page 25: Switching From Transport To Working Position
❑ 10 cm / 4″ for KDT 180, KDT 220, KDT 260. For KDT 300 Y should be from 30 / 11.8″ to 40 cm / 1′ 4″. For KDT 340 from 50 / 1′ 8″ to 60 cm / 1′ 12″. -
Page 26: Operating Positions Of The Mower
5.6. Preparing the mower for work WARNING! During storing of the machines in company SaMASZ the cylinders are protected by special grease in order to secure them against weather which may cause their premature wear. Before starting the operation excess grease should be removed from the cylinders. -
Page 27: Operation (Mowing)
OPERATOR’S MANUAL DISC MOWER WARNING! Improperly relieved cutting unit of the mower will cause increase of cutterbar pressure on the ground which will lead to faster wear of sliding skids, overload of cutterbar, higher fuel consumption, damage to the stubble and contamination of the fodder. -
Page 28: Design And And Operation Of Safety Breakaway Device
DISC MOWER OPERATOR’S MANUAL Too low PTO rpm impair the quality of mowing and in some cases the mower stops ❑ mowing.(too low linear velocity of the knife). In contrast with 2-drum mowers straight mounting of the mower and full speed is not always ❑... -
Page 29: Removing Clogging And Jams
OPERATOR’S MANUAL DISC MOWER Recommended length of safety device spring R (Fig. 17) should be 143 mm. If the safety device breaks away too easily, tighten up the spring approximately 1-2 mm. DO NOT tighten up too much, because you may prevent the safety device from working and damage the mower. 5.7.3. -
Page 30: Mounting And Adjustments
DISC MOWER OPERATOR’S MANUAL disconnect hydraulic hose, ❑ detach tractor's upper link and lower strands from mower's linkage, ❑ carefully drive the tractor away. ❑ 6. MOUNTING AND ADJUSTMENTS 6.1. Mounting and timing of the knives The knives should be mounted as shown in Fig. 20 and Fig. 22, according to the rule, that the cutting edges should be directed towards ground, so that a knife will lift the grass after cutting. -
Page 31: Replacing The Knives And Knife Mountings
OPERATOR’S MANUAL DISC MOWER Fig. 21. Permissible wear of knife mounting in disc a) knife mounting M12 b) knife mounting M12 with claw 6.3. Replacing the knives and knife mountings Worn and/or damaged knives should be immediately replaced like shown in Fig. 22. Replace knives, if necessary, only in sets. - Page 32 Improperly changed knife mounting will damage disc bearings. WARNING! Different mounting of the knives will block the mower. When mounting pay particular attention to loose rotation of the knife on the knife mounting pin. KDT 180 KDT 220 KDT 260 KDT 300...
-
Page 33: Adjusting The Cutterbar
Swath width is adjusted with swath guides mounted on the 3-point linkage frame of the cutterbar (Fig. 25). In order to adjust the guide, the following should be performed (for: KDT 180, KDT 220, KDT 260, KDT 300, KDT 340, KDT 341): loosen locknuts (2) and screws (3), ❑... -
Page 34: Adjusting The Cutting Height
DISC MOWER OPERATOR’S MANUAL In order to set swath width, adjustment of swath guides (1) should be performed (Fig. 27) (for: KDT 220 W, KDT 260 W): loosen eye screw (2) of the swath guide, ❑ set the swath guide (1) as needed, ❑... -
Page 35: Adjusting Pressure Of The Cutter Bar Using Support Springs
OPERATOR’S MANUAL DISC MOWER Fig. 29. Support chain 6.7. Adjusting pressure of the cutter bar using support springs Adjusting pressure of the cutter bar comprises changing tensioning of support springs by screw. To reduce pressure of the cutter bar on the ground, at the same time it is required to increase ❑... -
Page 36: Replacing The Conditioner's Tines
DISC MOWER OPERATOR’S MANUAL Fig. 31. Adjusting tine conditioner’s mask 6.9. Replacing the conditioner’s tines (Models: KDT 220 S KDT 260 S (SL)) Worn tines must be immediately replaced with new ones. Each time, before the work begins, check the conditioner’s tines along with the bolts on which the tines are mounted and tines’ holders. Bear in mind, that flails should be replaced in pairs (opposite) featuring the same weight in order to keep shaft well balanced. -
Page 37: Adjusting Force Of The Prssure Of Roller Conditioner
OPERATOR’S MANUAL DISC MOWER 1. Scarfier shaft 2. Self-locking nut M12 oc. kl. 8 3. Washer 4. Plastic flail 5. Bolt M12x55 oc. kl. 8.8 6. Plastic flail insert Fig. 32b. Replacement of flails in light-weight conditioner roller Tab. 5. Torque values for bolts In the absence of specific torque values, the following chart can be used as a guide to the maximum safe torque for a particular size and grade of fastener. -
Page 38: Maintenance And Service
DISC MOWER OPERATOR’S MANUAL Fig. 33. Adjusting the force of the pressure of roller conditioner 6.11. Maintenance and service 6.11.1. Checking the V-belts tension Check the V-belt tension. V-belts are tensioned with spring tensioner (Fig. 34) equipped with checking plate. Distance S between plate tip and holder should be 10 mm. If the gap is wider the V-belts will be looser. -
Page 39: Daily Maintenance
OPERATOR’S MANUAL DISC MOWER Fig. 35a. Rollers transmission guard Fig. 35b. Adjusting tension of transmission toothed belt Fig. 35c. Conditioner roller transmission guard Fig. 35d. Adjusting tension of toothed belt for conditioner roller transmission 6.11.3. Daily maintenance Everyday after work please carry out the following maintenance: clean the mower each day after working, especially between discs and the cutterbar, because grass ❑... -
Page 40: After-Season Maintenance And Storing Of Machine
DISC MOWER OPERATOR’S MANUAL 6.11.4. After-season maintenance and storing of machine It is recommended for the operator to wear protective gloves when performing maintenance works. Upon completion of operation the following shall be performed: lower the mower’s cutterbar onto the ground, ❑... -
Page 41: Axis Gear
Fig. 36. Point of oil inspection and manner of oil replacement in cutterbar Tab. 6. Oil capacities Model Oil capacity [l] Oil type Lubrication frequency KDT 180 KDT 220 S/W After first 50 h of operation and then KDT 260 S (SL)/W 80W90 after next 500 h (or at least once a... -
Page 42: Roller Conditioner's Gearbox
DISC MOWER OPERATOR’S MANUAL 7.3. Roller conditioner’s gearbox Before you check the lubrication of the gearbox, please remove the safety guard. Everyday before starting work please check the oil level and, if needed, please refill after having removed the vent A on the top of the gearbox (Fig. - Page 43 OPERATOR’S MANUAL DISC MOWER Lubrication point Lubrication point Fig. 40. Bearing lubrication point with LT43 grease in tine conditioner Lubrication point Lubrication points Fig. 41. Lubrication point of the suspension with Fig. 42. Lubrication point of the suspension with STP grease STP grease...
-
Page 44: Defects And Their Repairs
Torn off shaft of intersecting axis gear 023.01.COER transmitted from the tractor Damaged gears in the cutterbar. This repair must be done by SaMASZ Mower is blocked service Damaged bearings in the disc hub Damaged or dirty hydraulic cylinder... -
Page 45: Disassembly And Withdrawal From Use
OPERATOR’S MANUAL DISC MOWER 9. DISASSEMBLY AND WITHDRAWAL FROM USE 9.1. Disassembly WARNING! Before disassembly the mower should be disconnected from the tractor. Before starting any repair or service the mower should be cleaned and any grass or dirt removed. Carefully check nuts and bolts for adequate torque and the pins for wear. -
Page 46: Warranty Terms
2. The warranty period is for two years from the date of sale to the purchaser, stated above. 3. Any repair which is subject to warranty should be carried out by an authorised SaMASZ dealer. Upon completion of the repair the dealer must submit a warranty claim within 14 days. - Page 47 The Manufacturer have right to introduce design modifications. NOTICE: The SaMASZ company constantly works on development of all of ist machines types and models. Therefore, there is always a possibility in change of form, equipment and technology of the delivered machines. No claims can arise from data, drawings and descriptions included herein as well as in the spare part list.
-
Page 48: Warranty Repairs Record
DISC MOWER OPERATOR’S MANUAL 11.2. Warranty repairs record Repairs description and changed spare parts: Date, stamp and signature of repair shop Date, stamp and signature of repair shop Date, stamp and signature of repair shop... - Page 49 OPERATOR’S MANUAL DISC MOWER APPENDIX. DEFINING THE TOTAL WEIGHT, AXIS LOAD, TYRE LOAD CAPACITY AND MINIMUM LOAD CAUTION: When mounting the machine on a tractor using front and/or rear 3-point linkage, a maximum value of permissible load cannot be exceeded – tractor's front axis load must be 20% of the tractor's overall weight.
- Page 50 DISC MOWER OPERATOR’S MANUAL Calculating minimum weight of front balast M – machine mounted at tractor's rear: ❑ P min. �� × ( �� + �� ) − �� × �� + 0,2 × �� × �� �� �� �� ��������.
- Page 51 OPERATOR’S MANUAL DISC MOWER...
- Page 52 DISC MOWER OPERATOR’S MANUAL SaMASZ Sp. z o.o. tel. (+48) (85) 664 70 31 ul. Trawiasta 1 fax (+48) (85) 664 70 41 16-060 Zabłudów e-mail: samasz@samasz.pl Polska www.samasz.pl...
Need help?
Do you have a question about the KDT 180 and is the answer not in the manual?
Questions and answers