MSA G1 SCBA Operating Manual
Niosh cbrn/nfpa 2018 edition
Hide thumbs
Also See for G1 SCBA:
- User manual ,
- Operating manual (97 pages) ,
- Instruction manual (88 pages)

Subscribe to Our Youtube Channel
Related Manuals for MSA G1 SCBA


Summary of Contents for MSA G1 SCBA
- Page 1 Operating Manual G1 SCBA 2018 Edition NIOSH CBRN/NFPA Order No.: 10187007/00 CR 800000035596 MSAsafety.com...
- Page 2 The warranties made by MSA with respect to the product are voided if the product is not installed and used in accordance with the instructions in this manual. Please protect yourself and your employees by following the instructions.
-
Page 3: Table Of Contents
3.1.2 Qualitative Test ..............21 G1 SCBA 2018 Edition... - Page 4 8.2.2 HUD Light Sensor ..............46 G1 SCBA 2018 Edition...
- Page 5 Safety Precautions for MSA SCBA Cylinders ........
- Page 6 G1 SCBA ........
-
Page 7: Safety Regulations
Refer to User Instructions, and/or maintenance manuals for information on use and mainte- nance of these respirators. Special or critical User Instructions and/or specific use limitations apply. Refer to user instruc- tions before donning. G1 SCBA 2018 Edition... -
Page 8: Niosh S - Special Or Critical User Instructions
CGA G-7.1, Section 2.1, Quality Verification Levels (Grades) D, or equivalent specifications. • In fire service applications, MSA recommends breathing air quality in accordance with NFPA 1989, Standard on Breathing Air Quality for Emergency Services Respiratory Protection. The cylinder shall meet applicable Department of Transportation (DOT) specifications. -
Page 9: Niosh Cbrn Approval Information
NFPA 1982-2018, Standard on Personal Alert Safety Systems (PASS), when configured in accordance with the NFPA approval. The MSA G1 SCBA must be used in accordance with NFPA 1500-2018, Standard on Fire Department Occupational Safety and Health Program, to maintain the requirements of NFPA 1981. -
Page 10: Fcc Approval
Intrinsic Safety Approval Information The MSA G1 SCBA equipped with a regulator with HUD, battery, power module, speaker module, and control module are intrinsically safe and conform to UL 913, 6th edition, Class I, Division 1, Groups C and D, Temperature Rating T1. -
Page 11: Industry Canada Statement
Cylinders, Compressed Gas Association, Inc., Arlington, VA, 2013. • CGA G-7.1, Commodity Specification for Air, Compressed Gas Association, Inc., Arlington, VA, 2011. • ISO 2230, Rubber Products – Guidelines for Storage, International Organization for Standardiza- tion, Geneva, Switzerland, 2002. G1 SCBA 2018 Edition... -
Page 12: Contact Information
Economic Development Canada, Ontario, Canada, 2016. Contact Information For product concerns, contact your local MSA authorized repair center or distributor, who will provide the necessary information to MSA for issue resolution. To report any serious concerns or to inquire about the products, use the following contact information:... -
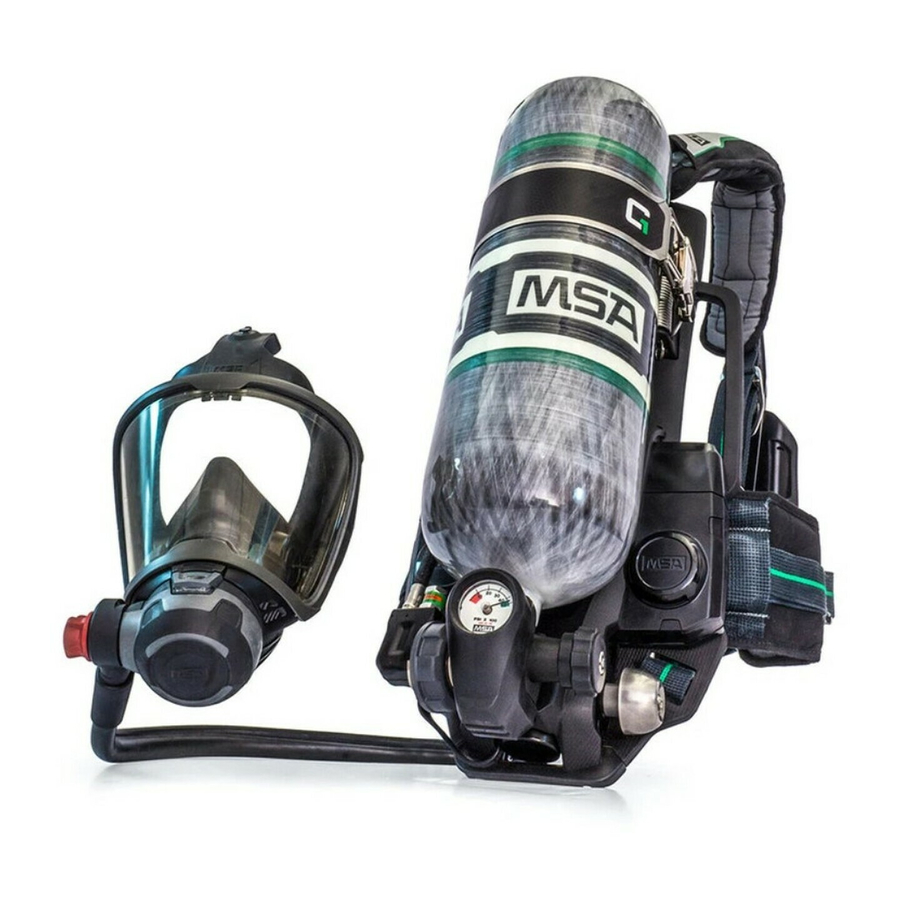
Page 13: Description
Description Description The G1 SCBA, referred to hereafter as SCBA, is an open-circuit, pressure-demand, self-contained breathing apparatus (SCBA). Breathable air is supplied to the user from a self-contained compressed air cylinder. The SCBA includes a broad range of facepiece, regulator, carrier, harness, and cylinder options. -
Page 14: Facepiece
The facepiece includes a broad range of head harness designs and material options. An optional spectacle kit is available. G1 SCBA 2018 Edition... -
Page 15: Regulator
SCBA and PASS device from the power module. The HUD has seven LEDs that are divided between the left and right sides to improve visibility and clarity. A light sensor in the regulator adjusts the LED intensity according to ambient light conditions (optional setting). G1 SCBA 2018 Edition... -
Page 16: Pressure Reducer With Primary Low-Pressure Warning Device
The cylinder valve assembly includes a pressure-relief device to vent pres- sure safely if the cylinder is overpressurized. The cylinder valve assembly can be equipped with a male quick-connect adapter to enable connection to a female quick-connect handwheel assembly. G1 SCBA 2018 Edition... -
Page 17: Pass Device
Description PASS Device The PASS device on the G1 SCBA is made up of three components: control module, power module, and battery module (alkaline, rechargeable). The PASS device monitors movement through a motion sensor. When a user is motionless for 20 seconds, the PASS device goes into pre-alarm. After 30 seconds, the PASS device goes into full alarm to alert those around the user. -
Page 18: Power Module
Description 2.6.2 Power Module The power module distributes the G1 SCBA power and provides all of the information for the control module, regulator, and speaker module. The power module is connected to the backplate. The power module connects to the alkaline or rechargeable battery module, emits audible PASS alarms and pre-alarms, and has four buddy lights. -
Page 19: Optional Components
The Quick-Fill Pouch is a storage pouch attached to the user's right side. It is similar to the ExtendAire II system pouch, but is used to hold a Quick-Fill line. The pouch is held closed securely by a combination of hook-and-loop fasteners and snaps, but can be opened using one hand. G1 SCBA 2018 Edition... -
Page 20: Telemetry Module
The Rescue Belt II system is a personal escape system that can be installed in place of the lumbar pad in a G1 SCBA. The Rescue Belt II system is designed to provide a means of escape from an elevated position. The Rescue Belt II system must be used in accordance with the user’s fire depart- ment procedures. -
Page 21: Size Selection
Make sure the probe does not contact the face during fit testing. Failure to do so can result in false protection factor readings. Use the instructions provided with the MSA Quik Chek Kit (P/N 805078) to perform respirator fit testing. 3.1.1 Quantitative Test A fit factor of at least 500, based on ambient aerosol fit test methods or equivalent, is required before any type of respirator is assigned to an individual. -
Page 22: Visual Inspections
If the SCBA shows damage, deterioration, or any of the conditions listed in the Visual Inspections section, remove the SCBA from service and return it to an MSA trained and certified repair techni- cian. Never substitute, modify, add, or omit parts. Use only exact replacement parts in the configuration ... -
Page 23: Pressure Reducer With Primary Low-Pressure Warning Device
Make sure the bell is aligned correctly and that the screws are tight. Make sure the bell is not loose or able to turn. If the bell is loose or can turn, remove the SCBA from service. G1 SCBA 2018 Edition... -
Page 24: Cylinder And Cylinder Valve Assembly
(DOT) regulations. DOT regulations require that composite cylinders be removed from service after the 15 year. This does not include cylinder valve assemblies that can be reused. Contact an MSA distributor or sales associate for more information about this policy. -
Page 25: Battery Module (Alkaline Or Rechargeable)
The 2018 ExtendAire II system has UEBSS quick-connect fittings. Examine the ExtendAire II system manifold. Make sure all roll pins are present. Make sure there is no dirt or debris in the openings of the quick- connect fittings. G1 SCBA 2018 Edition... -
Page 26: Remote Quick-Fill System
Make sure the Quick-Fill pouch can securely hold and protect the emergency hose. Make sure the Quick-Fill pouch is attached securely to the carrier and harness. Make sure each snap on the Quick-Fill pouch flap is in position and fastened securely. G1 SCBA 2018 Edition... -
Page 27: Record Keeping
When inspection is complete, record the date of the inspection and the initials of the designated inspector. To make a more detailed record of the operations performed, use an MSA Inspection and Maintenance Checklist for Self-Contained Breathing Apparatus (P/N 492329). When the inspection data has been recorded, the SCBA is ready for functional tests. -
Page 28: Control Module, Power Module, Hud, And Primary Low-Pressure Warning Device Operation
Removing the coupling nut while the SCBA is pressurized can result in serious personal injury or death, or damage to equipment. 5.3.1 SCBAs with an Integrated PASS Device To make sure all lights are visible during functional testing, align the control module, regulator, and SCBA as shown below. G1 SCBA 2018 Edition... - Page 29 (15) Shake the control mode to make sure shaking does not reset the full alarm. (16) To reset the PASS alarm, push the left green RESET button on the side of the control module twice within approximately 1 second. G1 SCBA 2018 Edition...
-
Page 30: Speaker Module Operation
Make sure the LED on the speaker module is off. Push and hold the on/off button on the speaker module until there is an audible tone and the speaker module comes on. G1 SCBA 2018 Edition... -
Page 31: Donning
SCBA, refer to Section 1 "Safety Regulations". For NIOSH 42 CFR Part 84 approval configura- tions, refer to the G1 SCBA Approval Label Insert (P/N 10187230). For NIOSH CBRN approval configurations, refer to the G1 SCBA CBRN Approval Label Insert (P/N 10187241). -
Page 32: Donning The Scba
Put the left arm through the left shoulder strap. a) Make sure the orientation of the shoulder straps is correct. b) If there is a chest strap, make sure the regulator hose is on top. Bend forward slightly, resting the carrier on the back. G1 SCBA 2018 Edition... - Page 33 Release the adjustment lever, and pull up or down to make sure the lumbar pad is locked in position. (10) Safety the shoulder straps and waist strap ends. Shoulder straps and waist strap ends must lay flat across the body. G1 SCBA 2018 Edition...
- Page 34 During system pressurization, listen for the sound of hissing or popping. If you hear hissing or popping, remove the SCBA from service, and return it to an MSA trained and certified repair technician. Failure to obey this warning can result in serious personal injury or death.
- Page 35 If the primary low-pressure warning device does not alarm, the power module does not make a sound, or the buddy lights or HUD lights do not come on, remove the SCBA from service. Make sure an MSA trained and certified repair technician corrects the unsatisfactory condition before returning the SCBA to service.
-
Page 36: Donning The Facepiece
Spread the harness with both hands. Put the chin into the chin cup. Pull the head straps over your head. Make sure the harness is in the correct position and is not twisted. G1 SCBA 2018 Edition... -
Page 37: Testing The Negative Pressure Seal
If the facepiece does not hold a negative pressure seal, remove the SCBA from service and return it to an MSA trained and certified repair technician. Do a negative pressure seal test before each use and before going into a toxic atmosphere. -
Page 38: Installing The Push-To-Connect Regulator
WARNING! Do NOT use the SCBA if there is not a continuous flow of air when the regulator bypass valve is open. Failure to obey this warning can result in serious personal injury or death. G1 SCBA 2018 Edition... -
Page 39: During Use
SCBA, refer to Section 1 "Safety Regulations". For NIOSH 42 CFR Part 84 approval configu- rations, refer to G1 SCBA Approval Label Insert (P/N 10187230). For NIOSH CBRN approval configurations, refer to the G1 SCBA CBRN Approval Label Insert (P/N 10187241). -
Page 40: Factors That Affect The Service Life Of The Scba
The HUD, control module, and primary low-pressure warning device indicate when cylinder pressure decreases below the following approximate values: • 775 psi for 2216 psi systems • 1575 psi for 4500 psi systems • 1925 psi for 5500 psi systems G1 SCBA 2018 Edition... -
Page 41: Cold Weather Operation
32°F (0°C), the temperature inside the regulator may be lower. Prior to storage of the SCBA at temperatures below 0°F (-18°C), verify that the alkaline battery module has new batteries and that the rechargeable battery module is fully charged. G1 SCBA 2018 Edition... -
Page 42: Scba With A Telemetry Module
Install new batteries in the alkaline battery modules before storing the SCBA at temperatures below 0°F (-18°C) for an extended period of time. Make sure the rechargeable battery module is fully charged before storing the SCBA at temperatures below 0°F (-18°C) for an extended period of time. G1 SCBA 2018 Edition... -
Page 43: Heads-Up Display (Hud)
Segment 1: 75 – 100% Steady on for 20 sec Segment 2: 50 – 74% Steady on for 20 sec Segment 3: 36 – 49% Flash for 30 sec Segment 4: 0 – 35% Flash continuously until shutdown G1 SCBA 2018 Edition... -
Page 44: Intermittent Mode With Continuous At Segment 3
Segment 4 is reached. In Segment 4, the LEDs flash until the SCBA is shut down. Segment 1: 75 - 100% Oscillate Segment 2: 50 - 74% Oscillate Segment 3: 36 - 49% Flash for 30 sec, then oscillate Segment 4: 0 - 35% Flash continuously until shutdown G1 SCBA 2018 Edition... -
Page 45: Hud Alarm Status
LCD Thermal Alarm Blue flashing* Pressure Drop Alarm (optional) Blue flashing* Evacuate (if equipped) Red flashing* Evacuate confirmed (if equipped) Red solid* Low Battery Alarm Yellow flashing* * Look at the control module display to see more information. G1 SCBA 2018 Edition... -
Page 46: Hud Buddy Light
Heads-Up Display (HUD) ® NOTE: To configure optional alarms, refer to the Operating Manual: MSA A2 Software, Account- ability Control Software (P/N 10162374). 8.2.1 HUD Buddy Light The HUD has a buddy light that uses the top button on the regulator. The buddy light on the regulator is the only buddy light that does not light green. -
Page 47: Control Module
If the control module shows a Hardware Alarm icon during start-up, remove the SCBA from service. Make sure an MSA trained and certified repair technician corrects the unsatisfactory condition before returning the SCBA to service. Failure to obey this warning can result in serious personal injury or death. - Page 48 Control Module The logo screen shows the MSA logo and a user and/or team name, if assigned to the device, on the control module. • The buddy lights on the power and control modules Step 1 cycle through red, yellow, and green.
- Page 49 • Time remaining calculation The icons on the screen indicate different states of the device. Similar to the primary screen, the calculation for time remaining is configurable to pressure status, time remaining, or time on air. G1 SCBA 2018 Edition...
-
Page 50: Alarms
Control Module Alarms ® The PASS device is capable of indicating the following alarms. Use the Operating Manual: MSA A2 Software, Accountability Control Software (P/N 10162374) to configure optional alarms. Alarm Type Control Module Buddy Lights Sound Motion pre- Red atten-... -
Page 51: Secondary Alarms
The attention icon flashes for active and new warnings, or shows steady for warnings that have been viewed. The evacuation alarm (running man icon) shows on the primary screen if the evacuation has been confirmed. The buddy light status is based on the pressure status for secondary alarms. G1 SCBA 2018 Edition... -
Page 52: Thermal Alarm
The secondary alarm icons indicate that a thermal alarm, battery alarm, or loss of radio connection occurred. These icons show on the primary screen until the condition is corrected (for example, the radio connection is re-established). The evacuate alarm can only be cleared by restarting the SCBA. G1 SCBA 2018 Edition... -
Page 53: Id Tagging
A team ID tag is used to assign a team/truck and position to an SCBA. If a team ID tag is scanned into the power module but a name ID tag is not, the team ID will show on the MSA A2 accountability system software. -
Page 54: Base Station Id Tag
When the reading is complete, the control module will show the ID tag information and emit a beep. If the control module does not show the ID tag informa- tion, do Steps (1) and (2) again. G1 SCBA 2018 Edition... -
Page 55: After Use
The user can also assign a tag when the SCBA is turned off. Push and hold BOTH green RESET buttons at the same time until the battery symbol shows on the control module. When the battery icon shows, push the ALARM button. The RFID symbol will show. G1 SCBA 2018 Edition... -
Page 56: Button Functions
While in TIC mode, use single, short pushes of either green RESET button to toggle between palettes. Five different color palettes can be added to the SCBA via custom configuration. For more information, ® refer to the Operating Manual: MSA A2 Software, Accountability Control Software (P/N 10162374). G1 SCBA 2018 Edition... -
Page 57: Turning The Control Module Off
When the pressure decreases below 200 psi, double-push the green RESET button to turn the control module off. The shutdown sequence will show on the screen, and the lights on the control and power modules will stop flashing. G1 SCBA 2018 Edition... -
Page 58: After Use
When protective equipment has been decontaminated, discard it as required by federal, state, and/or local laws. 10.1 Doffing the SCBA Grasp the regulator buttons. Push the release buttons, and pull the regulator out of the facepiece. Turn the handwheel clockwise to close the cylinder valve fully. G1 SCBA 2018 Edition... - Page 59 Put the regulator in the regulator retainer when it is not in use. To remove the carrier and harness, push in on the release button on the waist belt buckle. Disconnect the chest strap buckle (if used). G1 SCBA 2018 Edition...
-
Page 60: Doffing The Facepiece
(12) Remove the right arm from the shoulder strap. (13) Remove the harness. 10.2 Doffing the Facepiece To loosen the head harness, use your fingers to pull the buckles forward. Grip the chin straps and pull the head harness forward over the head. G1 SCBA 2018 Edition... -
Page 61: After Doffing
Make sure the head harness straps for the facepiece and the harness adjustment straps are fully extended. Put the complete SCBA in the storage case or an approved storage location for easy access during emergency conditions. Refer to Section 19 "Safekeeping and Storage". G1 SCBA 2018 Edition... -
Page 62: Cleaning And Disinfecting The Scba
Protection for the Fire Service, recommends that users be trained in the cleaning procedure. MSA recommends the use of Confidence Plus Germicidal Cleaner (P/N 10009971), which cleans and disinfects components in one operation; retains its germicidal efficiency in hard water to inhibit the growth of bacteria;... - Page 63 Operate the exhalation valve manually to make sure it operates correctly. Make sure there is no water, moisture, or dampness on or in the facepiece before returning it to service. (10) Do a negative pressure seal test before returning the facepiece to service. G1 SCBA 2018 Edition...
-
Page 64: Cleaning The Remainder Of The Scba
32°F (0°C), the temperature inside the regulator may be lower. Any water, moisture, or dampness inside can freeze and restrict airflow. Do the following when using a water hose to clean and disinfect the SCBA: G1 SCBA 2018 Edition... - Page 65 After cleaning, use the inspection procedures in Section 4 "Visual Inspections" to examine the entire SCBA. Make sure there is no water, moisture, or dampness on or in any of the components before returning the SCBA to service. G1 SCBA 2018 Edition...
-
Page 66: Cylinders
Use this SCBA only after receiving the correct training. Use this SCBA in accordance with the MSA ... -
Page 67: Preparing Cylinders For Use
For remote connections, make sure the dovetail bracket is attached to the cylinder before use. If the dovetail is not available, do the following: Remove the old cylinder boot and insert (if equipped) from the cylinder. If MSA cylinders are already available, use the following table to determine which cylinder retainer kit is necessary. NIOSH Service... -
Page 68: Installing The Quick-Connect Adapter To The Cylinder
If the cylinder valve assembly is damaged, remove the SCBA from service and return it to an MSA trained or certified repair technician. Make sure there is no dirt, debris, or damage on the internal threads and nipple of the male adapter. - Page 69 Use a torque wrench to tighten the adapter to 13 – 15 ft·lbf (18 – 20 N·m). For cylinders with retainers already installed, use the following MSA part numbers. NIOSH Service Life Rating Pressure G1 Cylinders c/w QC and Air, Packaged...
-
Page 70: Changing The Cylinder
Make sure the cylinder band and latch are in the correct slot. Slot orientation starts from the edge of the cylinder band label. Cylinder Band Diameter Slots 3, 4 H45 (lite) 7, 8, 9 H45 (carbon) 11, 12, 13 12, 13 G1 SCBA 2018 Edition... -
Page 71: Charging The Cylinders
Apply a leak solution to determine if there is any leakage between the cylinder and the valve. a) If there is no leakage, the cylinder is ready for use. b) If there is leakage, remove the cylinder from service. G1 SCBA 2018 Edition... -
Page 72: Uac Fitting
70°F (21°C) to provide the maximum service time. To make sure the SCBA is in a configuration approved by NIOSH 42 CFR Part 84, use only MSA- approved hose assemblies during transfilling procedures. -
Page 73: Filling Instructions
System. NOTE: Rapid intervention teams should use a separate air supply such as MSA's RescueAire II Portable Air-Supply System (P/N 10100095) to fill the SCBA cylinders in atmospheres that are IDLH. Connect the Quick-Fill hose to the secondary air supply. -
Page 74: Transfilling Between Scbas
If the donor's primary low-pressure warning device is not in alarm, the HUD/control module lights are not flashing, and there is sufficient air to transfill to a receiver (more than 1000 psi for 2216 psi SCBAs and more than 2000 psi for 4500 psi SCBAs), do the following: G1 SCBA 2018 Edition... - Page 75 A hissing or popping sound may occur as the fittings sepa- rate and the high-pressure air is sealed off. Immediately install the rubber dust cap on the UAC fitting to make a redundant seal and prevent dirt, water, and debris from going into the fitting. G1 SCBA 2018 Edition...
-
Page 76: Leakage
Do the following to prepare the emergency transfill hose for storage: Push in on the center of the quick-disconnect dust cap to release any pressure in the emergency transfill hose. Wind up the hose and put it in its protective pouch. G1 SCBA 2018 Edition... -
Page 77: G1 Extendaire Ii System
UEBSS quick-connect fittings. Snap-tite and UEBSS quick-connect fittings will not operate correctly together. Do NOT install or try to use any hose assembly or fitting other than those supplied by MSA for the ExtendAire II system with UEBSS fittings. -
Page 78: Quick-Connect Fittings
1/8 in. (0.32 cm). b) Move the outer sleeve of the female fitting away from the male fitting. c) Pull the male fitting out of the female fitting. d) Install dust caps on the quick-connect fittings. G1 SCBA 2018 Edition... -
Page 79: Providing Or Obtaining Emergency Breathing Support
SCBA has been re-opened. NOTE: Having both receiver and donor cylinder valves open during EBSS connection may result in unequal pressure usage between both cylinders causing one cylinder to reduce in air time remaining faster than the other. G1 SCBA 2018 Edition... - Page 80 (11) Upon reaching a safe, nontoxic atmosphere, disconnect the quick-connect coupling between the donor and receiver manifold blocks. (12) Install dust caps on the donor and receiver manifold fittings. G1 SCBA 2018 Edition...
-
Page 81: Flow Test And Overhaul Requirements
Annual flow tests are a requirement of NFPA 1852, Standard on Selection, Care, and Maintenance of Open-Circuit Self-Contained Breathing Apparatus (SCBA), 2019 edition. Although this standard relates to SCBA used in the fire service, MSA requires that a flow test be done at least annually on all SCBA and combination respirators that use a regulator. -
Page 82: Spectacle Kit
2 in. (5 cm) from the ends. Push the top part of the wire frame into the lens of the facepiece. The faceblank has three rubber tabs made to grab the wire frame. G1 SCBA 2018 Edition... - Page 83 Make sure the end of the wire frame is in position in the small pockets in the faceblank on the edge of the lens. Do Steps (4) and (5) on the opposite side. Don the facepiece. Adjust the lens frame up/down and in/out to optimize fit and visibility. G1 SCBA 2018 Edition...
-
Page 84: Telemetry Module
1 second. If the SCBA is logged onto the base station, there is a slight delay between the two pushes of the RESET button and the actual shutdown of the device while the base station removes the SCBA from its registry. G1 SCBA 2018 Edition... -
Page 85: Base Station With The Telemetry Module
The telemetry module is designed to work in conjunction with a remote base station. The base station must be connected to a personal computer (PC) or notebook computer before use. For additional ® information, refer to the Operating Manual: MSA A2 Software, Accountability Control Software (P/N 10162374). -
Page 86: Maintenance
Maintenance Maintenance 18.1 G1 SCBA Make sure this product is inspected and serviced regularly by authorized MSA service personnel. Keep detailed inspection and service records. MSA is liable only for maintenance and repairs performed by MSA. MSA recommends maintenance intervals that follow the overhaul and flow test requirements. -
Page 87: Replacing Alkaline Batteries
(5) Make sure there is no dirt, debris, or damage on the cover of the alkaline battery housing. If necessary, replace it. (6) Make sure the gasket is in position and does not have nicks or tears. G1 SCBA 2018 Edition... - Page 88 NOTE: This is the position of the battery cover to the housing when the Torx screws are tightened correctly. (14) Make sure there is no dirt or debris on the power module. (15) Make sure the pins and grooves are not damaged. G1 SCBA 2018 Edition...
-
Page 89: Disposing Of Alkaline Batteries
Failure to obey these warnings can result in a loss of electronics functionality and serious personal injury or death. WARNING! Use only MSA rechargeable battery charging station (P/N 10158385) with the MSA G1 SCBA replacement rechargeable battery (P/N 10148741-SP). -
Page 90: Charging The Rechargeable Battery Module
MSA recommends removing and charging the rechargeable battery module once a month during normal use. MSA recommends removing and charging the rechargeable battery module every 6 months if it has not been in use or kept continuously in a charging station. -
Page 91: Disposing Of Rechargeable Batteries
Do not dispose of batteries as ordinary trash. Dispose of or recycle the rechargeable battery module in accordance with all applicable federal, state, and local regulations. Contact the local municipality for instructions about the correct disposal of rechargeable batteries. G1 SCBA 2018 Edition... -
Page 92: Safekeeping And Storage
Store the rechargeable battery module fully charged at temperatures between -4°F – 104°F (-20°C – 40°C). MSA recommends charging the rechargeable battery module every 6 months if it has not been in use or kept continuously in a charging station. -
Page 93: Product Labels
Product Labels Product Labels Intrinsic Safety/FCC (Power Module) With Telemetry Without Telemetry 2216 Pressure 4500 Pressure 5500 Pressure G1 SCBA 2018 Edition... - Page 94 Product Labels Facepiece G1 Tag G1 SCBA 2018 Edition...
- Page 95 Product Labels Battery Module Alkaline Battery Pack Rechargeable Battery Pack User Removable PASS Warning (Battery Pack) G1 SCBA 2018 Edition...
- Page 96 For local MSA contacts, please visit us at MSAsafety.com...
Need help?
Do you have a question about the G1 SCBA and is the answer not in the manual?
Questions and answers