Table of Contents
Advertisement
Quick Links
Advertisement
Table of Contents

Related Manuals for MSA G1


Summary of Contents for MSA G1
- Page 1 Operating Manual G1 Integrated SCBA System Order No.: 10165342/04 MSAsafety.com...
- Page 2 MSA Europe GmbH Schlüsselstrasse 12 8645 Rapperswil-Jona Switzerland info.ch@MSAsafety.com www.MSAsafety.com © MSA 2019 All rights reserved...
-
Page 3: Table Of Contents
Assembly..........G1 Alarm and Control Unit (Automatic Distress Signal Unit, ADSU) (Version with Integrated Electronics Only) . - Page 4 G1 Heads-Up Display (HUD) (Version with Integrated Electronics only) ..... . G1 HUD Pressure Status ............
- Page 5 G1.........
-
Page 6: Safety Regulations
Safety Regulations Correct Use The MSA G1 - referred to hereafter also as device - is a pressure-demand self-contained breathing apparatus (SCBA) operating independent of the ambient air for use in firefighting in atmospheres immediately dangerous to life or health. -
Page 7: Approval
Contact Information In the event of a product concern, contact the local MSA authorized repair center or distributor, they will provide the necessary information to MSA for issue resolution. To report any serious concerns or to inquire about the products, go to MSAsafety.com for information on the local MSA authorized repair center or distributor. -
Page 8: Description
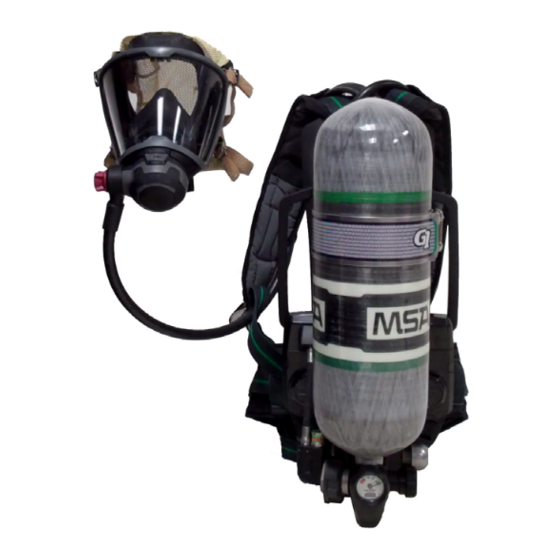
Description Description The G1 SCBA is a pressure-demand self-contained open circuit breathing apparatus (SCBA) operating independent of the ambient air for use in atmospheres immediately dangerous to life or health. Breathable air is supplied to the user from a compressed air cylinder via a pressure reducer, a lung governed demand valve (LGDV) according to EN 137:2006 and a full face mask according to EN 136:1998 (see Operating Manual of full face mask). - Page 9 Description RFID RADIO Fig. 1 System Overview (schematic representation) G1 Integrated SCBA System...
-
Page 10: G1 Facepiece (Full Face Mask)
Description G1 Facepiece (Full Face Mask) The full face mask provides breathable air from the LGDV. The inhalation air flows from the component housing of the mask past the inhalation valve to the inside of the lens (thus keeping the lens fog-free) and then through the inlet valves into the nosecup. -
Page 11: Mask Versions
Harness Versions The mask is available with different head harnesses; Kevlar (textile) 4-point or rubber (5-point). The rubber head straps are numbered to indicate the correct tightening sequence. Fig. 2 Kevlar (textile) harness Fig. 3 Rubber harness G1 Integrated SCBA System... -
Page 12: G1 Demand Valve
Fixed Push-To-Connect G1 Demand Valve (LGDV) The mask mounted G1 Demand Valve is a pressure-demand LGDV, which maintains a positive pressure in the full face mask while the SCBA is in use. The positive pressure LGDV reduces the pressure coming from the pressure reducer further to provide breathable air to the user. -
Page 13: Only)
Description G1 Heads-Up Display (HUD) (Electric Version Only) The HUD is integrated into the LGDV and projects different colored light into the full face mask to indicate current cylinder pressure and alarm status of the device. The HUD allows users to make conclusions about cylinder pressure and alarm status while wearing the SCBA. - Page 14 55 5 bar. Depending on pneumatics the low pressure warning device is located at the G1 Pressure Reducer next to the Cylinder and Valve Assembly (Fig. 5) or within the Single Line (SL) Manifold (Fig. 6 "SL manifold").
-
Page 15: Assembly
Description G1 Harness and Carrier Assembly The harness and carrier assembly consists of: • Backplate (houses the pressure reducer, and, if present, the power module and battery module) • Cylinder retainer to hold the cylinder • Shoulder pads • Adjustable pull straps •... -
Page 16: G1 Alarm And Control Unit (Automatic Distress Signal Unit, Adsu) (Version With Integrated Electronics Only)
Reset button Power/pressure inlet The G1 control module is the user’s interface with the SCBA and ADSU device. The control module is assembled to the high pressure air source and to the power module by a pneumatics and electronic hose assembly. The unit combines an analog gauge and graphical display to provide current status information of the SCBA: •... -
Page 17: G1 Power Module (Version With Integrated Electronics Only)
NOTICE Before placing the SCBA in service, verify that the internal clock is set to the appropriate time as per the user's geographic location using the G1 alphaCONTROL 2 Software. Failure to do so can result in inaccurate data logging. -
Page 18: G1 Voice Projection Speaker (Optional For Version With Integrated Electronics)
Size Selection G1 Voice Projection Speaker (Optional for Version with Integrated Electronics) The voice projection speaker amplifies and clarifies the speech from the full face mask during use. When inhaling, the breathing sound will not be amplified. The voice projection speaker is turned OFF when the complete SCBA is turned OFF and can also be activated/deactivated with its button. -
Page 19: Visual Inspections
If the SCBA shows damage, deterioration, or any of the conditions listed in the Visual Inspec- tions section, remove the SCBA from service and return it to an MSA trained and certified repair technician. Never substitute, modify, add, or omit parts. Use only exact replacement parts in the configu- ... -
Page 20: Lung Governed Demand Valve
Observe national regulations for inspection intervals. Make sure that the cylinder in use is approved as part of the MSA G1 SCBA system and fulfills all requirements to be in operation according to the cylinder manual and relevant national regula- tions. -
Page 21: Control Module
Reinsert the battery module and turn off the alarm and control device. Record Keeping Available as an accessory, the MSA TecBOS.Tech software - stand-alone or as part of the SmartCHECK test bench - provides assistance for inventory management, due date monitoring and service records. -
Page 22: Functional Tests
If the SCBA does not operate correctly for all functional tests, remove the SCBA from service. Make sure an MSA trained and certified repair technician corrects the unsatisfactory condition before returning the SCBA to service. Failure to obey this warning can result in serious personal injury or death. -
Page 23: Check Function Of Lgdv
Close the connection between LGDV and test equipment. Switch on LGDV by pushing the flush button. Open test adapter line. a) Release a volume flow of 5 l/min through test equipment vent. Close vent. The static pressure must be less than 3.9 mbar. G1 Integrated SCBA System... -
Page 24: Control Module, Power Module, Hud, And Primary Low-Pressure Warning Device Operation
Verify that shaking the control module does not reset the full alarm. Reset the motion alarm by pressing the left reset button (green) on the side of the control module twice within approximately one second. G1 Integrated SCBA System... -
Page 25: Voice Projection Speaker Function
OFF. The LED on the voice projection speaker should be OFF. Press and hold the on/off button on the voice projection speaker until the audible tone sounds and the unit turns ON. G1 Integrated SCBA System... -
Page 26: Donning
A nosecup must be installed in the full face mask. In order to guarantee a proper fit for those wearing glasses, the G1 spectacle kit must be worn since ordinary glasses cannot be worn under the full face mask. -
Page 27: Scba Donning Procedure
Bend forward slightly; resting the carrier on the back. Fasten the waist belt and pull forward on the waist strap pull tabs to tighten for a snug fit. a) Most of the SCBA weight should be carried on the hips. G1 Integrated SCBA System... - Page 28 Tuck in the shoulder straps and waist strap ends. a) They must be tucked in and lay flat across the body. Grasp the LGDV and push the side buttons to release the LGDV from the LGDV retainer. G1 Integrated SCBA System...
- Page 29 WARNING! During system pressurization, listen for the sound of hissing or popping. If you hear hissing or popping, remove the SCBA from service, and return it to an MSA trained and certified repair tech- nician. Failure to obey this warning can result in serious personal injury or death.
-
Page 30: Full Face Mask Donning Procedure (See Also Facepiece Operating Manual)
Adjust mask and tighten the straps firmly and evenly. a) Tighten the lower straps first by pulling them straight back, not out. Tighten the temple straps in the same manner. If present, tighten the top strap for best visibility and fit. G1 Integrated SCBA System... -
Page 31: Leak Check
The exhalation valve should open and release the pressure inside the mask. If necessary retighten the straps. a) If the leak check fails, re-don the mask. If the leak check still fails, the mask must not be used. G1 Integrated SCBA System... -
Page 32: Installing The Push-To-Connect Lgdv
NOTE: If the SCBA passes all tests, it is ready for use. These tests must be performed every time before entering a hazardous atmosphere. If the SCBA fails to meet any of the tests, the condi- tion(s) must be corrected before using the SCBA. G1 Integrated SCBA System... -
Page 33: During Use
proper servicing/maintenance has not been made or genuine MSA spare parts have not been used. Take into account the following factors which may affect the duration or the service life: the degree of physical activity of the user;... -
Page 34: Cold Weather Operation
During use in cold temperatures, the SCBA can lose and gain connection with the telemetry module. If the connection to the telemetry module is disconnected, the device will try to reconnect. The breathing performance of the SCBA is not affected by the telemetry module. G1 Integrated SCBA System... -
Page 35: G1 Heads-Up Display (Hud) (Version With Integrated Electronics Only)
G1 HUD Pressure Status The G1 HUD provides the pressure and alarm status to the user through light pipes into the full face mask. The pressure status is on the right side of the user, while the alarm status is on the left side of the user. -
Page 36: G1 Hud Alarm Status
Evacuate Confirmed (with telemetry option Red Solid* only) Low Battery Alarm Yellow Flashing* * Check control module for more information NOTE: For optional alarms, refer to the MSA alphaCONTROL 2 Software to configure these alarms. G1 Integrated SCBA System... - Page 37 G1 HUD Buddy Light The G1 HUD is equipped with a buddy light that utilizes the top button on the LGDV. The buddy light on the LGDV is the only one that does not light green. The buddy light lights up yellow or red if the cylinder pressure falls below a certain threshold.
-
Page 38: Control Module (Adsu) (Version With Integrated Electronics Only)
4. Level for 30 seconds, full motion alarm, deactivated by reset button press With optional telemetry module only the full motion alarm is transmitted to the G1 base station and displayed within the accountability software. When the SCBA is not in use, it is in sleep mode. During sleep mode, the SCBA periodically checks for system changes and wakes as needed. -
Page 39: Use
The pressure status is a configurable option in the control module and is set as the default. The settings can be changed by using the MSA alphaCONTROL 2 Software. The two other options for the primary screen are time remaining calculation or breathing time. - Page 40 The background color of the screen corresponds with the system pressure: Green indicates pressure of 100 bar or higher. Yellow indicates pressure between 99 bar and 60 bar. Red indicates pressure lower than 59 bar. G1 Integrated SCBA System...
-
Page 41: Primary Alarms
Control Module (ADSU) (Version with Integrated Electronics only) Primary Alarms Below is the list of alarms the alarm and control device is capable of indicating to the user. Optional alarms can be activated by using the MSA alphaCONTROL 2 Software. Control Alarm Type... -
Page 42: Secondary Alarms
The thermal alarm activates if the preset limit exceeds the curve shown on the graph. Depending on the severity of conditions, the alarm will self-cancel. This may occur even though the temperature is above the thermal curve. G1 Integrated SCBA System... -
Page 43: Secondary Alarm Icons
Similar to the primary screen, the time remaining calculation is configurable to pressure status, time remaining or breathing time. The icons on the screen indicate different states of the device. The chart below explains the different states of the device. G1 Integrated SCBA System... - Page 44 Change/exchange disabled battery, do not use device NOTE: To get the most out of the batteries, it is recommended to only change the batteries once they reach the low battery alarm (1 red segment). G1 Integrated SCBA System...
-
Page 45: Id Tagging
Control Module (ADSU) (Version with Integrated Electronics only) ID Tagging The G1 was designed to allow the user to tag the SCBA during the use of the product. Press and hold the RESET button until the RFID symbol appears. Place the ID Tag on the user side of the backplate, on the left side of the power module. -
Page 46: Screen Displays During Tagging
To start the tagging procedure, press the RESET button until the RFID screen appears. RFID screen Personal ID TAG read RFID could not be read - try again or check ID Tag note message on control unit When the device has read the tag, it confirms with a beep. G1 Integrated SCBA System... -
Page 47: Button Functions
When the pressure falls below 15 bar, turn the control module off by double pressing the reset button (green). The shutdown sequence will display on the screen and the lights on the control module and the power module will stop flashing. G1 Integrated SCBA System... -
Page 48: After Use
After Use 10.1 Removing the SCBA Grasp the LGDV buttons. Push the release buttons and pull the LGDV out of full face mask. Close the cylinder valve fully. Press the purge button to release system pressure. G1 Integrated SCBA System... - Page 49 To remove the carrier and harness, press in on the waist belt buckle release button. Disconnect the chest strap buckle (if used). To loosen the shoulder straps, grasp the pull tabs and push them out and away from the body. G1 Integrated SCBA System...
-
Page 50: Removing The Full Face Mask
Loosen the head harness by pulling the buckles forward using your fingers. Grip the chin straps and pull the head harness forward over the head. Grip the front of the mask (as shown) and pull the mask away and down from the user. G1 Integrated SCBA System... -
Page 51: Cylinders
Cylinders Cylinders 11.1 Safety Precautions for MSA Self-Contained Breathing Apparatus Cylinders The operating manual of the cylinders has to be regarded. WARNING! This system must be supplied with respirable or higher quality air according to EN 12021. DO NOT drop the cylinder or bump the valve knob. An unsecured cylinder can become an ... -
Page 52: Installing Quick Connect Adapter (Alphaclick 2) To Cylinder
The bore of the cylinder valve must be undamaged and free from dirt and debris. If the cylinder valve is damaged, remove from service and return it to a MSA trained or certi- fied repair technician. - Page 53 Push the quick connect coupling onto the cylinder valve adapter until an audible snap is heard. The handgrip will rapidly rotate approx. 45° counter clockwise indicating that the valve is connected to the pressure regulator. Grasp the handwheel firmly and pull on it to ensure the handwheel is fully attached. G1 Integrated SCBA System...
-
Page 54: Charging Cylinders
Apply a leak solution to determine if there is any leakage between the cylinder and the valve. If there is no leakage, the cylinder is ready for use. WARNING! Never fill cylinders in explosive atmospheres. Enter areas with explosive atmospheres only after the filled cylinder has cooled down. G1 Integrated SCBA System... -
Page 55: Quick-Fill Coupling
When transfilling, the secondary air supply pressure must be greater than SCBA cylinder pres- sure. Examples of air supplies include: cascade air cylinder refilling systems; high pressure compressor systems with a fixed reservoir; or a portable air system such as the MSA RIT Bag. WARNING! DO NOT connect a high pressure SCBA to a secondary air supply with a pressure greater than 300 bar. - Page 56 Listen for any leaks from the Quick-Fill coupling. Immediately install the dust cover on the Quick-Fill coupling. The SCBA cylinder is ready for service if the cylinder pressure gauge needle is on the appro- priate color band. G1 Integrated SCBA System...
-
Page 57: Maintenance And Care Of The Scba
Always use original parts from MSA. Repairs and maintenance must be carried out only by authorised service centres or by MSA. Changes to devices or components are not permitted and will result in loss of approval. -
Page 58: Maintenance Intervals
Mask/Cylinder Operating manuals. Applicable national regulations must be observed For SCBA apparatus that are frequently used, MSA recommends a complete overhaul after approx. 600 hours. For example, this corresponds to 1200 applications with a duration of 30 minutes. Visual test of diaphragm only after use in aggressive media or under extreme conditions, function and tightness test always. -
Page 59: Cleaning And Disinfection
Remove rough dirt from breathing apparatus with water hose. Here, we recommend using a mild detergent. Close cylinder valve, release air from apparatus with lung governed demand valve. Cleaning, light Soiling Clean device manually using a brush, damp cloth or similar. Air-dry device completely. G1 Integrated SCBA System... -
Page 60: Disinfection
• Observe material compatibility and manufacturer's recommendation of the disinfectant. ® ® ® Permissible disinfectant: Incidin Rapid, Ecolab Healthcare, Sekumatic FDR depending on the disinfection/washing procedure. See instructions for use of the disinfection agent. G1 Integrated SCBA System... -
Page 61: Cleaning/Disinfection Mask
Push flush button, fully blow out moisture for at least 20 s. Uncouple from medium pressure. Switch on LGDV with flush button. Dry completely in a drying cabinet at max. 50 °C. 13.4.6 Compressed Air Cylinder For cleaning instructions of the cylinder, see cylinder manual. G1 Integrated SCBA System... -
Page 62: Batteries
NOTE: The temperature class is T4 when the above alkaline cells are installed within the alkaline battery pack, except the temperature class is T3C when the Energizer EN93 alkaline cells are installed within the alkaline battery pack. G1 Integrated SCBA System... - Page 63 Pull the removal tool and the battery module out of the power module. Open the battery module: Loosen the Torx screws in the battery housing lid. Remove the battery housing lid. G1 Integrated SCBA System...
- Page 64 NOTE: This is the position of the battery lid to the housing once the screws are tightened. Install the battery module in the power module: (10) Make sure before inserting the battery pack that the power module is clean and that no pins or grooves are damaged. G1 Integrated SCBA System...
-
Page 65: Rechargeable Battery Module
WARNING! Use only battery charger MSA 10170546 with rechargeable battery module MSA 10161002. Do not remove or install the rechargeable battery module in an environment with explosive concen- trations of combustible gases, vapors, or mists. - Page 66 If charging does not resume, the rechargeable battery module may be exhausted or defective. Install the rechargeable battery module in the power module: Make sure before inserting the rechargeable battery pack that the power module is clean and that no pins or grooves are damaged. G1 Integrated SCBA System...
- Page 67 Do not dispose of batteries as ordinary trash. Dispose of or recycle the rechargeable battery module in accordance with all applicable federal, state, and local regulations. Contact the local municipality for instructions about the correct disposal of rechargeable batteries. G1 Integrated SCBA System...
-
Page 68: Personalization
The name Tag must be scanned into the power module at start of each shift (every 24 hours by default) or prior to each use. NOTE: MSA's A2 Software can be used to change this default to allow a name ID to be perma- nently assigned to the SCBA until a new name Tag has been scanned. -
Page 69: Telemetry Module
Before the control module completely turns off, the base station must remove the SCBA from its registry. This causes the slight delay between pressing the reset button and the actual shut- down of the device. G1 Integrated SCBA System... -
Page 70: Scanning The Id Tag Into The Power Module
ID Tag data that is stored in the power module will be used as the identification for the SCBA in the data log or on the MSA Accountability System Software. If no ID Tag data has been assigned to the SCBA, the power module serial number will be used as its identification on the base station PC screen. -
Page 71: Using The Base Station With The Telemetry Module
WARNING! When using an ID Tag with the G1 power module, the ID Tag must touching the power module during this process. If the tag is not, the device can lockup. To fix the lockup, the batteries must be removed for 30 seconds and then reinstalled. -
Page 72: Using The Scba With Telemetry Module
RESET button twice within approximately 1 second to confirm the evacuation signal. When the evacuation signal is confirmed, the running man icon stops flashing and shows steady on the display until the control module is turned off. G1 Integrated SCBA System... -
Page 73: Safekeeping And Storage
For the safekeeping of the full face mask, a full face mask pouch or container should be used. MSA rubber products are protected by an anti-aging agent that can become visible as a light coating. This coating is harmless and can be removed during cleaning. -
Page 74: Buddy Breather
Ensure that the Quick-connect plug on the manifold black is protected by the supplied dust cap. WARNING! DO NOT install or attempt to use any hose assembly or fitting other than those supplied by MSA for the G1 Buddy Breather System. Misuse can result in serious injury or death. 17.2 Inspection Before Use... -
Page 75: Preparation For Use
Follow these procedures to connect and disconnect the emergency breathing system hardware. Individual development of operating procedures and sufficient training is required to use this equipment in actual emergency conditions. Misuse can result in serious injury or death. G1 Integrated SCBA System... -
Page 76: Hose Connection Procedure
(6) Connect the donor’s and receiver’s manifold blocks using a male and female quick-connect fitting with a single action. NOTE: Each manifold has both male and female quick-connect fittings to either supply or receive air. G1 Integrated SCBA System... - Page 77 (10) Replace the dust cap on the manifold fittings. WARNING! The receiver’s facepiece or regulator must be removed upon disconnection from the donor’s air supply. Misuse can result in serious injury or death from suffocation. G1 Integrated SCBA System...
-
Page 78: Certification
The function of the electronic components were not assessed for the certi- fication in accordance with Directive 89/686/EC or Regulation (EU) 2016/ 425, because even in case of a complete failure of all electronic compo-nents, the respiratory protection provided by MSA G1 remains unchanged. 0158 DEKRA Testing and Certification GmbH, Dinnendahlstr. -
Page 79: G1 Electronic Components
Certification 18.3 G1 Electronic Components 18.3.1 Marking, Certificates and Approvals According to the Directive 2014/34/EU (ATEX) Mine Safety Appliances Manufacturer: Company, 1000 Cranberry Woods Drive, Cranberry Township, PA 16066 Product: SCBA Electronics Type G1 Type of protection: EN 60079-0:2012, EN 60079-11:2012... - Page 80 • Before entering the hazardous area, the complete self contained breathing apparatus elec- tronics type G1 has to be checked for mechanical damages including the conductive ink layers of the housings. • The disconnection of the alkaline battery pack and the changing of the batteries is only allowed in non hazardous area.
-
Page 81: Marking And Certificates According To
18.3.2 Marking and Certificates according to IECEx Mine Safety Appliances Manufacturer: Company, 1000 Cranberry Woods Drive, Cranberry Township, PA 16066 Product: SCBA Electronics Type G1 IEC 60079-0:2011, IEC 60079- Type of protection: 11:2011 Marking: Ex ia IIC T4 Ga -30 °C TX +60 °C TX: The permissible surface temperature depends on device configuration. -
Page 82: Australia
• Before entering the hazardous area, the complete self contained breathing apparatus elec- tronics type G1 has to be checked for mechanical damages including the conductive ink layers of the housings. • The disconnection of the alkaline battery pack and the changing of the batteries is only allowed in non hazardous area. -
Page 83: Ordering Information
G1 SCBA, LGDV, alphaCLICK, HUD 10160445 G1 SCBA, LGDV, alphaCLICK, no electronics 10160444 G1 SCBA, LGDV, no electronics 10160443 G1 SCBA, LGDV, TM AUS, HUD, alphaCLICK, voice amplifier 10177916 G1 SCBA, CL, LGDV, no electronics, CFA, AUS • Reducer: no QF, whistle, handwheel •... -
Page 84: Accessories
Ordering Information 19.3 Accessories Description Part No. APR adapter for G1 mask 10144231 G1 spectacle kit for prescription glasses 10144230 RFID tag for G1 10083875 RFID reader/writer for G1 10158407 Battery removal tool 10164450 RFID tag, G1 (pack of 5) -
Page 85: Full Face Mask
M - Medium C - Cloth Connect EN 136 L/I - Large Hycar APEC L - Large R - Rubber M - M45 x 3 E - Rubber EU with E - ESA ("M"+ buckles ESA-Adapter) G1 Integrated SCBA System... - Page 86 Ordering Information The following table shows all possible configurations that can be ordered for the G1 G1 Integrated SCBA System...
- Page 87 For local MSA contacts, please visit us at MSAsafety.com Because every life has a purpose...
Need help?
Do you have a question about the G1 and is the answer not in the manual?
Questions and answers