
Related Manuals for GigRig G2


Summary of Contents for GigRig G2
- Page 1 The Advanced Switching System User Manual www.TheGigRig.com [COMPANY NAME] Edition May 2017...
- Page 2 10.MIDI IN and OUT 11.ADVANCED FEATURES a) Start Up Options b) Software c) Factory Reset 12.G2’s True Bypass Dynamic Computed Array 13.FAQ’s and Set Up Examples a)Connecting an amplifier’s’ effects loop b)Wet/Dry rigs c)Best order of effects 14.Tech Spec and Patent...
- Page 3 I know you’ll be amazed at what G2 can do, how easy it is to use and the sonic possibilities that are available to you with the touch of a single footswitch. And let’s not forget the most important part - I know you’ll love how G2 enhances your tone.
- Page 4 UIDE You are now ready to rock! Need more presets? Simply press the bank up switch, choose the bank you want, then choose the presets. G2 has 120 presets in total. 8 banks of 15 presets. © TheGigRig Ltd 2013...
- Page 5 Stomp Box Mode End of Quick Start Guide… © TheGigRig Ltd 2013...
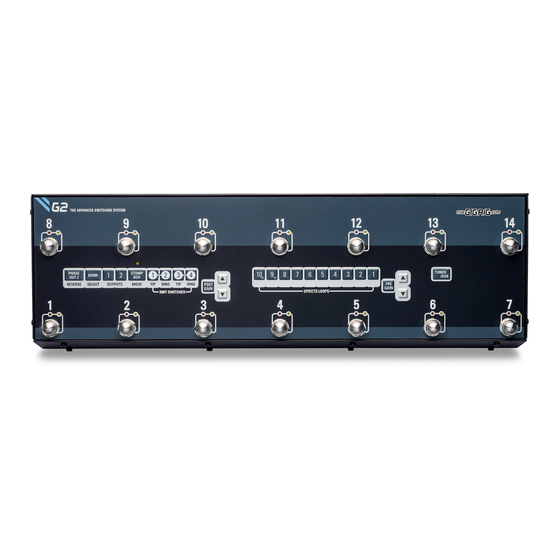
- Page 6 UTTONS AND ONNECTIONS 1. Footswitch – There are 14 footswitches on the G2. 2. Phase Out 2 – This button reverses the phase on OUT2. If you use two amps then you can ensure that both amps are always in phase.
- Page 7 Remember that no matter where it’s set, it needs to be activated by pressing the POST GAIN ON button (number 7) 14. TUNER/AUX – This turns on the tuner output on the back panel of G2. You can have any preset set up as your tuner out.
- Page 8 If you need to get in touch for any reason regarding your G2, please quote this serial number 7. OUTPUTS 1 & 2 – These outputs are the point where the signal leaves G2 and heads back to your amp. If you are using a single amp then use OUT1 ONLY! Out1 Is your earth so it needs to be connected at all times to a good earth/ground.
- Page 9 FFECTS OOPS G2 is so incredibly easy and intuitive to use. You simply press the footswitch/preset that you want to set up, then press the Effects Loops and Control Features buttons that you want to link to that preset, and you’re done! Don’t look for a store/save button, it’s not there. Every time you press an Effects Loops or Control Features button, G2 remembers what you’ve pressed and...
- Page 10 Changing the order of an effects loop G2 allows you to change the order of any of the 8 mono loops per preset, and it’s so easy. Let’s start with a preset that uses loops 2, 3 and 8. I want to move loop 2 so it comes after 3.
- Page 11 This function allows you to set up ANY preset as your tuner. Simply connect your tuner to the TUNER/AUX output on the back panel of G2 then go to the preset you want to set up as your tuner and press the TUNER/AUX button. Now whenever you go to that preset, your signal will...
- Page 12 OUTPUTS 1&2 If you run a dual amp or stereo rig you’ll be very pleased to know that G2 has 2 independent switchable outputs. These outputs solve all the problems associated with multi amp rigs being mainly earth/ground loops and phase problems.
- Page 13 MODE, which could be set up on either the top or the bottom rail of presets. We’ve taken this feature one step further with G2, so instead of this feature only being available on either rail, you can now choose ANY preset to be in STOMP BOX MODE.
- Page 14 4. Let’s press a standard preset, number 2 which might have loops 1, 3 and 8 selected. We want to ADD the delay from loop 10 ON TOP of this sound, but don’t want to clear this sound. All we have to do is press preset number one which is set up in STOMP BOX MODE Note –...
- Page 15 7. U SUBTRACT SING TOMP ODE TO FROM A RESET So you can see how useful using Stomp Box mode is to add to a preset, but what about the ability to subtract? Let’s say you have a solo preset that incudes loops 1, 3, and 8 and let’s say that the effect in loop 8 is a chorus.
- Page 16 TheGigRig.com Hidden Preset All banks of G2 can include a hidden preset. To turn this feature on simply power up G2 while holding down footswitch 14 (repeat to turn the feature off again) Please note, you can turn the hidden preset on and off PER BANK.
- Page 17 2. Use the Insert to connect to your amplifiers FX Loop. This makes using your amplifiers effects loop so easy, and you don’t have to give up a loop in G2 to do it. And as this loop is movable, you can place this insert after ANY G2 effects loop you like.
- Page 18 This is a great position to have the Post Gain amplifier if you use stereo effects as the amplifier will drive the input to the stereo effects so any gain change will happen on both stereo outputs. To change the position of the Post Gain circuit simply hold down footswitch 5 and press the PHASE button.
- Page 19 His way you can choose which sounds will have trails and which ones won’t. Trails works by using G2’s built in mixer. If you go from a preset using loop 9 or 10 to one that doesn’t, the output from the spill over loops will be connected to one side of the mixer while the guitar signal is connected to the other.
- Page 20 Changing the MIDI channels If you want your G2 to send out the program change code on a different channel, hold down foot switch 7 and press the PHASE button and you will access the midi channel setting system. You have a choice of any of 10 Channels for each foot switch.
- Page 21 In this mode your G2 will also send the midi out to the pedals and amps; this is so you can check that the midi is doing exactly what you expect while still in midi setup mode.
- Page 22 When you press foot switch 3 on your G2 you will see your amplifier and the two pedals change instantly. You can now do this setup for all other presets or wait until later when you have finished this example.
- Page 23 G2 can send midi control message as a tap tempo midi output. This function is designed to work on foot switch 7. Instead of sending a program change message, just once; foot switch 7 can be set to send a CC message in time with every tap of the switch.
- Page 24 Special Functions) turn OFF the MIDI on footswitch 7. You can of course leave MIDI on and send a PCM message as well to turn on a specific delay preset, at the same time as sending tap tempo information MIDI TABLES Midi Midi Midi Out...
- Page 25 No Response Midi-in Midi in signals correspond to the above MIDI program change numbers, so that if G2 receives a program patch change message number 8 on channel 1, it will recall preset 8 bank 1. If it © TheGigRig Ltd 2013...
- Page 26 G2 devices together. The G2 can take in Midi on CH1 and be programmed using foot switch 7 to send out the same program change on any of 10 Midi channels. If required each foot switch can be programmed to send its midi on three separate channels.
- Page 27 PECIAL UNCTIONS You can permanently change the way your G2 functions using the Special Functions or SF menu below. Special functions are simple on/off settings you can change by pressing and holding the appropriate footswitch, and pressing the PHASE button on G2. These settings will be memorized even when you remove power from your G2.
- Page 28 It’s not too late yet; however, if you hold down 2 at power on then you press and hold foot switch 3 for three seconds, all your user settings are lost and your G2 resets totally back to factory settings. If you enter this mode TheGigRig Logo will flash continuously.
- Page 29 Your G2 will remember this amp position setting even when powered off. SF6- Test Mode. All lights, all relays and all circuits are switched on. The G2 should then take the maximum current from the supply which is about 500mA. This is a good test and is strongly advised if you are not using TheGigRig Generator to power the pedal board.
- Page 30 Remove and re apply power as a final procedure. All settings have now been lost and your G2 is exactly the same as the day it left our factory. © TheGigRig Ltd 2013...
- Page 31 YPASS ATRIX At the heart of G2 is TheGigRig Passive True Bypass Matrix. This is a revolutionary new technology for pedalboard control and takes the True Bypass approach to an entirely new level. 1. With a standard pedalboard, each of the pedals are placed one after the other chained together with patch leads.
- Page 32 In this example the pedals are completely bypassed, and the guitar signal is goig through one switch in the G2 before being sent directly to the output 4. Now when a pedal is kicked in, the signal is sent directly to that pedal, then directly to the amp bypassing all unused switches 5.
- Page 33 Q. What are the power requirements? Can I power it with a PP2? A. G2 requires 0.5 amp 9V DC power. The plug is standard 2.1mm centre NEG. G2 has been designed to run from TheGigRig Generator power supply which is part of our Modular Power Supply system.
- Page 34 A. Yes, we have launched the G2 EXTENSION KIT which gives you the ability to disconnect the back panel of G2 where all of your effects are connected and put it in a rack or in a separate pedal board and have it stashed out of the way so the only thing on the stage is G2.
- Page 35 A. I cover this in detail on the website under the Top Tone Tips section, but in short, I believe this is a good place to start. 1st Germanium Fuzz Had to start off with this as germanium fuzz pedals are so incredibly sensitive to what goes into them.
- Page 36 Supply Voltage. 9V DC @ 500mA. We recommend TheGigRig Generator power supply ONLY to be used with G2.G2 doubles the voltage internally to 18V DC Input impedance 2.2M Ohm Out 1 - Signal path with input and output amps OFF – True Bypass The Guitar is AC coupled directly to the amplifier through 300R resistance.
- Page 37 In no event will The GigRig be liable for more than the amount of the purchase price, not to exceed the current retail price of the product. The GigRig disclaims any other warranties, express or implied. By using the product, the user accepts all terms herein.
Need help?
Do you have a question about the G2 and is the answer not in the manual?
Questions and answers