Table of Contents
Advertisement
Quick Links
Advertisement
Table of Contents

Related Manuals for GigRig G3 ATOM


Summary of Contents for GigRig G3 ATOM
- Page 1 ATOM THE ADVANCED SWITCHING SYSTEM USER MANUAL...
-
Page 2: Table Of Contents
5.2.6 STOMPBOX -------------------------------------------------------------------------------- 17 5.2.7 TRAILS -------------------------------------------------------------------------------------- 18 5.2.8 PARALLEL ---------------------------------------------------------------------------------- 18 5.2.9 TAP TEMPO -------------------------------------------------------------------------------- 21 5.2.10 COPY / RESET ----------------------------------------------------------------------------- 21 5.2.11 HIDDEN PRESET ------------------------------------------------------------------------- 21 6. GLOBAL SETUP ----------------------------------------------------------------------------22 6.1 GLOBAL SETUP --------------------------------------------------------------------------------------- 22 THE GIGRIG G3 ATOM USER MANUAL... - Page 3 6.8 GLOBAL PHASE --------------------------------------------------------------------------------------- 22 6.9 BACKLIGHT ------------------------------------------------------------------------------------------- 22 6.10 BANK RESET ----------------------------------------------------------------------------------------- 22 6.11 FACTORY RESET ------------------------------------------------------------------------------------- 22 6.12 VERSION --------------------------------------------------------------------------------------------- 22 7. THE G3 APP AND BLUETOOTH-----------------------------------------------------------23 8. TECH SPECS -------------------------------------------------------------------------------24 9. WARRANTY --------------------------------------------------------------------------------25 THE GIGRIG G3 ATOM USER MANUAL...
-
Page 4: Introduction
After years of work by myself and my extraordinary team of engineers, we are delighted to introduce our new generation of pedalboard switching systems – TheGigRig G3 and G3 Atom. We started from scratch and designed G3 from the ground up, obsessively testing and retesting every aspect of its design to ensure we delivered the most robust, fully featured, tonally transparent switching system in the world. -
Page 5: Quick Start Guide
6. Connect your Remote Switch controllable devices (i.e. Amp channel, Remote Loopy 2, Tap Tempo) using G3 Atom’s REMOTE SWITCH sockets. 7. Connect your power to G3 Atom. We strongly recommend using TheGigRig Generator, supplied with your G3 Atom. THE GIGRIG G3 ATOM USER MANUAL... -
Page 6: Programming
Select the EFFECTS LOOPS and CONTROL FUNCTIONS you wish to use with that preset. Repeat for the other presets you wish to programme. There is no store button. The G3 Atom remembers every time you press a button and automatically saves after each step. -
Page 7: Navigating The Deep Edit Menu
OUTPUTS, PHASE, REMOTE SWITCHES, MIDI, PARALLEL & WET/DRY SIGNAL PATHS, DELAY/REVERB TRAILS, PRESET NAMES, BLUETOOTH SOFTWARE UPDATES, STOMPBOX MODES, PRESET BANK COPY & PASTE, SCREEN BRIGHTNESS, etc. THE GIGRIG G3 ATOM USER MANUAL... -
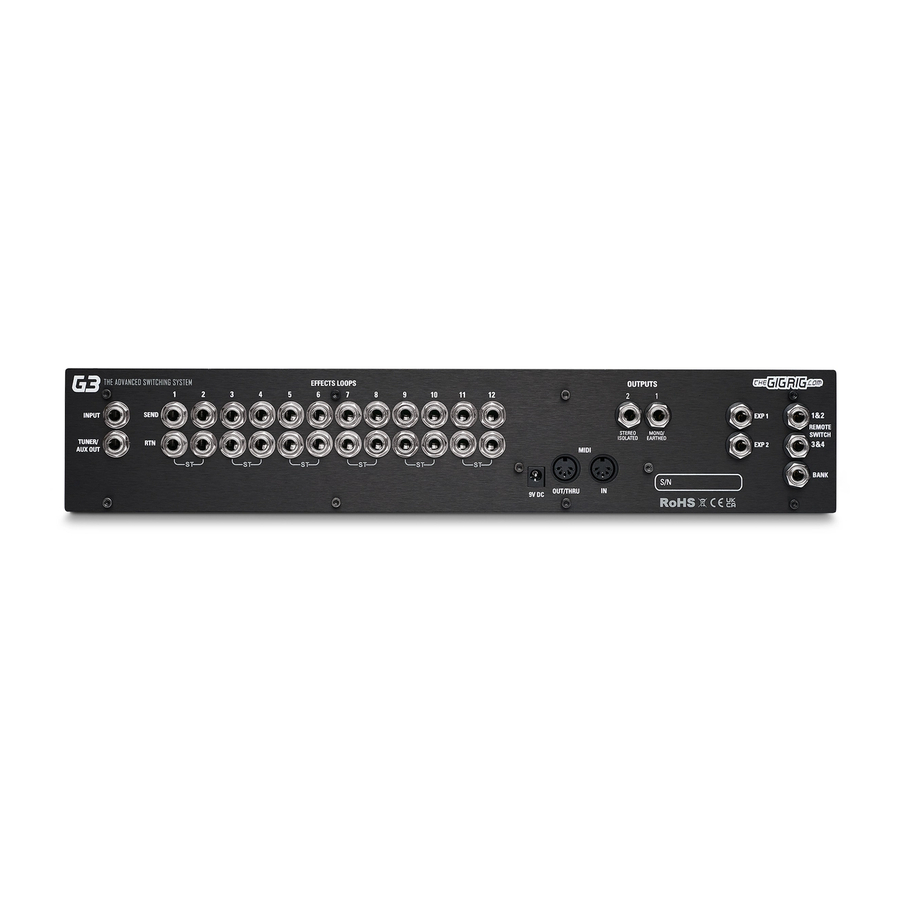
Page 8: Connections
G3 Atom banks remotely. 3.7. MIDI IN & OUT - This is where you connect your MIDI in and MIDI out cables from G3 Atom to control your MIDI effects. The connection here is a standard five pin din. -
Page 9: Connection Examples
Return. CONNECTING STEREO EFFECTS If you want to use stereo effects with the G3 Atom, you can pair two mono loops together into a single stereo loop. G3 Atoms’ loops are paired as follows: Each of G3 Atoms’ loops can be configured into stereo loops using TRS to Dual Mono connectors. - Page 10 FX LOOP sits, between the preamp and power amp. a. First select a G3 Atom loop to connect with your amps FX loop. In the diagram above, loops 1-2 are placed before the pre-amp, loop 3 contains the preamp and loops 4-6 are placed inside the FX loop (note - any loop can be selected).
-
Page 11: Basic Programming
Repeat for each footswitch, as necessary. d. You can now switch between your programmed presets. There are 8 standard pre-sets plus up to 8 hidden presets in each of G3 Atom’s 99 banks. 4.2 STOMP BOX MODE STOMPBOX MODE allows you to add any function or loop(s) on top of a G3 Atom preset. - Page 12 You can create as many Stompbox Mode presets as you like. There are 3 Stompbox modes in the G3 Atom; Standard, Sticky and Flash. Standard is the default setting, to select either of the other two modes you will need to enter the DEEP EDIT MENU, scroll down to STOMPBOX, and select the stompbox mode you want BEFORE you create your stompbox mode preset.
-
Page 13: Changing Banks
G3 Atom footswitch. In the Deep Edit Menu in Global Settings, you have the option to assign the Bank Select switch to a G3 Atom footswitch. Once done, simply tap the footswitch to go up a Bank or press and hold to go down a Bank. -
Page 14: Deep Edit
9. TAP TEMPO - Using a combination of remote switches and MIDI CC messages to enable Tap Tempo 10. COPY/RESET – use this to copy, paste or reset presets 11. HIDDEN PRESET - Each preset in G3 has a separate fully programable hidden preset THE GIGRIG G3 ATOM USER MANUAL... -
Page 15: Atom Stuff
These can be PC (Program Change), CC (Control Change) or EXP (Expression Pedal) MIDI messages. The G3 Atom also has a MIDI Clock and a separate MIDI Tap Tempo feature. MIDI Menu screen – to edit, scroll down to each of the 15 available MIDI messages. - Page 16 Scroll right and choose the HEEL down position number and the TOE down position number. There are two expression pedal inputs in the G3 Atom, so you have the choice of which expression pedal you want to use, to send your EXP commands.
-
Page 17: Expression
Expression Pedal. 5.2.5 LOOP ORDER With the G3 Atom, you can reorder your effects loops in any way you like: a. Go to LOOP ORDER on the Deep Edit menu. b. Scroll right and you will see Loops 1-6 which correspond to your effects loops. -
Page 18: Trails
Parallel, Wet Dry, and even send different effects to different amplifiers. The G3 Atom allows you to flip the phase of the parallel signal chain. This is important for resolving phase cancellation between the two signal paths. If the effect is out of phase you will hear a cancellation/reduction of frequency/volume. - Page 19 Now select Parallel End, then select before Loop 6. d. Select Parallel Loops then engage Loop 2. e. Now use the Phase setting to correct any phase cancellation issue between loop 2 and loop 3. THE GIGRIG G3 ATOM USER MANUAL...
- Page 20 This is basically the same as your Wet/ Dry rig, where you do not have a join after you split the signal. Any stereo effects that you add from this will be added into the signal path, keeping the signal path separate. It’s important that the effect be true stereo with LEFT and RIGHT inputs. THE GIGRIG G3 ATOM USER MANUAL...
-
Page 21: Tap Tempo
5.2.11 HIDDEN PRESET How it works: The G3 Atom enables you to have a secondary preset for every standard preset. In order to use this feature, it must be tuned on in GLOBAL SETUP. a. Go back to the Deep Edit Menu and scroll down to the HIDDEN PRESET option. -
Page 22: Global Setup
Here you can edit the following settings: NUMBER OF BANKS – the G3 Atom has up to 99 banks but if you don’t use that many, you can limit the number of banks you use here. -
Page 23: The G3 App And Bluetooth
DONE! PLEASE NOTE – If you do not connect to the G3 Atom’s BLUETOOTH within 2 minutes the BLUETOOTH in the Atom will automatically turn off. If the screen on your iOS device goes to sleep during the process, simply tap the screen and the download will continue. -
Page 24: Tech Specs
Screen size: Approximately 5 x 3.8cm / 1.96"x 1.5" Weight: 1.65kgs / 3.64lbs Power Requirements: 9V DC (2.1mm centre neg) @ 650mA.We recommend the use of The GigRig Generator power supply supplied with The G3 Switching System. (Strymon Zuma, True Tone 1-Spot and Voodoo Labs Pedal Power 2 have been tested to power G3 sufficiently). -
Page 25: Warranty
In no event will The GigRig be liable for more than the amount of the purchase price, not to exceed the current retail price of the product. The GigRig disclaims any other warranties, express or implied. By using the product, the user accepts all terms herein.
Need help?
Do you have a question about the G3 ATOM and is the answer not in the manual?
Questions and answers