GigRig G2 Manual
- User manual (38 pages) ,
- User manual (34 pages) ,
- Installation manual (7 pages)
Advertisement
- 1 Quick Start Guide
- 2 Buttons and Connections
- 3 Special Functions
- 4 Basic Operation and Effects Loops
- 5 Control Features
- 6 Stompbox Mode
- 7 Using Stompbox Mode to Subtract From A Preset
- 8 Bank Up Engage and Hidden Preset
- 9 Post Gain Functions
- 10 Delay Trails
- 11 G2 Midi
- 12 Midi Out
- 13 Sending No Midi
- 14 Midi In
- 15 G2 Special Functions
- 16 Special Functions in depth
- 17 Software
- 18 Factory Restore
- 19 The GigRig Passive True Bypass Matrix
- 20 FAQ's and Set Up Examples
- 21 G2 Technical Specification and Patent Information
- 22 Documents / Resources
Quick Start Guide
Connect your effects to the G2 Effects Loops Send & Returns
If you use one amp, connect it to OUT1. Connect a second amp to OUT2
If your amp has switchable features such as channel change, reverb or tremolo, you can control these functions with the 4 Remote Switches via 2 TRS connections.

Press the footswitch that you want to set up. The Red LED will light up to indicate you've pressed that footswitch
Press the EFFECTS Loops buttons that you want to attach to that Footswitch
If you want a boost before or after the effects, simply press the pre-gain or post gain buttons and set the levels with the up/down buttons
Tun on the OUTPUTS for that sound
If you have connected the Remote Switches to your amp, press the switches you want to activate
Repeat for all the other footswitches
You are now ready! Need more presets? Simply press the bank up switch, choose the bank you want, then choose the presets. G2 has 120 presets in total. 8 banks of 15 presets.
Our unique Stompbox mode means you can kick in and out any preset just like you would a stomp box. Kick in a boost, a delay, even combinations.
- Press the footswitch you want to set up in stomp box mode
![]()
- Choose the effect(s) and control features you want to be able to kick in on top of any already selected presets


Press the Stompbox Mode button. The yellow LED will light up, telling you that this preset is now in Stompbox Mode and is now locked. To edit, you must press the footswitch, then turn the Stompbox Mode off.

The yellow LED will be lit on all presets set up in Stompbox Mode, making them easily identifiable. Pressing a standard preset will clear any selected Stombox Mode presets.

The volume insert gives you an insert point between any 2 loops which is activated whenever you turn on the Post Gain feature. Plug your volume pedal in here and use the Post Gain level to set your maximum volume. Without the Post Gain selected, your volume pedal will be completely bypassed.

Use any momentary switch to easily toggle between the lower and upper bank of presets

The GigRig G2 also features Midi In and Midi Out, si it can control or be controlled by external Midi devices. You can also connect another G2 for expanded capability.

Each bank has a Hidden Preset. It is accessed by pressing any footswitch for a second time, as if you're turning that preset off. This bring up the hidden preset. You can use this as your bypass tone, your tuner select, anything you like.

There's enough information here to get your G2 up and running in no time at all, G2 has even more amazing features including delay spillover, moveable post gain/ volume insert and other advanced functions. You can read the full manual to become an expert!
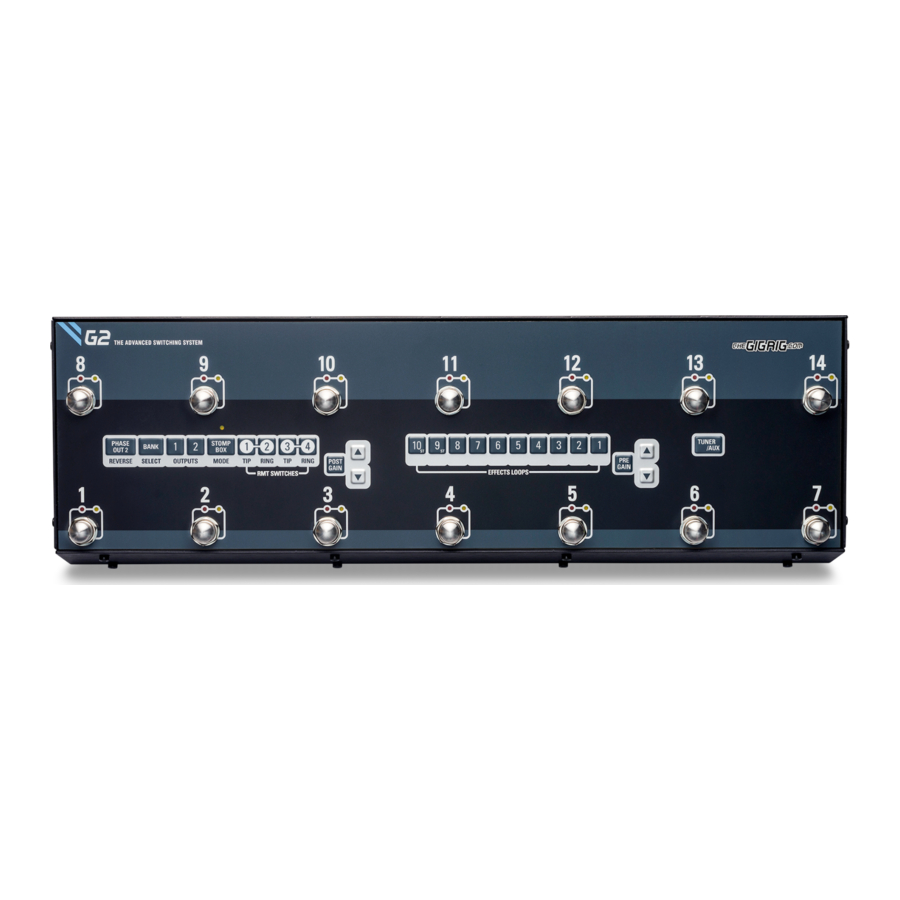
Buttons and Connections

Footswitch – There are 14 footswitches on the G2.

Phase Out 2 – This button reverses the phase on OUT2. If you use two amps then you can ensure that both amps are always in phase. This is a global command and effects ALL footswitches, however, it is possible to program a different phase per preset. This button is also used to enter the special functions. See the Advanced Functions section.
Bank Up Engage – This is how you access the banks. Press the BANK UP ENGAGE button and you'll see lights 1~8 flash. Simply select the bank you want, and then press the preset you want to engage. G2 has 120 presets.
OUTPUTS 1&2 – Choose any combination of outputs 1&2 per preset.
STOMP BOX MODE – You can set up your presets in 2 different states. The first is standard preset mode where you press the footswitch and it clears the previous selection, and the second is STOMP BOX MODE, which lets you add/layer sounds together WITHOUT clearing the previous sound.
REMOTE SWITCHES – There are 4 isolated latching remote switches via 2 TRS connections.
POST GAIN ON – This button will turn on the POST GAIN feature for this pre-set. (Press and hold for 3 seconds UNITY GAIN. This circuit can be moved after any loop. See special functions footswitch number 5.
POST GAIN VOLUME SELECT – These two UP and DOWN buttons allow you to precisely set the level of POST gain. Hold the button down to increase rapidly, or press individually for fine-tuning
POST GAIN LEVEL INDICATOR – This is a visual reference on where you POST GAIN volume is set. Remember that no matter where it's set, it needs to be activated by pressing the POST GAIN ON button (number 7).
Effects Loops – These effects loop buttons are where you program the effects that you want to have turned on for a particular sound.
PRE GAIN ON – This button will turn on the PRE GAIN feature for this pre-set. This circuit is BEFORE the effects loops. Press and hold for 3 seconds to find UNITY GAIN.
PRE GAIN VOLUME SELECT – These two UP and DOWN buttons allow you to precisely set the level of PRE gain. Hold the button down to increase rapidly, or press individually for fine tuning.
PRE GAIN LEVEL INDICATOR – This is a visual reference on where you POST GAIN volume is set.
Remember that no matter where it's set, it needs to be activated by pressing the POST GAIN ON button (number 7)
TUNER/AUX – This turns on the tuner output on the back panel of G2. You can have any preset set up as your tuner out.
TheGigRig LOGO – This backlit logo tells you that the power is on and will also let you know when you are in the HIDDEN PRESET. Go to any preset, you will see the red LED light up saying that you are on that pre-set. Now press it a second time and you are in the HIDDEN PRESET, at the same time the logo will turn blue to indicate that you are in the hidden preset. You can set this up as a bypass, or a tuner, anything you like. You can also DISABLE this feature so the second press simply stays on the preset by powering up while holding down footswitch 14.

INPUT – Plug your guitar in here 2.
TUNER/AUX OUT – Connect your tuner here. The TUNER/AUX button on the top panel of G2 activates the TUNER/AUX output.
EFFECTS LOOPS SEND – These SEND jacks are connected to the INPUT of your pedal. Loops 1~9 are mono sends, and loop 10 has stereo sends. If you are only using a mono pedal, use the 10m send
EFFECTS LOOPS RETURN – This is where you connect the OUTPUT of your effects. Loops 1~8 have mono returns while loops 9 & 10 both have stereo returns
REMOTE SWITCHES – There are 4 remote switches in G2 accessed via two TRS (TIP, RING, and SLEEVE) connections. The connections are as illustrated in the diagram. These connections are LATCHING, not momentary

SERIAL NUMBER – Every G2 has its own unique serial number. If you need to get in touch for any reason regarding your G2, please quote this serial number
OUTPUTS 1 & 2 – These outputs are the point where the signal leaves G2 and heads back to your amp. If you are using a single amp then use OUT1 ONLY! Out1 Is your earth so it needs to be connected at all times to a good earth/ground. OUTPUT 2 is isolated using a high quality audio transformer ensuring that you won't get earth loops. Connect your second amp to OUTPUT 2 and choose the combination of outputs you want using the OUTPUT selection buttons on the top panel.
VOLUME INSERT LOOP – The volume loop insert is the perfect place to put your volume pedal. It is part of the POST AMP circuit and turned on when you have the POST GAIN included on a preset. This insert can be moved after any effects loop so you decide where it works best for you. The VOLUME LOOP INSERT can also be used to connect your amplifier's effects loop to G2. Check out the Special Functions section for more info.
BANK UP – Connect our optional BANK MANAGER switch here so you can remotely access the other banks. You can use any MOMENTARY switch. Press the connected switch, you'll see the lights 1~8 flashing (except for one light which will be solid. This tells you the bank you are currently on.) Select the bank you want to go to, then select the preset. Easy.
Special Functions
On occasion in this manual you will note we talk about Special Functions, or SF followed by a number. This number relates to one of G2's footswitches. Each footswitch also has a special function that you enter into by holding down that footswitch, and while its held down, pressing the PHASE OUT2 button. Our special functions are the key to Midi, moving the volume insert point, turning on a dedicated always on buffer, turning on delay trails and many more functions.
So, if you see a reference to SF3 for example, you know that to enter that mode you need to hold down footswitch 3 and press the PHASE button. SF7, hold down footswitch 7 and press PHASE, etc
Basic Operation and Effects Loops
G2 is so incredibly easy and intuitive to use. You simply press the footswitch/preset that you want to set up, then press the Effects Loops and Control Features buttons that you want to link to that preset, and you're done! Don't look for a store/save button, it's not there. Every time you press an Effects Loops or Control Features button, G2 remembers what you've pressed and automatically saves it to whatever preset you're on.
Lets have a look at programming your Effects Loops.

On the top panel you'll see the EFFECTS LOOPS buttons. These correspond to the EFFECTS LOOPS sends and returns on the back panel of G2.

Let's look at loop1. The SEND from LOOP1 plugs into the INPUT of the pedal you want in loop1. Then the OUTPUT of the pedal plugs into the RTN of loop1. Repeat for all the loops. With your guitar plugged into the INPUT and your amp plugged into the OUT1 try turning on some loops by pressing the EFFECTS LOOPS BUTTONS.
Your guitar signal travels through any selected effects loops from 1 through 10, right to left

Stereo Loops For lovers of stereo effects, G2 includes 2 stereo EFFECTS LOOPS. Loop 9 has a mono send and stereo return, loop 10 has a stereo send and stereo return. These are clearly marked on the back panel. If you are using MONO effects then use the send and returns on the left marked 'M'. For stereo effects use connect the second stereo connection to the send and returns marked with 'ST'. G2 automatically detects if the stereo connections are made and when either of these loops are selected, routes the stereo signal left and right through G2's outputs 1&2.
Once you have selected your combination of effects loops, that combination is automatically stored. Every time you press a button on G2, every time you select or de-select an effects loop or control feature, it is stored to whatever preset you are on. Don't look for a store button, there is one. G2 takes does it all.
Changing the order of an effects loop
G2 allows you to change the order of any of the 8 mono loops per preset, and it's so easy. Let's start with a preset that uses loops 2, 3 and 8. I want to move loop 2 so it comes after 3.

I press and hold loop 2 until it flashes

Now I just select the loop I want it to come before. In this case, I want it before loop 5. Once selected the two loops that your moved loop now sit between will flash. On this preset loop 2 now sits between loop 4 & 5. (please note that loops only move in preset mode, not stompbox)
To check your loop position press and hold loop 10, to clear press and hold loop 9.

Control Features

TUNER/AUX This function allows you to set up ANY preset as your tuner. Simply connect your tuner to the TUNER/AUX output on the back panel of G2 then go to the preset you want to set up as your tuner and press the TUNER/AUX button. Now whenever you go to that preset, your signal will be sent straight to the TUNER/AUX output.
PRE GAIN The PRE GAIN function on G2 gives you the ability to send a controlled level to the input of the first effect selected in the chain, OR you can set it up with no effects loops selected and simply have a buffered clean signal to your amp. Simply press the PRE GAIN button, then the blue LED will come on indicating that the PRE GAIN circuit is now selected for this pre-set. To find UNITY gain (where the output level is the same as the input level) simply press and hold the PRE GAIN ON button for 3 seconds and the level will automatically be set to unity. Now use the UP and DOWN buttons to select your level. If you press and hold the UP and DOWN buttons the volume will change quickly. To fine tune simply press the UP or DOWN buttons momentarily and it will increase incrementally per press. There are 200 increments to the volume level so you can set it to be exactly the volume you need. Remember, the PRE GAIN needs to be turned on for the PRE GAIN circuit to work. You can easily tell exactly where your volume is set by toggling the PRE GAIN button on and off to compare the level with your direct sound. With the PRE GAIN off, the circuit is completely removed from your signal path.
POST GAIN Like the PRE GAIN, the POST GAIN gives you the ability to select a volume level but this time it is AFTER your effects. In fact, the POST GAIN circuit is positioned after loop 10 as standard BUT you can actually position the post gain amplifier AFTER any effects loop you like. To reposition the Post Gain Amplifier simply power up holding down footswitch 5, then press and hold the effects loop button you want to place the amp AFTER. Also the VOLUME PEDAL INSERT LOOP is part of the POST GAIN circuit. This insert is a great place for your volume pedal, or to use with the effects send and return from your amplifier. It means you can connect your effects to your amp's FX loop WITHOUT having to give up one of your G2 effects loops. The POST GAIN feature works exactly the same as the PRE GAIN feature. Simply press the POST GAIN button to turn it on then use the UP and DOWN arrows to select the level. To find UNITY gain (where the output level is the same as the input level) simply press and hold the PRE GAIN ON button for 3 seconds and the level will automatically be set to unity.
REMOTE SWITCHES G2 will allow you to remotely switch pretty much anything that uses a latching switch such as amplifier channels and reverb, remote switching effects, and of course our Remote LOOPY2's. G2 boasts 4 latching remote switches using 2 ¼" TRS sockets. Simply insert the ¼" TRS (TIP, RING, SLEEVE) cables into the REMOTE SWITCHES connections on the back panel of G2, then connect that to your amp and/or device that you want to switch remotely. Once the connections are made simply press the REMOTE SWITCH button(s) on G2's front panel that you want to turn on with your current preset and you're done!

OUTPUTS 1&2 If you run a dual amp or stereo rig you'll be very pleased to know that G2 has 2 independent switchable outputs. These outputs solve all the problems associated with multi amp rigs being mainly earth/ground loops and phase problems. Out2 uses a high quality audio transformer and some very special TGR circuitry to ensure that there will be no earth loops between the two amps, and using the PHASE button you'll be able to ensure your 2 amps are always IN PHASE. YOU MUST HAVE OUT 1 CONNECTED as it is your main earth. You don't necessarily need to have it switched on, but it needs to be connected to your amp with a good path to ground/earth. OUT 2 is the ISOLATED output. This output is floating and will ensure that with two amps connected OUT 1 gives you your path to earth/ground and OUT 2 gives you an isolated output. With the outputs connected to your 2 amps simply press the OUT1 and OUT2 buttons and set up the combination of amps you want per sound.
PHASE The PHASE button flips the phase on OUT 2 so no matter what two amplifiers you're plugged into, you can insure that they'll always be in phase. When you're talking about phase in this context it is a relative term. What it means is that if you have two amplifiers working together you want the speakers to be moving in the same direction, i.e. when the speaker in one amp pushes forward, you want the other amplifiers' speaker to do the same. When one amps' speaker pushes forward and the other amps' speaker pulls back, this means that the amps are OUT of phase. Certain frequencies get cancelled out and can leave the tone sounding very thin. Checking if the two amps are in phase is easy. Simply turn them up to an equal level, the toggle the PHASE button. One setting they will sound rich and full, the other setting they'll sound thin. Thin is out of phase, full is in phase.
Stompbox Mode
One of the features on the original Pro14 that was universally loved was STOMP BOX MODE, which could be set up on either the top or the bottom rail of presets. We've taken this feature one step further with G2, so instead of this feature only being available on either rail, you can now choose ANY preset to be in STOMP BOX MODE.
Here's how it works:

Here is preset 1. No lights are on so it is off.

Press preset 1 and the red LED comes on above the footswitch. You might want this preset to be your delay sound which might be in loop 10, so you press LOOP 10 on the EFFECTS LOOPS panel. Loop 10 turns on indicated by the blue LED so you can clearly see what has been selected.

Now press the STOMP BOX MODE button. The yellow LED above the footswitch lights up telling you that preset 1 is set up in STOMP BOX MODE. The yellow led above the STOMP BOX MODE will also light up indicating that STOMP BOX has been selected for this sound. This preset is now set up in STOMP BOX MODE.
Let's press a standard preset, number 2 which might have loops 1, 3 and 8 selected.

We want to ADD the delay from loop 10 ON TOP of this sound, but don't want to clear this sound. All we have to do is press preset number one which is set up in STOMP BOX MODE
 Note – when you go to a standard preset, all the STOMP BOX MODE presets will still have their yellow LED lit telling you that THIS footswitch is set up in STOMP BOX MODE. When a yellow.

LED is on, it means the preset is locked. To edit a STOMP BOX MODE preset you MUST turn STOMP BOX MODE OFF, then edit the preset, and then turn STOMP BOX MODE back on again
Let's add something else. Let's say we have preset 4 set up in STOMP BOX MODE to change our amps' channel using one of the REMOTE SWITCHES. Kick that in and the amp channel changes with all of the previous selections still activated.

We've built up quite a sound here, now we just want to go back to a simple preset. Easy, just press any normal preset. This turns off all the added STOMP BOX MODE presets and takes you straight back to one of your core sounds
The Golden Rule - If a button does not respond, you need to look at the Stomp Light. To edit a patch you must exit stomp mode. Exit stomp mode by pressing the stomp mode button to turn off the yellow stomp light and then press the foot switch you want to edit. After editing you can turn the stomp light back on again.
Using Stompbox Mode to Subtract From A Preset
So you can see how useful using Stomp Box mode is to add to a preset, but what about the ability to subtract?
Let's say you have a solo preset that includes loops 1, 3, and 8 and let's say that the effect in loop 8 is a chorus.
 - Step 1")
You're very happy with this sound but it would be nice to be able to remove the chorus from this preset.
Let's set up the chorus in loop8 on a separate footswitch in Stomp Box mode, same method as above.
 - Step 2")
Now with my clean chorus sound (preset 2) selected I add this Stomp Box mode, and guess what? Nothing Happens! That's right, because you've ADDED the Chorus (loop 8) in Stomp Box mode, and it's already a part of the preset, but now if I TURN OFF preset 4...
 - Step 3")
It will SUBTRACT that loop from the preset.
Bank Up Engage and Hidden Preset
G2 boasts 120 presets separated into 8 banks

On the top panel you'll see footswitches 1 through to 14. Each of these can be set up as a standard preset OR in STOMP BOX MODE. To access a different bank of presets simply press the ENGAGE BANK UP button. You'll see the lights above footswitches 1~8 flash. 1 footswitch light will be constant, this tells you the bank you're currently on. Press the bank you want to go to, and then press the preset you want to go to.

Of course it's not always feasible to do this in the middle of a song so we have included a BANK UP ENGAGE REMOTE on the rear panel of G2. Use our BANK MANAGER or any MOMENTARY footswitch here to access the other banks of presets.

We now sell our very own G2 BANK MANAGER switch available at TheGigRig.com

Hidden Preset All banks of G2 can include a hidden preset. To turn this feature on simply power up G2 while holding down footswitch 14 (repeat to turn the feature off again) Please note, you can turn the hidden preset on and off PER BANK. Now to access the HIDDEN PRESET, all you need to do is press any selected standard preset for a second time. You'll know you're in the hidden preset as TheGigRig logo will glow blue

Post Gain Functions
Insert Loop The Volume Insert Loop is connected to the Post Gain circuit and is turned on whenever you activate the Post Gain amplifier. With nothing plugged to the Insert Loop the Post Gain will simply amplify your signal at the output but when you connect to the Volume Insert the signal from the Post Gain is routed to the Insert. This gives you some really fantastic options.

- Use any volume pedal, passive or active with no tone loss. Simply set the maximum level using the post gain buttons on the front panel and the low impedance Post Gain circuit will drive the Volume Pedal.
- Use the Insert to connect to your amplifiers FX Loop. This makes using your amplifiers effects loop so easy, and you don't have to give up a loop in G2 to do it. And as this loop is movable, you can place this insert after ANY G2 effects loop you like.
Movable Insert
You can place the insert after ANY effects loop you like using SF5. Not only that but you can change that position for each bank of 8 presets. If you want your volume pedal after your Overdrives, then place the insert AFTER your OD's. Want your delay pedal in your amp's FX loop? Simply place the insert before your delay pedal.
Here's how it works
Your G2 is shipped with POST GAIN after loop 10, but if you place it after loop 8 it will look like this.

This is a great position to have the Post Gain amplifier if you use stereo effects as the amplifier will drive the input to the stereo effects so any gain change will happen on both stereo outputs. To change the position of the Post Gain circuit simply hold down footswitch 5 and press the PHASE button. The effects loop buttons will now flash. Press and hold the effects loop button you want your Post Gain/Volume Insert to be AFTER. The lights will cycle and you're done. If I press Effects Loop button 4, then the post gain circuit will be between loops 4&5.

Remember, that to use the insert loop, the Post Gain must be turned ON.

Post Gain after loop 10
Delay Trails
Another amazing function of G2 is the ability to have your delay 'spillover' into the next preset using a built in mixer in combination with our Post Gain amplifier. You can have your delay in either loop 9 or 10.
There are 3 easy steps to set this up. First you must move the Post Gain amplifier AFTER loop10 by holding down footswitch 5 then pressing PHASE. You'll see the Effects Loop lights flashing. Now press the effects loop 10.
You can have trails on loops 9&10, which is great if you're using reverb and delay. To choose trails on loop 9, simply hold footswitch 9 down and press the PHASE button. Repeat using footswitch 10 to turn on trails for footswitch 10. Holding down footswitch 11 and pressing the PHASE button will clear any connections to the mixer.
Your trails function is now ON. To set up a sound with trails you must have the Post Gain amplifier selected in the sound where you want trails. For example, choose a sound that uses your delay, and then go to a sound with the Post Gain selected, and you will hear the echo trail over the new sound. If you go to a sound WITHOUT the Post Gain selected, the sound will have no trails. His way you can choose which sounds will have trails and which ones won't.
Trails works by using G2's built in mixer. If you go from a preset using loop 9 or 10 to one that doesn't, the output from the spill over loops will be connected to one side of the mixer while the guitar signal is connected to the other.

G2 Midi
G2 has both Midi in and Midi out functionality. Midi out can control any external MIDI capable gear including amplifiers and pedals etc. The MIDI IN lets you control your G2 externally from any device that sends MIDI Program Patch Change messages.
Controlling your external MIDI device by G2 is often as simple as just plugging in a MIDI cable from the MIDI OUT of G2 to the MIDI IN of your external device. G2 sends out a Midi Program Patch Change Message (PCM) signal automatically every time you press a foot switch; the default is Midi Chanel 1 but you can change the MIDI channel per preset. In fact you can send the program patch change message on up to 3 separate MIDI channels per preset.
Or if you need to, you can turn the MIDI off per preset. We have added ten midi channels, so if you don't want a foot switch to send midi on CH1, you can change to any of ten midi Channels CH1 to CH10.
Midi Out
G2 sends out standard patch change messages (PCM) per preset. The default setting outputs these messages on Midi Ch1 but you can set this to any channel you like from 1 to 10, up to three separate channels per preset.
Program change 1 is sent out from foot switch 1 and program change 2 for foot switch 2 and so on up to foot switch 14. Program change 15 is sent out if you use the hidden preset.
When you go to a different bank on G2, the outputted Program Change message will correspond to the preset on that bank. We've included a detailed chart below so you can see exactly what Program Patch Change message is sent for each preset.
Changing the MIDI channels
If you want your G2 to send out the program change code on a different channel, hold down foot switch 7 and press the PHASE button and you will access the midi channel setting system. You have a choice of any of 10 Channels for each foot switch.
Here's how it works: Hold down 7 and press the PHASE BUTTON and you will enter the Midi setup mode. You can exit at any time by simply switching off the power.
In this mode all the foot switches will flash quickly; you can now press any foot switch; your G2 will then show you which midi channels your program change commands will be sent on via the effects loop lights. In this mode your G2 will also send the midi out to the pedals and amps; this is so you can check that the midi is doing exactly what you expect while still in midi setup mode.
You can jump between foot switches and see exactly what happens when each foot switch is pressed.
The effects loop lights will show you the midi channels the program change codes have been sent to. One or up to three lights will be 'on'. For example, foot switch 4 may show blue lights 1, 3 and 4; this means program change code 4 will be sent out on Midi CH1, CH3 and CH4. Your G2 will also send these codes in the order they were entered when first set up by you the user.
If you want to edit any foot switch midi, then simply Press the effects loop buttons corresponding to the channels you want the program code to be sent on. This will overwrite the three existing channel numbers and then exit back to foot switch midi mode. You can then press the foot switch again to test the new midi commands if you are confident you can move onto the next foot switch.

The preset is looking for 3 selections. You can select a single MIDI channel but you must press that button 3 times. For example, if you go to preset number 10 and you want to send on MIDI channel 1 you need to press effect loop 1 three times. If you want it out output on MIDI channels 1 &2, press loop 1, then press loop 2 twice. If you want to send on MIDI channels 4,8 and 10, press loops 4, 8 and 10. Once its received the three presses it will automatically ask you to select the next preset.
To go to a different bank and edit the MIDI out on a preset simply press the BANK UP button, then select the bank you want to go to, select the preset and edit the MIDI in the same way.
Your G2 will remember these settings; so reading, programming and experimenting with midi is very simple; you don't need to exit midi setup mode to test the settings.
Remember, you will always need three presses of the blue loop light buttons before you can set up another foot switch or function. Or do anything.
Sending No Midi
When you're editing your preset you'll notice that the remote switch 1 light is on. This means that MIDI messages are turned on. If you want to turn off MIDI completely for that preset, simply select remote switch 2 before moving on to another preset or exiting the MIDI setup by pressing the PHASE button.
Example, tips and tricks
Set up your pedal board and connect G2's midi out to say two different pedals and a midi controlled amplifier. Let's set the amplifier to midi program change ch1 on foot switch 3 and the two pedals to ch2 and ch3 respectively; also on foot switch 3. You can do this by entering the midi out setup on foot switch 7. (See special function 7 for midi out). Your amplifiers midi input should be set to receive on ch1 and the midi in on the foot switches should be set to ch2 and ch3, as you would expect.
When you press foot switch 3 on your G2 you will see your amplifier and the two pedals change instantly. You can now do this setup for all other presets or wait until later when you have finished this example.
 Tip. You can have more than one pedal on each midi channel; remember with G2 the unused effects are out of the signal path and so it does not matter how they are set until they are selected.
Tip. You will need to do the midi mapping on each of your midi pedals and midi amplifiers. See their corresponding manuals for individual midi in instructions.
Tip. The midi setup on function 7 (foot switch 7) will allow you to send midi while still in setup mode; this is so you can send midi to devices that can learn and associate midi commands with preset functions.
Using Midi with StompBox Mode
One of the great things about using Midi with our StompBox mode is that you can set it to work for any situation.
Example 1. I have a Midi controlled delay and reverb pedal, and I want to have two stompbox presets that turn on two different delays on top of any other sound I have going.
First, set the Midi IN Channel on the pedal so that it has its own channel, let's use channel 2. Now we do into SF7 Midi set up mode, we select the presets that we want to use as stompbox mode presets for out two delay sounds, and make sure that they are set to Midi channel 2 and only Midi channel 2 by using the instructions in the chapter above. Exit SF7 Midi set up mode by pressing the PHASE button. Now press the G2 footswitches that you want to set up your first delay on, don't forget to make sure that you have the delay effects loop selected as well. You'll see the delay preset changing on the pedal. Now program the corresponding sounds you want on the pedal. When you're happy with that just press the StompBox Mode but and you 'll now have and instant access to those stored delay presets and be able to throw them on top of any other preset. You'll still be able to use those delay and reverb pedals as part of a preset, you just need to make sure that preset also includes Midi channel 2, as well as the channel on any other Midi device you want to include.
Example 2. Using StompBox mode with non Midi pedals.
All you need to remember is to turn the Midi OFF on any StompBox mode preset that that doesn't include a midi device. (See Special Function 7 for details) If you don't then G2 will still send PCM message so while you might be trying to add a phaser, the Midi signal will still be sent to the Midi device.
CC Messages For Tap Tempo
G2 can send midi control message as a tap tempo midi output.
This function is designed to work on foot switch 7.
Instead of sending a program change message, just once; foot switch 7 can be set to send a CC message in time with every tap of the switch.
A CC message will be sent to the midi out in time with your foot switch press. In single mode and on each press in stomp mode)
This tap tempo output can be switched on or off in all eight banks separately.
To activate CC tap tempo output, go to SF3 (this is Special Function Footswitch 3, so press and hold footswitch 3m then press the PHASE button). Press loop1 to 'on' or any other of the loops, to tell G2 what CC messages should be sent. See below.
Here is a list of the pedals supported so far:
- Strymon TimeLine/Eventide H9/Source Audio Nemesis/Chase Bliss Audio Tonal Recall - #cc 93 (any value) CH2
- Eventide TimeFactor - #cc 80 (value 127) CH2 3 DD500 - #cc 84 (any value) CH2
- Moog analog/supa delay #cc 114 (any value) CH2
- H9 - assign #cc 93 to tap tempo CH2
- Line 6 M series #cc 64 CH2
- Pigtronix Echolution Tap Tempo - #25
- RESERVED
Whilst in SF3 you can use the loop buttons to select the required pedal from the list above. You can also use the ENGAGE button to set the CC messages in other banks. Press Phase to escape as usual.
When foot switch 7 is pressed its light will flash if any CC message has been set to 'on' in the current banks.
To indicate that this mode is activated, foot switch 7's will flash at 100 beats per minute, but please note the speed of the flashing led will not change in relation to the tempo tapped in.
Combined with the CC messages you can send up to three program changes each time you stomp on foot switch 7. This is achieved by selecting stomp mode and selecting up to three midi outputs using SF7.
If you just want the CC message and nothing else, then switch on stomp and using SF7 (see Special Functions) turn OFF the MIDI on footswitch 7. You can of course leave MIDI on and send a PCM message as well to turn on a specific delay preset, at the same time as sending tap tempo information.
MIDI TABLES


Midi In
Midi in signals correspond to the above MIDI program change numbers, so that if G2 receives a program patch change message number 8 on channel 1, it will recall preset 8 bank 1. If it receives patch change 114, it will recall preset 2 on bank 8. You can press the foot switches yourself at the same time as well, nothing is locked or suspended.
Filtered Midi Through
The Midi-in signal can be passed to the Midi out of your G2; however, only program changes will be passed through to the Midi output all other Midi messages will be filtered out. Midi through can be switched off, for example when connecting two G2 devices together. The G2 can take in Midi on CH1 and be programmed using foot switch 7 to send out the same program change on any of 10 Midi channels. If required each foot switch can be programmed to send its midi on three separate channels.
Other interesting MIDI features
We have set Midi in CH2 as a do not respond channel. You will see that your G2 has received the midi word; however, your G2 is programmed to ignore all Midi input commands on this channel.
Filtered MIDI Through
Midi-in signal will be passed to the Midi out of your G2; however, only program changes will be passed through to the Midi output all other Midi messages will be filtered. This filtered Midi through can be switched off, for example when connecting two G2 devices together. Please see special functions to switch off Midi through.
Reset using MIDI
Any program change sent to your G2 on Midi CH4 will instigate a soft reset. This is exactly the same as switching of the power off and then switching it on again. Your G2 will flash then go to bypass.
G2 Special Functions
You can permanently change the way your G2 functions using the Special Functions or SF menu below. Special functions are simple on/off settings you can change by pressing and holding the appropriate footswitch, and pressing the PHASE button on G2. These settings will be memorized even when you remove power from your G2.
Here is a list of special functions, further details of these special functions can be found in this manual.
Continuous light show. Buttons locked for security.
Factory Reset. Hold down 2 and press PHASE, then press and hold 3. All user settings are lost. Take care!
Mono/Stereo mode and input buffer. 1=mono, 2=stereo on loop 9 & 10. Aux = Input Buffer.
Phase Mode. (Global or Patch) toggle. Memorized
Volume Insert Point. Select post amp/mixer/vol insert location & software version #
Test Mode. Test mode all lights and relays on. (0.5A power). SF7- Midi Mode. In Midi mode you can set up to 3 Midi channel sends on each foot switch. RMT SW 1=Midi ON, 2=Midi OFF
Mixer Mode. Toggles 9 right Rtn to mix with out-amp (mixer input) Memorized
Trails Loop 9. Toggles 9 left to mix with out-amp (trails) Memorized
Trails Loop 10. Toggles 10 left to mix with out-amp (trails) Memorized
Mixer Rest. Mixer input trails and midi through. (No other settings are changed.)
Midi Thru ON. Switch on midi through. for midi control of pedals etc.
Midi Thru OFF. Switch off midi through. For two unit operation.
Hidden Preset Mode. Toggles second press bypass on all foot switches
Special Functions in depth
SF1- Continuous light show.
All switches are deactivated until power is removed and re applied.
SF2- Factory Settings Restore. WARNING you have now entered a mode where you can lose all your patch settings! It's not too late yet; however, if you hold down 2 at power on then you press and hold foot switch 3 for three seconds, all your user settings are lost and your G2 resets totally back to factory settings. If you enter this mode TheGigRig Logo will flash continuously. Removing the power at this point will exit this mode and nothing will be lost.
SF3- Stereo or Dual Mono function and Input Buffer. Out lights 1&2 will flash. Choose 1 for dual mono function or 2 for stereo function. Set in Dual Mono it insures that both loops 9 & 10 will go through the POST GAIN amplifier and then to both outputs. In STEREO function when using loops 9&10 only OUTPUT 1 will receive the POST GAIN amplifier. Factory preset is stereo.
Input Buffer
This feature allows you to turn on an input buffer located at the input of G2, directly after the guitar input. Ideal if you want all your pedals to see a low impedance input or if you are connection your amps FX Loop to G2. This buffer is programmable PER BANK so if you want to turn it on for all presets you'll need to repeat this process on all banks. In SF3 simply press the AUX/TUNER OUT button. You'll know if the buffer is on because TheGigRIg Logo will have a blue light in the middle. The input buffer is turned on for BANK 8 in factory settings so if you want to try the buffer, set up your preset in BANK 8. You can of course turn off the buffer in BANK 8 by simply repeating the SF3 process in BANK 8 and pressing the AUX/TUNER button.
SF4- Phase mode. (Global or Patch) this toggles the way the phase switch works.
In global mode the phase switch reverses the phase of output 2 with respect to output 1 no matter what patch you have selected or weather Engage is selected (Ideal if you have a two amp system).
In the more complex Patch mode the relative phase of output 2 can be selected for each of the 28 patches this is ideal if you have loops with none true phase pedals. Hold down foot switch 4 again at power on to toggle back to Global Phase mode.
These setting are memorized by your G2; it will remember everything you have set.
You can even move to Global mode without losing your patch mode settings.
SF5- Volume Insert Position. This is how you chose the location of the output amplifier volume pedal insert and the mixer input (the default location is after loop 10). Note this insert is buffered and can be used for any type of pedal or amplifier loop.
When foot switch five is held down and power is applied, all the blue loop lights will flash on and off. Simply hold down the loop button you want the amplifier and loop send/return to follow. The G2 will then go back to normal mode.
If you are using the output amplifier as a mixer; the mixer input (default 9 right) will also be inserted in between the specified loops
Your G2 will remember this amp position setting even when powered off.
SF6- Test Mode. All lights, all relays and all circuits are switched on. The G2 should then take the maximum current from the supply which is about 500mA. This is a good test and is strongly advised if you are not using TheGigRig Generator to power the pedal board. Dimming or resetting would be obvious signs of weak unsuitable power.
SF7- Midi Setup. This enters a Midi setup mode so each foot switch can send out its program change code on any of ten available Midi Channels.
You can set Midi on each foot switch to send its foot switch program number on up to three separate channels to control thee separate pedals or amplifiers etc. See MIDI section for more details.
SF8- Mono/Stereo - This toggles the function of the stereo RIGHT input on loop 9. This special function changes this input from a conventional stereo return to a guitar input that will mix another guitar or pedal with the out-amp. This function is memorized by your G2.
This mixer input is only active when the output amp is selected; it can be used to mix in other guitars, drum machines or pedals into your system. (High quality low noise mixer)
SF9- Loop 9 Trails/Spillover. Loop 9 trails (delay spillover) on/off. This toggles the function of the stereo LEFT input on loop 9. This special function changes this input from a conventional stereo return to mix stereo trails into the out-amp. This function is memorized by your G2 until you power on again holing down foot switch 9.
Note to use trails you must have the output amp selected in your signal path.
SF10- Loop 10 Trails/Spillover. Loop 10 Trails (delay spillover) on/off. This toggles the function of the stereo LEFT input on loop 10. This special function changes this input from a conventional stereo return to mix stereo trails into the out-amp. This function is memorized by your G2 until you power on again holing down foot switch 10.
Note: to use trails you must have the output amp selected in your signal path, AND it must be placed AFTER the delay loop, so after 9 or 10. To do this power up holding down footswitch 5, then press 9 or 10 to reposition the output amp.
SF11- Mixer Reset. This will turn off the Mixer and Trails functions on loops 9 and 10. It will switch off all mix inputs and trails functions to the original factory defaults. No other settings or patch parameters are changed or lost.
SF12- Midi Thru ON. This function will switch ON midi 'through'.
SF13- Midi Thru OFF. This function will switch off midi through for two-unit operation. In the default mode a midi in signal will activate a foot switch and then the foot switch will send its program change command to the midi out.
In some configurations when two G2 systems are connected midi through needs to be switched off.
Note: this midi through is filtered; only foot switch program changes will go through to the midi out. In this mode pressing a foot switch with your foot will still send a midi output.
SF14- Hidden Preset Mode - toggles second press bypass on all foot switches. This function is programmable PER BANK, so you can decide if you want the hidden preset to be active on all banks or just a select few.
Software
G2 uses TheGigRig advanced pedalboard operating system, PBOSXX1, which remembers every button press on every one of the 120 presets. It also remembers each and every pre-gain and post-gain volume setting for all 120 of these presets and much more.
To make sure you can't go wrong it also stores all your settings for over 40 years, even with the power switched off!
Designed using the same techniques as aircraft software, for freeze free reliable operation, it makes sure you don't lose your settings. Even if the power is lost in the middle of changing a patch it will remember your last action.
It also watches your settings and if you try to do something that would be confusing or just wrong, it won't let you progress.
Designed for simplicity on the surface and complex functions underneath; all you need are a couple of facts and you are ready to go.
Note: You don't need to look for a save button - there isn't one. Everything is saved as you go along.
If a button does not respond, you need to look at the Stomp Light. To edit a patch you must exit stomp mode. Exit stomp mode by turning off the yellow stomp light and then press the foot switch you want to edit. After editing you can turn the stomp light back on again.
Factory Restore
Your G2 can be returned to its factory settings at any time. All the memories and therefore all your patch settings will be lost. Following the instructions below will completely remove all your patch and volume setting from all corners of the G2s memory.
THIS PROCEDURE WILL CLEAR ALL STORED SETTINGS!
To clear the G2 and return the unit to its factory defaults, remove the power then hold down foot switch 2 whilst you reconnect the power. The G2 will not power on as normal, instead it will flash TheGigRig Logo. You can still change your mind and abort this total reset by removing the power plug again; however, if you are absolutely certain you want to lose all your settings and return the unit to its factory defaults, whilst the logo is flashing hold down foot switch 3. Your G2 will flash and go to bypass; all memories are now re-written. Remove and re apply power as a final procedure.
All settings have now been lost and your G2 is exactly the same as the day it left our factory
The GigRig Passive True Bypass Matrix
At the heart of G2 is TheGigRig Passive True Bypass Matrix. This is a revolutionary new technology for pedalboard control and takes the True Bypass approach to an entirely new level.
- With a standard pedalboard, each of the pedals are placed one after the other chained together with patch leads. Each pedal and each patch lead adds a small amount of load to the signal. By the time the signal reaches your amp it can be vastly different to what is actually coming out of your guitar.

- With relay-based systems, the relays bypass the pedal and the patch leads reducing the load. This approach solves a magnitude of problems and done properly with good quality relays can make a huge difference to your tone and signal path quality. But of course, we are driven by the question, can we do it better?

- TheGigRig True Bypass Matirx technology not only bypasses the pedals and patch leads, but also bypasses any unused switches. In this example the pedals are completely bypassed, and the guitar signal is going through one switch in the G2 before being sent directly to the output

- Now when a pedal is kicked in, the signal is sent directly to that pedal, then directly to the amp bypassing all unused switches.

- When multiple pedals are selected the output of the first pedal is connected directly to the input of the next pedal selected in the chain.


FAQ's and Set Up Examples
There are a load of constantly updated FAQ's on the website but for now here's a few that might help.
Q. What are the power requirements? Can I power it with a PP2?
A. G2 requires 0.5 amp 9V DC power. The plug is standard 2.1mm centre NEG. G2 has been designed to run from TheGigRig Generator power supply which is part of our Modular Power Supply system. We cannot guarantee G2's performance from any other supply. A PP2 does not have enough juice t power G2.
Q. What are the dimensions?
A. 43cm x 13cm x 7.8cm. G2 weighs 2 kilos
Q. Can I change the channels of my amp with G2?
A. Yes, check out the REMOTE SWITCHES in Control Features section.
Q. How do I use G2 with my Amps FX LOOP?
A. Like this. PLEASE NOTE, depending on your rig you may want to turn on the Input Buffer using SF3. See 'Special Functions' above for details.

Q. Can I have a Wet/Dry or a Wet/Dry/Wet set up?
A. Yes, check this out

Q. Can I have my effects off stage or behind my amp and just have G2 control everything?
A. Yes, we have launched the G2 EXTENSION KIT which gives you the ability to disconnect the back panel of G2 where all of your effects are connected and put it in a rack or in a separate pedal board and have it stashed out of the way so the only thing on the stage is G2.
Q. How do I connect G2 to my Pedaltrain?
A. Using our Pedaltrain brackets, G2 can securely connect to your Pedaltrain without any messy Velcro. The brackets attach to the underside of G2 using the screws provided, then using the cable ties also provided, lock directly to the Pedaltrain.
Q. How can I get more loops?
A. Yu can use Remote Loops 2's controlled by the Remote Switches for an extra 2 or 4 programmable loops or you can connect two G2's together and 20 programmable loops per preset!
Q. What order should I place my effects in?
A. I cover this in detail on the website under the Top Tone Tips section, but in short, I believe this is a good place to start.
1st Germanium Fuzz Had to start off with this as germanium fuzz pedals are so incredibly sensitive to what goes into them. So if you have a germanium transistor Fuzz Face or Tone Bender type fuzz pedal, start off with it right at the front of your chain. It may not end up here, but hear it first with just your guitar going straight in.
2nd Envelope Filter and Tone Shaping Effects - These include Auto Wahs and Wah pedals. These effects rely on the dynamics of your guitar tone and should be the first thing you signal sees.
3rd Phasers/Vibes/Flangers - This might sound a bit unusual, but try it. Phasers work so great going into gain stages such as OD's or preamps. Flangers can work great at the end of the chain but for that Van Halen type flanger tone, it needs to go right at the front before the OD's
4th Compression - Compression can work well with a variety of different pedals, so best to have it close to the front.
5th Overdrives, Distortions and Fuzz's, and in that order. If you go from the least amount of drive to the greatest amount of drive you can get some pretty cool combinations. A low gain pedal can be a great solo boost into a higher gain pedal, but the other way around can often spell disaster. There is one major exception to this rule - Germanium Transistor boosters such as Fuzz Faces, Octavia's and treble boosters. The nature of the design of these effects means that they don't like to see the buffer from another pedal at the input. They prefer to see the guitar pickup. So, if you have one of these type of pedals, best to stick it at the front before any buffers.
6th Modulation Effects - These include chorus and tremolos. It can also include flangers, but I personally prefer them right at the front with phasers. The specific order of the modulation effects is probably the least important as you rarely use more than one at a time and if you do is more a sound effect than a toneful combination.
7th Delay effects - A good rule of thumb here if you use multiple delay effects is to put your short delay before your long delay. Adding a nice drawn out delay on top of a slap back effect can sound quite cool.
8th and finally Reverb - Technically speaking, reverb is actually a delay effect. Very short delays combined to give the effect of being in an enclosed space. Think about what happens when you shout in a hall. That's the delayed sound of your voice bouncing of the walls. Leaving this effect till last works well with many different combinations including clean and dirty sounds.
Don't Forget, you can change the order of any off the 8 mono loops in any preset by pressing and holding the loop you want to move, then selecting the loop you want to place the moved loop BEFORE. For more details check out Basic Operation and Effect Loops
G2 Technical Specification and Patent Information
Physical size: The unit, without the power supply, will fit in a container with inside dimensions of 44cm X 13cm X 7.8cm.
Supply Voltage.
9V DC @ 500mA. We recommend TheGigRig Generator power supply ONLY to be used with G2.
G2 doubles the voltage internally to 18V DC
Input impedance 2.2M Ohm
Out 1 - Signal path with input and output amps
OFF – True Bypass The Guitar is AC coupled directly to the amplifier through 300R resistance.
Out 1 is earthed and must be connected to ground at all times.
Out 2 - Signal path with input and output amps
OFF – Buffered and Isolated
The Guitar is connected to the amplifier through a Laser Trimmed Precision Buffer and audio Isolation transformer to remove earth loop hum.
Out 2 is isolated and phase reversible.
Input signal handling Maximum = 19.4V peak to peak in true bypass.
Signal Bandwidth in true bypass = 4Hz to 75KHz (measured at 19V peak to peak) Input signal handling
Maximum. 10.8V peak to peak in true bypass.
Signal Bandwidth 20Hz to 82KHz (measured at 1V peak to peak)
Noise. 4.7nV per root Hz Input Amplifier/Buffer
Minimum gain X0.001= -30dB
Maximum Gain X4 = +16dB
Bandwidth at 1V = 28Hz to 150KHz.
Buffer output impedance 300R Noise. 4.7nV per root Hz
Gain control steps = 256 (Log corrected)
Output Amplifier/Buffer Minimum gain -24dB
Maximum Gain X3.5= +10dB
Bandwidth at 1V = 28Hz to 150KHz.
Buffer output impedance 300R Noise. 6.5nV per root Hz
Gain control steps = 256 (Log corrected)
This specification is subject to change without notice. Consult our Web site for amendments.
Documents / Resources
References
![thegigrig.com]() The GigRig | Guitar Effects Switching and Modular Power Solutions
The GigRig | Guitar Effects Switching and Modular Power Solutions![www.thegigrig.com]() The GigRig | Guitar Effects Switching and Modular Power Solutions
The GigRig | Guitar Effects Switching and Modular Power Solutions
Download manual
Here you can download full pdf version of manual, it may contain additional safety instructions, warranty information, FCC rules, etc.
Advertisement


Need help?
Do you have a question about the G2 and is the answer not in the manual?
Questions and answers