Advertisement
Quick Links
860543388
Rev C, May 2017
www.commscope.com
SYSTIMAX 360
General
®
iPatch
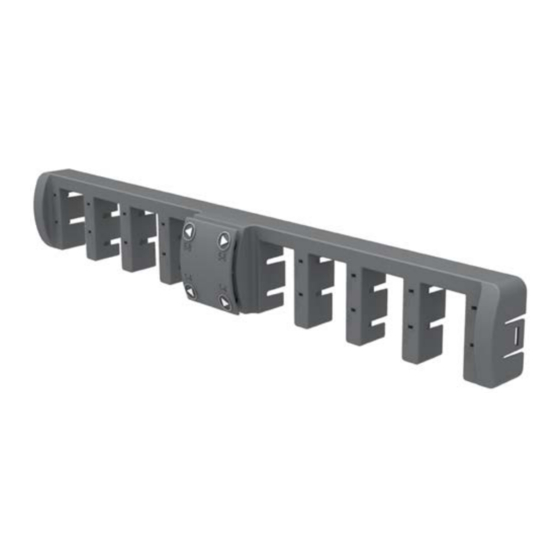
Upgrade Kits adapt previously installed SYSTIMAX
enable iPatch system high performance patching solutions. Patchcords remain connected when installing kits,
so network is not interrupted.
Note: To use the SYSTIMAX iPatch shelf in an existing iPatch System, the imVision
firmware version 10.3d or later. The System Manager software, used to manage the system, must be version
7.3.1 or later. We recommend that you upgrade the System Manager software before installing the shelf.
Ordering information is listed below:
Material ID
760169151
360G2-iP-32-MPO-SD-KIT-5PK
760169169
360G2-iP-32-MPO-UHD-KIT-6PK SYSTIMAX 360
Tools Required
•
Flat blade screwdriver
•
KS-22035-L2 spudger
Specifications
Fiber Optic Interface
Industry-standard MPO
™
iPatch
Part No.
SYSTIMAX 360
upgrade kit
upgrade kit
™
SYSTIMAX 360
iPatch
© 2018 CommScope, Inc.
All rights reserved
Instruction Sheet
®
Fiber MPO Upgrade Kit
®
MPO fiber shelves to iPatch fiber shelves to
Description
™
iPatch 32-MPO sliding shelf, 5 pack
™
iPatch 32-MPO UHD shelf, 6 pack
®
32-MPO Upgrade Kit
Recycling information can be obtained from the WEEE
recycling section at
www.CommScope.com
SYSTIMAX
®
Controller must be running
Page 1 of 19
®
Advertisement

Related Manuals for CommScope SYSTIMAX 360 iPatch 360G2-iP-32-MPO-SD-KIT-5PK


Summary of Contents for CommScope SYSTIMAX 360 iPatch 360G2-iP-32-MPO-SD-KIT-5PK
- Page 1 32-MPO Upgrade Kit Tools Required • Flat blade screwdriver • KS-22035-L2 spudger Specifications Fiber Optic Interface Industry-standard MPO Page 1 of 19 © 2018 CommScope, Inc. Recycling information can be obtained from the WEEE All rights reserved recycling section at www.CommScope.com...
-
Page 2: Parts List
860543388 www.commscope.com Instruction Sheet Environmental Data Temperature Range -40º F to 158º F (-40º C to 70º C) (storage) 23º F to 122º F (-5º C to 50º C) (operational) Humidity 95% non-condensing Parts List Verify parts against the parts list below:... - Page 3 860543388 Instruction Sheet The iPatch upgrade kit is ready to use on these G2, MP and HD shelves: Material ID Part No. Description 760193771 360G2-1U-MOD-SD 360G2 1U sliding modular cassette shelf 760193854 360G2-2U-MOD-SD 360G2 2U sliding modular cassette shelf...
-
Page 4: Important Safety Cautions
860543388 www.commscope.com Instruction Sheet Important Safety Cautions • To reduce the risk of fire, electric shock, and injury to persons, read, understand, and adhere to the following instructions as well as any warnings marked on the product. • Remote risk of electric shock. Never install the product in wet locations or during lightning storms. - Page 5 860543388 Instruction Sheet Step 1 – Mount the Panel Bus 1. A panel bus must be installed on each rack where you plan to upgrade shelves. The panel bus allows the ® imVision controller and iPatch shelves to communicate. Also, the imVision controller supplies power to the iPatch shelves through the panel bus.
- Page 6 860543388 www.commscope.com Instruction Sheet Step 3 – Upgrade Fiber Shelf with the iPatch MPO Upgrade Kit ® Step 3a Install the iPatch MPO Upgrade Kit to convert SYSTIMAX fiber shelves for use with the iPatch system and connect each panel to the panel bus.
- Page 7 860543388 Instruction Sheet Panel bus Detail B jumper connector Feed panel bus jumper Detail A rotated 90° Panel bus port (max. Backplane kit of 5 panels with hole facing 10-pin per bus port) Flat front of shelf connector retainer clip...
- Page 8 860543388 www.commscope.com Instruction Sheet 9. Facing equipment from front of rack, prepare to install iPatch MPO upgrade kit. Feed black Ribbon cable Patch cord ribbon cable from the rear of the upgrade kit through faceplate slot located between two MPO bezels as shown, ready to be connected later.
- Page 9 860543388 Instruction Sheet Step 3c – Instructions Specific to Each Type of Fiber Shelf SYSTIMAX 360G2 1U/2U Sliding Shelf UD 2U/4U Sliding Modular Shelf HD 1U/2U/4U Sliding Modular Cassette Shelf SYSTIMAX 360G2 1U and 2U Fixed Shelves SYSTIMAX 360G2 1U Internal Sliding Shelf...
- Page 10 860543388 www.commscope.com Instruction Sheet 2. Place the iPatch upgrade kit on the front of the tray, being careful to pull the ribbon cable through opening in the center of tray at the same time. Do not allow cable to be kinked or damaged. Cable will be pulled to back of shelf when connecting to backplane kit.
- Page 11 860543388 Instruction Sheet 6. Connect the keyed female 10-pin connector on the panel bus jumper into the nearest cable bus port on panel bus as shown on the next page. Jumper is secured with flat retainer clips on outside of side wall.
- Page 12 860543388 www.commscope.com Instruction Sheet Note: See Step 3b for panel bus jumper termination table and connection diagram. 11. Remove paper cover to expose adhesive on backplane kit. After making connections with ribbon cables and panel bus jumper, mount backplane to shelf floor in available space in back of shelf.
- Page 13 860543388 Instruction Sheet 8. When working with 1U internal sliding shelf, cut corrugated tubing to fit over panel bus jumper inside of shelf to protect panel bus jumper from internal sliding shelf movement. Internal sliding shelf has excess panel bus jumper coiled and secured with cable ties on shelf floor, as shown on next page.
- Page 14 860543388 www.commscope.com Instruction Sheet SYSTIMAX 360G2 4U Fixed Shelf MPO Upgrade Kit Installation Backplane Kit C, D Module side A, B Module side Front Connector 5 Connector 3 Panel bus Connector 4 jumper connector (Bus) Connector 2 Connector 1 Front...
- Page 15 860543388 Instruction Sheet SYSTIMAX 360 1U/2U/4U Modular Shelf MPO Upgrade Kit Installation Detail A 860543388-014 1. From the front of the rack, remove front door by gently pressing both upper corners to release the latches. Then lift the door off the trough.
- Page 16 860543388 www.commscope.com Instruction Sheet SYSTIMAX 360G2 UHD 1U/2U/4U Modular Shelf MPO Upgrade Kit Installation Cover ® iPatch upgrade kit LED kit cable Front LED kit 860543388-015 Replace center fiber patchcord divider with iPatch ® front LED kit (Detail A). upgrade kit 1.
- Page 17 860543388 Instruction Sheet Top front LED kit cable connector Panel bus jumper connector Black ribbon cable Front LED kit cable Panel bus jumper Backplane kit Sliding tray Black ribbon cable Rear door Panel bus Panel bus jumper Cable retainer clip...
- Page 18 860543388 www.commscope.com Instruction Sheet 18. Install corrugated tube by snapping onto cable retainers clips on side of shelf. 19. Plug each panel bus jumper onto backplane kit and other end to panel bus located on rack. Note: The connector is keyed. The polarized tab on the jumper connector fits into the opening in the header connector on the panel bus.
-
Page 19: Contact Information
This document is for planning purposes only and is not intended to modify or supplement any specifications or warranties relating to CommScope products or services. CommScope is committed to the highest standards of business integrity and environmental sustainability, with a number of CommScope’s facilities across the globe certified in accordance with international standards, including ISO 9001, TL 9000, and ISO 14001.
Need help?
Do you have a question about the SYSTIMAX 360 iPatch 360G2-iP-32-MPO-SD-KIT-5PK and is the answer not in the manual?
Questions and answers