Table of Contents
Advertisement
Quick Links
Advertisement
Table of Contents

Related Manuals for Newland NLS-HR20-RF


Summary of Contents for Newland NLS-HR20-RF
- Page 1 NLS-HR20-RF Wireless 2D Barcode Scanner User Guide...
- Page 2 All pictures in this manual are for reference only and actual product may differ. Regarding to the product modification and update, Fujian Newland Auto-ID Tech. Co., Ltd. reserves the right to make changes to any software or hardware to improve reliability, function, or design at any time without notice.
-
Page 3: Revision History
Revision History Version Description Date V1.0.0 Initial release. January 3, 2019 Added the ECI Output, Set Length Range for Code 128/ UCC/EAN-128/ AIM 128/ Interleaved 2 of 5/ Matrix 2 of 5/ Industrial 25/ Standard 25/ Code 39/ Codabar/ Code 93/ Code 11/ Plessey/ MSI-Plessey, and Febraban features in V1.0.1 May 17, 2019 Chapter 5. -
Page 4: Table Of Contents
Table of Contents Revision History ..................................- 3 - Chapter 1 Getting Started ................................1 Introduction ..................................1 About This Guide ................................1 Unpacking ..................................1 HR20 Scanner .................................. 2 Charging the Scanner Battery ............................2 Plug and Play ................................... 2 Power On, Sleep ................................ - Page 5 Emulate ALT+Keypad ............................19 Convert Case ..............................19 Code Page ................................20 Character Encoding ............................22 Direct Character Transfer ..........................22 Emulate Keypad with Leading Zero ......................... 23 Inter-Keystroke Delay.............................. 23 Chapter 4 Prefix & Suffix ................................24 Prefix Sequence ................................24 Custom Prefix .................................
- Page 6 Enable/Disable EAN-13 ............................36 Transmit Check Character ............................36 Add-On Code ................................37 ISSN ....................................38 ISBN ....................................38 Enable/Disable ISBN............................... 38 Set ISBN Format ..............................38 UPC-E .................................... 39 Enable/Disable UPC-E ............................39 Transmit Check Character ............................39 Add-On Code ................................40 Transmit System Character.............................
- Page 7 Enable/Disable Standard 25 ............................ 54 Check Character Verification ........................... 54 Set Length Range for Standard 25 .......................... 55 Code 39 ..................................56 Enable/Disable Code 39 ............................56 Transmit Start/Stop Character ..........................56 Enable/Disable Code 39 Full ASCII ........................56 Check Character Verification ........................... 57 Set Length Range for Code 39 ..........................
- Page 8 RSS-Expand .................................. 72 Enable/Disable RSS-Expand ..........................72 PDF417 ..................................72 Enable/Disable PDF417 ............................72 Data Matrix ..................................73 Enable/Disable Data Matrix ............................. 73 Rectangular Barcodes ............................. 73 Mirror Images ................................73 QR Code ..................................74 Enable/Disable QR Code ............................74 Micro QR .................................
-
Page 9: Chapter 1 Getting Started
Chapter 1 Getting Started Introduction The NLS-HR20-RF wireless barcode scanner (hereinafter referred to as “HR20 scanner” or “the scanner”), armed with the world-leading Newland patented , a computerized image recognition system-on-chip, bring about a new era of 2D barcode scanner. -
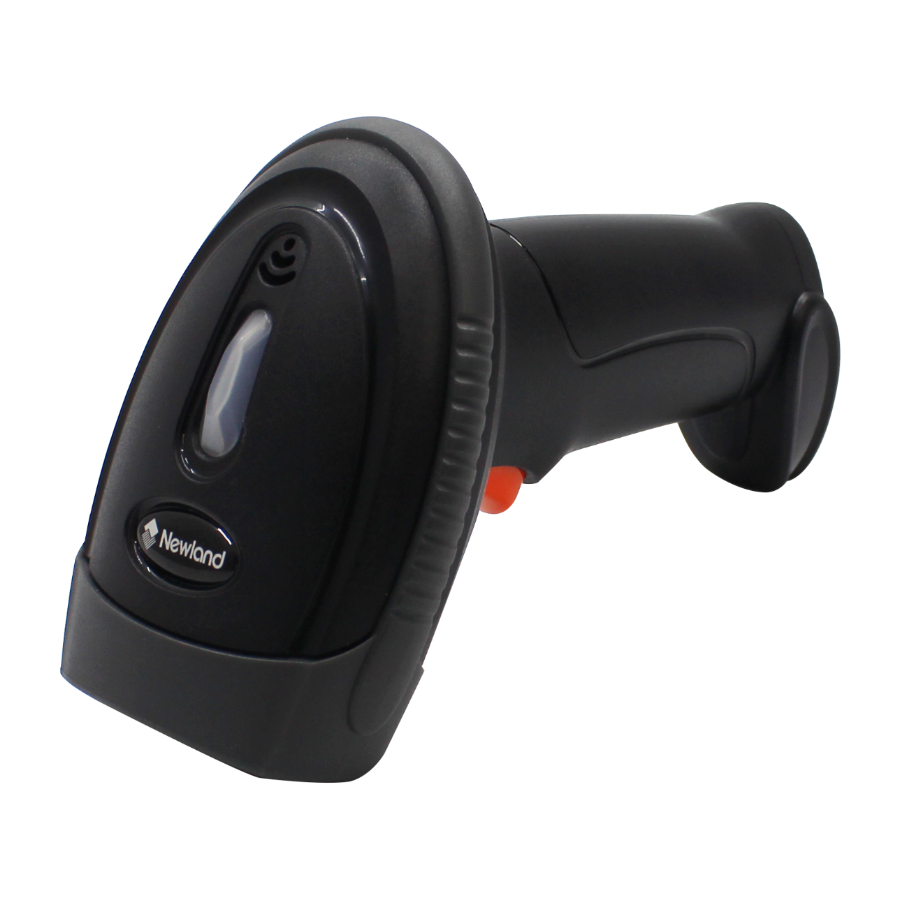
Page 10: Hr20 Scanner
HR20 Scanner Good Read/Network LED: Red LED On – Charging in progress. Red LED Off – Fully charged. Blue LED On - Connection established. Blue LED flashes - Data transmission in progress. Green LED flashes once - Good read in Real-time mode. Blue LED flashes once - Good read in Inventory mode. -
Page 11: Power On, Sleep
Power On, Sleep Power on the scanner Plug the supplied dongle into the USB port of a host device, and pull the trigger on the scanner. Then the scanner will be turned on and the connection will be automatically established. Enter the sleep mode If no operation is performed on the scanner for 5 seconds, it will automatically enter the sleep state. -
Page 12: Dimensions (Unit: Mm)
Dimensions (unit: mm) -
Page 13: Scanning Instructions
Scanning Instructions When the scanner is in the default scan mode, you can follow the steps below to scan a barcode: 1. Press and hold the trigger. Then the scanner will project a red aiming pattern. 2. Center the aiming pattern on the barcode, as shown in the figure below. 3. -
Page 14: Chapter 2 System Settings
Chapter 2 System Settings Factory Defaults Scanning the following barcode can restore the scanner to the factory defaults. You may need to reset all parameters to the factory defaults when: 1. Scanner is not properly configured so that it fails to decode barcodes; 2. -
Page 15: Aiming
Aiming When scanning/capturing image, the scanner projects an aiming pattern which allows positioning the target barcode within its field of view and thus makes decoding easier. Normal: The scanner projects an aiming pattern during barcode scanning/capture. Always On: Aiming pattern is constantly on after the scanner is powered on. Off: Aiming pattern is off all the time. -
Page 16: Good Read Beep Frequency/Duration
Good Read Beep Frequency/Duration Low Frequency ** Medium Frequency High Frequency 40ms ** 80ms 120ms... -
Page 17: Scan Mode
Scan Mode Manual Mode Manual Mode (default): A trigger pull activates a decode session. The decode session continues until the barcode is decoded or the trigger is released. ** Manual Mode Continuous Mode Continuous Mode: The scanner automatically starts one decode session after another at specific intervals (i.e. timeout between decodes). - Page 18 Decode Session Timeout sets the maximum time decode session continues during a scan attempt. It is programmable in 0.1s increments from 0.1s to 25.5s. The default timeout is 5.0s. To set the timeout, scan the Decode Session Timeout barcode, then the two numeric barcodes corresponding to the desired timeout in hexadecimal. Decode Session Timeout Example: Set the decode session timeout to 5.0s (50 in hex is 32) Scan the Decode Session Timeout barcode.
-
Page 19: Query Product Serial Number
Query Product Serial Number After scanning the barcode below, the serial number of the scanner will be sent to the host device. Query Product Serial Number... -
Page 20: Chapter 3 Wireless Communications
Chapter 3 Wireless Communications Pairing the Scanner to a Dongle The scanner that comes with a USB dongle is already paired with it and can work out of the box through plug and play. You simply plug the dongle into the USB port of your computer, pull the trigger on the scanner, and the connection will be automatically established with a beep from the scanner. -
Page 21: Transmit Stored Data
Transmit Stored Data You may scan the barcode below to send the stored data in the flash memory to the host. Transmit Stored Data Clear Stored Data in Flash To clear stored data in flash, you need to scan the Clear Stored Data then the Confirm Clear Operation barcodes. Clear Stored Data Confirm Clear Operation Interface Selection... -
Page 22: Hid Keyboard Parameters
HID Keyboard Parameters Characters can be represented by key values of a keyboard or by numeric representations in a code page. The former method should only be used when scanning barcodes containing single-byte characters. Keyboard Types If you want barcode data to be represented by key values of a keyboard, you may select the keyboard type by scanning the appropriate barcode below. - Page 23 Denmark Finland (Swedish) France Germany/Austria Greece Hungary Israel (Hebrew) Italy...
- Page 24 Latin America/South America Netherlands (Dutch) Norway Poland Portugal Romania Russia Slovakia...
- Page 25 Spain Sweden Switzerland (German) Turkey_F Turkey_Q Japan...
-
Page 26: Standard Keyboard
Standard Keyboard When Standard Keyboard is enabled, characters are sent as corresponding keys on the selected keyboard. This feature is only effective when a keyboard type is enabled. ** Standard Keyboard Function Key Mapping When Function Key Mapping is enabled, function characters (0x00 - 0x1F) are sent as ASCII sequences. This feature is only effective when a keyboard type is enabled. -
Page 27: Emulate Alt+Keypad
Emulate ALT+Keypad When Emulate ALT+Keypad is enabled, any ASCII character (0x00 - 0xFF) is sent over the numeric keypad. This feature is only effective when a keyboard type is enabled. ALT Make Enter the number corresponding to the ASCII character on the keypad. ALT Break Emulate ALT+Keypad Convert Case... -
Page 28: Code Page
Code Page If you want barcode data to be represented by numeric representations in a code page, you may select the code page by scanning the appropriate barcode below. Code Page 1252 (West European Latin) Code Page 1251 (Cyrillic) Code Page 1250 (Central and East European Latin) Code Page 1253 (Greek) Code Page 1254 (Turkish) Code Page 1255 (Hebrew) - Page 29 Code Page 1256 (Arabic) Code Page 1257 (Baltic) Code Page 1258 (Vietnamese) Code Page 936 (Simplified Chinese, GB2312, GBK) Code Page 950 (Traditional Chinese, Big5) Code Page 874 (Thai) Code Page 932 (Japanese, Shift-JIS)
-
Page 30: Character Encoding
Character Encoding You should select the character encoding with which the barcodes were created. ** Code Page UTF-8 Direct Character Transfer When a code page is enabled, any character is sent over the numeric keypad. ALT Make Enter the number corresponding to the code point in selected code page on the keypad. ALT Break Different host program may use different character encodings for handling incoming barcode data. -
Page 31: Emulate Keypad With Leading Zero
Emulate Keypad with Leading Zero You may turn this feature on to send character sequences sent over the numeric keypad as ISO characters which have a leading zero. For example, ASCII A transmits as “ALT MAKE” 0065 “ALT BREAK”. This feature is only applicable to Direct Character Transfer. -
Page 32: Chapter 4 Prefix & Suffix
Chapter 4 Prefix & Suffix A 1D barcode could contain digits, letters, symbols, etc. A 2D barcode could contain more data, such as Chinese characters and other multi-byte characters. However, in real applications, they do not and should not have all information we need, such as barcode type, data acquisition time and delimiter, in order to keep the barcodes short and flexible. -
Page 33: Set Custom Prefix
Set Custom Prefix To set a custom prefix, scan the Set Custom Prefix barcode then the numeric barcodes corresponding to the hexadecimal value of a desired prefix. Note: A custom prefix cannot exceed 5 characters. Set Custom Prefix Example: Set the custom prefix to “CODE” (HEX: 0x43/0x4F/0x44/0x45): 1. -
Page 34: Code Id Prefix
Code ID Prefix Code ID can also be used to identify barcode type. For more information, refer to the “Code ID Table” in Appdendix. Enable Code ID Prefix ** Disable Code ID Prefix You can choose to transmit original Code ID or visible Code ID by scanning the appropriate barcode below. ** Original Code ID Visible Code ID... -
Page 35: Custom Suffix
Custom Suffix Enable/Disable Custom Suffix If custom suffix is enabled, you are allowed to append to the data a user-defined suffix that cannot exceed 5 characters. For example, if the custom suffix is “AB” and the barcode data is “123”, the Host will receive “123AB”. ** Disable Custom Suffix Enable Custom Suffix Set Custom Suffix... -
Page 36: Terminating Character Suffix
Terminating Character Suffix A terminating character such as carriage return (CR) or carriage return/line feed pair (CRLF) or horizontal tab (TAB) can be used to mark the end of data. Disable Terminating Character Suffix Append CR Append CRLF Append TAB... -
Page 37: Chapter 5 Symbologies
Chapter 5 Symbologies Global Settings Video Reverse The Video Reverse feature only applies to 2D barcodes. Regular barcode: Dark image on a bright background. Inverse barcode: Bright image on a dark background. The examples of egular barcode and inverse barcode are shown below. Regular Barcode Inverse Barcode Video Reverse is used to allow the scanner to read barcodes that are inverted. -
Page 38: Eci Output
ECI Output ** Disable ECI Output Enable ECI Output... -
Page 39: Code 128
Code 128 Enable/Disable Code 128 ** Enable Code 128 Disable Code 128 Set Length Range for Code 128 The scanner can be configured to only decode Code 128 barcodes with lengths that fall between (inclusive) the minimum and maximum lengths. To accomplish it, you need to set the minimum and maximum lengths. Set the Minimum Length (Default: 1) Set the Maximum Length (Default: 80) Example: Set the scanner to decode Code 128 barcodes containing between 8 and 12 characters:... -
Page 40: Ucc/Ean-128 (Gs1-128)
UCC/EAN-128 (GS1-128) Enable/Disable UCC/EAN-128 When disabled, UCC/EAN-128 is identified as Code 128. ** Enable UCC/EAN-128 Disable UCC/EAN-128 Set Length Range for UCC/EAN-128 The scanner can be configured to only decode UCC/EAN-128 barcodes with lengths that fall between (inclusive) the minimum and maximum lengths. To accomplish it, you need to set the minimum and maximum lengths. Set the Minimum Length (Default: 1) Set the Maximum Length (Default: 80) Example: Set the scanner to decode... -
Page 41: Aim 128
AIM 128 Enable/Disable AIM 128 When disabled, AIM 128 is identified as Code 128. ** Enable AIM 128 Disable AIM 128 Set Length Range for AIM 128 The scanner can be configured to only decode AIM 128 barcodes with lengths that fall between (inclusive) the minimum and maximum lengths. -
Page 42: Ean-8
EAN-8 Enable/Disable EAN-8 ** Enable EAN-8 Disable EAN-8 Transmit Check Character EAN-8 is 8 digits in length with the last one as its check character used to verify the integrity of the data. ** Transmit EAN-8 Check Character Do Not Transmit EAN-8 Check Character... -
Page 43: Add-On Code
Add-On Code An EAN-8 barcode can be augmented with a two-digit or five-digit add-on code to form a new one. In the examples below, the part surrounded by blue dotted line is an EAN-8 barcode while the part circled by red dotted line is add-on code. Enable 2-Digit Add-On Code ** Disable 2-Digit Add-On Code Enable 5-Digit Add-On Code... -
Page 44: Ean-8 Extension
EAN-8 Extension Disable EAN-8 Zero Extend: Transmit EAN-8 barcodes as is. Enable EAN-8 Zero Extend: Add five leading zeros to decoded EAN-8 barcodes to extend to13 digits. Enable EAN-8 Zero Extend ** Disable EAN-8 Zero Extend EAN-13 Enable/Disable EAN-13 ** Enable EAN-13 Disable EAN-13 Transmit Check Character EAN-13 is 13 digits in length with the last one as its check character used to verify the integrity of the data. -
Page 45: Add-On Code
Add-On Code An EAN-13 barcode can be augmented with a two-digit or five-digit add-on code to form a new one. In the examples below, the part surrounded by blue dotted line is an EAN-13 barcode while the part circled by red dotted line is add-on code. Enable 2-Digit Add-On Code ** Disable 2-Digit Add-On Code Enable 5-Digit Add-On Code... -
Page 46: Issn
ISSN When disabled, ISSN is identified as EAN-13. Enable ISSN ** Disable ISSN ISBN Enable/Disable ISBN When disabled, ISBN is identified as EAN-13. ** Enable ISBN Disable ISBN Set ISBN Format ** ISBN-13 ISBN-10... -
Page 47: Upc-E
UPC-E Enable/Disable UPC-E ** Enable UPC-E Disable UPC-E Transmit Check Character UPC-E is 8 digits in length with the last one as its check character used to verify the integrity of the data. ** Transmit UPC-E Check Character Do Not Transmit UPC-E Check Character... -
Page 48: Add-On Code
Add-On Code A UPC-E barcode can be augmented with a two-digit or five-digit add-on code to form a new one. In the examples below, the part surrounded by blue dotted line is a UPC-E barcode while the part circled by red dotted line is add-on code. Enable 2-Digit Add-On Code ** Disable 2-Digit Add-On Code Enable 5-Digit Add-On Code... -
Page 49: Transmit System Character
Transmit System Character The first character of UPC-E barcode is the system character “0”. Transmit System Character “0” ** Do Not Transmit System Character “0” UPC-E Extension Disable UPC-E Extend: Transmit UPC-E barcodes as is. Enable UPC-E Extend: Extend UPC-E barcodes to make them compatible in length to UPC-A. Enable UPC-E Extend ** Disable UPC-E Extend... -
Page 50: Upc-A
UPC-A Enable/Disable UPC-A When disabled, UPC-A is identified as EAN-13. ** Enable UPC-A Disable UPC-A Transmit Check Character UPC-A is 13 digits in length with the last one as its check character used to verify the integrity of the data. ** Transmit UPC-A Check Character Do Not Transmit UPC-A Check Character... -
Page 51: Add-On Code
Add-On Code A UPC-A barcode can be augmented with a two-digit or five-digit add-on code to form a new one. In the examples below, the part surrounded by blue dotted line is a UPC-A barcode while the part circled by red dotted line is add-on code. Enable 2-Digit Add-On Code ** Disable 2-Digit Add-On Code Enable 5-Digit Add-On Code... -
Page 52: Transmit Preamble Character
Transmit Preamble Character Preamble characters (Country Code and System Character) can be transmitted as part of a UPC-A barcode. Select one of the following options for transmitting UPC-A preamble to the host device: transmit system character only or transmit system character and country code (“0”... -
Page 53: Interleaved 2 Of 5
Interleaved 2 of 5 Enable/Disable Interleaved 2 of 5 ** Enable Interleaved 2 of 5 Disable Interleaved 2 of 5 Check Character Verification A check character is optional for Interleaved 2 o 5 and can be added as the last character. It is a calculated value used to verify the integrity of the data. -
Page 54: Set Length Range For Interleaved 2 Of 5
Set Length Range for Interleaved 2 of 5 The scanner can be configured to only decode Interleaved 2 of 5 barcodes with lengths that fall between (inclusive) the minimum and maximum lengths. To accomplish it, you need to set the minimum and maximum lengths. Set the Minimum Length (Default: 6) Set the Maximum Length (Default: 100) Example: Set the scanner to decode Interleaved 2 of 5 barcodes containing between 8 and 12 characters:... -
Page 55: Febraban
Febraban Disable/Enable Febraban ** Disable Febraban Enable Febraban Expand Febraban ** Do Not Expand Febraban Expand Febraban Transmit Delay per Character Transmit Delay per Character applies to both expanded and unexpanded Febraban. This feature is available only when USB HID Keyboard is enabled. The transmit delay per character is 75ms and is NOT user programmable. ** Disable Transmit Delay per Character Enable Transmit Delay per Character... -
Page 56: Transmit Delay Per 12 Characters
Transmit Delay per 12 Characters Transmit Delay per 12 Characters applies to expanded Febraban only. This feature is available only when USB HID Keyboard is enabled. ** Disable Transmit Delay per 12 Characters Enable Transmit Delay per 12 Characters To set this parameter, scan the Set Transmit Delay per 12 Characters barcode below and then a numeric barcode (0-7, which represent 0ms, 300ms, 400ms, 500ms, 600ms, 700ms, 800ms and 900ms, respectively). -
Page 57: Itf-6
ITF-6 When disabled, ITF-6 is identified as Interleaved 2 of 5. ** Disable ITF-6 Enable ITF-6 But Do Not Transmit Check Character Enable ITF-6 and Transmit Check Character ITF-14 When disabled, ITF-14 is identified as Interleaved 2 of 5. Disable ITF-14 Enable ITF-14 But Do Not Transmit Check Character Enable ITF-14 and Transmit Check Character... -
Page 58: Matrix 2 Of 5
Matrix 2 of 5 Enable/Disable Matrix 2 of 5 ** Enable Matrix 2 of 5 Disable Matrix 2 of 5 Check Character Verification A check character is optional for Matrix 2 of 5 and can be added as the last character. It is a calculated value used to verify the integrity of the data. -
Page 59: Set Length Range For Matrix 2 Of 5
Set Length Range for Matrix 2 of 5 The scanner can be configured to only decode Matrix 2 of 5 barcodes with lengths that fall between (inclusive) the minimum and maximum lengths. To accomplish it, you need to set the minimum and maximum lengths. Set the Minimum Length (Default: 6) Set the Maximum Length (Default: 80) Example: Set the scanner to decode Matrix 2 of 5 barcodes containing between 8 and 12 characters:... -
Page 60: Industrial 25
Industrial 25 Enable/Disable Industrial 25 ** Enable Industrial 25 Disable Industrial 25 Check Character Verification A check character is optional for Industrial 25 and can be added as the last character. It is a calculated value used to verify the integrity of the data. Disable: The scanner transmits Industrial 25 barcodes as is. -
Page 61: Set Length Range For Industrial 25
Set Length Range for Industrial 25 The scanner can be configured to only decode Industrial 25 barcodes with lengths that fall between (inclusive) the minimum and maximum lengths. To accomplish it, you need to set the minimum and maximum lengths. Set the Minimum Length (Default: 6) Set the Maximum Length (Default: 80) Example: Set the scanner to decode Industrial 25 barcodes containing between 8 and 12 characters:... -
Page 62: Standard 25
Standard 25 Enable/Disable Standard 25 ** Enable Standard 25 Disable Standard 25 Check Character Verification A check character is optional for Standard 25 and can be added as the last character. It is a calculated value used to verify the integrity of the data. Disable: The scanner transmits Standard 25 barcodes as is. -
Page 63: Set Length Range For Standard 25
Set Length Range for Standard 25 The scanner can be configured to only decode Standard 25 barcodes with lengths that fall between (inclusive) the minimum and maximum lengths. To accomplish it, you need to set the minimum and maximum lengths. Set the Minimum Length (Default: 6) Set the Maximum Length (Default: 80) Example: Set the scanner to decode Standard 25 barcodes containing between 8 and 12 characters:... -
Page 64: Code 39
Code 39 Enable/Disable Code 39 ** Enable Code 39 Disable Code 39 Transmit Start/Stop Character Code 39 uses an asterisk (*) for both the start and the stop characters. You can choose whether or not to transmit the start/stop characters by scanning the appropriate barcode below. Transmit Start/Stop Character Do Not Transmit Start/Stop Character Enable/Disable Code 39 Full ASCII... -
Page 65: Check Character Verification
Check Character Verification A check character is optional for Code 39 and can be added as the last character. It is a calculated value used to verify the integrity of the data. Disable: The scanner transmits Code 39 barcodes as is. Do Not Transmit Check Character After Verification: The scanner checks the integrity of all Code 39 barcodes to verify that the data complies with the check character algorithm. -
Page 66: Set Length Range For Code 39
Set Length Range for Code 39 The scanner can be configured to only decode Code 39 barcodes with lengths that fall between (inclusive) the minimum and maximum lengths. To accomplish it, you need to set the minimum and maximum lengths. Set the Minimum Length (Default: 4) Set the Maximum Length (Default: 50) Example: Set the scanner to decode Code 39 barcodes containing between 8 and 12 characters:... -
Page 67: Codabar
Codabar Enable/Disable Codabar ** Enable Codabar Disable Codabar Check Character Verification A check character is optional for Codabar and can be added as the last character. It is a calculated value used to verify the integrity of the data. Disable: The scanner transmits Codabar barcodes as is. Do Not Transmit Check Character After Verification: The scanner checks the integrity of all Codabar barcodes to verify that the data complies with the check character algorithm. -
Page 68: Transmit Start/Stop Character
Transmit Start/Stop Character Transmit Start/Stop Character Do Not Transmit Start/Stop Character Start/Stop Character Format ** ABCD/ABCD as the Start/Stop Character ABCD/TN*E as the Start/Stop Character abcd/abcd as the Start/Stop Character abcd/tn*e as the Start/Stop Character... -
Page 69: Set Length Range For Codabar
Set Length Range for Codabar The scanner can be configured to only decode Codabar barcodes with lengths that fall between (inclusive) the minimum and maximum lengths. To accomplish it, you need to set the minimum and maximum lengths. Set the Minimum Length (Default: 4) Set the Maximum Length (Default: 60) Example: Set the scanner to decode Codabar barcodes containing between 8 and 12 characters: 1. -
Page 70: Code 93
Code 93 Enable/Disable Code 93 ** Enable Code 93 Disable Code 93 Check Character Verification Check characters are optional for Code 93 and can be added as the last two characters, which are calculated values used to verify the integrity of the data. Disable: The scanner transmits Code 93 barcodes as is. -
Page 71: Set Length Range For Code 93
Set Length Range for Code 93 The scanner can be configured to only decode Code 93 barcodes with lengths that fall between (inclusive) the minimum and maximum lengths. To accomplish it, you need to set the minimum and maximum lengths. Set the Minimum Length (Default: 2) Set the Maximum Length (Default: 80) Example: Set the scanner to decode Code 93 barcodes containing between 8 and 12 characters:... -
Page 72: Code 11
Code 11 Enable/Disable Code 11 ** Enable Code 11 Disable Code 11 Check Character Verification Check characters are optional for Code 11 and can be added as the last one or two characters, which are calculated values used to verify the integrity of the data. If the Disable option is enabled, the scanner transmits Code 11 barcodes as is. -
Page 73: Set Length Range For Code 11
One Check Character, MOD11 (Len <= 11) Two Check Characters, MOD11/MOD11 (Len > 11) One Check Character, MOD11 (Len <= 11) Two Check Characters, MOD11/MOD9 (Len > 11) ** Transmit Check Character Do Not Transmit Check Character Set Length Range for Code 11 The scanner can be configured to only decode Code 11 barcodes with lengths that fall between (inclusive) the minimum and maximum lengths. -
Page 74: Plessey
Plessey Enable/Disable Plessey Enable Plessey ** Disable Plessey Check Character Verification Check characters are optional for Plessey and can be added as the last two characters, which are calculated values used to verify the integrity of the data. Disable: The scanner transmits Plessey barcodes as is. Do Not Transmit Check Character After Verification: The scanner checks the integrity of all Plessey barcodes to verify that the data complies with the check character algorithm. -
Page 75: Set Length Range For Plessey
Set Length Range for Plessey The scanner can be configured to only decode Plessey barcodes with lengths that fall between (inclusive) the minimum and maximum lengths. To accomplish it, you need to set the minimum and maximum lengths. Set the Minimum Length (Default: 4) Set the Maximum Length (Default: 60) Example: Set the scanner to decode Plessey barcodes containing between 8 and 12 characters: 1. -
Page 76: Msi-Plessey
MSI-Plessey Enable/Disable MSI-Plessey ** Enable MSI-Plessey Disable MSI-Plessey Check Character Verification Check characters are optional for MSI-Plessey and can be added as the last one or two characters, which are calculated values used to verify the integrity of the data. If the Disable option is enabled, the scanner transmits MSI-Plessey barcodes as is. -
Page 77: Transmit Check Character
Transmit Check Character ** Transmit Check Character Do Not Transmit Check Character Set Length Range for MSI-Plessey The scanner can be configured to only decode MSI-Plessey barcodes with lengths that fall between (inclusive) the minimum and maximum lengths. To accomplish it, you need to set the minimum and maximum lengths. Set the Minimum Length (Default: 4) Set the Maximum Length (Default: 60) Example: Set the scanner to decode MSI-Plessey barcodes containing between 8 and 12 characters:... -
Page 78: Rss-14
RSS-14 Enable/Disable RSS-14 ** Enable RSS-14 Disable RSS-14 Transmit Application Identifier “01” ** Transmit Application Identifier “01” Do Not Transmit Application Identifier “01”... -
Page 79: Rss-Limited
RSS-Limited Enable/Disable RSS-Limited ** Enable RSS-Limited Disable RSS-Limited Transmit Application Identifier “01” ** Transmit Application Identifier “01” Do Not Transmit Application Identifier “01”... -
Page 80: Rss-Expand
RSS-Expand Enable/Disable RSS-Expand ** Enable RSS-Expand Disable RSS-Expand PDF417 Enable/Disable PDF417 ** Enable PDF417 Disable PDF417... -
Page 81: Data Matrix
Data Matrix Enable/Disable Data Matrix ** Enable Data Matrix Disable Data Matrix Rectangular Barcodes ** Decode Rectangular Barcodes Do Not Decode Rectangular Barcodes Mirror Images Decode Mirrored DM ** Do Not Decode Mirrored DM... -
Page 82: Qr Code
QR Code Enable/Disable QR Code ** Enable QR Code Disable QR Code Micro QR Enable Micro QR ** Disable Micro QR Chinese Sensible Code Enable Chinese Sensible Code ** Disable Chinese Sensible Code... -
Page 83: Appendix
Appendix Digit Barcodes 0 - 5... - Page 84 6 - 9...
- Page 85 A - F...
-
Page 86: Factory Defaults Table
Factory Defaults Table Parameter Factory Default Remark System Settings Illumination Normal Aiming Normal Mute Mode Disabled Good Read Beep Frequency Medium Good Read Beep Duration 80ms Scan Mode Manual Mode Decode Session Timeout 3.0s 0.1-25.5s Timeout between Decodes 1.0s 0-25.5s Wireless Communications Communication Mode Real-time Mode... - Page 87 ECI Output Disabled Code 128 Code 128 Enabled Maximum Length Minimum Length UCC/EAN-128 (GS1-128) UCC/EAN-128 Enabled Maximum Length Minimum Length AIM 128 AIM 128 Enabled Maximum Length Minimum Length EAN-8 EAN-8 Enabled Check Character Transmit 2-Digit Add-On Code Disabled 5-Digit Add-On Code Disabled Extend to EAN-13 Disabled...
- Page 88 Extend to UPC-A Disabled UPC-A UPC-A Enabled Check Character Transmit 2-Digit Add-On Code Disabled 5-Digit Add-On Code Disabled Transmit Preamble Character System Character Interleaved 2 of 5 Interleaved 2 of 5 Enabled Check Character Verification Disabled Maximum Length No less than 1 Minimum Length Febraban Febraban...
- Page 89 Maximum Length No less than 1 Minimum Length Code 39 Code 39 Enabled Check Character Verification Disabled Start/Stop Character Do not transmit Code 39 Full ASCII Disabled Maximum Length No less than 1 Minimum Length Codabar Codabar Enabled Check Character Verification Disabled Transmit Start/Stop Character...
- Page 90 Check Character Transmit Maximum Length No less than 1 Minimum Length RSS-14 RSS-14 Enabled AI (Application Identifier) Transmit RSS-Limited RSS-Limited Enabled AI (Application Identifier) Transmit RSS-Expand RSS-Expand Enabled PDF417 PDF417 Enabled Data Matrix Data Matrix Enabled Rectangular Barcodes Enabled Mirror Images Disabled QR Code QR Code...
-
Page 91: Aim Id Table
AIM ID Table Symbology AIM ID Remark Code 128 Standard Code 128 UCC/EAN 128 FNC1 is the character right after the start character (GS1-128) AIM 128 FNC1 is the 2nd character after the start character Standard EAN-8 ]E4….]E1… EAN-8 EAN-8 + 2-Digit Add-On Code ]E4….]E2…... - Page 92 Symbology AIM ID Remark One check character, MOD 43; transmit check character One check character, MOD 43; do not transmit check character Full ASCII enabled; no check character verification Full ASCII enabled; MOD43; transmit check character Full ASCII enabled; MOD43; do not transmit check character Standard Codabar Codabar Transmit check character after verification...
- Page 93 Symbology AIM ID Remark QR1 (comply with AIM ISS 97-001 specifications) QR2 (2005 symbol), ECI protocol not supported QR2 (2005 symbol), ECI protocol supported QR2 (2005 symbol), ECI protocol not supported; FNC1 is the character right after the start character QR Code QR2 (2005 symbol), ECI protocol supported;...
-
Page 94: Code Id Table
Code ID Table Symbology Original Code ID Visible Code ID Code 128 FNC3 A(0x41) Code 128 B(0x42) UCC/EAN 128 C(0x43) EAN-8 D(0x44) EAN-13 E(0x45) UPC-E F(0x46) UPC-A G(0x47) Interleaved 2 of 5 H(0x48) ITF-14 I(0x49) ITF-6 J(0x4A) Code 39 M(0x4D) Codabar O(0x4F) Standard 25... -
Page 95: Ascii Table
ASCII Table Char (Null char.) (Start of Header) (Start of Text) (End of Text) (End of Transmission) (Enquiry) (Acknowledgment) (Bell) (Backspace) (Horizontal Tab) (Line Feed) (Vertical Tab) (Form Feed) (Carriage Return) (Shift Out) (Shift In) (Data Link Escape) (XON) (Device Control 1) (Device Control 2) (XOFF) (Device Control 3) (Device Control 4) - Page 96 Char (Request to Send) (Unit Separator) (Space) (Exclamation Mark) " (Double Quote) (Number Sign) (Dollar Sign) (Percent) & (Ampersand) (Single Quote) (Left/ Opening Parenthesis) (Right/ Closing Parenthesis) (Asterisk) (Plus) (Comma) (Minus/ Dash) (Dot) (Forward Slash) (Colon) (Semi-colon) < (Less Than) (Equal Sign)
- Page 97 Char > (Greater Than) (Question Mark) (AT Symbol) (Left/ Opening Bracket) (Back Slash) (Right/ Closing Bracket)
- Page 98 Newland Auto-ID Tech. Co., Ltd. (Headquarters) 3F, Building A, No.1, Rujiang West Rd., Mawei, Fuzhou, Fujian, China 350015 Tel: +86 - (0) 591-83978605 Fax: +86 - (0) 591-83979216 E-mail: contact@nlscan.com Web: www.newlandaidc.com Newland Europe BV Rolweg 25, 4104 AV Culemborg, The Netherlands...
Need help?
Do you have a question about the NLS-HR20-RF and is the answer not in the manual?
Questions and answers