Table of Contents
Advertisement
Quick Links
Advertisement
Table of Contents

Related Manuals for Zimmer Biomet iASSIST Knee


Summary of Contents for Zimmer Biomet iASSIST Knee
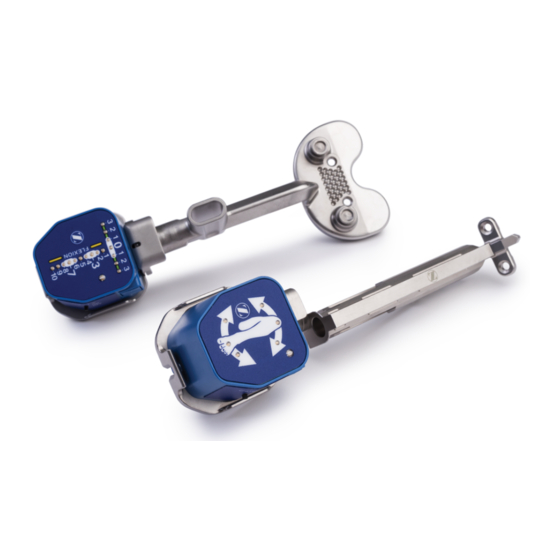
- Page 1 iASSIST ® Knee 2-Pod Version Surgical Technique...
-
Page 3: Table Of Contents
Activate the Field Issue Recorder ............... 42 Shut Down the System Controller Computer ............. 42 Equipment Inventory and Cleaning/Sterilization Methods ........43 Sterilization Parameters ..................43 iASSIST Knee Master Instrument Kit ..............44 Disposables ....................... 50 System Controller Kit ..................51 General Equipment Information ................ 51 Product Specifications and Regulatory Notices .......... -
Page 4: Overview
(e.g. avascular necrosis implant components relative to these axes. of the femoral head with collapse, severe dysplasia The present iASSIST Knee System is designed for total of the femoral head or the acetabulum, femoral knee arthroplasty. -
Page 5: Preoperative Guide
Ensure that one iASSIST Knee Pod Kit will be used per surgical procedure. The user must exit and restart the application with a new pod kit to begin another surgical procedure. -
Page 6: System Controller Computer Setup
iASSIST 2-Pod Version Surgical Technique Figure 2.2 System Controller Computer Setup System Controller Computer Setup 3. Position the system controller computer on the 1. Open and place the system controller carrying case on a stable flat surface outside the sterile angled flap. -
Page 7: Application Launch And Patient Side Selection
Note: If the wrong patient side is selected at 2. Scan the 2D barcode located on the iASSIST Knee Pod Kit. the beginning of the surgery, the “Side” button will be accessible once the pods have joined the Note: If the 2D barcode cannot be read, the user network. -
Page 8: Buttons, Icon And Pod Status Bar
iASSIST 2-Pod Version Surgical Technique Figure 2.4 Figure 2.5 Settings, Snapshot, Side, Barcode and Quit Buttons Patient Side Icon: Right, Undetermined, Left Buttons, Icon and Pod Status Bar Settings Button Side Button Click the “Settings” button located at the bottom Click the “Side”... - Page 9 iASSIST 2-Pod Version Surgical Technique Idle Cut Guide Not Connected Connected to Navigation Pod Femur Reference Figure 2.6 Pod Status Bar Buttons, Icon and Pod Status Bar (cont.) Patient Side Icon A pod that has not joined the network will be displayed The patient side is indicated at the top of the system in red.
-
Page 10: Intraoperative Guide
Powering-On Pods and Intraoperative Calibration Powering-On Pods and Intraoperative Calibration 1. Open an iASSIST Knee Pod Kit and remove the Warning: Make sure to power-on the pods at pods from the pod tray. Place them on the sterile the appropriate time i.e. when ready to perform instrument table. - Page 11 iASSIST 2-Pod Version Surgical Technique Figure 3.1 Powering-On Pods and intraoperative Calibration (Continued) Powering-On Pods and Intraoperative Calibration (cont.) 3. Wait for the green status LED of all of the pods to 5. Begin by placing the first face of the pod calibration start blinking slowly before continuing with the jig upwards on a sterile table.
-
Page 12: Pod Assembly
iASSIST 2-Pod Version Surgical Technique 10 | Figure 3.2 Assembling a Pod to an Instrument Pod Assembly 3. To unclip the pod, press on the locking lever and With the user interface of the pod facing upwards, pull on the pod to disengage the spring holder. 1. -
Page 13: Distal Femoral Cut
iASSIST 2-Pod Version Surgical Technique 11 | Figure 3.3 Distal Femur Cut – Instrument Assembly Distal Femoral Cut Instrument Assembly The femoral instrumentation is not side specific, 3. Clip the cut guide pod to the distal femoral cut therefore it is used for left and right knees. guide. - Page 14 iASSIST 2-Pod Version Surgical Technique 12 | Figure 3.3.1 Distal Femur Cut – Femur Rotation Alignment Femoral Registration 1. Break the cortex at the mechanical axis entry point Note: The femoral rotation may be set by: with a cortex breaker or a 3.2 mm drill bit. a.
- Page 15 iASSIST 2-Pod Version Surgical Technique 13 | Figure 3.4 Distal Femur Cut – Femur Registration Femoral Registration (cont.) 6. Press the “Z” button on the pod attached to the femoral reference to initiate the registration procedure. 7. Acquire 13 stable positions by accelerating and stopping the leg to create a star-shaped or circle pattern.
- Page 16 iASSIST 2-Pod Version Surgical Technique 14 | Figure 3.5 Distal Femur Cut Distal Femoral Cut Warning: The pelvis must remain immobile 4. Follow the feedback (red and green LEDs) on the during the femoral registration. pod attached to the femoral distal cut guide and adjust flexion/extension and varus/valgus using Do not perform the femoral registration by the gold and green screws respectively.
- Page 17 iASSIST 2-Pod Version Surgical Technique 15 | Figure 3.5 Distal Femur Cut Distal Femoral Cut (cont.) 5. Once the adjustment is complete, slide the femoral 7. With the knee stable and flexed between 45 and adjustment mechanism towards the femur until it 80 degrees, and the leg in neutral abduction, is fully seated on the most distal condyle.
- Page 18 iASSIST 2-Pod Version Surgical Technique 16 | Figure 3.5 Distal Femur Cut (Continued) Distal Femoral Cut (cont.) 8. Slide the femoral adjustment mechanism away 11. Manually adjust the resection level if desired. from the distal femur so both arrows are aligned Loosen the screw on the distal femoral cut guide and pull it off the assembly.
- Page 19 iASSIST 2-Pod Version Surgical Technique 17 | Figure 3.5 Distal Femur Cut (Continued) Distal Femoral Cut (cont.) 13. Optionally, a drop rod can be used to check 14. Resect the distal femur. the varus/valgus orientation of the cut before Warning: The femoral saw slot is compatible performing the resection.
- Page 20 iASSIST 2-Pod Version Surgical Technique 18 | Figure 3.6 Distal Femur Cut – Validation Distal Femoral Cut Validation 1. Remove the pod attached to the femoral reference For steps four through six, follow the feedback on the and clip it to the validation tool. pod attached to the validation tool.
- Page 21 iASSIST 2-Pod Version Surgical Technique 19 | Abduction Adduction Neutral Figure 3.6 Distal Femur Cut – Validation Distal Femur Cut Validation (cont.) Note: To restart the distal femur cut validation, 9. Remove the validation tool, the 3.2 mm headless press the “Z” button on the pod attached to the trocar drill pins, the femoral saw slot, and the distal validation tool.
-
Page 22: Proximal Tibial Cut
iASSIST 2-Pod Version Surgical Technique 20 | Figure 3.7 Proximal Tibia Cut – Instrument Assembly Proximal Tibial Cut Instrument Assembly Warning: The femoral distal cut guide must not 2. Connect the tibial positioner to the tibial have moved to perform an accurate distal cut adjustment mechanism. - Page 23 iASSIST 2-Pod Version Surgical Technique 21 | Tibia Registration 4. While continuing to firmly grip the distal clamps 1. Loosen the blue knob on the distal part of the tibial around the malleoli, partially insert (2-3 mm) the alignment guide. longer spike of the proximal part of the tibial 2.
- Page 24 iASSIST 2-Pod Version Surgical Technique 22 | Figure 3.8 Proximal Tibia Cut – Tibia Registration Tibial Registration (cont.) 7. Ensure the distal clamps of the tibial alignment 6. While continuing to firmly grip the distal clamps around the malleoli, impact the instrument until guide remain securely positioned on the malleoli.
- Page 25 iASSIST 2-Pod Version Surgical Technique 23 | Figure 3.8 Proximal Tibia Cut – Tibia Registration (Continued) Tibial Registration (cont.) 11. Use three 3.5 X 38 mm hex head screws to secure 10. Slide the tibial positioner towards the bone until the tibial adjustment mechanism sits on the the tibial adjustment mechanism to the bone.
- Page 26 iASSIST 2-Pod Version Surgical Technique 24 | Abduction Adduction Neutral Figure 3.8 Proximal Tibia Cut – Tibial Registration (Continued) Tibial Registration (cont.) 16. Loosen the blue knob on the distal end of the tibial For steps 13-15, follow the feedback on the pod attached to the tibial alignment guide.
- Page 27 iASSIST 2-Pod Version Surgical Technique 25 | Figure 3.9 Proximal Tibial Cut Proximal Tibial Cut 1. Unclip the cut guide pod from the tibial alignment guide and clip it to the front receptable of the tibial adjustment mechanism. 2. Follow feedback (red and green LEDs) on the pod attached to the tibial adjustment mechanism and adjust flexion/extension and varus/valgus using the gold and green screws respectively.
- Page 28 iASSIST 2-Pod Version Surgical Technique 26 | Figure 3.9 Proximal Tibial Cut Proximal Tibial Cut (cont.) 4. Insert the tibial cut guide elevator rod into the 3. Insert a stylus in the tibial cut guide. tibial adjustment mechanism. Note: Zimmer NexGen Posterior Note: The left/right tibial cut guides are...
- Page 29 iASSIST 2-Pod Version Surgical Technique 27 | Figure 3.9 Proximal Tibial Cut Proximal Tibial Cut (cont.) Warning: The fasteners used to secure the 7. Lock the tibial cut guide in place by hand- tightening the blue screw on the tibial adjustment tibial cut guide to the bone must be inserted mechanism.
- Page 30 iASSIST 2-Pod Version Surgical Technique 28 | Figure 3.10 Proximal Tibial Cut – Validation Proximal Tibial Cut Validation 1. Remove the cut guide pod attached to the front 11. A drop rod can optionally be used to check the varus/valgus orientation of the cut before receptacle of the tibial adjustment mechanism and performing the resection.
- Page 31 iASSIST 2-Pod Version Surgical Technique 29 | Abduction Adduction Neutral Figure 3.10 Proximal Tibial Cut – Validation Proximal Tibial Cut Validation (cont.) 8. The proximal tibia cut values are displayed on the 4. Press the “Z” button on the pod attached to the validation tool to initiate the validation procedure.
-
Page 32: Surgical Technique For Bilateral Procedures
Proximal Tibial Cut Validation (cont.) The user can perform a bilateral procedure using the 11. Proceed with the femoral registration if continuing same iASSIST Knee Pod Kit without restarting the with the distal femoral cut. application. Note: If the proximal tibial cut needs to be 1. -
Page 33: Freehand Positioning Of The Tibial Adjustment Mechanism
Instrument Assembly Note: Intraoperative calibration does not have to be repeated if the same iASSIST Knee Pod Kit 1. Follow steps four and five of “Proximal Tibial Cut: is used. Instrument Assembly” section. - Page 34 iASSIST 2-Pod Version Surgical Technique 32 | Figure 3.12 Tibial Registration Freehand Positioning of the Tibial Adjustment Mechanism (cont.) Note: The left/right tibial cut guides are side 2. Visually align the tibial adjustment mechanism in specific and must be used per the corresponding varus/valgus and in flexion/extension by aligning the elevator rod of the tibial cut guide parallel to left/right tibial adjustment mechanism.
- Page 35 iASSIST 2-Pod Version Surgical Technique 33 | Figure 3.12 Tibial Registration (Continued) Freehand Positioning of the Tibial Adjustment Mechanism (cont.) 3. Use three 3.5 X 38 mm hex head screw to secure 4. Loosen the blue knob on the distal part of the tibial the tibial adjustment mechanism to the bone.
- Page 36 iASSIST 2-Pod Version Surgical Technique 34 | Freehand Positioning of the Tibial Adjustment Mechanism (cont.) 8. While continuing to firmly grip the distal clamps 6. Place the distal part of the tibial alignment guide around the malleoli, set rotation using the tibial on the ankle by firmly gripping the distal clamps alignment guide.
- Page 37 iASSIST 2-Pod Version Surgical Technique 35 | Figure 3.12 Tibial Registration (Continued) Freehand Positioning of the Tibial Adjustment Mechanism (cont.) 9. While continuing to firmly grip the distal clamps 10. Ensure the distal clamps of the tibial alignment around the malleoli, impact the instrument until guide remain securely positioned on the malleoli.
-
Page 38: Tibial Aligner Technique
iASSIST 2-Pod Version Surgical Technique 36 | Figure 3.13 Figure 3.14 Instrument Assembly Tibia Registration Freehand Positioning of the Tibial Adjustment Mechanism (cont.) Tibial Aligner Technique The following section describes an alternate technique 11. Lock the blue knob on the tibial alignment guide. for positioning the tibial adjustment mechanism on 12. - Page 39 iASSIST 2-Pod Version Surgical Technique 37 | Figure 3.14 Tibia Registration (Continued) Tibial Registration 1. Place the pegs of the tibial aligner on the proximal 4. Visually align the tibial adjustment mechanism in tibial plateau and sit the tibial adjustment varus/valgus and in flexion/extension by aligning mechanism on the anterior cortex of the tibia.
- Page 40 iASSIST 2-Pod Version Surgical Technique 38 | Figure 3.14 Tibial Registration (Continued) Tibial Registration (cont.) 6. Disconnect the tibial aligner by grasping the 5. Use three 3.5 X 38 mm hex head screw to secure the tibial adjustment mechanism to the bone. instrument by the grip (blue highlight) and pulling it up and away from the tibial adjustment Note: Secure the tibial adjustment mechanism...
- Page 41 iASSIST 2-Pod Version Surgical Technique 39 | Figure 3.14 Tibial Registration (Continued) Tibia Registration (cont.) Note: The tibial alignment guide is designed 12. While continuing to firmly grip the distal clamps to be self-centered when placed around the around the malleoli, impact the instrument until both spikes are fully inserted in the tibia.
- Page 42 iASSIST 2-Pod Version Surgical Technique 40 | Tibia Registration (cont.) 14. Lock the blue knob on the distal tibial alignment 13. Ensure the distal clamps of the tibial alignment guide remain securely positioned on the malleoli. guide. If a readjustment is necessary, ensure the shaft 15.
-
Page 43: Postoperative Guide
iASSIST 2-Pod Version Surgical Technique 41 | Postoperative Guide Retrieve Surgical Procedures Archives Exit the iASSIST Application The system controller computer has an archiving At the end of the procedure, quit the application function to retrieve previous surgical procedure logs. before starting another procedure with another pod kit. -
Page 44: Activate The Field Issue Recorder
iASSIST 2-Pod Version Surgical Technique 42 | Shut Down the System Controller Computer Activate the Field Issue Recorder 1. Exit all applications in use, if any. The field issue recorder is a utility that extracts useful data for the investigation of anomalies. 2. -
Page 45: Equipment Inventory And Cleaning/Sterilization Methods
2-Pod Version Surgical Technique 43 | Equipment Inventory and Cleaning/Sterilization Methods The “iASSIST Knee Master Instruments Kit” section components while flushing the areas. Ultrasound lists the instruments supplied by Zimmer CAS and cleaning (Sonication) in an enzyme solution is... -
Page 46: Iassist Knee Master Instrument Kit
2-Pod Version Surgical Technique 44 | iASSIST Knee Master Instruments Kit Additional specific cleaning instructions as defined in the text are indicated as applicable to each instrument as follows: Requires disassembly Requires water jet to flush difficult to access areas... - Page 47 iASSIST 2-Pod Version Surgical Technique 45 | Sterilization and Specific Description Product ID Cleaning Instructions Additional Notes Tibial Left Adjustment Mechanism 20-8011-017-00 Autoclave Tibial Right Adjustment Mechanism 20-8011-018-00 Additional specific cleaning (Left instrument displayed) requirements: B C D E Tibial Left Cut Guide 20-8011-019-00 Autoclave Cut guides are...
- Page 48 iASSIST 2-Pod Version Surgical Technique 46 | Sterilization and specific Description Product ID cleaning instructions Additional Notes Femoral Adjustment Mechanism 20-8011-025-00 Autoclave Additional specific cleaning requirements: B C D E Femoral Reference 20-8011-026-00 Autoclave Additional specific cleaning requirements: Femoral Distal Cut Guide 20-8011-027-00 Autoclave HBMI Femoral Distal Cut Guide...
- Page 49 iASSIST 2-Pod Version Surgical Technique 47 | Sterilization and specific Description Product ID cleaning instructions Additional Notes Pod Calibration Jig 20-8011-048-00 Autoclave Additional specific cleaning requirements: Femoral A/P Slider 20-8011-028-00 Autoclave HBMI Femoral A/P Slider 20-8011-028-50 Additional specific cleaning requirements: Do not apply excessive force to the instruments as this may cause deformation or breakage.
- Page 50 iASSIST 2-Pod Version Surgical Technique 48 | Sterilization and specific Description Product ID cleaning instructions Additional Notes Tibial Left Positioner 20-8011-040-00 Autoclave Tibial Right Positioner 20-8011-041-00 Additional specific cleaning (Left instrument displayed) requirements: A B C D E...
- Page 51 iASSIST 2-Pod Version Surgical Technique 49 | Sterilization and specific Description Product ID cleaning instructions Additional Notes Femoral Saw Slot 20-8011-042-00 Autoclave Saw slot is compatible with saw blades of 1.27 mm (0.05”) thickness 3.5 mm Hex Head Knob 20-8011-050-00 Autoclave Optional Tibial Aligner -...
-
Page 52: Disposables
2-Pod Version Surgical Technique 50 | Disposables Sterilization and specific Instrument Product ID cleaning instructions Additional Notes iASSIST Knee 2-Pod Kit 20-8011-002-00 Not Applicable (provided Single use sterile (ETO), do not re- Provided sterile sterilize) 3.5 mm Hex Head Screw x 38mm... -
Page 53: System Controller Kit
iASSIST 2-Pod Version Surgical Technique 51 | System Controller Kit Before cleaning the system controller computer, Do not use aerosols, solvents, strong detergents, always unplug computer from the AC power outlet to or corrosive products. Never allow water or other prevent electrical shocks. - Page 54 Any iASSIST Knee Pod Kit objects on the computer screen may damage it during transportation or storage. The pods should be stored at normal ambient temperature (15°C to 30°C, 59°F to 86°F) and...
- Page 55 1. Use another iASSIST Knee 2-Pod Kit. Be careful to not expose the pods to water until the power button is depressed. Once depressed, the 2. Scan the 2D barcode located on the iASSIST Knee power button will seal the inner compartment of Pod Kit.
- Page 56 Follow indications on the system controller display in order to resolve the error Solid red End of battery life Consider opening a new iASSIST Knee Pod Kit or switching to conventional instrumentation. Blinking green Everything is working as it should...
- Page 57 iASSIST 2-Pod Version Surgical Technique 55 | Pod Battery Disposal 3. Expose the pod to an Ethylene Oxide (ETO) The pods contain batteries that require safe handling. sterilization cycle per the following parameters: They may leak or explode if exposed to heat or a.
-
Page 58: Product Specifications And Regulatory Notices
Portable and mobile RF communications equipment can affect the iASSIST Knee System. Turning off 2.4GHz band Radio Frequency (RF) devices around the system (such as Bluetooth, Wi-Fi) can improve communication performance between the pods and the system controller computer. - Page 59 iASSIST 2-Pod Version Surgical Technique 57 | Guidance and Manufacturer’s Declaration Table 5.1: Guidance and Manufacturer’s Declaration - ELECTROMAGNETIC EMISSIONS The system controller computer is intended for use in the electromagnetic environment specified below. The customer or the user of the system controller computer should assure that it is used in such an environment. Emissions test Compliance Electromagnetic environment –...
- Page 60 iASSIST 2-Pod Version Surgical Technique 58 | Table 5.3: Guidance and Manufacturer’s Declaration - ELECTROMAGNETIC IMMUNITY The system controller computer is intended for use in the electromagnetic environment specified below. The customer or the user of the system controller computer should assure that it is used in such an environment. IMMUNITY test IEC 60601 Compliance...
- Page 61 iASSIST 2-Pod Version Surgical Technique 59 | Table 5.4: Recommended separation distances between portable and mobile RF communications equipment and the system controller computer The system controller computer is intended for use in the electromagnetic environment in which radiated RF disturbances are controlled.
- Page 62 In some situations it is still possible that radiated electromagnetic fields such as those from portable and mobile devices may cause performance degradation. Portable and mobile RF communications equipment can affect the iASSIST Knee System. Turning off 2.4GHz band Radio Frequency (RF) devices around the system (such as Bluetooth, Wi-Fi) can improve communication performance between the pods and the system controller computer.
- Page 63 iASSIST 2-Pod Version Surgical Technique 61 | Essential Performance The iASSIST Pod contains inertial sensors (accelerometers and gyroscopes) and instrument identification switches. The following performances have been identified as essential to the iASSIST Pod: 1. The accelerometer inclination measurements on all axes are stable within ±1.0°. 2.
- Page 64 iASSIST 2-Pod Version Surgical Technique 62 | Table 5.6: Guidance and Manufacturer’s Declaration – Electromagnetic Immunity The pods are intended for use in the electromagnetic environment specified below. The customer or the user of the pods should assure that it is used in such an environment. Immunity test IEC 60601test level Compliance level...
- Page 65 iASSIST 2-Pod Version Surgical Technique 63 | Table 5.7: Guidance and Manufacturer’s Declaration – Electromagnetic Immunity The pods are intended for use in the electromagnetic environment specified below. The customer or the user of the pods should assure that it is used in such an environment. Immunity test IEC 60601 test level Compliance level...
-
Page 66: Symbols And Icons
iASSIST 2-Pod Version Surgical Technique 64 | Symbols and Icons Symbol for “Disposal of WEEE (Waste Electrical and Symbol for “Do not resterilize” Electronic Equipment)” In the EU, refer to www.weee.zimmer.eu for infor- mation. Symbol for “Caution, consult operating instruc- Symbol for “To be used by…... - Page 67 iASSIST 2-Pod Version Surgical Technique 65 |...
- Page 68 All content herein is protected by copyright, trademarks and other intellectual property rights, as applicable, owned by or licensed to Zimmer Biomet or its affiliates unless otherwise indicated, and must not be redistributed, duplicated or disclosed, in whole or in part, without the express written consent of Zimmer Biomet.
Need help?
Do you have a question about the iASSIST Knee and is the answer not in the manual?
Questions and answers