Table of Contents
Advertisement
Quick Links
Download this manual
See also:
Setup Manual
Advertisement
Table of Contents

Related Manuals for Extron electronics IP Link IPL T CR48


Summary of Contents for Extron electronics IP Link IPL T CR48
- Page 1 User Guide IP Link ® IPL T CR48 IP Link Ethernet Control Interface 68-738-05 Rev. D 08 19...
- Page 2 Safety Instructions Safety Instructions • English Istruzioni di sicurezza • Italiano AVVERTENZA: Il simbolo, , se usato sul prodotto, serve ad WARNING This symbol, , when used on the product, is intended to avvertire l’utente della presenza di tensione non isolata pericolosa alert the user of the presence of uninsulated dangerous voltage within the all’interno del contenitore del prodotto che può...
- Page 3 Copyright © 2010-2019 Extron Electronics. All rights reserved. www.extron.com Trademarks All trademarks mentioned in this guide are the properties of their respective owners. The following registered trademarks ( ® ), registered service marks ( ), and trademarks ( ) are the property of RGB Systems, Inc. or Extron Electronics (see the current list of trademarks on the...
- Page 4 FCC Class A Notice This equipment has been tested and found to comply with the limits for a Class A digital device, pursuant to part 15 of the FCC rules. The Class A limits provide reasonable protection against harmful interference when the equipment is operated in a commercial environment.
- Page 5 Conventions Used in this Guide Notifications The following notifications are used in this guide: Potential risk of severe injury or death. WARNING: AVERTISSEMENT : Risque potentiel de blessure grave ou de mort. CAUTION: Risk of minor personal injury. ATTENTION : Risque de blessure mineure. ATTENTION: •...
-
Page 7: Table Of Contents
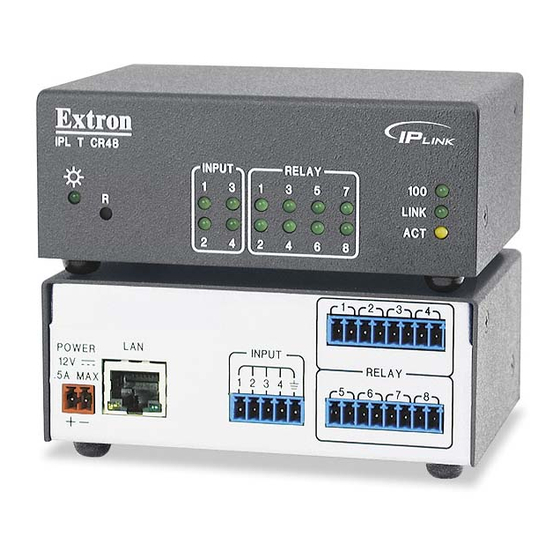
Contents Communication and Control ....16 Introduction ..........1 Ports Overview ..........16 About this Guide ..........1 Contact Closure Input Ports......16 About the IPL T CR48 ......... 1 Relay Ports ............ 16 Features .............. 1 Communication with the Interface ...... 17 Web Server ............ - Page 8 IPL T CR48 • Contents viii...
-
Page 9: Introduction
Introduction This section gives an overview of the user guide and describes the Extron IPL T CR48 IP Link Ethernet Control Interface and its features. Topics that are covered include: • About this Guide • About the IPL T CR48 Features • About this Guide This guide describes the function, installation, configuration, and operation of the IPL T CR48 Ethernet Control Interface. - Page 10 Built-in multi-level security You can control the access to devices attached to the • — unit. Two levels of password protection provide appropriate security. NOTE: The factory configured passwords for all accounts on this device have been set to the device serial number. In the event of a reset to factory defaults, the passwords revert to no password (see Setting and changing passwords page 19 to change a password).
-
Page 11: Installation And Operation
Installation and Operation This section describes the installation and the operation of the IPL T CR48. Topics that are covered include: • Installation Overview • Mounting the IPL T CR48 • Rear Panel Features and Cabling • Operation Installation Overview To install and set up the IPL T CR48, follow these steps: Turn all of the equipment off. -
Page 12: Rack Mounting
Reduced air flow Installation of the equipment in a rack should be such that the — amount of air flow required for safe operation of the equipment is not compromised. Mechanical loading Mounting of the equipment in the rack should be such that a —... -
Page 13: Furniture Or Projector Mounting
Furniture or Projector Mounting In addition to using the IPL T CR48 unit on a rack, it can be furniture or projector mounted. You can furniture mount the IPL T CR48 using an optional MBU 123 Under-Desk Mount Kit (see figure 3). You can also mount the controller to a projector mount pole using an optional PMK 100 Projector Mount (see figure 4). -
Page 14: Power
Power Power connection — (See figure 5 on the previous page) Plug the external 12 VDC power supply into this connector. The power supply is included with the unit. WARNING: The DC output cables must be kept separate from each other while the power supply is plugged in. -
Page 15: Ethernet/Lan
Orange Captive Screw Connector Ridges Smooth Tie Wrap SECTION A–A 3/16” (5 mm) Max. Power Supply Output Cord Ground +12 VDC External Power Supply (12 VDC, 1 A ) Figure 6. Power Connector Wiring ATTENTION: • Do not tin the stripped power supply leads before installing the captive screw connector. -
Page 16: Identification
Identification MAC address — (See figure 5 on page 5) The unique hardware ID number (MAC address) of the unit (for example, 00-05-A6-00-00-01 Operation Connect power cords and turn on the output devices (such as projector lifts, screen lifts, and lights), input (trigger) devices (such as motion detectors, and alarms), controller, and network devices (PC, laptop, and network equipment). -
Page 17: Resetting The Controller
Resetting the Controller There are four reset modes (numbered 1, 3, 4, and 5 for the sake of comparison with other Extron IPL products) available by using the button (see figure 8, on the previous Reset page) on the front panel. The button is recessed, so use of a pointed stylus, ballpoint Reset pen, or Extron Tweeker is suggested. - Page 18 IPL T CR48 Reset Mode Summary Mode Activation Result Purpose and Notes Hold down the button Mode 4: Mode 4 enables you to set IP Reset for about 6 seconds until the address information using ARP • Enables ARP capability. Power LED blinks twice (once at and the MAC address.
-
Page 19: Connection And Configuration
Connection and Configuration This section discusses how to connect and configure the IPL T CR48. Topics that are covered include: • Connecting the Hardware • Configuring the Hardware Connecting the Hardware To connect the IPL T CR48, connect the input and output devices to the unit (see figure 9). Screen Control Projector... -
Page 20: Contact Closure Input And Relay Connections
Contact Closure Input and Relay Connections Contact closure input connections The IPL T CR48 can be connected to any relay providing a closure to ground (closed = logic 1 and open = logic 0). The contact closure inputs are connected to 5 VDC via a 1k ohm pull-up resistor and must be wired with a ground. -
Page 21: Ipl T Cr48 Interface Configuration
IPL T CR48 Interface Configuration Configuring the IPL T CR48 using the ARP command You can make use of the ARP command to set up an IP address for your IPL T CR48. The ARP command tells your computer to associate the MAC address of the IPL T CR48 with the assigned IP address. - Page 22 Figure 11. Unit Response to a Ping Request You can reconnect using either Telnet or a web browser to verify that the update was successful. After verifying that the change was successful, enter and issue the command at arp -d the command prompt.
- Page 23 Write down your current IP address and subnet mask below. If your PC is set to Obtain address , make a note of that, instead. an IP automatically IP Address: Subnet Mask: Click (depending Specify an IP address Use the following IP address on your operating system) and leave the default gateway blank.
-
Page 24: Communication And Control
Communication and Control This section describes communication with the IPL T CR48 as well as AV device control. Topics that are covered include: • Ports Overview • Communication with the Interface • Programmer Guide for the Telnet and Web Browser • Device Control Troubleshooting •... -
Page 25: Communication With The Interface
Communication with the Interface Web Server The on-board web server is displayed as a set of default web pages, which can be accessed via a web browser. These pages are the primary means of communication with, and control through, the IPL T CR48 controller. Web browsers such as Microsoft Internet ®... - Page 26 Figure 13. System Status Page Establishing or changing system or port settings page is used to initially configure or change the configuration of the System Settings IPL T CR48. You may be required to change system settings if your network changes or if port settings change as you add or change display devices or switchers.
- Page 27 Figure 15. Port Settings Page Select the desired port and make changes to the port settings, as necessary. Click to enter the changes or click to revert to the previous settings. Submit Cancel Setting and changing passwords For security reasons, you may want to set passwords initially or change passwords either periodically or on a schedules basis.
- Page 28 Editing and adding e-mail alerts If you have created scheduled events or monitoring tasks on the IPL T CR48, you can write an e-mail alert with a message corresponding to that event or task (for example, a timer notification indicating it is time to replace a projector light bulb). The e-mail alert can notify up to eight recipients at one time.
- Page 29 Sending an e-mail alert through Telnet To complete the process of sending an e-mail alert, you must send it through a Telnet session and receive confirmation. To do so: Open a Telnet session (see Accessing and using Telnet on page 32 for instructions on how to do this).
- Page 30 Managing files is a useful tool that allows you to use and upload existing and custom File Management web pages. Custom pages can be developed using a third-party web page development program such as FrontPage or Dreamweaver also allows you to ®...
-
Page 31: Programmer Guide For The Telnet And Web Browser
Programmer Guide for the Telnet and Web Browser Using the Command and Response Table The following are either Telnet (port 23) or web browser (port 80) commands. There are some minor differences when implementing these commands via Telnet or via URL encoding using a web browser. - Page 32 } = Carriage return (no line feed) • = Space (hard) character Copyright information (c) COPYRIGHT 2009, EXTRON ELECTRONICS IPL T CR48, Vx.xx, 60-544-x5 Tue, 10 Aug 2010 16:29:10 The copyright message is displayed upon connecting to the IP Link product via TCP/IP or Telnet.
-
Page 33: Url Encoding
URL Encoding URL encoding is the method of using ASCII hexadecimal characters to display specific characters in a URL. URL encoding is used for several reasons. On some operating systems, certain characters are unsafe or not available, and others are reserved by the HTML or URL specification. - Page 34 Unsafe characters URLs use some characters for “special use” in defining their syntax and these should be encoded. For various reasons, these characters present the possibility of being misunderstood within a URL and are therefore considered “unsafe.” The following table lists unsafe characters. Characters Space Quotation marks...
-
Page 35: Command And Response Table For Sis Commands
Command and Response Table for SIS Commands Command ASCII (Telnet) URL Encoded (Web) Response Relay Functions Pulse Relay %2A 3%2A • Rly Toggle Relay %2A 2O • Rly Turn relay ON %2A 1O • Rly1 Turn relay OFF %2A0O • Rly0 View relay status KEY: = Specific port number... - Page 36 Command/response table for SIS commands (continued) Command ASCII (Telnet) URL Encoded (Web) Response IP Setup Commands E X1@ X1@] Set Unit name Ipn • Set Unit name to factory default X4(] • CN W %20 CN Ipn • X1@] Read Unit name Set time and date E X1# X1#]...
- Page 37 Command/response table for SIS commands (continued) Command ASCII (Telnet) URL Encoded (Web) Response NOTE: The factory configured passwords for all accounts on this device have been set to the device serial number. In the event of a complete system reset, the passwords convert to the default, which is no password (see Setting and changing passwords on page 19 to change a password).
- Page 38 Command/response table for SIS commands (continued) Command ASCII (Telnet) URL Encoded (Web) Response Re-map Port Designations Set Telnet port map port# MT W port# MT Pmt port# Reset Telnet port map 23MT W23MT Pmt00023 Disable Telnet port map W0MT Pmt00000 Read Telnet port map port# Set web port map...
- Page 39 Command/response table for SIS commands (continued) Command ASCII (Telnet) URL Encoded (Web) Response Event Control Read event buffer memory E X3% X3& X3& X5$] E X3% X3& X3& X3& X3(] Write event memory 24 27 Read string from event memory E X3% X3&...
-
Page 40: Device Control
Device Control Control of AV devices can be accomplished in several ways once the IPL T CR48 has been connected and configured. These include web pages, Telnet, and direct port access. Custom Web Pages These pages can either be modified versions of the existing web pages or new web pages developed in the field. -
Page 41: Troubleshooting
Passwords were set up for the connected system, so you are prompted to log in as Administrator or User. NOTE: The factory configured passwords for all accounts on this device have been set to the device serial number. In the event of a complete system reset, the passwords convert to the default, which is no password (see Setting and changing passwords... -
Page 42: Glossary
Glossary This section provides definitions of terms related to the IPL T CR48. 10/100Base-T Ethernet that uses Unshielded Twisted Pair (such as UTP - CAT 5) cable, — where the amount of data transmitted between two points in a given amount of time is equal to either 10 Mbps or 100 Mbps. - Page 43 GlobalViewer (GV) A set of web pages (HTML, XML, JS) and graphics that are loaded — into the memory of an IPL T CR48. These pages provide an interface for control of devices attached to the IPL T CR48. They communicate with the event scripts running on the unit, and the event scripts issue the commands and queries.
- Page 44 Extron Electronics makes no further warranties either expressed or implied with respect to the product and its quality, performance, merchantability, or fitness for any particular use. In no event will Extron Electronics be liable for direct, indirect, or consequential damages resulting from any defect in this product even if Extron Electronics has been advised of such damage.
Need help?
Do you have a question about the IP Link IPL T CR48 and is the answer not in the manual?
Questions and answers