Table of Contents
Advertisement
Advertisement
Table of Contents
Troubleshooting

Subscribe to Our Youtube Channel
Related Manuals for CME BodyGuard 595 Color Vision


Summary of Contents for CME BodyGuard 595 Color Vision
- Page 1 BodyGuard 595 Color Vision Pain Manager Infusion System Operator Manual 0344 Manufacturer: Caesarea Medical Electronics Ltd. 23 Staufenburg st. 72805 Lichtenstein, Germany T: +800-323-575-00 E: sales@cme-infusion.com www.cme-infusion.com Edition Jan 2014 Ref: 100-099XCV...
- Page 2 NOTE: to assure proper use of the BodyGuard 595 Color Vision™, Caesarea Medical Electronics Ltd. urges all users to read this manual carefully, become familiar with the procedures and system functions and follow all recommendations. U.S.A. federal law restricts this device to sale by or on the order of a physician.
-
Page 3: Table Of Contents
Table of Contents 1 - Introduction Overview Keypad Descriptions and Functions System Safety Checks Pump Accuracy 2 – Symbols, Warnings and Cautions System Symbols Terms Used In Manual Intended Use Warnings 3 – Installation and Set Up Unpacking Charging the Pump 4 –... - Page 4 Storage Battery Operation LIMITED WARRANTY BodyGuard 595™Color Vision Operator Manual...
-
Page 5: Introduction
1 – Introduction 1 - Introduction Overview The BodyGuard 595 Color Vision™ Pain Manager System provides the following features: Compact design, lightweight pump. Infusion Programs: Basal only Basal & bolus Bolus Bolus can be one of the following: ... -
Page 6: Keypad Descriptions And Functions
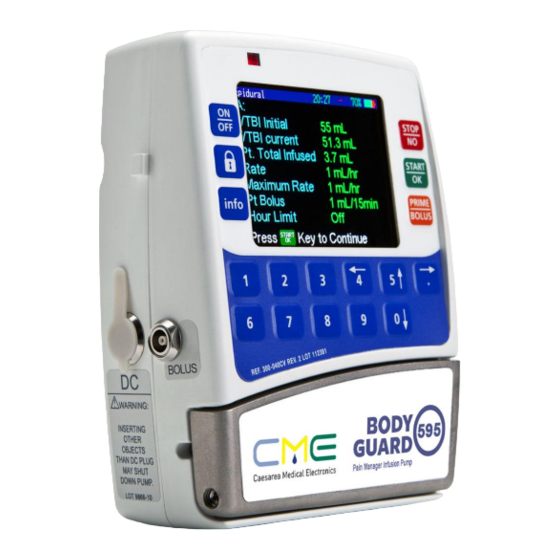
1 – Introduction Keypad Descriptions and Functions Front of BodyGuard 595 Color Vision™ Pain Manager 1. Operation LED Green Indicator Lights during system Self-Test An intermittent green light indicates infusion delivery Red Indicator 2. Display Screen ... - Page 7 1 – Introduction 5. INFO Supplies information about the pump and its programs (see Info Mode chapter). Pressing continuously locks and unlocks the keypad to 6. Numeric Keys prevent accidental or deliberate change to pump operation. Enters numeric parameters during programming 7.
- Page 8 1 – Introduction BodyGuard 595 Color Vision™ Pain Manager with Door Open Area Function Holds the door closed when latch is in vertical Latch Holder position. Flow Direction Shows direction of pump operation. Detects downstream tubing restriction and occlusion. Alarm level can be adjusted to suit Pressure Sensor patient needs.
- Page 9 1 – Introduction BodyGuard 595 Color Vision™ Pain Manager Charger Area Function Displays major pump messages and operation Charger Display values. Release Handle Push to release the pump from the Charger. BodyGuard 595™Color Vision Operator Manual...
-
Page 10: System Safety Checks
(usually within 15 seconds). Air-in-Line Detection BodyGuard 595 Color Vision™ utilizes two modalities to detect air-in-line. The ultrasonic detector can be configured between 0.0 (OFF in epidural mode only) & 1.0ml on the BodyGuard 595 Color Vision™ pump for single bubble detection whilst a cumulative check triggers the alarm if an accumulation of smaller bubbles totals 1.0ml (non-... -
Page 11: Pump Accuracy
24 standard. Trumpet and Flow Rate With the BodyGuard 595 Color Vision™, as with all infusion systems, the action of the pumping mechanism and variations cause short term fluctuations in rate accuracy. The following curves show typical performance of the system in two ways: The accuracy of fluid delivery over various time periods is measured (trumpet curves). - Page 12 1 – Introduction may have clinical impact depending on the shelf life of the drug being infused and the degree of inter-vascular integration. The clinical effect cannot be determined from the trumpet curves alone. BodyGuard 595™Color Vision Operator Manual...
- Page 13 1 – Introduction BodyGuard 595™Color Vision Operator Manual...
- Page 14 1 – Introduction BodyGuard 595™Color Vision Operator Manual...
-
Page 15: Symbols, Warnings And Cautions
2 – Symbols, Warnings and Cautions System Symbols The following symbols are used on the BodyGuard 595 Color Vision™ Pain Manager and components. Labels on the system or statements in this manual proceeded by any of the following words and/or symbols are of special significance and are intended to help you to operate the pump in a safe and successful manner. -
Page 16: Terms Used In Manual
BodyGuard 595 Color Vision™ Pain Manager. Intended Use The BodyGuard 595 Color Vision™ Pain Manager is designed for infusion of medications or fluids requiring continuous or intermittent delivery at precisely-controlled infusion rates through clinically acceptable routes of administration, including... - Page 17 Before operation, verify that the administration line is not kinked or occluded. The BodyGuard 595 Color Vision™ should be operated only with the MicroSet administration lines. Use of administration lines other than the MicroSet impair the operation of the pump and the accuracy of an infusion.
- Page 18 2 – Symbols, Warnings and Cautions Watch your fingers and nails when opening the pump door. When operati ng the pump on PCA program with a rate of 0.0 ml/h there is a hazard of blood clot forming. Connect saline infusion in parallel to avoid this problem.
-
Page 19: Installation And Set Up
9V Alkaline Battery compartment (optional) Disposable Battery Pack (optional) External charger (optional) Extended life battery Li-Ion Polymer If any items are missing or damaged, contact your BodyGuard 595 Color Vision™ supplier. BodyGuard 595™Color Vision Operator Manual... -
Page 20: Charging The Pump
3 – Installation and Set Up Charging the Pump NOTE: the pump is protected against overcharging. In order to keep your battery fully charged, connect the pump to the mains via the Charger whenever possible. Be sure that the battery is fully charged at all times. Warning: if the battery is removed during operation while pump is not connected to a charger connected to mains, the pump will turn off. - Page 21 3 – Installation and Set Up Caution: leaving the battery discharged for a long period of time may damage the battery. BodyGuard 595™Color Vision Operator Manual...
-
Page 22: Operation
4 – Operation 4 – Operation Before Operating the Pump Before attaching the system to a patient, run the following tests to verify that all indicators and alarms work properly. When an alarm is activated the following occurs: An alarm message appears on the display ... -
Page 23: Air In Line - Alarm Test
4 – Operation Air in Line – Alarm Test Insert a MicroSet administration set and close the door. Press the door until a click is heard. NOTE: for instructions on how to load and prime an administration set refer to sections “Loading the Administration Set”... -
Page 24: Door Open - Alarm Test
4 – Operation Depending upon the set flow rate and pressure █ ■ REGIONAL 10:00 - threshold, the Down Occlusion alarm will be activated. Down Press to mute the alarm. Occlusion Check Set / Access Press key to mute Door Open – Alarm Test Insert a MicroSet in the pump and close the door. -
Page 25: Charger Indicator Test
Operating the Pain Manager Infusion Pump NOTE: before using the BodyGuard 595 Color Vision™ for the first time please ensure you have carried out the 'pump operation tests’ as detailed in the previous chapter. These tests should be carried out periodically to ensure all systems are functioning correctly. -
Page 26: Access Codes & Keypad Lock
Access Codes & Keypad Lock To operate, program and configure the BodyGuard 595 Color Vision™ Infusion pump three Access Codes are required. All codes and codes levels can be modified and controlled from technician menu. -
Page 27: Dedicated Administration Sets
Dedicated Administration Sets The BodyGuard 595 Color Vision™ Pain Manager should be operated only with MicroSet dedicated Infusion sets, deferent color for deferent program: PCA (Blue), Epidural (Yellow) and Regional (Green). -
Page 28: The Bodyvalve
Warning: air embolism can cause death or serious injury to the patient. Do not connect a patient to the BodyGuard 595 Color Vision™ Infusion Pump until all trapped air has been cleared from the fluid path. Carefull y read the instructions for loading. -
Page 29: Microset™ With 0.2Mic Filter
4 – Operation MicroSet™ with 0.2mic Filter Area Function Spike Cap Keeps the set sterile Connects the administration set to Spike solution bag Administration Tubing 1.5 x 3 mm Transfers the solution Prevents incorrect tube stretching Anti Stretch locator and locates the administration set correctly Soft segment of the set for increased Administration Tubing 3 x 4.1 mm... -
Page 30: Priming The Set
4 – Operation Lift the door latch (on the right side of the door) to open the BodyGuard 595 Color Vision™ pump door and remove the administration set from the sterile packaging leaving the end caps on the line. Connect the administration set to the medication bag. Hold the section of tubing with the black key (small plastic block) and make sure the flow direction is in line with the flow direction arrows inside the pump door. - Page 31 Stop infusion and turn the pump off. Do not deliver the pump to the user while switched on. NOTE: all BodyGuard 595 Color Vision™ administration sets contain a check valve which means the line cannot be primed using gravity. Sets must be primed using the infusion pumps Priming function.
-
Page 32: Modify Protocol
Library" on the main menu for the first time you will see the protocols are blank. On the first few patients using the BodyGuard 595 Color Vision™ you can edit, add or delete any of these infusion protocols to tailor the protocols to your service. - Page 33 4 – Operation NOTE: entry of all parameters is via the numeric keypad. Only the protocol selection, concentration, limits setting are a scroll option menu using the up and down arrows. The previous value will be displayed. Enter the new value which will automatically delete the previous value.
- Page 34 4 – Operation The BodyGuard 595 Color Vision™ has 26 █ ■ 10:00 A: MORPHINE protocols (A-Z), which are divided between PCA 10 protocols (A-J) Select and press █ EPIDURAL 10:00 ■ K: BUPIVICAINE Epidural 8 Protocols (K-R) Select and press █...
- Page 35 4 – Operation Use numeric keys 5 (up) 4 (left), point (right) and █ ■ 10:00 0 (down) to navigate around the letter, number and symbol choices. To select a character, EFGH1234+- position cursor over target IJKLMNOPQ5678%& RSTUVWXYZ90.,:/ letter/number/symbol and press Abcdefghijklmno pqrstuvwxyz@() to Edit...
- Page 36 NOTE: the BodyGuard 595 Color Vision™ is capable of continuous (basal) rates of up to 100ml/hr. User can enter a maximum basal rate in "Change Set Up" using level three access code to ensure other users can not accidentally program the pump to deliver above the safe ceiling for your commonly used drugs.
- Page 37 4 – Operation 17. Set the protocol maximum rate. This will set the █ ■ 10:00 maximum rate allowed for titration. A: MORPHINE Protocol Maximum Rate mL/hr Enter and Press █ ■ 10:00 18. If your protocol requires bolus press A: MORPHINE confirm.
- Page 38 4 – Operation 20. In case of patient bolus: Patient triggers the █ 10:00 ■ A: MORPHINE bolus through an external bolus cable. Patient Bolus Dose Set bolus dose volume and press Enter and Press 21. Set a maximum bolus dose allowed for the █...
- Page 39 4 – Operation █ 10:00 ■ 25. Set bolus dose volume and press A: MORPHINE Auto-Bolus Dose Enter and Press 26. Set a maximum bolus dose allowed for the █ 10:00 ■ A: MORPHINE protocol Maximum Bolus Dose Enter and Press █...
- Page 40 4 – Operation █ 10:00 ■ 30. Set bolus dose volume and press A: MORPHINE Patient Bolus Dose Trigger the bolus through the external bolus cable Enter and Press █ 10:00 ■ 31. Set bolus dose volume and press A: MORPHINE Auto-Bolus Dose Enter and Press █...
- Page 41 4 – Operation 35. Set the lockout time from auto bolus and patient █ ■ 10:00 A: MORPHINE bolus and press Auto-Bolus To Patient Bolus Minutes Enter and Press 36. Set the maximum bolus volume allowed by a █ 10:00 ■...
- Page 42 4 – Operation █ 10:00 ■ 40. Set KVO rate and press . The to 0 if not A: MORPHINE applicable. Keep Vein Open Rate mL/hr Enter and Press Set occlusion pressure alarm level specific to the █ 10:00 ■ A: MORPHINE protocol/patient and press Occlusion Pressure...
-
Page 43: Select Protocol (Start An Infusion)
Review: Press NOTE: BodyGuard 595 Color Vision™ is capable of delivering the bolus dose at up to 1200 ml/hr. The user can adjust bolus delivery down to a minimum of 40 ml/hr in "Change set up mode" using the level three access code. - Page 44 4 – Operation If the previous infusion was not over, the following █ EPIDURAL 10:00 - ■ K: BUPIVICAINE screen will appear: Press key to Resume Press key for Menu █ ■ EPIDURAL 10:00 - To continue previous infusion, press The screen will then prompt for code.
- Page 45 4 – Operation From the menu press "Select Protocol" by █ EPIDURAL 10:00 - ■ Prime Select Protocol scrolling with the arrow keys and pressing Change Bag View Protocol Settings View Shi f t Totals View Patient History View Event Log Clinician Bolus Select and press...
- Page 46 4 – Operation 11. Enter the patient's weight. Enter in kilograms and █ EPIDURAL 10:00 ■ BUP IV ICA INE confirm with Patient weight Enter and Press 12. If auto-bolus, the following screen appears: █ EPIDURAL 10:00 ■ make sure that auto bolus is in fact required. To BUP IV ICA INE confirm press Warning !
-
Page 47: Titrating Basal Rate During Infusion
Clinician Bolus Patient Activated Bolus The BodyGuard 595 Color Vision™ infusion pump can be programmed to allow the patient to request boluses of a specified volume within predetermined time intervals. The patient can request a bolus by one of the following two methods: Using a Bolus Cable for various modes SAFETY CHECK: Prior to connecting the bolus cable to the pump test the bolus cable. -
Page 48: Clinician Activated Bolus
4 – Operation The pump will not accept a second press within a minimum time interval removing the risk that movement triggering a series of apparent requests (within the correct min and max pressing times) from being recognized as a genuine request. ... - Page 49 4 – Operation NOTE: The Bolus Titration can only be changed if the Bolus Titration mode has been defined as Bolus Titration ON in the "Change Set Up" option. The default set-up is OFF. Select and press █ EPIDURAL 10:00 ■...
- Page 50 4 – Operation After selecting a protocol and approving the █ EPIDURAL 10:00 - ■ protocol summary, press to start a loading dose. Start Infusion ? Press key to start for Loading Dose & Start █ ■ EPIDURAL 10:00 - Start Auto-Bolus? Press key to start...
- Page 51 4 – Operation The display screen will show a graph indicating the █ EPIDURAL 10:00 - ■ bolus is being infused. The graphical bar displays Bolusing 0.363 mL the amount of the bolus to be infused (grey) and ███████████████████ the amount infused (green). Bolus Dose 5 mL 2 mL/hr...
-
Page 52: Automatic Bolus Rate Adjustment
It is recommended to select a protocol prior to starting a clinician bolus. Automatic Bolus Rate Adjustment The BodyGuard 595 Color Vision™ has a special feature which optimizes bolus rate during infusion through narrow catheters such as Epidural catheters. The pump will attempt to deliver the bolus at the pre -set bolus delivery rate. -
Page 53: Mediguard Tm Option
4 – Operation Protocol The currently selected protocol letter (A-Z) appears in the left hand margin of the display. Protocol or drug name appears on the top line of the display. This is useful as you may use a standard morphine solution of, say, 1mg/ml, but have up to 26 protocols using different bolus volumes and lockouts. -
Page 54: Using History Functions
Using History Functions The BodyGuard 595 Color Vision™ keeps a rolling 24 hour history of the current patient’s infusion delivery. In this section we will address how this can be used. There is also a 2000 event history log keeping track of the last 2000 user actions in a date and time stamped record. - Page 55 4 – Operation • Current infusion totals • Bolus summary • Protocol information • Battery level • Time & date • Pump information Press to stop the infusion and then press repeatedly to scroll through the following information screens: • Volume and boluses given in the last 1 hour •...
-
Page 56: End Of Program/Infusion And Bag Change
4 – Operation Rate 2 mL/hr Pressing will display further data relevant to Vol, Remaining 9.6 mL Volume Infused 0.4 mL this event on the status of the program and pump Operation Battery at the time of this event. Battery Level Normal Lock Status Program... -
Page 57: Eliminating Air During Operation
4 – Operation To prime the set select the prime function from the █ 10:00 - ■ Prime menu. Select Protocol Change Bag View Protocol Settings View Shi f t Totals View Patient History View Event Log Clinician Bolus Select and press █... -
Page 58: Down Occlusion Alarm
4 – Operation Press to silence the alarm. Press and hold down for 3 seconds to return to the menu screen. Enter the Access Code. Select Prime and press Enter the relevant Access Code. Disconnect the line from the patient; use aseptic technique. Warning: ensure the line is disconnected from █... -
Page 59: View Set Up
4 – Operation Fix the obstruction in the I.V. line and press to continue. View Set Up Selecting ‘View Set Up’ from the menu and pressing allows you to scroll through, select and view any of the default parameters or events history. Simply scroll to a parameter you wish to view and press In this mode you can only view the parameters but cannot change any of the values which users can configure. -
Page 60: Default Settings
4 – Operation Default Settings The pump comes programmed with a number of default parameters that can be viewed using ‘View Set Up’ from the main menu and changed using the technician access code in ‘Change Set Up’ mode. PARAMETER PURPOSE RANGE Battery Level... - Page 61 4 – Operation hardware features prime volume, continuous Volume Test Test the volume calibration rate, bolus dose, bolus rate, bolus lock-out Keypad test, display test, sound alarm test, door sensor test, air sensor Manually test the pumps hardware test, motor & encoder test, Manual Tests features pressure sensor test,...
-
Page 62: Alarm Conditions And Troubleshooting
5 – Alarm Conditions and Troubleshooting 5 – Alarm Conditions and Troubleshooting Alarm Condition When the infusion pump detects a problem, four things occur: The infusion stops An audible alarm is activated A message appears on the display screen indicating the cause of the alarm ... -
Page 63: Troubleshooting
5 – Alarm Conditions and Troubleshooting Troubleshooting Description Result Possible Cause Required Action Infusion stops Air is present in administration Disconnect line from patient, press █ 10:00 - 70% ■ and an alarm is Set. Air or Up activated key. Pump stopped screen is Occlusion displayed. - Page 64 5 – Alarm Conditions and Troubleshooting Description Result Possible Cause Required Action █ Pump operation Battery is depleted. Place the pump in charger and 10:00 - 0% ■ stops. The pump connect to mains. Wait 2 minutes cannot be used before operating.
-
Page 65: Specifications
Battery Charging: Automatic when clicked into the Charger that is connected to an AC power source. Six hours needed to charge a fully-depleted battery. When a problem is detected, the BodyGuard 595 Color Vision™ Alarms: displays the following alarms: ... - Page 66 Manufactured in accordance to ISO 9001:2008 and ISO Standards 13485:2003 . CE marked (In accordance with the Medical Devices Directive 93/42/EEC) The BodyGuard 595 Color Vision™ Pain Manager is designed to be in compliance with EN 60601-1 (safety) and IEC 601-1-2 (EMC). Environmental...
-
Page 67: Service And Maintenance
Perform functional tests and ensure that battery is fully charged once every three months. Battery Operation The BodyGuard 595 Color Vision™ pump can operate on battery power which enables operation when the patient is being moved or during electrical power failure. When the pump operates on battery power, the AC icon is off. - Page 68 7 – Servi c e and Maintenance NOTE: whenever possible, use the pump connected to an AC power supply via the charging unit. This preserves the battery power supply for emergency use or for situations where the AC power is not available. ...
- Page 69 CME or its designated representative reserves the right to invoice purchaser for such inspection. This Limited Warranty is the sole and entire warranty pertaining to CME’s products and is in lieu of and excludes all other warranties of any nature whatsoever, whether stated, or implied or arising by operation of law, trade, usage or course of dealing, including but not limited to, warranties of merchantability and warranties of fitness for a particular purpose.
Need help?
Do you have a question about the BodyGuard 595 Color Vision and is the answer not in the manual?
Questions and answers