Table of Contents
Advertisement
Quick Links
Advertisement
Table of Contents

Related Manuals for GLP impression FR1 TM


Summary of Contents for GLP impression FR1 TM
- Page 1 Luminaire software version 1.20...
- Page 2 This manual covers firmware version 1.20 © 2017-2019 German Light Products GmbH. All rights reserved. The marks ‘GLP’ and ‘German Light Products’ are trademarks registered as the property of German Light Products GmbH in Germany, in the United States of America and in other countries.
-
Page 3: Table Of Contents
Contents Safety ....................4 Avoiding damage ................. 9 Product overview ................10 Product features ................11 Preparing for use .................15 Control menus and LCD display ..........21 Control menu layout ..............22 DMX channel layout ..............27 Service and maintenance ............30 Technical specifications .............33 Dimensions ..................35... -
Page 4: Safety
GLP® supplier for assistance. Your GLP supplier will be happy to help. The impression FR1 TM and this user manual are intended for use by experienced professionals with the knowledge and skills to set up, operate, and maintain high- powered, remotely controlled lighting equipment safely and efficiently. - Page 5 German Light Products® • If you have questions about the safe installation, operation or maintenance of the impression FR1 TM, please contact an authorized GLP distributor (see list of distributors at www.glp.de). • Use the luminaire only as directed in this user manual. Observe all markings in this user manual and on the luminaire.
- Page 6 Eye safety • The impression FR1 TM is classified as a Risk Group 2 luminaire according to EN 62471. Possibly hazardous radiation emitted. • Do not stare into the light output from the luminaire. May be harmful to the eyes.
- Page 7 If no fixed structure is available, secure the luminaire using the safety cable and retaining collar supplied with the luminaire (or identical replacement items supplied by GLP) as directed in this manual. impression® FR1 TM User Manual...
- Page 8 • If the luminaire becomes damaged, stop using it immediately and remove it from the installation. Do not attempt to use a luminaire that is obviously damaged. • Do not modify the luminaire in any way not described in this user manual. • Install genuine GLP parts only. impression® FR1 TM User Manual...
-
Page 9: Avoiding Damage
Do not expose the luminaire to heat (from other lighting luminaires for example). Transportation and storage Transport the impression FR1 TM either in a flightcase or in its original packaging to protect the luminaire from damage caused by shocks during transportation. -
Page 10: Product Overview
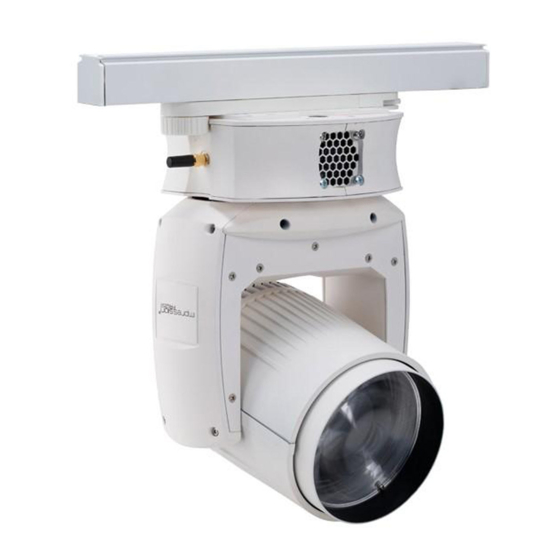
Product overview Figure 2: Product overview A – Front lens assembly F – Cooling vent B – Control panel with backlit LCD display G – Wireless control linking button C – Wireless control antenna H – Fuseholder D – Combined mechanical fastener and I –... -
Page 11: Product Features
DMX using the CRMX system from LumenRadio. See https://lumenradio.com/products/wireless-dmx/. The impression FR1 TM is not suitable for household use, for use in any location where unattended children have access to it, or for use in permanent outdoor installations. Light source The impression FR1 TM is equipped with an OSRAM Ostar RGBW LED with a rated lifetime of up to 50 000 hours. - Page 12 After you have set a color temperature on the CTC channel you can then fine-tune it using the RGBW channels. Shutter effects The impression FR1 TM features an electronic dimmer / shutter system that provides pulse and strobe effects. Dimming 0 –...
- Page 13 German Light Products® Fan modes The four different cooling fan modes give you a range of options to choose from depending on how much you want to give priority to high-intensity light output or to low fan noise: • Regulated gives priority to light output. If the luminaire is blacked out, fans run at minimum speed.
- Page 14 Control/Settings DMX channel. Zoom The impression FR1 TM has a 10:1 zoom range. You can narrow the beam angle from 35° in flood mode to 3.7° in spot mode. Zoom can be inverted from flood spot to spot flood using the control panel and the Control/Settings DMX channel.
-
Page 15: Preparing For Use
Included Items See Figure 4. The impression FR1 TM is supplied with the following items: • Retaining collar A for installing in lighting track • Safety cable B with lockable clip and eyebolt for fastening to a retaining collar. - Page 16 See Figure 5. At the end of the track adapter next to the wireless linking button, use the lever (arrowed) to close the main mechanical fastener. This will fix one side of the luminaire into the track and make the connection to the Neutral line inside the track.
- Page 17 German Light Products® anchoring point and to the safety cable attachment point in the luminaire’s baseplate so that it will hold the luminaire if the rigging clamp fails. Take up as much slack as possible in the safety cable (by looping it more than once around the rigging structure, for example).
- Page 18 See Figure 8. Attach the free end of the safety cable to the safety cable anchoring point in the luminaire’s baseplate using the lockable carabiner clip (arrowed in Figure 8) on the end of the safety cable. Fasten the lock on the carabiner clip so that the safety cable cannot become unfastened from the luminaire.
- Page 19 Use certified DMX cable for DMX links between XLR-type DMX connectors. Connecting to a CRMX wireless control system The impression FR1 TM has an onboard wireless receiver that allows remote control by DMX over a Lumenradio CRMX wireless network. You can use any transmitter that is CRMX-compatible.
- Page 20 The transmitter will now search for unlinked luminaires for a limited period. To link one or more impression FR1 TM luminaires to the transmitter, press the wireless linking button on the side of the luminaire(s) once. As soon the button is pressed the luminaire will try to connect to any CRMX transmitter that is within range and in discovery mode.
-
Page 21: Control Menus And Lcd Display
German Light Products® Control menus and LCD display Warning! DMX control is disabled when the control menus are active. Be prepared for the head to move as soon as you exit the control menus. The control panel and LCD display provide access to user settings, readouts, and utilities. -
Page 22: Control Menu Layout
Control menu layout DMX Start 1 - 512 DMX start address Address Setup DMX Mode NORM Invert Pan ON / OFF Invert pan left/right Invert Tilt ON / OFF Invert tilt up/down Swap ON / OFF Swap Pan/Tilt channels... - Page 23 German Light Products® Luminaire blacks out if Blackout DMX signal is lost Last DMX values are held Hold if signal is lost Luminaire goes to stored DMX Hold Stand-Alone stand-alone scene if DMX signal is lost Take snapshot of current DMX Shot scene and save it as stand-alone scene...
- Page 24 -128 - 127 Current °C/°F Maximum -128 - 127 Main head Main resettable °C/°F temperature Temperature sensor readouts Maximum -128 - 127 non- °C/°F resettable Temperatures -128 - 127 Current °C/°F Maximum -128 - 127 resettable °C/°F temperature Temperature...
- Page 25 German Light Products® Full System Confirm (Yes/No) Reset luminaire Reset Pan/Tilt Reset pan and tilt Reset Confirm (Yes/No) Reset only LED Driver Confirm (Yes/No) Reset LED driver only Reset 0 - 255 Zoom 0 - 255 Pan rotation 0 - 255 Manually apply Special 0 - 255...
- Page 26 ON / OFF Test Colour ON / OFF Run test sequence ON / OFF Enter code (contact GLP if you would like the code) to access Service Menu (resets Enter Code 0 - 255 automatically after luminaire restart or after 10 min. with no...
-
Page 27: Dmx Channel Layout
German Light Products® DMX channel layout Normal mode (16 DMX channels) Default Channel Function Description % Range* Fade range Pan coarse Left – right in 1.2° 0 – 65535 32768 0 – 100% Fade increments (16 bit) Pan fine Tilt coarse Up –... - Page 28 Control/Settings Idle 0 – 11 0 – 4.3% Snap (see notes at No function 12 – 26 4.7 – 10.2% end of this Performance = Fast* 27 – 29 10.6 – 11.4% table) Performance = Normal* 30 – 32 11.8 –...
- Page 29 German Light Products® 607 Hz** 68.6% 608 Hz** 69.0% continued 609 Hz** 69.4% 610 Hz** 69.8% 611 Hz** 70.2% 612 Hz** 70.6% 613 Hz** 71.0% 614 Hz** 71.4% 615 Hz** 71.8% 616 Hz** 72.2% 617 Hz** 72.5% 618 Hz** 72.9% No function 187 –...
-
Page 30: Service And Maintenance
Cleaning impression FR1 TM components require occasional cleaning to prevent the buildup of dust, dirt, and smoke fluid residue. Pay special attention to the air vents and front lens. Failure to keep the luminaire clean will significantly reduce light output and may cause damage. - Page 31 German Light Products® To remove the micro-Fresnel lens: Shut down power to the luminaire and allow it to cool. Figure 11. Removing a micro-Fresnel lens See Figure 11. Remove the three Phillips #1 screws (arrowed) from the lens in the front of the head.
- Page 32 Figure 13. Main fuse GLP Service and Support Contact information for the nearest GLP Service and Support is available online at www.glp.de/en/service, by request via email at info@glp.de, or by telephone at the following numbers: •...
-
Page 33: Technical Specifications
German Light Products® Technical specifications Light source LED type: Osram Ostar RGBW LED lifetime: 50.000 hours Number of LEDs: 1 CRI (Ra): 80 TLCI: 80 TM30-15 77/106 Optics Min. zoom angle: 3.7° Max. zoom angle: 35° Zoom range: 10:1 Effects Color mixing: RGBW continuous Color presets: 12 + 3 whites, adjustable via RGBW Color temperature correction: 2500 K –... - Page 34 Electrical AC power: 100-240 V, 50/60 Hz Maximum power consumption @230 V: 80 W Power consumption at idle: 14 W Primary fuse: 20 mm T 2A EEC (Energy Efficiency Class): E EEI (Energy Efficiency Index): 1.193 Energy consumption (kWh/1 000 h): 68...
-
Page 35: Dimensions
German Light Products® Dimensions Dimensions given in millimeters impression® FR1 TM User Manual...
Need help?
Do you have a question about the impression FR1 TM and is the answer not in the manual?
Questions and answers