Table of Contents
Advertisement
Quick Links
Advertisement
Table of Contents

Related Manuals for GLP JDC Burst 1


Summary of Contents for GLP JDC Burst 1
- Page 1 JDC Burst 1 Document revision: 20250120-02 Fixture software version : v.0.1.2...
-
Page 2: Document Revisions
GLP® JDC Burst 1 User Manual © 2025 German Light Products GmbH. All rights reserved. The marks ‘GLP’ and ‘German Light Products’ are trademarks registered as the property of German Light Products GmbH in Germany, in the United States of America and in other countries. -
Page 3: Table Of Contents
Safety............................5 Key to symbols ......................5 GLP Service and Support ..................6 Avoiding damage to the fixture ................ 7 JDC Burst 1 overview ...................... 8 Features and settings ....................9 Controlling the fixture ..................... 9 Control options ......................9 Control Modes ...................... - Page 4 Control menus ......................... 23 Quick menu ........................ 23 Main menu ........................24...
-
Page 5: Safety
If you have any doubts or questions about how to use the GLP® JDC Burst 1 lighting fixture safely, contact your GLP supplier for assistance. Your GLP supplier will be happy to help. -
Page 6: Glp Service And Support
DMX commands available in the fixture. This information is also included in the User Manual. The JDC Burst 1 is intended for use by experienced professionals with the knowledge and skills to set up, operate, and maintain high-powered, remotely controlled lighting equipment safely and efficiently. -
Page 7: Avoiding Damage To The Fixture
German Light Products® JDC Burst 1 Avoiding damage to the fixture The Quick Start and Safety Manual contains important information that is intended to help you avoid possible damage to the fixture from other light sources, during transportation, etc. Read that information before storing, transporting or using the fixture. -
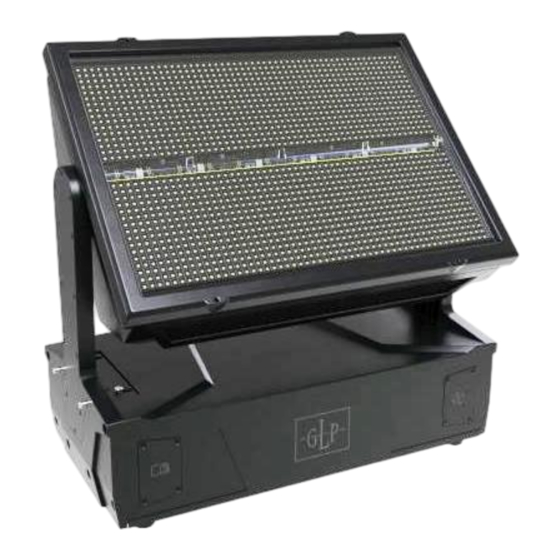
Page 8: Jdc Burst 1 Overview
JDC Burst 1 2. JDC Burst 1 overview Figure 1. JDC Burst 1 overview A - Head G – NFC Sensor (behind display) B – Cooling vent H – Safety cable attachment point (underside of base) C – Alignment pins button I –... -
Page 9: Features And Settings
JDC Burst 1 3. Features and settings The JDC Burst 1 is a powerful LED Strobe & Wash Light and is designed for temporary outdoor use or permanent and temporary installations in dry locations. The unit features Powerful white strobe line •... - Page 10 White Beam Module (all beam segments linked as one group) RGBW Plate Module (all beam segments linked as one group) Pattern Module Beam (fx on all beam segments) Pattern Module Plate (fx on all plate segments) JDC Burst 1 User Manual...
- Page 11 German Light Products® JDC Burst 1 Mode 3 - Segment (23 channels + segment controls) Main Personality a.) White Beam module: Dimmer, Shutter, Duration, Rate b.) RGBW Plate module: Dimmer, Shutter, Duration, Rate, RGB(W)-Colormix c.) Pixel Engine Beam (2nd Layer Fixture): Master Dimmer for beam segments d.) Pixel Engine Plate (2nd Layer Fixture): Master Dimmer for plate segments...
- Page 12 Beam Segment 1 … … Beam Segment n (user setting in Pixel Engine Beam → Segment Count) RGBW Plate Segment 1 … … RGBW Plate Segment n (user setting in Pixel Engine Plate → Segment Count) JDC Burst 1 User Manual...
-
Page 13: Powering On
When power is applied to the fixture and no valid DMX signal is present, the head moves automatically to its home position (tilt center). Tilt The JDC Burst 1 has 16-bit motorized tilt movement with coarse and fine control channels. Direction of tilt movement... -
Page 14: Duration
Pattern Select In Modes 2 and 4 the JDC Burst 1 offers a wide range of static and dynamic pre- programmed FX patterns for the white beam segments and for the RGBW plate segments. -
Page 15: Pattern Speed/Index
Sub module(s) are merged together – or which value has higher priority. This lets you switch between the layers or create special effects using both layers. See the Mix Priority table in the JDC Burst 1 DMX Channel Index document for descriptions of the different modes. -
Page 16: Fan Modes
Segment Count and Protocol Settings→Pixel Engine Plate → Segment Count options. See the JDC Burst 1 DMX Channel Index document for details of segment layout. The segments may be mirrored in X or Y axis or both using the Fixture Settings→Pixel Mirror option. -
Page 17: Display Mode
German Light Products® JDC Burst 1 Display Mode Sets how the fixture‘s control panel display operates. The display will always come on when you press a button. ● Auto (default): display switches off after a few seconds if the fixture is receiving a control signal and has no errors. -
Page 18: Service
Factory Menu Important! Do not enter the Factory Menu if you are not a trained service professional with service documentation or clear instructions from GLP Service. Read the user and service documentation carefully before entering this menu. In the Factory Menu you can apply critical settings which can damage the fixture. -
Page 19: Control Panel
German Light Products® JDC Burst 1 4. Control panel Warning! DMX control is disabled when the control menus are active. Be prepared for the head to move as soon as you exit the control menus. The control panel and backlit graphic LCD display with self-charging battery allow you to setup the fixture even when the fixture is disconnected from power. - Page 20 ● The fixture is set to DMX Mode 1 ● The fixture is set to receive data via DMX ● The fixture’s DMX start address is 001 ● The fixture is using DMX channels 1 to 19. JDC Burst 1 User Manual...
-
Page 21: Using The Control Panel
German Light Products® JDC Burst 1 Using the control panel The four control panel buttons under the display have the following functions. In the main screen: QUICK MENU – Activates the Quick Menu UP/DOWN – Press three times to open the live diagnostic tool MENU –... -
Page 22: Live Diagnostics
No Signal setting – see ‘No signal’ on page 16). Service and maintenance See the separate JDC Burst 1 Quick Start and Safety Manual supplied with the fixture and available for download from www.glp.de for information on service and maintenance. - Page 23 Calls up overview of all main Live Diagnostic fixture information, signal quality and settings. Enables connectivity to the iQ.Service Connect >>>Connect<<< GLP iQ.Service App for 5 minutes. User Setting >>>Confirm<<< Preset 1 User Setting >>>Confirm<<< Loads custom user settings...
- Page 24 JDC Burst 1 Main menu The following menus and commands are available in the JDC Burst 1 control panel. Menus Notes DMX Address Set fixture’s DMX start address. Highest possible 001-512 address depends on control mode. Control Mode M1 Basic M2 FX Set fixture’s DMX control...
- Page 25 German Light Products® JDC Burst 1 Menus Notes Plate pattern FX not affected by Independent Dimmer/Shutter of main fixture Beam segment controls Disabled follow main fixture Separate Patch controls Beam segment controls Enabled patched separately Beam segments controlled by Normal...
- Page 26 Fixture blacks out if no Blackout DMX signal received Fixture continues to Hold display current effect if No Signal no DMX signal received Plays the stored captured scene (see next Scene menu item) if no DMX signal received JDC Burst 1 User Manual...
- Page 27 German Light Products® JDC Burst 1 Menus Notes Captures current scene Capture DMX Values >>>Confirm<<< and stores it for use in No Signal Scene → Display dims after a short period of inactivity if no Auto errors and valid DMX signal...
- Page 28 Menus Notes Service Live diagnostic Shows overview of fixture information iQ.Service >>> Connect <<< Enables connectivity to the GLP iQ.Service app. Connect Run test sequence of all effects including tilt. Stop Test All with BACK. Tests Test Fan Manually test fans one by one...
Need help?
Do you have a question about the JDC Burst 1 and is the answer not in the manual?
Questions and answers