Table of Contents
Advertisement
Advertisement
Table of Contents

Related Manuals for Park House Healthcare RICHMOND ULTRA LOW BED


Summary of Contents for Park House Healthcare RICHMOND ULTRA LOW BED
- Page 1 RICHMOND ULTRA LOW BED Acute Care Bed Service Manual...
-
Page 2: Table Of Contents
Richmond Ultra Low Bed – Service Manual Rev 1 Content 1. Foreword ............................. 1 1. Duties of the user ..........................3 2. Product description ..........................3 3. Technical specification ........................4 4. Parts ..............................5 5. Installation ............................7 Transport and storage ......................... 7 6. - Page 3 Richmond Ultra Low Bed – Service Manual Main lift actuator ..........................28 Gas strut ............................29 CPR cable ............................30 Castor ..............................31 10. Troubleshooting ..........................0 11. Guarantees and warranty ......................... 0...
-
Page 5: Foreword
• If the operation or specification of the bed does not match the descriptions stated, then the bed is not suitable for use and any defects must be reported to Park House Healthcare. • The bed must be connected to a mains power supply of the correct voltage. - Page 6 Park House Healthcare guarantee. • Any repair that is made to the bed must be carried out by a Park House Healthcare approved engineer. Disregarding this requirement will invalidate the guarantee •...
-
Page 7: Duties Of The User
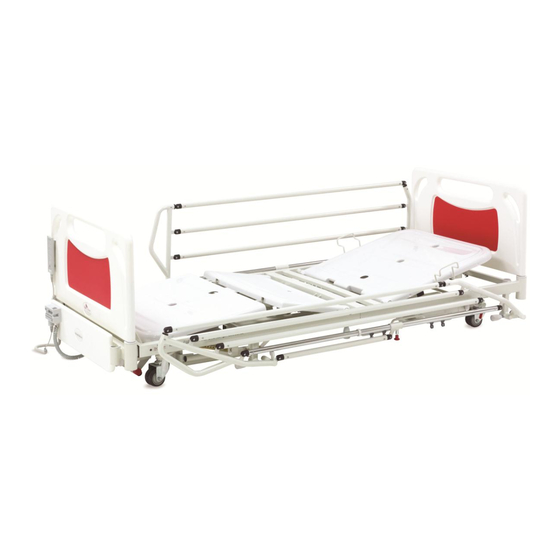
2. Product description The Richmond Ultra Low Bed provides a functional solution for nursing patients who may be at risk of falling out of bed. For maximum safety the sleeping surface can be lowered to just 17cm from the floor, allowing the patient to be nursed at a safe height and minimising the... -
Page 8: Technical Specification
Richmond Ultra Low Bed – Service Manual 3. Technical specification Product codes E5-8502 (blue head & footboards) E5-8503 (red head & footboards) Overall length 2145mm Overall width 900mm (without side rails) 1020mm (with side rails) Mattress platform dimensions 1980 x 880mm... -
Page 9: Parts
Richmond Ultra Low Bed – Service Manual 4. Parts... - Page 10 Richmond Ultra Low Bed – Service Manual Description Code SIDERAIL 4-Bar (Pair) for RULB 3009980001 Linen tray 3009060073 PANEL Platform Thigh ABS Plastic White Low 3009060046 PANEL Platform Foot ABS Plastic White Low 3009060045 PANEL Platform Backrest ABS Plastic White...
-
Page 11: Installation
CAUTION! Ensure there is sufficient distance between the bed and stationary objects CAUTION! If the bed does not function correctly, Park House Healthcare should be informed immediately and the bed should be taken out of service CAUTION! The bed should be located on a level flat surface. Do not site the... - Page 12 Richmond Ultra Low Bed – Service Manual CAUTION! The mains cable must be secured to avoid it from being trapped in moving parts...
-
Page 13: Operations
Richmond Ultra Low Bed – Service Manual 6. Operations Breaking and steering At the foot end of the bed on the lower platform is a braking bar which controls the brakes on all 4 castors on the bed. When the brake bar is pressed down fully, all 4 castors will lock and the bed will not move. -
Page 14: Handset Functions
Richmond Ultra Low Bed – Service Manual Handset functions The handset is connected to the nurse lockout by a flexible cable and can be positioned in various places throughout the bed. The electrical funtions of the bed are activated via a push of a button on the handset. By pressing the required button, movement is activated. -
Page 15: Battery Back-Up
Richmond Ultra Low Bed – Service Manual Autocontour button simultaneously operates both the back rest and the thigh rest functions. CPR button – Press and hold this button to return the bed to a horizontal position. Before using this button, ensure the nurse lock out is in the unlock position. -
Page 16: Safety Sides
Richmond Ultra Low Bed – Service Manual Safety sides The safety sides on this bed are integral to this bed. Locate the sleeves into the cylindrical mounting brackets. Push in the side rail and tighten the handscrews. Secure the handscrews by tightening up the top nut. -
Page 17: Mains Cable
Richmond Ultra Low Bed – Service Manual Mains cable UK mains supply cables are provided with a BS1363A 5A 3 pin plug. When the bed is to be moved, disconnect the mains from the socket outlet and store the cable so it does not trail and create any hazards. - Page 18 Richmond Ultra Low Bed – Service Manual Linen tray At the foot end of the bed the integral linen tray can be utilised to store bedding and linen. Pull the linen tray out to store the linen during changing.
-
Page 19: Maintenance
WARNING! Protective clothing should be worn at all times The following cleaning procedures are suggested by Park House Healthcare as being suitable infection control procedures. Further information is available upon request. NB - These guidelines are for the bed and its accessories only. Please refer to specific cleaning guidelines for mattresses. -
Page 20: Preventive Maintenance
Richmond Ultra Low Bed – Service Manual CAUTION! Frequent or prolonged exposure to higher concentration disinfection solutions may prematurely age the bed’s appearance CAUTION! Do not use phenol based cleaning solutions CAUTION! Do not use abrasive compounds or pads If the correct cleaning and disinfection guidelines are not followed as stated in this manual any damage to the bed will not be covered under Park House Healthcares guarantee. - Page 21 Richmond Ultra Low Bed – Service Manual adjust the cable accordingly. Tighten the grub screw once the cable has been adjusted. Test the manual CPR function after adjustment. Castors & brakes Apply the brakes on the bed and attempt to push the bed, the bed should not move.
-
Page 22: After Service Testing
Richmond Ultra Low Bed – Service Manual 8. After service testing The following tests should be performed before returning the bed back to service. WARNING! If any electrical components have been replaced, the bed should be PAT tested to ensure it is electrically safe to use... - Page 23 Richmond Ultra Low Bed – Service Manual Disengage the brakes, move the bed 360°. All castors will swivel and move freely. Safety sides Raise the side rails and ensure they lock in position. Pull the quick release on the side rail down towards the floor, then slowly slide the top rail towards the foot end of the bed.
-
Page 24: Part Replacement
Richmond Ultra Low Bed – Service Manual 9. Part replacement CAUTION! Ensure the mains supply is isolated prior to replacing any parts Mains lead Removal 1. Disconnect the mains cable from the electrical power supply 2. Remove the trunking lid on the lower platform section 3. -
Page 25: Battery Back-Up
Richmond Ultra Low Bed – Service Manual Battery back-up Removal 1. Disconnect the mains cable from the electrical power supply 2. Remove the trunking lid on the lower platform section 3. Remove the battery back up cable from the trunking 4. -
Page 26: Nurse Lock Out
Richmond Ultra Low Bed – Service Manual 6. Allow the battery to charge for 24 hours Nurse lock out Removal 1. Disconnect the mains cable from the electrical power supply 2. Remove the security clip on the control box 3. Pull the cable away from the control box 4. -
Page 27: Control Box
Richmond Ultra Low Bed – Service Manual Control box Removal 1. Disconnect the mains cable from the electrical power supply 2. Remove the two screws that secure the control box to the bed frame 3. Remove the mains lead as described previously 4. - Page 28 Richmond Ultra Low Bed – Service Manual WARNING! The control box should be disposed of in accordance with environmental regulations Install 1. Reconnect the actuator cables, ensure these are in the correct ports Port 1: Main lift actuator Port 2: Back rest actuator Port 3: Knee break actuator 2.
-
Page 29: Back Rest Actuator
Richmond Ultra Low Bed – Service Manual Back rest actuator Removal 1. Ensure the back rest section is in the horizontal position 2. Disconnect the mains cable from the electrical power supply 3. Remove the security clip on the control box 4. - Page 30 Richmond Ultra Low Bed – Service Manual Install 1. Reconnect the CPR cable into the actuator and secure the lid by pressing down firmly 2. Place the actuator into position under the bed 3. Insert the bolts through the gas strut, beds brackets and the actuator and secure with the nut 4.
-
Page 31: Knee Break Actuator
Richmond Ultra Low Bed – Service Manual Knee break actuator Removal 1. Ensure the knee break section is in the horizontal position 2. Disconnect the mains cable from the electrical power supply 3. Remove the security clip on the control box 4. -
Page 32: Main Lift Actuator
Richmond Ultra Low Bed – Service Manual Main lift actuator WARNING! A minimum of two people are required to safely replace the main lift actuator Removal 1. Ensure the bed is in its lowest position 2. Disconnect the mains cable from the electrical power supply 3. -
Page 33: Gas Strut
Richmond Ultra Low Bed – Service Manual Gas strut Removal 1. Disconnect the mains cable from the electrical power supply 2. Ensure the back rest section is in the horizontal position 3. Remove both bolts from each end of the actuator 4. -
Page 34: Cpr Cable
Richmond Ultra Low Bed – Service Manual CPR cable Removal 1. Disconnect the mains cable from the electrical power supply 2. Ensure the back rest section is in the horizontal position 3. Snip the crimp off the end of the cable 4. -
Page 35: Castor
Richmond Ultra Low Bed – Service Manual Castor Removal 1. Disconnect the mains cable from the electrical power supply 2. Engage the brake system 3. Remove the head and foot boards from the bed 4. Place the bed on its side using a set of transporters 5. -
Page 36: Troubleshooting
Richmond Ultra Low Bed – Service Manual 10. Troubleshooting Symptom Possible cause Action No actuators will function Nurse lock out in the locked position Unlock the nurse lockout Power has been disconnected and the battery is Connect the bed to the power supply and allow to charge for... -
Page 37: Guarantees And Warranty
If upon inspection, Park House Healthcare accepts liability then the equipment shall be repaired or replaced. If Park House Healthcare does not accept liability it shall inform the customer of its reasons for declination and provide the customer with an estimate on either the repair or replacement cost.
Need help?
Do you have a question about the RICHMOND ULTRA LOW BED and is the answer not in the manual?
Questions and answers