Table of Contents
Advertisement
Advertisement
Chapters
Table of Contents

Related Manuals for Jacto ARBUS 1000


Summary of Contents for Jacto ARBUS 1000
- Page 1 ARBUS 1000 English Version / MI - 0103 Edition No. 05/2016 Code: 767541 Operator’s Manual Máquinas Agrícolas Jacto Rua Dr. Luiz Miranda, 1650 17580-000 - Pompéia - SP - Brasil Tel.: +55 14 3405-2100 Fax: +55 14 3452-1916 CNPJ: 55.064.562/0001-90 e-mail: export@jacto.com.br...
- Page 3 ARBUS 1000 Table of contents Intro d u ct i o n ............... .. 5 P rec a u ti o n s .
- Page 5 If you still have questions, contact your Jac- to dealer. ATTENTION! The Jacto Arbus 1000 equipment has been developed for the exclusive use of spraying chemicals. The Jacto Arbus 1000 sprayer manual refers only to instructions for use and maintenance of parts and components made by Jacto.
-
Page 7: Table Of Contents
ARBUS 1000 Table of contents In t r o duc tion ..............1 - 9 Op er a t or ’s and o w ner ’s r e sp onsibilitie s ... -
Page 9: Introduction
ARBUS 1000 Introduction Chapter ‘Precautions” is intended to guide the operator on the cautions to be taken dur- ing the operation, maintenance and storage of this equipment. It is important to remind that this equipment has been carefully developed to provide op- timum performance with cost savings, and ease of operation and safety. -
Page 10: Op Er A T Or 'S And O W Ner 'S R E Sp Onsibilitie
Operator’s and owner’s responsibilities ARBUS 1000 According to the provisions in Directive NR31 – Owner responsibilities: Directive on Safety and Health in Farming Labor, the farm equipment owner and operator shall • The equipment owner shall keep the ins- contribute to the safe application of chemicals... -
Page 11: E Nv Ir Onmen T Al R E Sp Onsibilitie
The sprayer owner or the person responsible shall provide information to operators on environmental risks and how to care for the environment. Jacto recommends wearing approved and proper PPEs whenever operating the sprayer. • It is responsibility of the sprayer owner... -
Page 12: Safety Decals
Safety decals ARBUS 1000 Safety and maintenance related decals have Keep them in good repair, clean and legible. been affixed all over the equipment indicating Replade them immediately in case of damage any hazardous conditions that could cause by ordering them through the part numbers damages or accidents affecting the operator specified below. - Page 13 ARBUS 1000 Adesivos de segurança P/N: 379065 ATTENTION: Risk of serious P/N: 379123 injuries. Keep all protection devices in its places. WARNING: mandatory use of ear protectors. P/N: 379214 P/N: 379131 ATTENTION: Maximum WARNING: mandatory speed allowed for the use of protective clothing.
- Page 14 Adesivos de segurança ARBUS 1000 P/N: 379222 P/N: 380014 WARNING: highway ATTENTION: Do not get transit of this machine into the main tank of is prohibited. the sprayer. P/N: 169128 WARNING: Never ac- tuate the packaging washer valve unless the bottle is properly...
- Page 15 ARBUS 1000 Adesivos de segurança P/N: 379164 ATTENTION: Nut torque table. P/N: 515601 Procedures for fan belts tension. P/N: 428631 Instructions to connect the PTO shaft P/N: 391631 ATTENTION: Tire pressure table. P/N: 018630 P/N: 039222 Fan diameter - 28.54 inches.
- Page 16 • Only skilled and qualified operator and knowledgeable of the information con- tained in the manuals accompanying the product should operate the Jacto Arbus 1000 sprayer; • Before starting any operation, it is very important to learn about all information contain in this manual.
-
Page 17: General Safety Recommendations
• For movement and transportation the use erty within the speed limits as recom- mended by Jacto (limit of up to 18.5 mph of trucks or ramps is recommended, tak- for transportation on the property inter-... - Page 18 The precautions listed below apply only for • Avoid staying in the way of the tractor coupling the Jacto Arbus 1000 to the trac- tires. If possible, carry out the coupling tor. Precautions related to the use and of the equipment by yourself.
-
Page 19: S A F E T Y F Or Unlo Ading T He E Quip Men
• When uncoupling the machine, hold it mended by Jacto (limit of 30 km/h in the on firm and level ground; if the equip- routes inside the farm and 12 km/h when ment is provided with parking brake, ac- spraying). -
Page 20: C Au Tions Dur Ing C Omp Onen T As S Embl
• The PTO shaft will be adjusted to its spe- the parking brake and remove the start- cific use on the Jacto Arbus 1000 equip- ing key from the contact keyhole before ment. Use of the PTO shaft on any other coupling the PTO shaft to the tractor PTO. -
Page 21: Warning When Using And Filling The Tank
ARBUS 1000 Warning when using and filling the tank Fresh water tank for hand wash • The fresh water tank on this sprayer is for • Do not in any circumstances use the wa- The fresh water tank on this sprayer is for ter for drinking. - Page 22 Safety in applying chemicals ARBUS 1000 • READ the sprayer instructions manual. For an efficient spraying operation, it is necessary to know the sprayer employed in detail. Only thus will we prevent wast- ing chemical or improper use of the equipment, and the desired result will be achieved.
-
Page 23: Safety In Applying Chemicals
ARBUS 1000 Safety in applying chemicals • letting contaminated materials coming in (e.g.: PPEs), use immediately an approved and suitable breathing mask and contact Jacto’s Technical Assistance; • IF the manufacturer of the product to be used recommends using a breather mask during application, use it! •... - Page 24 Safety in applying chemicals ARBUS 1000 • KEEP children away from the sprayed ar- eas. Remove children, domestic animals and unprotected people from the treat- ed areas. Do not allow children or other persons not necessary for the services to remain in the chemical handling and ap- plication areas.
- Page 25 ARBUS 1000 Safety in applying chemicals • NEVER fill the sprayer to the top. By do- ing so, you will prevent the mixture from overflowing and possible contamination of the operator and the environment. When supplying the reservoir, do it up to the maximum limit indicated in its grad- uated scale.
-
Page 26: S A F E T Y On Main T Enan C
Safety on maintenance ARBUS 1000 • Awareness of and compliance with the rec- • In case that no possibility exists of provid- ommendations contained in this manual ing maintenance service to the equipment will reduce the maintenance costs and ex- with the diesel engine shut down and out- tend the service life of the equipment. -
Page 27: Tr Ansp Or T A Tion S Af E T
ARBUS 1000 Transportation safety • Before starting transportation, it is very im- • Wash the equipment on the outside after portant that the path over which the equip- its use. Even if it appears to be clean, the ment will pass be carefully studies and that... - Page 29 ARBUS 1000 Table of contents C hoo sing t he t r ac t or ............2 - 3 1 S e t ting up t he t r ac t or .
- Page 31 Empty machine weight = 1,223.56 lb with the following criteria when choosing a Reservoir capacity = 264 gallons tractor for products of Jacto Arbus 1000 line. Total cower consumption = 21 HP • Check the weight of the machine (lb) on the identification plate of the product.
- Page 32 Setting up the tractor ARBUS 1000 Adjusting the drawbar • Fit the drawbar pin into the proper hole (1 or 2) to vary the distance between the PTO shaft and the hitch point (see figure A). NOTE: For heavy load, the hole no. 2 is recommended (see figure A).
- Page 33 ARBUS 1000 Mounting the sprayer to the tractor (Arbus with fixed axle) With the draw bar in the chosen position (see draw bar adjustment), perform the con- necting procedure as follow. • Remove the plastic straps used in the hitch fork (A).
- Page 34 Mounting the sprayer to the tractor (Arbus with fixed axle) ARBUS 1000 Install the safety chain Install the safety chain as shown in the figure below and give heed to the following: • Leave some slack on the chain so that it is not stretched when maneuvering.
- Page 35 ARBUS 1000 Mounting the sprayer to the tractor • Hitch the sprayer to the tractor (figures A and B). OBSERVATION: If the sprayer is equipped with tracking axle, it is necessary to leave a clearance between the sprayer’s hitch and the PTO...
- Page 36 Adjusting the PTO shaft ARBUS 1000 Adjusting the PTO shaft male and female tubes • Position the tractor until its rear tire gets close to the sprayer’s tongue. • Connect the PTO shaft. ATTENTION! When maneuvering, disengage the PTO and keep the tire from touching the sprayer’s tongue,...
- Page 37 ARBUS 1000 Adjusting the PTO shaft NOTE: Before cutting the PTO shaft, check if it is possible to use it wi- thout reducing its length.Check: The position on the tractor’s Figure M drawbar. If the sprayer’s tongue can be adjusted for longer.
- Page 39 ARBUS 1000 Table of contents E quip men t p r e s en t a tion A r bus E A / E F ......... 3 - 41 Te chnic al Sp e cif ic a tions ........... 3 - 4 2 E quip men t p r e s en t a tion A r bus P lus ..
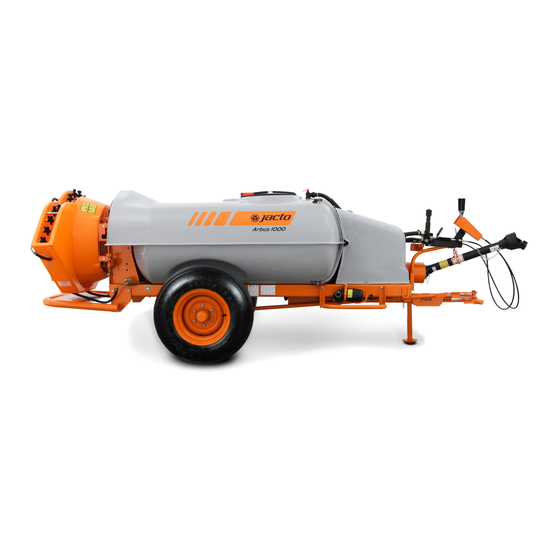
- Page 41 ARBUS 1000 Equipment presentation Arbus 1000 13 14 15 1. PTO Shaft 9. Flaps 2. Hitch 10. Tank 3. Jack 11. Lever of the package washer 4. Suction filter 12. Clean water tank 5. Level indicator 13. Chemical control 6. Nozzle branch 14.
- Page 42 ARBUS 1000 Technical Specifications Model ARBUS 1000 EF/EA Weight Empty machine weight 1,223.55 lb Dimensions with tire 7,35 x 14 Total lenght 150 in Width 53 in Height 47 in Track width 45 in Ground clearance 10 in Dimensions with tire 11 L 15...
- Page 43 11 L 15 Pressure 44 psi Recommended working velocity 1.5 to 4 mph Filler unit (optional) Model EJ-250 Description Arbus 1000 EA/EF (JP-75) Arbus 1000 EA/EF (JP-100) Fan diameter (in) Pulley diameter (in) 3.509 Rotation (rpm) 2,000 1,800 Air speed (mph)
- Page 44 Equipment presentation ARBUS 1000 Arbus 1000 Plus 12 13 14 1. PTO Shaft 8. Nozzle branch 2. Hitch 9. Tank 3. Jack 10. Lever of the package washer 4. Suction filter 11. Clean water tank 5. Level indicator 12. Chemical control 6.
- Page 45 ARBUS 1000 Technical Specifications Model Arbus 1000 Plus Weight Empty machine weight 1223.56 lb Dimensions Total lenght 149.60 in Width 62.20 in Height 50.39 in Track width Fixed 50.39 in Ground clearance 13.77 in Main tank Material Fiberglass Capacity 264 gallons...
- Page 46 Articulator axle 11L-15 Articulator axle 7,35 x 14 Deflector Vertical Electrical control EC 4400 Line filters Description Arbus 1000 PLUS / Tower (JP-75) Fan diameter (mm) Rotation (rpm) 2,000 Air speed (Km/h) Air volume (m /min) Power consumption (HP) 3-46...
- Page 47 ARBUS 1000 Equipment presentation Arbus 1000/850 1. PTO Shaft 9. Flaps 2. Hitch 10. Tank 3. Jack 11. Lever of the package washer 4. Suction filter 12. Clean water tank 5. Level indicator 13. Chemical control 6. Nozzle branch 14. Gauge 7.
- Page 48 ARBUS 1000 Technical Specifications Model ARBUS 1000/850 Weight Empty machine weight 1565.28 lb Dimensions Total lenght 155.51 in Width 55.90 in Height 65.35 in Track width 45.27 in Ground clearance (11L-15) 14.56 in Main tank Material Fiberglass Capacity 1000 liters...
- Page 49 ARBUS 1000 Technical Specifications Tires Type 11 L 15 Pressure 44 PSI Recommended working velocity 1.5 to 4 mph Filler unit (optional) Model EJ-250 OPTIONAL Filler unit Fonte limpa (with quick fitting) Spray gun Pump JP-75 (75 L/min) NI-Resiste Pump...
- Page 51 ARBUS 1000 Índice C hemic al pump .............. . 4 - 5 3 Suc tion f ilt er .
-
Page 53: Chemical Pump
If it re- mains closed, you will hear an unusual noise in the pump. Chemical pump • The pumps mounted to JACTO sprayers have flow rate ranging from 10.03 to 79.25 gallons per minute. • The ceramic liners ensure greater resistan- ce to abrasion and agrochemicals’... -
Page 54: P R E S Sur E R E Gula T
Flow by pass valve (Optional) ARBUS 1000 • This is an accessory designed for the atta- chment of a spray gun or lance to spray specific spots of pests or diseases, see- dlings, young trees, thus making quicker the treatment. -
Page 55: B P Pr E S Sur E Gauge K It ( A C C E S S Or
ARBUS 1000 Nozzles • The nozzles have the job to generate droplets and distribute them uniformly over the surface being sprayed. • Flow, angle and droplet sizes vary according to working pressure. Operating with pres- sure over that recommended by the manu- facturer will decrease the nozzles’... - Page 56 Nozzles holders ARBUS 1000 Nozzle holder with valve • The nozzle holders with valve can be ad- justed to desired angle and can be shut off individually. OBSERVATION: Arbus 1000 (with JP-100 pump) To adjust the nozzle, loosen the nut (1), set it in the desired posi- tion and retighten the nut.
-
Page 57: Clean Water Tank
Clean water tank for washing hands (Arbus Plus) • Arbus 1000 Plus has 2 clean water tanks for washing hands. One is a fiber tank (detail A) and the other is plastic (detail B), each of them with 4 gallons capacity •... - Page 58 Electrical control EC 4400 ARBUS 1000 With the electrical unit it is possible to con- trol the opening and closing of spraying seg- ments (left and right sides). • Switch 1: Turns on and off the electrical unit; • Swtich 2: Opens left spraying segment;...
-
Page 59: Ele C T R Ic Al C On T R Ol E
ARBUS 1000 Assembly diagram Assembly diagram for electrical control ATTENTION! Pay close attention to the position of harness connectors to avoid damaging the circuits 1. Chemical control 5. Fred wire (positive pole) 2. Main harness 6. Black wire (negative pole) 3. -
Page 60: L Ine F Ilt Er
Line filters ARBUS 1000 Line filters (Optional: supplied when the ma- chine is equipped with electrical unit EC 4400). • The line filters retain impurities of chem- icals, wich damage thespraying, before they reach the electric valves, segments and nozzle holders. There is a line filter installed in the pressure line before each electric valve. - Page 61 ARBUS 1000 The fan has a locking device designed to be used during the tank filling, agitation of chemical mixture while spraying, as well as for spray lance application. The use of this device reduces power consumption in any of said operations.
- Page 62 Fan unlocking system (Arbus 1000 Plus) ARBUS 1000 • The fan coupling in this sprayer is located in the transmission rear part according to illustration beside. This device is useful for operations which do not require the fan such as mixing chemical, using the spray lance or the spray gun.
-
Page 63: P T O Sha F
ARBUS 1000 PTO Shaft • The machine PTO shaft is assembled with a protection to increase the safety of the operator. • This protection is made of a series of plastic components that envelop the PTO shaft and avoid contact with the opera- tor and its clothing, decreasing the risk of accidents. - Page 64 Spray discs - series D • Made in stainless steel, these discs are de- signed to be used on the Jacto spray gun for spot spraying on fruit trees due to its large application range, as well as for cle- aning sheds, warehouses and agricultural equipment.
-
Page 65: Filler Unit (Optional)
ARBUS 1000 Filler unit (Optional) • Put 13.20 gallons of water in the tank. • After filling the tank, set the main valve (2) lever back to the working position. • Connect the filler unit hose (1) to the main valve (2). -
Page 66: C Hemic Al C On T R
Chemical control ARBUS 1000 • The pressure regulator control provides ad- justments that ranges from 2 to 35 kgf/cm2 (30 to 500 psi), shown in the pressure gauge. • The levers (1), (2), and (3) have different functions: lever (1) turns the chemical... - Page 67 ARBUS 1000 Regulagem da pressão Cautions with pressure gauge: to ensure lon- After calibrating the sprayer, use the lever (1) ger life of the pressure gauge, its valve should to release the pressure in the circuit and close be closed and without retained pressure du- the pressure gauge valve.
- Page 68 PTO Shaft adjusting ARBUS 1000 Connecting the PTO • Adjust the sprayer’s tongue and the trac- tor’s drawbar so that there is an overlap of approximately 2 in when the tractor is making a sharp turn (that is, when the tractor’s tire is touching the sprayer’s...
- Page 69 ARBUS 1000 PTO Shaft adjusting b. Cutting the shaft • Dismantle the protection guards as shown in the figures A and B. • Cut the two tubes (male and female) at the desired dimensions (figure C). • Remove the burrs resulting from the cut- ting operation as well as the filings re- sulting from the burrs removal (figure D).
- Page 70 Tracking axle ARBUS 1000 • This is a device that allows to maneuver the tractor in narrower spaces in the field, even with the PTO engaged. ATTENTION! Whenever you need to move ba- ckward with the sprayer (reverse gear), do this carefully, without dragging the sprayer’s tires, in...
-
Page 71: Package Washer
ARBUS 1000 Package washer • The package washer is assembled at the reservoir´s opening and provides a correct and safe discard of empty packages. • Wash packages after use for 30 seconds, before the residues start to dry. • Wash the packages three times. - Page 72 Using the quick fitting connection ARBUS 1000 • This sprayer has a device that allows the use of the pump for spot spraying with lance or gun (both optional). Procedures: • With the tractor off, disengage the fan as described on item “Fan”.
-
Page 73: De Fle C T
ARBUS 1000 Deflector Vertical deflector - assembly (Arbus 1000 Plus) • The vertical deflector is a component moun- ted on the sides of the sprayer that allows to spray grapres planted in trellis system. • The deflector has breakaway device to protect against frontal impacts. - Page 74 Tower kit for Arbus 1000 Plus (Optional) ARBUS 1000 Follow instructions below to assemble it: ATTENTION! With sprayer hitched to the tractor, park on a firm and level ground free of obstacles. Apply the tractor parking break. Wash the machine before assembling Tower Kit.
- Page 75 ARBUS 1000 Tower kit for Arbus 1000 Plus (Optional) 3. Pull the clip and remove the quick fit- ting clamp (C). Then, disconnect the hose from left and right branches. 4. Loosen nozzle branch mounting bolts (D) and remove both right and left branches.
- Page 76 Kit Tower para Arbus 1000 (Opcional) ARBUS 1000 6. To remove the fan guard screen, loosen the mounting bolt for the spacer bushing (F) and remove the deflector upper faste- ner (G). Next, tighten the mounting bolt (F) for the spacer bushing.
- Page 77 ARBUS 1000 Kit Tower para Arbus 1000 (Opcional) 9. Equipment without spacer bushings and guard screen ready for Tower Kit installation. 4-77...
- Page 78 Tower kit for Arbus 1000 (Optional) ARBUS 1000 Tower Kit assembly 1. Connect the branch hose to the Tower Kit (J) and tighten the clamp with a screwdriver (L). 2. Tower Kit with branch hose connected. 3. The items shown are included with Tower Kit and are used in the assembly.
-
Page 79: Tower Kit For Arbus 1000 (Optional)
ARBUS 1000 Tower kit for Arbus 1000 (Optional) 4. Remove nozzle holders from left and right branches. 5. Install the nozzle holders with seal (1) on the Tower Kit nozzle branch (2 and 3). By, placing the nozzle holder seal (1) in the hole of the Tower Kit nozzle branch and install the nozzle-holder (3). - Page 80 Tower kit for Arbus 1000 (Optional) ARBUS 1000 7. Install the Tower Kit to the fan housing. Align the spacer bushings with the holes on the fan housing. 8. With Tower Kit installed, insert mounting bolts into spacer bushings (M) and tighten.
- Page 81 ARBUS 1000 Tower kit for Arbus 1000 (Optional) 9. With both sides of Tower Kit installed, lo- cate the two mounting holes (N and O). Insert mounting bolts and tighten. 10. Connect the branch hose to the quick fit- ting (right and left sides) and attach the quick fitting clamp (P).
- Page 82 Tower kit for Arbus 1000 (Optional) ARBUS 1000 The Tower kit is available for Arbus 1000 air- blast sprayers line. Follow the instructions below to assemble the kit: ATTENTION! Park the tractor with the ma- chine coupled to it on a level ground free of obstacles.
- Page 83 ARBUS 1000 Tower kit for Arbus 1000 (Optional) 3. Use an appropriate wrench to loosen the fastening bolt on the adjustable vanes (detail C). 4. 4. Remove the fastening bolt from the adjustable vanes. 5. 5. Locate the fastening points on both sides of the fan box (detail D).
- Page 84 Tower kit for Arbus 1000 (Optional) ARBUS 1000 6. To remove the fan guard screen and the branches, loosen the fastening bolts on the spacer bushings (detail E) and remo- ve them. NOTE: The spacer bushings (detail E) will be replaced by the new ones that are included in the Tower kit.
- Page 85 ARBUS 1000 Tower kit for Arbus 1000 (Optional) 9. Loosen the fastening bolts on the guard screens (detail H). 10. Remove the guard screens (left and right sides). NOTE: After removing the guard screens (I), store them in an appropriate...
- Page 86 Tower kit for Arbus 1000 (Optional) ARBUS 1000 Assembling the Tower kit 1. Remove the hose that comes with the Tower kit 2. Attach the branch hose to the Tower kit (detail I). Use a screwdriver to tighten the fastening clamp (detail J).
- Page 87 ARBUS 1000 Tower kit for Arbus 1000 (Optional) 4. The items beside come with Tower kit and they will be used in the assembly process. 5. Use the spacer bushings included in the kit and install them in the Tower kit according to the illustration beside.
- Page 88 Tower kit for Arbus 1000 (Optional) ARBUS 1000 7. After installing the Tower kit, insert the fastening bolts in the spacer bushings (de- tail L) and tighten them. 8. When the two sides of the Tower kit are installed, locate the two holes to assem- ble the fasteners (details M and N).
- Page 89 ARBUS 1000 Tower kit for Arbus 1000 (Optional) 9. Attach the branch hose (O) to the quick coupling (left and right side). Next, insert the quick coupling clamp (detail P). 10. View of the machine with the Tower kit assembled.
-
Page 90: Spr Ay Ap Plic A Tion T E Chnolo G
Spray application technology ARBUS 1000 • The success of an application not only de- Factors like: pends of good equipment and correct use of chemicals. Depends also on field fac- • Right moment; tors, such as specialized orientation. • Safety during application;... - Page 91 ARBUS 1000 Spray application technology Good coverage • A good coverage consists of obtaining • This means that one could get the same ideally sized drops to reach the target coverage with different spraying volumes. with good uniform distribution, with po- sitive results during control and that do •...
- Page 92 Spray calibration ARBUS 1000 ATTENTION! The safety and protection of people, animals and the environment depend upon the correct application of the chemicals, therefore, care must be taken during their use. During the manipulation of the chemicals: During handling of the equipment: •...
- Page 93 ARBUS 1000 Spray calibration Calculating the spraying volume through formula • The calibration of sprayers can be obtained Example: through calculations obtained according Noozles flow rate = 14 gpm at 200 psi (14 x to formula below. J4-2 and 12 x JA-3 nozzles = 26 nozzles) Row spacing = 16.40 x 22.96 ft...
- Page 94 Spray calibration ARBUS 1000 Calibration of sprayer via practical method Do a complete checkup of the equipment: • Suction filter, line filter – cleaning. • Hoses – check for holes or bents. • Pressure regulator - components valve seat, valve and spring, if not worn or lo- cked by impurities.
-
Page 95: Spray Calibration
ARBUS 1000 Spray calibration 11. Measure the spray swath. 12. With the sprayer stopped on a leveled surface, preferentially where it was fil- led, complete the tank and measure the volume used. 13. Calculate the pulverization volume in Li- ter/hectares, using the formula::... - Page 96 Instructions for chemical product dilutions ARBUS 1000 ATTENTION! Working with the sprayer with less than 50 liters of water on the tank can cause seri- ous damage to the pump. Never operate the sprayer for a prolonged time with less than 50 liters of water on the tank.
- Page 97 ARBUS 1000 Instructions for chemical product dilutions Mix preparation • Carefully read the chemical product leaflet. • Put the product in a recipient with a little amount of water. Shake the mix. • Add the amount of water that is needed to fill out the recipient.
- Page 98 • To ease this important package washing operation, JACTO installed in its tractor sprayers a device that aids this operation. This device internally washes the package with pressurized water, eliminating most of the residues.
- Page 99 ARBUS 1000 Procedures for using the package washer • Fill up the chemicals reservoir with ap- proximately 90% its capacity. • Place the chemicals in the reservoir. • Activate the tractor power take-off. NOTE: Lever 1 of the flow regulating...
- Page 100 Clean water tank ARBUS 1000 • To assist in the operation of the pressure- wash, a clean water tank is also installed on the sprayers. ATTENTION! The water from this tank is not fit for drinking, or even washing hands, face, tools, etc. It must be used only to fill the chemical containers for the final rinse.
- Page 101 ARBUS 1000 Chemical container rinse Package rinsing NOTE: To keep from contaminating the water and the clean water tank tap during the filling of the che- mical container, hold the contai- ner at least 5 cm away from the tap and fill the chemical container with water up to 1/4, as shown.
- Page 102 Triple wash of chemical containers ARBUS 1000 After having washed the package contamina- ted by mix, it is necessary to do a triple wa- shing of the containers. For this, follow the instructions below: • Use personal protective equipment –...
-
Page 103: Triple W Ash Of Chemic Al C On T Ainer
ARBUS 1000 Triple wash of chemical containers Additional information 1. In the case of a medium sized packa- ge or large sized (13.20, 26.40 and 52.84 gallons), after washing in an adequate vo- lume, place a lid over the package roll it on the ground for approximately 30 seconds. - Page 105 ARBUS 1000 Table of contents Gener al r e c ommenda tions ..........5 -10 7 Main f ilt er ..............5 -10 8 P r e s sur e r e gula t or ( VA R) .
-
Page 107: General Recommendations
ARBUS 1000 General recommendations Every day, after completion of the spraying • Wash the work clothing separately from operation, pour clean water into the reser- all other clothing of your family. voir, remove the nozzles and run the machi- ne until all water runs out. -
Page 108: Main F Ilt
Main filter ARBUS 1000 • The filter cleaning intervals depend on the quality of the water employed and the type of chemical used for that purpose. • Clean the filters as necessary or every time you supply the sprayer with chemical. -
Page 109: Nozzle Holder
ARBUS 1000 Component maintenance Nozzle holder Nozzle holder with valve • Clean the nozzle holders daily or when necessary. • Cap (G), nozzle (H), ring (I), swirlcore (J), seat (K) and nozzle holder (L). Double nozzle holder (optional) 5-109... -
Page 110: M E Chanic Al Agit A T
NOTE: In case of need for a more de- tailed maintenance (replace-ment of piston cups, bearings, etc.), contact the nearest JACTO dealer. Mechanical agitator • At any sign of the drain (B) leak, replace the mechanical seal. Contact your nearest Jacto dealer. -
Page 111: Belts Tension
ARBUS 1000 Belts tension ATTENTION! Always stop the sprayer and turn off the tractor’s engine be- fore any kind of maintenance. Always use the individual pro- tective equipment during the maintenance of the PTO shaft. • Check the belts tension periodically. - Page 112 Belts tension ARBUS 1000 Fan belt • Loosen the four nuts (1) enough to allow the frame to be moved. • Loosen the two nuts (2). • Hand-tighten equally the two knobs (3) until obtaining the tension recommend- ed tension.
-
Page 113: L Ubr Ic A Tion P Oin T
ARBUS 1000 Lubrication points PTO shaft • Lubricate every day: refer in this manual to page related to drive shaft maintenance. ATTENTION! Before operating the equipment for the first time, clean and lubri- cate all drive shaft grease points as depicted in the above figure... - Page 114 Operation chart ARBUS 1000 Table 12: Operation Periodicity When When using the Whenever Operation chart Whenever receiving the equipment for filling spraying equipment the first time the tank Strictly follow the information contained in • this instructions manual. Check all components for integrity.
-
Page 115: Op Er A Tion Char
ARBUS 1000 Operation chart Table 13: Operation Periodicity Daily or at every every every Operations chart First First Every at every 500h or 1000 2000 100H every year hours hours Clean nozzles, strainers and filters. • Check grease fittings and joint pins. -
Page 116: Re C Ommende D Lubr Ic An T
Recommended lubricants ARBUS 1000 Table 14: Recommended lubricants and filters Components Type Specification Indication Amount Pump all oils for internal 0.39 gallons lubricat- JP 75 combustion engines URSA LA-3 SAE within this 15W-40 API CG-4 Pump 0.66 gallons specification JP 100 PTO Shaft, trailer’s... -
Page 117: Pto Shaft (Conventional)
ARBUS 1000 PTO shaft (conventional) Use, maintenance, disassembly and assembly of PTO shaft with protection ATTENTION! Only operate with the PTO shaft provided with safety guard. Every kind of mainte- nance to the PTO shaft shall be performed when wearing PPEs such as: protection gloves, boots, goggles, etc. - Page 118 PTO shaft (conventional) ARBUS 1000 Disassembly 1. Remove locking screw. 2. Turn the cone up to the indicated position. 3. Loosen the safety protection. 4. Remove the slide ring. Assembly: 1. Clean and lubricate the PTO shaft bars. 2. Install the sliding ring into the recess with the grooves facing the bar.
-
Page 119: Winter Storage
ARBUS 1000 Winter storage ATTENTION! In regions where the temperature during wintertime drops to 0º C or below, some procedures are required to prevent damages, particularly to the chemical pump ow- ing to the accumulation of water inside the pump. - Page 120 Trouble-shooting ARBUS 1000 1. Tank 5. Nozzles branch 2. Main filter 6. Chemical control 3. Pump 7. Pressure hose 4. Return 5-120...
-
Page 121: Trouble-Shooting
ARBUS 1000 Trouble-shooting Problems, causes and corrections Whenever problems affect JACTO machines fitted with piston cup-type pumps, try to ca- tegorize the same within one the four groups listed below. a. Suction and boost deficiency • No liquid comes out from the nozzles;... - Page 122 Trouble-shooting ARBUS 1000 Table 15: Suction and boost deficiency (total lack of pressure) Probable causes Indications and corrections The machine shall be driven with the power take-off 1. Complete absence of power take-off (PTO) running at 540 rpm. revolution. Visually check whether the pump is being driven.
- Page 123 ARBUS 1000 Trouble-shooting Table 17: Intermittence Probable causes Indications and corrections Due to the quick shut-off valve construction charac- teristic, there will be circulation of liquid even in the 1. Filter valve closed (quick shut-off). closed position with the pump in operation, causing intermittent circulation of liquid.
- Page 124 Tire change ARBUS 1000 • When raising the equipment to change ti- res or track width require much attention • Keep the machine connected to the trac- tor on a level and firm ground. To change the tires, proceed as follows: •...
-
Page 125: General Precautions
ARBUS 1000 General precautions Precautions when using the equipment and chemicals • Owners and users of the equipment are • Strictly follow the directions for use of advised that the IMPROPER USE of this the equipment and chemicals in order... -
Page 126: Cleaning And Storage
Cleaning and storage ARBUS 1000 • Once the work has been completed, pour human beings or animals, lest such food- clean water into the reservoir (50% of its stuff may become contaminated. holding capacity) and run the equipment until draining all water out in order to •... - Page 127 ARBUS 1000 Table of contents War r an t y ................ 6 -12 9 Te chinic al insp e c tions r e gis t r a tion ...
- Page 129 ARBUS 1000 Warranty Máquinas Agrícolas Jacto S.A. will grant to • It is understood that the replacement of the original buyer a warranty for parts and complete components such as pumps, components that, in normal services and use, commands, engines, transmissions, hy-...
- Page 130 Jacto; the product registration card found in the instruction manual must be fil- • Jacto will have the right to revise, modi- led in and returned to your jacto dealer. fy or improve, discontinue or change the This card must be signed by the original...
- Page 131 ARBUS 1000 Techinical inspections registration Date Hours No. Description Techinical/Dealer 6-131...
- Page 133 The warranty is in force as of this date: _______ /_______ /________ Retail purchaser signature: ______________________________________________________ Copy Máquinas Agrícolas Jacto S. A. - Urgent respond with in 30 days first class postage required PRODUCT REGISTRATION CARD Invoice number:________________________________________ Date: ____/_____/ _____...
Need help?
Do you have a question about the ARBUS 1000 and is the answer not in the manual?
Questions and answers