Table of Contents
Advertisement
WARNING!
Read Operator's Manual before setting up, operating, or maintaining sprayer. Failure
to follow safety precautions in this manual an in labels on the product could result in
serious injury or death to the operator or bystanders.
Keep manual nearby for futher reference. If manual is demaged or illegible, contact
your Jacto dealer or Jacto at the address below for a replacement.
Operatos's Manual
J-600 ELECTRIC
English version / MI_USA - 0344
EDITION Nº 07/2011
Code: 059179
JACTO INC.
19217 SW 119
Tualatin, Oregon 97062
Tel.: (503) 885-8723
Fax.: (800) 511-3671
Toll Free: (800) 522-8610
E-mail: info@jacto.com
Home page: www.jacto.com
Ave
th
Advertisement
Chapters
Table of Contents

Subscribe to Our Youtube Channel
Related Manuals for Jacto J-600 Electric


Summary of Contents for Jacto J-600 Electric
- Page 1 Keep manual nearby for futher reference. If manual is demaged or illegible, contact your Jacto dealer or Jacto at the address below for a replacement. Operatos’s Manual JACTO INC.
-
Page 3: Technical Specifications
TABLE OF CONTENTS J-600 ELECTRIC Introduction Precautions ................Chapter 1 Assembling ................Chapter 2 Technical specifications ............Chapter 3 Operation and Adjustments ............Chapter 4 Maintenance ................Chapter 5 Warranty.................Chapter 6... -
Page 5: Maintenance
If you still have questions, contact your Jacto dealer. ATTENTION! The J-600 ELECTRIC was developed exclusively for the chemical spray application. The J-600 ELECTRIC sprayer manual refers only to instructions of use and maintenance of parts and components manufactured by Jacto. Read it carefully and follow strictly the instructions. -
Page 7: Table Of Contents
CHAPTER 1 Precautions J-600 ELECTRIC Safety manual .................. 9 Safety decals .................. 10 Safety guidelines ................13 Safety recommendations for transport ..........14 Recommendation to unload the equipment ........15 Operational safety ................16 Warning to assemble the components ........... 17 Warning when using and filling the tank ........ -
Page 9: Safety Manual
Safety manual J-600 ELECTRIC This chapter of the manual guides the operator to work safely with this equipment. It is important to remember that this equipment was carefully developed so as to provide maxi- mum efficiency with economy, easy operation and safety. -
Page 10: Safety Decals
Safety decals J-600 ELECTRIC Safety decals are placed on the equipment to redu- Keep them in good repair, clean and legible. Re- ce the risk of damages or accidents to the operator plade them immediately in case of damage by or- or to the equipment during the use. - Page 11 Safety decals J-600 ELECTRIC ATTENTION: Clean water ATTENTION: Hydraulic oil tank for washing hands. level indicator. P/N: 379073 P/N: 379107 AT TENTION: Maximum speed allowed for the machine ATTENTION: Obligatory use is 18.5 mph. of protective clothing. P/N: 379214 P/N: 379131...
- Page 12 Safety decals J-600 ELECTRIC Decal “J - 600 EXPORT”. P/N: 219691 ATTENTION: Obligatory use of protective mask. Instructions to unlock the fan. P/N: 018705 P/N: 379115 ATTENTION: Obligatory use of Logotype “Jacto” hearing protector. P/N: 763672 Final test of the equipment.
-
Page 13: Safety Guidelines
Safety guidelines J-600 ELECTRIC ∙ Only qualified operators and with information’s knowledge of the owner’s manual that comes with the machine must operate the J-600 ELECTRIC; ∙ Prior to initiate any operation, it’s very important to be aware all the information in this manual. In case of doubts, please contact Jacto. ∙ Do not drink alcoholic drinks, sedative or stimulant before or during work. -
Page 14: Safety Recommendations For Transport
Safety guidelines J-600 ELECTRIC ∙ Keep a step and handrail always clean; oil and grease can cause accidents. ∙ Do not use equipment if there is repair need in some key components. Make the repair prevously. ∙ This equipment can cause accidents if used inept or irresponsabily. ∙ Do not hop on the machine when it’s moving. -
Page 15: Recommendation To Unload The Equipment
The warning realated to follow are re- hook up the equipment by yourself. Do not forget commended just for the J-600 ELECTRIC hook the safety chain in the traction bar. up too the tractors. Warning related to the use ∙... -
Page 16: Operational Safety
∙ Before executing any type of service, adjustment ∙ Request a JACTO representative during the or maintenance in your equipment, turn off the technical delivery of the equipment for a proper PTO shaft and the tractor’s engine. -
Page 17: Warning To Assemble The Components
Warning to assemble the components J-600 ELECTRIC > Warning to adjust and hook the PTO shaft into the tractor ∙ Check the tractor’s owner’s manual prior to do ∙ After adjusting the lenght, clean and lubricate this operation. the PTO shaft’s components. In this case, use protective gloves. -
Page 18: Operation And Adjustments
Warning use and tank filling J-600 ELECTRIC > Fresh water tank for hand’s wash ∙ Fill up the fresh water tank for hand’s wash only ∙ It’s extremely important to keep that this tank with clean water. The use of soap or solutions are always full. -
Page 19: Safety In Agrochemicals Application
Safety in agrochemicals application J-600 ELECTRIC 1 • READ the operator’s manual of the sprayer: To spray efficiently it is necessary to know the sprayer fully. This way, the chemical waste and the bad use of the equipment will be avoided, and the de- sired result will be obtained. - Page 20 Safety in agrochemicals application J-600 ELECTRIC 6 • NEVER blow through nozzles, valves or pipe- lines by mouth. For this operation use protective gloves. All spraying equipment has agrochemicals residues. Never put spraying parts in touch with mouth. This is the quickest way to be poisoned. If it is necessary to clean the nozzles, use a nylon bristle brush (toothbrush).
- Page 21 Safety in agrochemicals application J-600 ELECTRIC 12 • RINSE the chemical containers before discarding them: After preparing the chemical mixture, rinse for around 30 seconds. 13 • NEVER reuse empty chemical containers: Even after rinsing the chemical containers many times, they still have residues. Never burn empty chemical containers.
-
Page 22: Maintenance Safety
Maintenance safety J-600 ELECTRIC The knowledge and the follow of recommenda- ∙ If there’s no possibility to do the maintanence tions in this manual minimize the cost of mainte- with the tractor’s engine off and out of the buil- nance and increase the equipment lifetime. - Page 23 CHAPTER 2 Assembling J-600 ELECTRIC Choosing the tractor ................. 3 Setting up the tractor ................ 4 Mounting the sprayer to the tractor ........... 6...
- Page 25 J-600 ELECTRIC Different working conditions lead us to adopt total power consumption required. the following criterion for choosing the tractor Example: that will drive the Jatão J-600 ELECTRIC cannon Sprayer weight = 904 lb sprayer. Tank capacity = 160 gallons ∙...
- Page 26 Setting up the tractor J-600 ELECTRIC > Adjusting parts to hitch to the tractor’s three-point suspension ATTENTION! The instruction below is an example of what should be done for properly hitching the sprayer to the tractor’s three-point suspension. To exemplify we have used the Ford 4600 tractor. Ho- wever, you should proceed as directed in the operator’s manual of your tractor.
- Page 27 Setting up the tractor J-600 ELECTRIC > Third point frame ∙ The third point frame has two positions (1 and 2) to install the third arm and two positions (3 and 4) to install the frame lower pin. ∙ Thus there are four different positions for this assembly.
- Page 28 Mouting the sprayer to the tractor J-600 ELECTRIC ∙ Remove or pull the tractor’s drawbar aside. tractor’s drawbar ∙ Mount the sprayer to the tractor’s three-point sus- pension and level it as shown in the figure beside. ∙ Adjust the tractor’s hydraulic lift lever so that the sprayer is not raised too high.
- Page 29 CHAPTER 3 Technical Specifications J-600 ELECTRIC Presentation - J-600 ELECTRIC ............03 Technical specifications ..............04...
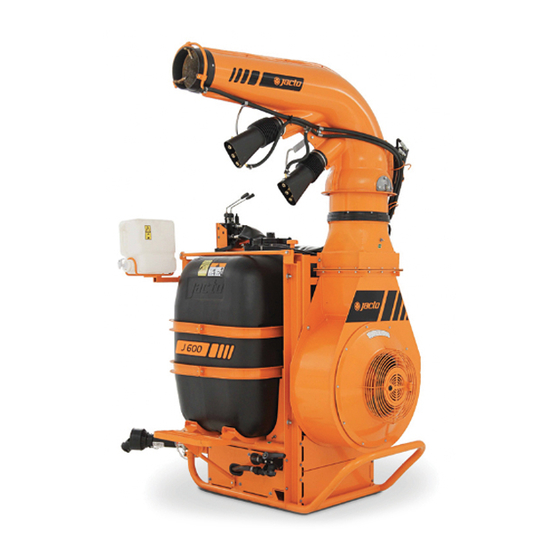
- Page 31 Presentation of sprayer J-600 ELECTRIC 1 - Main duct 7 - Main filter 2 - Auxiliary duct 8 - PTO Shaft 3 - Belt tension 9 - Level indicator 4 - Fan 10 - Tank 5 - Pump 11 - CEJ-100 chemical control...
- Page 32 Technical specifications J-600 ELECTRIC Model ........................J-600 ELECTRIC Weight Net weight .............................904 lb Dimensions Length ............................. 126 in Width .............................50 in Height ...............................87 in Tank Material ..........................Polyethylene Capacity ..........................160 gallons Clean water tank Material ..........................Polyethylene Capacity ............................3 gallons Level indicator ..................Level indicator with graduated scale Pump Model ........................
- Page 33 CHAPTER 4 Operation and Adjustments J-600 ELECTRIC Suction filter ................... 03 Pump ..................... 03 Flow rate regulating valve ............... 03 Hydraulic control ................04 Clean water tank for washing hands ..........04 Chemical control ................04 Spout ..................... 05 Nozzles ..................05 PTO shaft ..................
-
Page 35: Suction Filter
If it re- mains closed, the mechanical seal of the pump can be damaged. shut off valve > Pump ∙ The pumps mounted to Jacto cannon sprayers centrifugal pump have flow rate ranging from 29.06 up to 39.63 (dual-stage) gpm. ∙... -
Page 36: Hydraulic Control
Controls / Clean water tank J-600 ELECTRIC > Hydraulic control ∙ This control is located in an easy of access place, mounted onto a sliding support that can be adjustade in length to meet the tractor model or even the operator´s needs. -
Page 37: Spout
Spout / Nozzles / PTO Shaft J-600 ELECTRIC > Spout ∙ The main spout on the J- 600 ELECTRIC can be adjustade both horizontally and vertically. It also has two auxiliary spouts wich can also be adjustade to cover the area close to the tractor, thus improving the quality of spray applications. -
Page 38: Jec-2500 Control Panel
JEC-2500 Control panel / Fan lock J-600 ELECTRIC > JEC-2500 control panel ∙ The JEC-2500 control panel allows to turn on and off the duct flow and to adjust the duct spray angle. ∙ The switch (1) adjusts the duct height down- ward or upward. ∙ The switch (2) adjusts the duct to the left and right. - Page 39 JEC-2500 Installation diagram J-600 ELECTRIC ATTENTION! Note carefully the fitting positon of the cable connectors to avoid damage to the terminals. hydraulic control (electric) chemical control (electric) main cable battery cable fuses black wire (negative pole) red wire (positive pole)
-
Page 40: Mechanical Agitator
Mechanical agitator / Filling unit J-600 ELECTRIC > Mechanical agitator ∙ This device provides a better homogenization agitator´s puley to the chemical mixture, thus reducing clogging of nozzles and filter. > Filling unit 1- Set the spout valve lever (A) to turn off. -
Page 41: Spray Application Technology
Spray application technology J-600 ELECTRIC A successful spray application does not depend ∙ Ideal time only on a good sprayer or correct use of the ∙ Safety chemicals but also on factors to be determined in ∙ Good coverage the field under specialized orientation. ∙ Application rate... - Page 42 Spray application technology J-600 ELECTRIC > Improper conditions to spray ∙ With strong wind and high temperature. ∙ Against the wind. > Proper conditions to spray ∙ Cooler times of the day, that is, early in the morning or late in the afternoon. ∙ Always with the (light) wind.
-
Page 43: Selecting The Spray Swath
Selecting the spray swath J-600 ELECTRIC ∙ Select the spray swath according to the plant Spray swath (ft) growing stage, kind of pest or disease, chemicals Chemicals to be applied and weather conditions. Work Maximum begining ∙ The table beside show some suggestions of spray swath. -
Page 44: Calibrating The Sprayer (Formula)
Calibrating the sprayer (formula) J-600 ELECTRIC ATTENTION! The safety of people, animals and environment depends on correct spray applications. Therefore, we list below some operational procedures. WHEN HANDLING THE CHEMICALS WHEN HANDLING THE SPRAYER ∙ Follow strictly the instructions on the labels. -
Page 45: Calibrating The Sprayer (Practical Method)
Calibrating the sprayer (practical method) J-600 ELECTRIC > Calibrating the sprayer through a pratical method Before calibrating the sprayer be sure: ∙ pump is properly lubricated (oil level and grease) and has no leakage. ∙ suction filter is clean. ∙... -
Page 46: Determining The Spout Flow Rate
Determining the spout flow rate J-600 ELECTRIC ∙ Different flow rates can be obtaining through the setting of the flow rate regulating valve. flow rate regulating valve > Procedure ∙ Choose an even ground and level both the ∙ Spray for one minute and again fill the tank up sprayer and spout. -
Page 47: Flow Rate Table
Flow rate table / Adjusting the auxiliary ducts J-600 ELECTRIC > Flow rate table NOTE: For a more homogeneous distribution of the chemical mixture along the spray swath, one recommends to install on the auxiliary spouts the nozzles shown in the table above according to the setting of the flow rate regulating valve. -
Page 48: Tractor Path And Spout Inclination
Tractor path and spout inclination J-600 ELECTRIC ∙ The figures below show how to make the spray application and adjust the spout according to the tractor speed and wind direction. wind direction Without wind (spout slightly inclined upward) With wind of up to 6.5 mph... -
Page 49: Diluting The Chemicals
Diluting the chemicals J-600 ELECTRIC ATTENTION! To avoid damaging pump, do not run sprayer with less than 14 gallons of water in the tank. Always use the following individual protective impermeable clothing when handling chemicals: wide-brimmed ∙ Impermeable wide-brimmed hat goggles ∙... - Page 50 Diluting the chemicals J-600 ELECTRIC ∙ Add water until filling the bucket up. ∙ Stir until the chemical and water are mixed. ∙ Pour the solution into the sprayer’s tank. ∙ Install the tank lid and make sure there is no leackage. ATTENTION! Always follow technical recommendations when handling chemicals.
-
Page 51: Chemical Container Rinse
∙ Metal, plastic and glass containers must be rinsed for decontamination. ∙ To facilitate this important operation , Jacto has installed on its trailed sprayers a suitable device that rinses internally the containers with pressurized water, eliminating most of the resi- fixer valve dues. - Page 52 Chemical container rinse J-600 ELECTRIC ATTENTION! Never pull the directional valve with- out the chemical container over the container rinse nozzle. After rinsing the chemical container, wash it for the last time. > Container rinse NOTE: To keep from contaminating the...
-
Page 53: Triple Wash Of Chemical Containers
Triple wash of chemical containers J-600 ELECTRIC After washing the chemical container with the mixture, it is necessary to make the triple wash of the chemical containers as follows: ∙ Always use individual protective clothing. ATTENTION! This equipment does not have auxiliary tank to wash chemical containers. - Page 54 Triple wash of chemical containers J-600 ELECTRIC ADDITIONAL INFORMATION 1- In case of mid and large sized container (13.20, 26.5 and 53 gallons), after washing with the ap- propriate volume and fitting the cap, roll it on the ground during approximately 30 seconds.
- Page 55 CHAPTER 5 Maintenance J-600 ELECTRIC Guidelines ....................03 Components ....................03 Lubricantion points ..................04 Belt tension ....................05 Operations table ..................07 Recommended lubricants ................09 Conventional PTO shaft ................10 Winter storage ...................12 Trouble-shooting ..................13 General care ....................14 Cleaning and storage .................15...
-
Page 57: Guidelines
Guidelines J-600 ELECTRIC ∙ After the first working hours, check if the bolts, ∙ Take off and wash the individual protective nuts, clamps on the tanks, wheel and axle are well clothing separated from other clothes. installed. Retighten them if necessary. -
Page 58: Lubricantion Points
Lubrication points J-600 ELECTRIC > Auxiliary spouts ∙ Clean the nozzles and strainers daily or when- ever necessary. > Spray ducts ∙ Lubricate daily. > Agitator If there is leakage through the agitator assembly, proceed as follows: ∙ Tighten the screw fastening the gasket (1) until it stops leaking. -
Page 59: Belt Tension
Belt tension J-600 ELECTRIC > PTO Shaft ∙ Lubricate daily. For instruction in detail, please refer to the section MAINTENANCE - PTO SHAFT. ATTENTION! Before using the equipment for the first time, clean and lubricate every point of the PTO shaft, as shown in... - Page 60 Belt tension J-600 ELECTRIC > Fan belt ∙ Deflection: +/- 0.31 in ∙ Loosen the four screws (1). ∙ Loosen the two nuts (2). ∙ Equally tighten the two knobs (3) until obtaining the tension recommended. ∙ Retighten the nuts (2). ∙ Retighten the screws (1).
-
Page 61: Operations Table
Operations table J-600 ELECTRIC... - Page 62 Operations table J-600 ELECTRIC...
-
Page 63: Recommended Lubricants
Recommended lubricants J-600 ELECTRIC... -
Page 64: Conventional Pto Shaft
Conventional PTO Shaft J-600 ELECTRIC > Use, maintenance, disassembly and assembly of PTO shaft with guard ATTENTION! Always stop the sprayer and turn off the tractor engine before servicing the pto shaft. All kind of maintenance on the pto shaft must be done with the use of appropriate protective clothing, such as: gloves, boots, goggles, etc. - Page 65 Conventional PTO Shaft J-600 ELECTRIC 2º - Servicing a) Disassembling 1- Remove the lock screw. 2- Turn the guard cone until the indicated posi- tion. 3- Pull the guard cone. 4- Remove the sliding ring. b) Assembling 5- Clean and lubricate the male and female tubes.
-
Page 66: Winter Storage
Winter storage J-600 ELECTRIC ATTENTION! In regions where temperatures drop to 32º Fahrenheit or less, the water accumulated in the pump can freeze and cause serious damage. tank chemical control JEC-2500 pump filter filling unit valve working filling intermediate > Procedures ∙... -
Page 67: Trouble-Shooting
Trouble-shooting J-600 ELECTRIC tank hose chemical control filter pump filling unit hose filling unit valve > Problems, causes and corrections a. Total lack of pressure INDICATION: No liquid flow. PROBLABE CAUSES CORRECTIONS 1. Lack of water. Fill up the tank. -
Page 68: General Care
General care J-600 ELECTRIC > Handling agricultural sprayers and chemicals ∙ We warn the owners and users that the UN- ∙ Follow strictly the instructions for proper use of REASONABLE USE of this sprayer and chemicals this sprayer and chemicals to ensure more safety applied may cause damage to people, properties, and efficiency when spraying your crops. -
Page 69: Cleaning And Storage
Cleaning and storage J-600 ELECTRIC ∙ After finishing the work, fill up the tank with ∙ Store the sprayer in a closed, dry and ventilated clean water (50% of its capacity), remove the noz- place. zles and filters in appropriate place and run the ∙ Do not store the sprayer together with foods for system until draining all the water in order to clean people or animals that can be contaminated. - Page 71 CHAPTER 6 Warranty J-600 ELECTRIC Statement of limited warranty ..............3 Techinical inspections registration ...............4...
- Page 73 Instruction Manual must be filled in and returned to ∙ Eventual delays in performing services do not your Jacto dealer. THIS CARD MUST BE SIGNED BY confer to the owner the right to indemnity or to THE ORIGINAL RETAIL PURCHASER, INDICATING extension of the warranty period.
- Page 74 Techinical inspections registration J-600 ELECTRIC Date hours nº Description Techinical/Dealer...
- Page 75 PRODUCT REGISTRATION CARD Invoice number Date Retailing delaer Phone City State Sprayer Model Series Sprayer No. Pump No. Original retail purchaser Adress Phone City State Purchase date by the original retail purchaser The warranty is in force as of this date Retail purchaser signature Original retail purchaser’s copy PRODUCT REGISTRATION CARD...
Need help?
Do you have a question about the J-600 Electric and is the answer not in the manual?
Questions and answers
What size **** belt does the cannon sprayer need