Table of Contents
Advertisement
Quick Links
Download this manual
See also:
Instruction Manual
Advertisement
Table of Contents

Related Manuals for StarTech.com ARMPIVOTHD


Summary of Contents for StarTech.com ARMPIVOTHD
- Page 1 Single-Monitor Arm - One-Touch Height Adjustment - Heavy Duty Actual product may vary from photos User Manual SKU#: ARMPIVOTHD & ARMPIVOTHDB For the latest information and specifications visit www.startech.com/ARMPIVOTHD Manual Revision: 06/27/2018...
-
Page 2: Compliance Statements
StarTech.com. Where they occur these references are for illustrative purposes only and do not represent an endorsement of a product or To view manuals, videos, drivers, downloads, technical drawings, and more visit www.startech.com/support... - Page 3 To view manuals, videos, drivers, downloads, technical drawings, and more visit www.startech.com/support...
-
Page 4: Safety Statements
• Kablar (inklusive elkablar och laddningskablar) ska dras och placeras på så sätt att risk för snubblingsolyckor och andra olyckor kan undvikas. To view manuals, videos, drivers, downloads, technical drawings, and more visit www.startech.com/support... -
Page 5: Warning Statements
Das Gewicht des Monitors darf die zulässige Traglast des Produkts nicht übersteigen. Wenn die Traglast überschritten wird, kann dies zu Verletzungen von Personen oder Schäden an Geräten führen. Dieses Produkt ist für folgendes To view manuals, videos, drivers, downloads, technical drawings, and more visit www.startech.com/support... - Page 6 Nunca opere o ponga en funcionamiento este producto si faltan piezas o hay daños en las mismas. En caso de que los cables de su componente queden atascados en piezas en To view manuals, videos, drivers, downloads, technical drawings, and more visit www.startech.com/support...
- Page 7 Als uw componentkabels tussen bewegende delen vast komen te zitten, kan dit lichamelijk letsel of schade aan de apparatuur veroorzaken. 注意 必ず取扱説明書に従って本製品の組み立てを行って下さい。 取り扱いを誤った場 合に、 傷害を負う恐れや物的損害が発生する恐れがあります。 取り付けるモニターの重量が、 本製品で定められた最大積載重量を超えないよう にして下さい。 最大積載重量をオーバーした場合、 傷害を負う恐れやモニターや 本製品に損害が発生する恐れがあります。 本製品は、 モニター1台あたり9kgまで 支持できます。 本製品で使用している部品の一部が紛失していたり損傷している状態で使用す るのは絶対に止めて下さい。 ケーブルの一部が本製品の可動部に引っ掛かってしまった場合、 傷害を負う恐れ やモニターや本製品に損害が発生する恐れがあります。 To view manuals, videos, drivers, downloads, technical drawings, and more visit www.startech.com/support...
-
Page 8: Table Of Contents
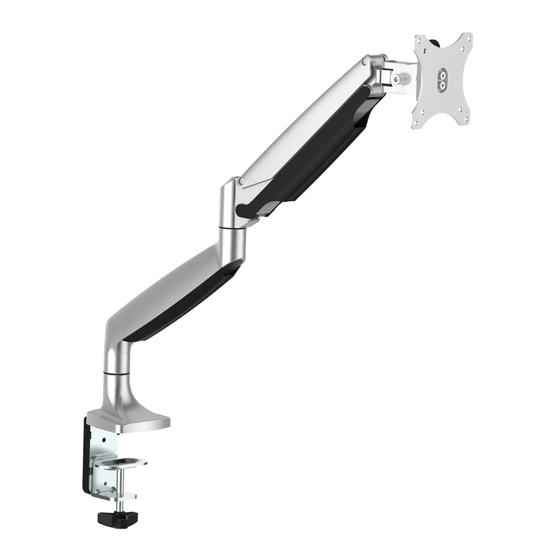
Use the Grommet Mount to Attach the Arm Mount ..............14 Attach a Monitor............................15 Adjust the Spring Arm ................17 Routing the Cables ........................... 17 Adjust the Position of the Arm Mount ..........18 To view manuals, videos, drivers, downloads, technical drawings, and more visit www.startech.com/support... - Page 9 Product Diagram Spring Arm Lower Cable Upper Cable Cover Cover VESA Monitor Mount Desk Clamp Holder To view manuals, videos, drivers, downloads, technical drawings, and more visit www.startech.com/support...
- Page 10 Product Dimensions 210 mm min 255 mm to max 315 mm 80 mm 75 mm 100 mm 115 mm To view manuals, videos, drivers, downloads, technical drawings, and more visit www.startech.com/support...
-
Page 11: Technical Specification
Type of Measurement Measurement 75x75 100x100 VESA Mounting Hole Pattern Up to 9 kg (19.8 lb.) Weight Capacity +900 to -900 Tilt Max 813 mm (32 in.) Screen Size To view manuals, videos, drivers, downloads, technical drawings, and more visit www.startech.com/support... - Page 12 1800 Rotate 1800 Swivel To view manuals, videos, drivers, downloads, technical drawings, and more visit www.startech.com/support...
-
Page 13: Package Contents
Package Contents VESA Monitor Mount Spring Arm Qty: One Qty: One Grommet Base Plate Grommet Knob Qty: One Qty: One Grommet Plate Grommet Screw Qty: One Qty: One To view manuals, videos, drivers, downloads, technical drawings, and more visit www.startech.com/support... - Page 14 Rubber Pads Desk Clamp Qty: Two Qty: One L Bracket Clamp Screws Qty: One Qty: Five 4 mm Hex Key Hex Key Holder Qty: One Qty: One To view manuals, videos, drivers, downloads, technical drawings, and more visit www.startech.com/support...
- Page 15 6 mm Hex Key Qty: One Qty: One M5x12 mm Screws M4x12 mm Thumbscrews Qty: Four Qty: Four Washers Spacers Qty: Four Qty: Four User Manual Qty: One To view manuals, videos, drivers, downloads, technical drawings, and more visit www.startech.com/support...
-
Page 16: Requirements
Spring Arm’s (1) base. Insert three of the Clamp Screws (10) through the L Bracket and into the bottom of the Spring Arm. To view manuals, videos, drivers, downloads, technical drawings, and more visit www.startech.com/support... - Page 17 Use the 4 mm Hex Key (12) to tighten the Clamp Screws. (Figure 1) Spring Arm Base L Bracket Clamp Screw 4 mm Hex Figure 1 To view manuals, videos, drivers, downloads, technical drawings, and more visit www.startech.com/support...
- Page 18 Position the Desk Clamp (8) so that the holes on the Desk Clamp line up with the top two holes in the L Bracket. Insert two of the Clamp Screws through the L Bracket and into the Desk Clamp. To view manuals, videos, drivers, downloads, technical drawings, and more visit www.startech.com/support...
- Page 19 Use the 4 mm Hex Key to tighten the Clamp Screws. (Figure 3) 4 mm Hex 10 to 55 mm Clamp Desk Screw Clamp L Bracket Figure 3 To view manuals, videos, drivers, downloads, technical drawings, and more visit www.startech.com/support...
- Page 20 Use the 4 mm Hex Key to tighten the Clamp Screws. (Figure 4) Clamp Screw 50 to 85 mm 4 mm Hex Desk L Bracket Clamp Figure 4 To view manuals, videos, drivers, downloads, technical drawings, and more visit www.startech.com/support...
- Page 21 Turn the knob on the Desk Clamp counterclockwise until you reach the thickness of the mounting surface that the Arm Mount is attached to. Slide the Desk Clamp over the edge of the mounting surface. To view manuals, videos, drivers, downloads, technical drawings, and more visit www.startech.com/support...
- Page 22 Turn the knob clockwise to tighten the Desk Clamp. (Figure Desk Clamp Figure 6 To view manuals, videos, drivers, downloads, technical drawings, and more visit www.startech.com/support...
-
Page 23: Use The Grommet Mount To Attach The Arm Mount
This product can support the following weight: Up to 9 kg (19.8 lb.). Insert the Grommet Screw (5) through the Grommet Base Plate (3). (Figure 7) Grommet Base Plate Grommet Screw Figure 7 To view manuals, videos, drivers, downloads, technical drawings, and more visit www.startech.com/support... - Page 24 Use the 4 mm Hex Key (12) to tighten the Clamp Screws. (Figure 8) Spring Arm Grommet Base Plate Clamp Screw Grommet 4 mm Screw Hex Key Figure 8 To view manuals, videos, drivers, downloads, technical drawings, and more visit www.startech.com/support...
- Page 25 Rubber Pads to the tops of two of the Clamp Screws on the underside of the Spring Arm. (Figure 9) Grommet Screw Rubber Pad Spring Arm Figure 9 To view manuals, videos, drivers, downloads, technical drawings, and more visit www.startech.com/support...
- Page 26 Screw the Grommet Knob (4) onto the Grommet Screw and turn the Grommet Knob clockwise to tighten it flush against the Grommet Plate. (Figure 10) Grommet Screw Grommet Plate Grommet Knob Figure 10 To view manuals, videos, drivers, downloads, technical drawings, and more visit www.startech.com/support...
-
Page 27: Attach A Monitor
VESA Monitor Mount so that the arrow on the back of the VESA Monitor Mount is pointed towards the top of the monitor. Position the four Washers (17) over the holes on the VESA Monitor Mount. To view manuals, videos, drivers, downloads, technical drawings, and more visit www.startech.com/support... - Page 28 M5x12 mm Screws (16) through the Washers, the VESA Monitor Mount, and into the back of the monitor. (figure 11) VESA Monitor Mount Top of M4 Thumbscrew or Monitor M5 Screw Washer Spacer Figure 11 To view manuals, videos, drivers, downloads, technical drawings, and more visit www.startech.com/support...
- Page 29 Pull the tab on the Spring Arm (1), and slide the VESA Monitor Mount and monitor into the mount on the Spring Arm. (Figure 12) VESA Monitor Mount Spring Arm Figure 12 To view manuals, videos, drivers, downloads, technical drawings, and more visit www.startech.com/support...
-
Page 30: Adjust The Spring Arm
Spring Arm so that it is straight, and use the 6 mm Hex Key (14) to turn the screw in the joint of the Spring Arm counterclockwise or clockwise. (Figure 13) 6 mm Hex Figure 13 To view manuals, videos, drivers, downloads, technical drawings, and more visit www.startech.com/support... - Page 31 Use the 6 mm Hex Key to turn the screw clockwise to tighten it. (Figure 14) 6 mm Hex Figure 14 To view manuals, videos, drivers, downloads, technical drawings, and more visit www.startech.com/support...
- Page 32 Hex Key Holder (11) on the side of the L Bracket (9). (Figure 15) 6 mm Hex 4 mm Hex Hex Key Holder Figure 15 To view manuals, videos, drivers, downloads, technical drawings, and more visit www.startech.com/support...
-
Page 33: Routing The Cables
Routing the Cables On the bottom portion of the Spring Arm (1), slide the Cable Cover up and away from the Spring Arm. (Figure 16) Spring Cable Cover Figure 16 To view manuals, videos, drivers, downloads, technical drawings, and more visit www.startech.com/support... - Page 34 On the upper portion of the Spring Arm, pull the ends of the Cable Cover away from the Spring Arm, and remove the Cable Cover from the Spring Arm. (Figure 17) Spring Cable Cover Figure 17 To view manuals, videos, drivers, downloads, technical drawings, and more visit www.startech.com/support...
- Page 35 Cover and insert the Tabs on the inside of the Cable Cover into the holes on the Spring Arm. (Figure 18) Hole Spring Cable Cover Hole Figure 18 To view manuals, videos, drivers, downloads, technical drawings, and more visit www.startech.com/support...
- Page 36 Run the cables along the inside of the Cable Cover that you removed from the bottom portion of the Spring Arm. (Figure Cable Cable Cover Figure 19 To view manuals, videos, drivers, downloads, technical drawings, and more visit www.startech.com/support...
- Page 37 Spring Arm, and slide the Cable Cover down so that the Hooks on the Cable Cover slide into the Clips in the Spring Arm. (Figure 20) Spring Hook Cable Cover Hook Figure 20 To view manuals, videos, drivers, downloads, technical drawings, and more visit www.startech.com/support...
-
Page 38: Adjust The Position Of The Arm Mount
Adjust the Position of the Arm Mount You can adjust the Arm Mount in the following ways: 180° +90° 180° -90° 360° 270° To view manuals, videos, drivers, downloads, technical drawings, and more visit www.startech.com/support... -
Page 39: Technical Support
Limitation of Liability In no event shall the liability of StarTech.com Ltd. and StarTech.com USA LLP (or their officers, directors, employees or agents) for any damages (whether direct or indirect, special, punitive, incidental, consequential, or otherwise), loss of profits, loss of business, or any pecuniary loss, arising out of or related to the use of the product exceed the actual price paid for the product. - Page 40 StarTech.com is an ISO 9001 Registered manufacturer of connectivity and technology parts. StarTech.com was founded in 1985 and has operations in the United States, Canada, the United Kingdom and Taiwan servicing a worldwide market.
Need help?
Do you have a question about the ARMPIVOTHD and is the answer not in the manual?
Questions and answers