Table of Contents
Advertisement
Quick Links
Desk Mount Monitor Arm with Cable
Management & Height Adjust
ARMPIVOT
DE: Bedienungsanleitung - de.startech.com
FR: Guide de l'utilisateur - fr.startech.com
ES: Guía del usuario - es.startech.com
IT: Guida per l'uso - it.startech.com
NL: Gebruiksaanwijzing - nl.startech.com
PT: Guia do usuário - pt.startech.com
For the most up-to-date information, please visit: www.startech.com
Manual Revision: 12/04/2018
*actual product may vary from photos
Advertisement
Table of Contents

Subscribe to Our Youtube Channel
Related Manuals for StarTech.com ARMPIVOT


Summary of Contents for StarTech.com ARMPIVOT
- Page 1 DE: Bedienungsanleitung - de.startech.com FR: Guide de l'utilisateur - fr.startech.com ES: Guía del usuario - es.startech.com IT: Guida per l'uso - it.startech.com NL: Gebruiksaanwijzing - nl.startech.com PT: Guia do usuário - pt.startech.com For the most up-to-date information, please visit: www.startech.com Manual Revision: 12/04/2018...
- Page 2 StarTech.com. Where they occur these references are for illustrative purposes only and do not represent an endorsement of a product or service by StarTech.com, or an endorsement of the product(s) to which this manual applies by the third-party company in question. Regardless of any direct acknowledgement elsewhere in the body of this document, StarTech.com hereby...
-
Page 3: Table Of Contents
Table of Contents Introduction ....................1 Packaging Contents ..........................1 Product Diagram ..................2 Installation ....................2 Desk / Grommet Mounting ........................2 Attaching the Display ..........................5 Completing the Assembly ........................6 Adjusting Monitor Mount Resistance ....................7 Specifications ..................8 Technical Support ..................9 Warranty Information ................9 Instruction Manual... -
Page 4: Introduction
Introduction Packaging Contents Large C Clamp Monitor Mount Support Post Qty: 1 Qty: 1 Qty: 1 Thumb Screws EVA Cushion Small C Clamp Qty: 4 Qty: 1 Qty: 1 Cable Clip / Collar M5x14mm Hex Screws (attached) M6x12mm Phillips Screws Qty: 4 Qty: 1 Qty: 4... -
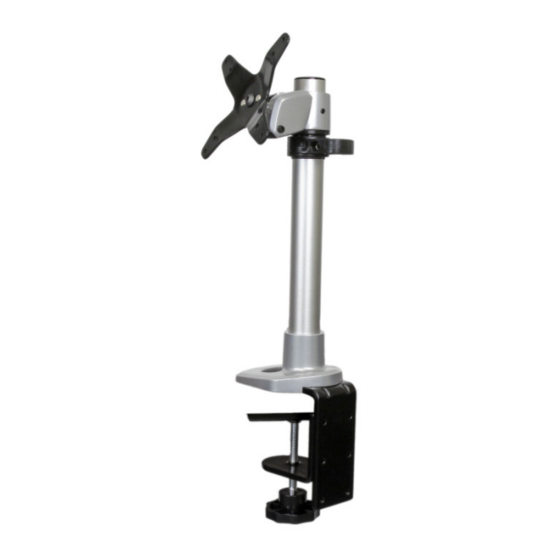
Page 5: Product Diagram
Product Diagram Installation Warning: It is the installer’s responsibility to ensure that the combined weight of all components does not exceed the maximum 14 kg (30.9 lbs) weight capacity of the mounting arm. Desk / Grommet Mounting The Monitor Arm can be clamped to a desk / table, or mounted through a grommet hole. - Page 6 Grommet Mount 1. Remove the Hand Screw (13) from the base of the Support Post (1). 2. Place the EVA Cushion (4) beneath the Support Post (1) and thread the Hand Screw (13) from below until secure. Ensure that the Pressure Plate (14) is making full contact with the desk surface.
- Page 7 2. Slide the Hand Screw (13) through the bottom of the clamp and attach the Pressure Plate (14) using the Male Round Washer (11), Female Round Washer (12) and M4x15mm Phillips Screw (10). 3. Attach the completed Desk Clamp to base of the Support Post (1) using 4 M5x14mm Hex Screws (9).
-
Page 8: Attaching The Display
Attaching the Display 1. Carefully place your display face down on a protective surface to access the mounting points. 2. Attach the display to the Monitor Mount (2) using the 4 Thumb Screws (5). Instruction Manual... -
Page 9: Completing The Assembly
WARNING! Do not over-tighten the screws and stop immediately if you encounter resistance to avoid damage to your display. Ensure that all spacers and screws being used are the same length and thread type. Completing the Assembly 1. Loosen the Cable Clip / Collar (7) on the Support Post (1) and adjust to the desired height. -
Page 10: Adjusting Monitor Mount Resistance
Adjusting Monitor Mount Resistance WARNING! Forced movement of the Mount Bracket without loosening the screws may damage the product or the mounted displays. Always support your display from underneath when making any adjustments to the LCD Arms or Mount Brackets to avoid damage to the display. Note: For all adjustments outlined below, turning the screw clockwise will increase the resistance, while turning the screw counter-clockwise will decrease resistance. -
Page 11: Specifications
Specifications Weight Capacity 30.9 lbs (14 kg) Max Display Size 30” VESA Compatibility 75x75 mm and 100x100 mm Maximum Mounting Surface 4 in (100 mm) Thickness Instruction Manual... -
Page 12: Technical Support
Limitation of Liability In no event shall the liability of StarTech.com Ltd. and StarTech.com USA LLP (or their officers, directors, employees or agents) for any damages (whether direct or indirect, special, punitive, incidental, consequential, or otherwise), loss of profits, loss of business, or any pecuniary loss, arising out of or related to the use of the product exceed the actual price paid for the product. - Page 13 StarTech.com is an ISO 9001 Registered manufacturer of connectivity and technology parts. StarTech.com was founded in 1985 and has operations in the United States, Canada, the United Kingdom and Taiwan servicing a worldwide market.
Need help?
Do you have a question about the ARMPIVOT and is the answer not in the manual?
Questions and answers