Table of Contents
Advertisement
Quick Links
Download this manual
See also:
User Manual
Single-Monitor Arm - One-Touch
Height Adjustment - Heavy Duty
ARMPIVOTHD
FR: Guide de l'utilisateur - fr.startech.com
DE: Bedienungsanleitung - de.startech.com
ES: Guía del usuario - es.startech.com
NL: Gebruiksaanwijzing - nl.startech.com
PT: Guia do usuário - pt.startech.com
IT: Guida per l'uso - it.startech.com
For the latest information, technical specifications, and support for
this product, please visit www.StarTech.com/ARMPIVOTHD.
Manual Revision: 09/15/2017
*actual product may vary from photos
Advertisement
Table of Contents

Related Manuals for StarTech.com ARMPIVOTHD


Summary of Contents for StarTech.com ARMPIVOTHD
- Page 1 Single-Monitor Arm - One-Touch Height Adjustment - Heavy Duty ARMPIVOTHD *actual product may vary from photos FR: Guide de l’utilisateur - fr.startech.com DE: Bedienungsanleitung - de.startech.com ES: Guía del usuario - es.startech.com NL: Gebruiksaanwijzing - nl.startech.com PT: Guia do usuário - pt.startech.com IT: Guida per l’uso - it.startech.com...
- Page 2 StarTech.com. Where they occur these references are for illustrative purposes only and do not represent an endorsement of a product or service by StarTech.com, or an endorsement of the product(s) to which this manual applies by the third-party company in question. Regardless of any direct acknowledgement elsewhere in the body of this document, StarTech.com hereby...
- Page 3 Warning statements Waarschuwingen Make sure to assemble this product according to the instructions. Failure to do so might result in Zorg dat dit product volgens de instructies in elkaar wordt gezet. Indien dit niet goed gebeurt kan personal injury or property damage. lichamelijk letsel of materiële schade ontstaan.
-
Page 4: Table Of Contents
Technical specifications .......................... 3 Package contents ............................4 Requirements ............................. 7 Assembly ....................8 Attach the ARMPIVOTHD to your mounting surface ..............8 Attach a monitor ............................14 Adjust the spring arm ..........................16 Route your cables............................18 Adjust the position of ARMPIVOTHD ....................21 Technical support ...................22... -
Page 5: Introduction
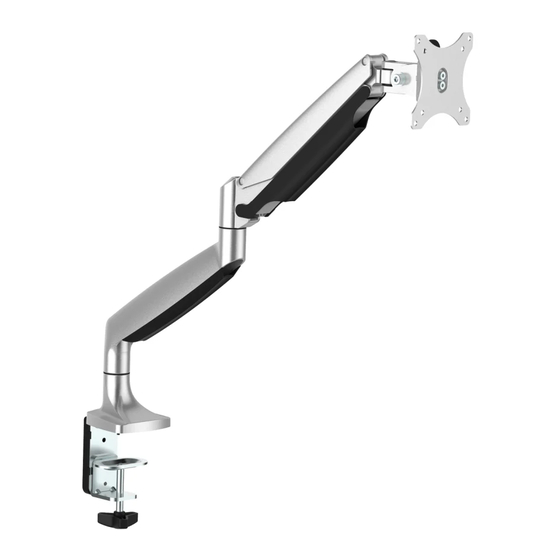
Introduction The ARMPIVOTHD is a heavy duty single-monitor arm that you can use to mount monitors up to 813 mm (32 in.) in size and 9 kg (19.8 lb.) in weight. The height of the ARMPIVOTHD can easily be adjusted with one touch, and the finish on the ARMPIVOTHD makes it an attractive addition to your workspace. -
Page 6: Product Dimensions
Product dimensions 210 mm min 255 mm to max 315 mm 80 mm 75 mm 100 mm 115 mm Instruction manual... -
Page 7: Technical Specifications
Technical specifications Type of measurement Measurement VESA mounting hole pattern 75x75 100x100 Weight capacity Up to 9 kg (19.8 lb.) Tilt +900 to -900 Screen size Maximum 813 mm (32 in.) Rotate 1800 Swivel 1800 Instruction manual... -
Page 8: Package Contents
Package contents Spring arm VESA monitor mount Qty: One Qty: One Grommet base plate Grommet knob Qty: One Qty: One Grommet screw Grommet plate Qty: One Qty: One Instruction manual... - Page 9 Rubber pads Desk clamp Qty: Two Qty: One L bracket Clamp screws Qty: One Qty: Five Hex key holder 4 mm hex key Qty: One Qty: One Instruction manual...
- Page 10 5 mm hex key 6 mm hex key Qty: One Qty: One M4x12 mm thumbscrews M5x12 mm screws Qty: Four Qty: Four Washers Spacers Qty: Four Qty: Four Instruction manual...
-
Page 11: Requirements
Instruction manual Qty: One Requirements • A monitor or display that’s compatible with a VESA mount • A Phillips screwdriver Requirements are subject to change. For the latest requirements, please visit www.StarTech.com/ARMPIVOTHD. Instruction manual... -
Page 12: Assembly
Assembly Attach the ARMPIVOTHD to your mounting surface You can use either the desk clamp or grommet mount to attach the ARMPIVOTHD to your mounting surface. Use the desk clamp to attach the ARMPIVOTHD Warning! Make sure that the weight of the monitor doesn’t exceed the weight capacity of this product. - Page 13 4. Remove the backing from the two rubber pads (7) and affix the rubber pads to the tops of two of the clamp screws on the underside of the L bracket and spring arm. (figure 2) figure 2 Rubber pads Clamp screw L bracket Spring arm...
- Page 14 figure 3 4 mm hex key 10 to 55 mm Clamp screw Desk clamp L bracket figure 4 50 to 85 mm 4 mm hex key Clamp screw Desk clamp L bracket Instruction manual...
- Page 15 L bracket 7. Turn the knob on the desk clamp counterclockwise until you reach the thickness of the mounting surface that you’re attaching the ARMPIVOTHD to. 8. Slide the desk clamp over the edge of the mounting surface. 9. Turn the knob clockwise to tighten the desk clamp. (figure 6)
- Page 16 Use the grommet mount to attach the ARMPIVOTHD Warning! Make sure that the weight of the monitor doesn’t exceed the weight capacity of this product. If you exceed the weight capacity, you might experience personal injury or damage to the product. This product can support the following weight: Up to 9 kg (19.8 lb.).
- Page 17 5. Remove the backing from the two rubber pads (7) and affix the rubber pads to the tops of two of the clamp screws on the underside of the spring arm. (figure 9) figure 9 Grommet screw Rubber pad Spring arm 6.
-
Page 18: Attach A Monitor
Warning! Attaching a monitor is a two-person job. Do not attempt to complete this task by yourself. To accommodate different monitor designs, the ARMPIVOTHD comes with two sets of screws that are different lengths and diameters, and a set of spacers. - Page 19 figure 11 M4x12 mm thumbscrew VESA monitor mount Top of monitor M5x12 mm screw Washer Spacer (if required) 5. Pull the tab on the spring arm (1), and slide the VESA monitor mount and monitor into the mount on the spring arm. (figure 12) figure 12 VESA monitor mount Spring arm...
-
Page 20: Adjust The Spring Arm
Adjust the spring arm You need to adjust the spring arm in two places. 1. To increase or decrease the tension in the spring arm (1), hold down the spring arm so that it is straight, and use the 6 mm hex key (14) to turn the screw in the joint of the spring arm counterclockwise or clockwise. - Page 21 Tip! If you used the desk mount to mount the ARMPIVOTHD, when you’re done adjusting the ARMPIVOTHD, you can store the hex keys in the hex key holder (11) on the side of the L bracket (9). (figure 15) figure 15...
-
Page 22: Route Your Cables
Route your cables 1. On the bottom portion of the spring arm (1), slide the cable cover up and away from the spring arm. (figure 16) figure 16 Spring arm Cable cover 2. On the upper portion of the spring arm, pull the ends of the cable cover away from the spring arm, and remove the cable cover from the spring arm. - Page 23 3. Run the cables along the inside of the cable cover that you removed from the upper portion of the spring arm. 4. To reattach the cable cover, pull out the ends of the cable cover and insert the tabs on the inside of the cable cover into the holes on the spring arm.
- Page 24 5. Run the cables along the inside of the cable cover that you removed from the bottom portion of the spring arm. (figure 19) figure 19 Cable Spring arm Cable cover 6. Place the cable cover slightly higher than the cavity in the lower part of the spring arm, and slide the cable cover down so that the hooks on the cable cover slide into the clips in the spring arm.
-
Page 25: Adjust The Position Of Armpivothd
Adjust the position of ARMPIVOTHD You can adjust ARMPIVOTHD in the following ways: 180° +90° 180° -90° 360° 270° Instruction manual... -
Page 26: Technical Support
Limitation of liability In no event shall the liability of StarTech.com Ltd. and StarTech.com USA LLP (or their officers, directors, employees or agents) for any damages (whether direct or indirect, special, punitive, incidental, consequential, or otherwise), loss of profits, loss of business, or any pecuniary loss, arising out of or related to the use of the product exceed the actual price paid for the product. - Page 27 StarTech.com is an ISO 9001 Registered manufacturer of connectivity and technology parts. StarTech.com was founded in 1985 and has operations in the United States, Canada, the United Kingdom and Taiwan servicing a worldwide market.
Need help?
Do you have a question about the ARMPIVOTHD and is the answer not in the manual?
Questions and answers