Table of Contents
Advertisement
Advertisement
Table of Contents

Subscribe to Our Youtube Channel
Related Manuals for Insportline Yukona


Summary of Contents for Insportline Yukona
- Page 1 USER MANUAL – EN IN 16635 Rowing Machine inSPORTline Yukona...
-
Page 2: Table Of Contents
CONTENTS SAFETY PRECAUTIONS ........................3 PRODUCT DESCRIPTION ........................4 ASSEMBLY PARTS ..........................5 ASSEMBLY STEPS ..........................6 STORAGE ............................... 9 MOVING INSTRUCTIONS ........................9 EXPLODED DRAWING ......................... 10 PARTS LIST ............................11 METER INSTRUCTIONS ........................14 POWER UP............................14 KEY FUNCTION ..........................14 FUNCTIONS ............................ -
Page 3: Safety Precautions
SAFETY PRECAUTIONS Read this manual carefully before first using and retain it for future reference. Observe all warnings and precautions including assembly steps. Use it only for intended purpose. Assemble and use it only according to this manual to assure your safety. Inform all other users about safe usage. -
Page 4: Product Description
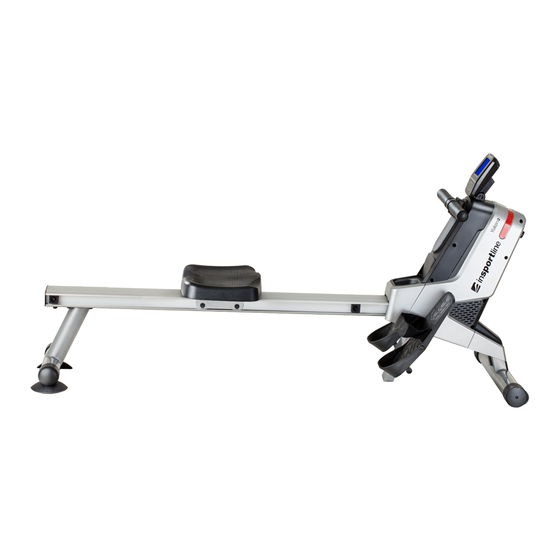
PRODUCT DESCRIPTION 1) Handlebar 2) Left cover 3) Bottle holder 4) Pedal strap 5) Seat 6) Rail 7) Rear stand 8) End cap 9) Meter 10) Right cover 11) Front cover 12) Transporting wheels 13) Front stand 14) Pedal... -
Page 5: Assembly Parts
ASSEMBLY PARTS Picture Description Qty. Button head bolt M8x40 mm Button head bolt M8x15 mm Button head bolt M8x20 mm Flat washer M8 Large washer M8 Flat washer M6 Lock washer M8 Cross self-tapping bolt ST4.2x45 Cross flat head bolt M6x15 Allen wrench 5 mm Screwdriver and wrench... -
Page 6: Assembly Steps
ASSEMBLY STEPS STEP 1 Position the rowing machine as shown in picture A. Insert the rear support (5) into the base frame (3) and lock with button head bolts M6x15 mm (63) and washers M6 (64). Attach the base frame (3) to the connection bracket (11) with button head bolts M8x40 mm (84) and washers M8 (62). - Page 7 STEP 3 Unfold the rail (48) and thereafter attach the connection bracket (11) to the base frame (3) using button head bolts M8x20 mm (85) and washers M8 (62). STEP 4 Attach the seat (21) to the seat carriage (10) with round head bolts M6x15 mm (63) and washers M6 (64).
- Page 8 STEP 8 Install the bottle holder (27). To do it, loosen screw M4.2x16 mm (67) on the right cover (18). Push the bottle holder (27) into the gap of the left and right covers (17 and 18) and tighten the screw M4.2x16 mm (67) again.
-
Page 9: Storage
STORAGE Store it only in a clean and dry place. Move this device using moving wheels on the front stabilizer of the base frame (3). Lift the rear stand (2) to move it. Never use seat (21) to push or pull it. The seat could move, the seat carriage (10) could hurt or crush your fingers. -
Page 10: Exploded Drawing
EXPLODED DRAWING... -
Page 11: Parts List
PARTS LIST Item Qty. Main frame Rear stand Base frame Foot bracket Rear support Pedal shaft Rear spring hook Spring hook Rail cap Seat carriage Connection bracket Magnetic bracket Spacer (ø12.8.x38.5 mm) Shaft rod (ø12.8.x58.5 mm Handlebar Round head self-drill (ST4.2x20 mm) Left cover Right cover Pedal cap... - Page 12 Meter plate Foot stand PU roller Return bearing housing Strap pulley shaft ø10*100 Strap pulley Bearing (6000RS) Bearing (6003zz) Pulley ø155*J3 Round-head bolt (M6x25 mm) One-way bearing (16003) Collar Rail Magnetic flywheel Flywheel shaft V-ribbed belt (220 PJ3) Idler roller Idler wheel Button head bolt M8x20 Bearing (608zz)
- Page 13 Inner C ring M35 Spacer Retaining plug Eye bolt M6 Tension bracket Nut M10 Nut M6 Round-head screw ST4.2x45 Cross head screw M5x12 Large washer M8 Button head bolt M8x40 Button head bolt M8x20 Round-head screw M6x12 Button head bolt M8x60 Button head bolt M8x80 Spacer S10 Thin nut M10...
-
Page 14: Meter Instructions
METER INSTRUCTIONS POWER UP Connect all the cables to the monitor. After powering up, all LCD segments will light up for 2 seconds and CPU will be reset the resistance to level 1. The monitor will enter the initial mode. ... -
Page 15: Functions
FUNCTIONS PROGRAM Selection of the workout mode. There are total 21 manual programs (P01-P16 and U1-U4). TIME Exercise time will be shown on display during training. If there is no signal detected within 256 seconds, it enters the sleep mode. To wake up the computer, push any key, give some input or start workout. -
Page 16: Operations
OPERATIONS There are 21 manual programs in all. The user can set the workout time and then the program divides this workout period (time) into 10 parts. If the user will not set the workout time, the program will count up per second and each part lasts for 1 minute. -
Page 17: Program P16
PROGRAM P16 The computer will adjust the resistance level according to the pulse value. If the current value is lower than desired value, the resistance will be increased. Otherwise, it will be decreased. Press the PROGRAM button to P16. ... -
Page 18: How To Exercise
HOW TO EXERCISE Phase of right rowing to strengthen specific muscles: 1. Stroke (Lower Muscle Exercise): Bend your knees and stretch your arms. Grasp the handle and keep your back straight (Pic 01). 2. Movement (center muscles): Reflect the legs and bend the arms (Pic 02). 3. -
Page 19: Terms And Conditions Of Warranty, Warranty Claims
TERMS AND CONDITIONS OF WARRANTY, WARRANTY CLAIMS General Conditions of Warranty and Definition of Terms All Warranty Conditions stated hereunder determine Warranty Coverage and Warranty Claim Procedure. Conditions of Warranty and Warranty Claims are governed by Act No. 89/2012 Coll. Civil Code, and Act No. - Page 20 VAT ID: CZ26847264 Phone: +420 556 300 970 E-mail: eshop@insportline.cz reklamace@insportline.cz servis@insportline.cz Web: www.insportline.cz INSPORTLINE s.r.o. Headquarters, Warranty & Service centre: Elektricna 6471, 911 01 Trencin, Slovakia CRN: 36311723 VAT ID: SK2020177082 Phone: +421(0)326 526 701 E-mail: objednavky@insportline.sk reklamacie@insportline.sk servis@insportline.sk Web: www.insportline.sk...
Need help?
Do you have a question about the Yukona and is the answer not in the manual?
Questions and answers