Advertisement
Advertisement
Table of Contents

Related Manuals for Insportline BR-3010


Summary of Contents for Insportline BR-3010
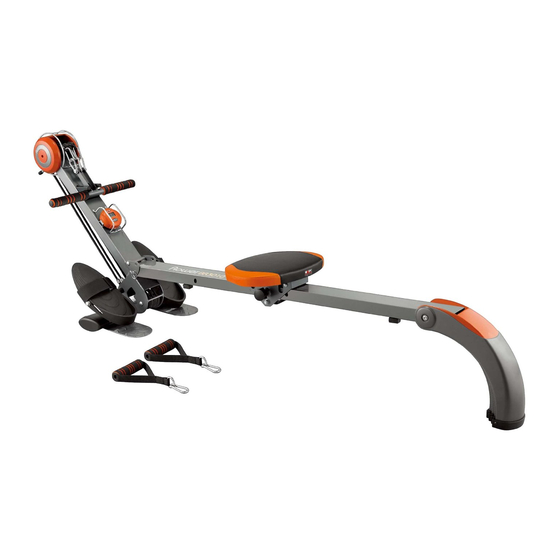
- Page 1 User manual - EN IN 2810 – Rowing machine RIO (BR-3010)
- Page 2 Important Safety Information Please keep this manual in a safe place for reference. 1. It is important to read this entire manual before assembling and using the equipment. Safe and efficient use can only be achieved if the equipment is assembled, maintained and used properly. It is your responsibility to ensure that all users of the equipment are informed of all warnings and precautions.
-
Page 3: Exploded-View Assembly Drawing
15. If you experience any problems or require assistance, please contact the customer service in your country, see 1 page for tel. numbers. EXPLODED-VIEW ASSEMBLY DRAWING... -
Page 4: Parts List
PARTS LIST PART PART DESCRIPTION Q'TY DESCRIPTION Q'TY Rubber pad Foam grip Bolt (M8*48) End cap Front stabilizer Handlebar Screw (ST4.2*10) Computer protector End cap Screw (ST2.9*8) End cap cover Computer Bolt (M6*40) Upper computer wire Transport wheel Wire bracket Curved washer (Φ8) Lock nut (M6) Pulley (φ63*29.25) - Page 5 ASSEMBLY INSTRUCTIONS STEP 1 Connect the front stabilizer (3) to the main frame (21) by use the bolt M8*47 (2), Curved cushionφ8 (47) and lock nut M8 (13). Warning: insert the bolt M8*47 (2) into the hole in the front stabilizer (3), with square bolt head fit into the square hole.
- Page 6 STEP 3 Connect the rear stabilizer (61) to the roller tube (53) by use the bolt (60) and screw (M6*10) (64).
-
Page 7: Folding For Storage
STEP 6 Assembly Pedal (15), Bushing (19) and (Axle for Pedal) (16) to the Main frame (21) by use lock nut M8 (13) and Washer (14). FOLDING FOR STORAGE Pull the pin (18) out of the main frame (21), then turn roller tube (53) anticlockwise, insert pin (18) to the hold. -
Page 8: Exercise Guide
EXERCISE GUIDE Rowing is an extremely effective form of exercise. It strengthens the heart and improves circulation as well as exercising all the major muscle groups; the back, waist, arms, shoulders, hips and legs. The Basic Rowing Stroke 1) Sit on the saddle and fasten your feet to the pedals using the Velcro straps. Then take hold of the rowing bar. -
Page 9: Heart Rate
This stage helps get the blood flowing around the body and the muscles working properly. It will also reduce the risk of cramp and muscle injury. It is advisable to do a few stretching exercises as shown below. Each stretch should be held for approximately 30 seconds. Do not force or jerk your muscles into a stretch - if it hurts, STOP. -
Page 10: Weight Loss
you should increase resistance making your legs work harder. You will have to reduce your speed to keep your heart rate in the target zone. WEIGHT LOSS The important factor here is the amount of effort you put in. The harder and longer you work the more calories you will burn. - Page 11 Time Display the workout time from 00:00 to 99:59. User also can press the button to display the workout time value. Calories Display the calories consumption during training from 0.0 to 9999. User also can press the button to display the calories consumption value. EXERCISE SESSION EXERCISE 1 LEG N THIGH BURNER ROW Sit facing the front of the Gym N Rower.
- Page 12 Sitting in the same position as the above exercise, grip one handle holding it near the back of your head like this. Your other hand can hold onto the roller tube for support. Inhale and extend your arm up over your head.
- Page 13 To do the Power Pull, stand to one side of your Gym N Rower like this, with your right foot on the front stabilizer footplate. (This is the position if you’re working your right arm. Reverse it when working the left arm.) Now, take the handle in your right hand, like this.
- Page 14 For the Rear Deltoid / Tricep Pullback exercise place your right knee comfortably on the padded seat rest. Your left hand can be supported on your left knee, or on the head of the mainframe. Now, take hold of the pulley handle with your right hand and bring it up to this position.
- Page 15 For this exercise stand straight facing the mainframe; your legs should be on either side of the roller tube and placed firmly on the front stabilizer foot plates. Now, take the handles, one in each hand, and bring them up around your chin or upper chest area. Keep your elbows in.
- Page 16 Stand on one side of the Gym N Rower and grip the handle with your right hand. Your right foot should be on the footplate. Now exhale and raise your arm bringing it to shoulder level…. Hold it a moment then return to first position as you exhale. Do seven to 10 reps and two sets before working the left arm.
- Page 17 EXERCISE 13 LOWER BACK POWER For this exercise you will again use the handlebar. Now, sitting in the same position as the last exercise, place the handlebar across the inner elbows like this. Your feet should be placed securely in the footrests and your knees bent at about 90 degrees.
Need help?
Do you have a question about the BR-3010 and is the answer not in the manual?
Questions and answers