Table of Contents
Advertisement
Advertisement
Table of Contents

Summary of Contents for Hardkernnel ODROID-C2
- Page 1 USER MANUAL ODROID-C2 rev. 20161115...
-
Page 2: Table Of Contents
Index ODROID-C2 Beginner’s Guide Chapter 1 • Welcome ..................1 Differences between a typical PC and a Single Board Computer (SBC) ..2 Components Included on an SBC ..............2 Block Diagram ....................3 Board Image ....................3 Attaching Peripherals ..................3 Power Supply ....................4 Monitor ......................6 Keyboard and Mouse ..................6... - Page 3 Index ODROID-C2 Beginner’s Guide Chapter 3 • Operating Systems ..............36 Ubuntu/Debian ....................36 Linux Basics ....................37 Kernel ......................38 GUI ........................38 720p vs 1080p and 2160p ................38 Progressive vs Interlaced Video ..............39 Video Downconversion ..................39 Video Upconversion ..................40 HDMI Overscan .....................40 Disabling Monitor Overscan ................41 Display Setting Button on Remote Control ............41...
- Page 4 Index ODROID-C2 Beginner’s Guide Chapter 4 • Hardware Tinkering ..............52 Preparation ....................52 USB / UART Module Kit .................53 Bluetooth Module 2 ..................58 Tinkering Kit ....................61 ODUINO ONE ....................64 ODROID-SHOW2 ..................66 16x2 LCD I/O Shield ..................68 Weather Board ....................69 USB-DC Plug Cable 2.5x0.8mm ..............71 USB-SPDIF ....................71...
- Page 5 Credits Authors: Rob Roy Venkat Bommakanti Art Editor: Bruno Doiche Assistant Art Editor: Nicole Scott Contributors: Alan Tung Anawat Hokoon Patrick Oberli Robert Cleere What we stand for. We strive to symbolize the edge of technology, future, youth, humanity, and engineering. Our philosophy is based on Developers.
-
Page 6: Chapter 1 • Welcome
Welcome ongratulations on purchasing the ODROID-C2! It is one of the most powerful low-cost 64-bit Single Board Computers avail- able, as well as being an extremely versatile device. Featuring a fast, quad-core AmLogic processor, advanced Mali GPU, and Giga- bit ethernet, it can function as a home theater set-top box, a general... -
Page 7: Differences Between A Typical Pc And A Single Board Computer (Sbc)
ARM device. To begin with, the speed of an ARM processor is not directly comparable to the speed of an Intel proces- sor. Because of the efficiency of the CPU, the ODROID-C2 can give great response time that feels just as fast as using a more expensive computer. -
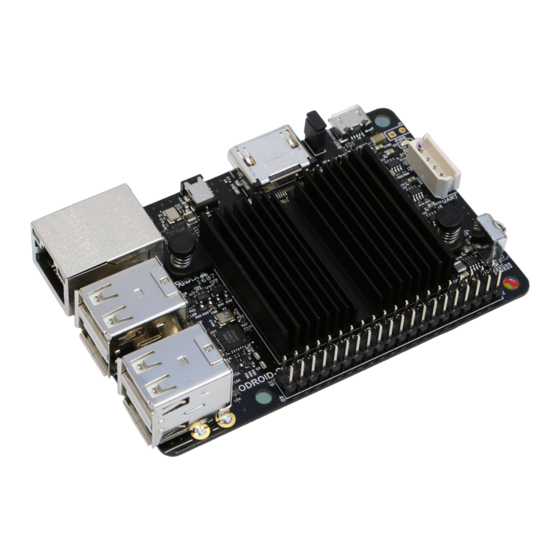
Page 8: Block Diagram
Chapter 1 Block Diagram The following diagram illustrates conceptually how the compo- nents of the ODROID-C2 fit together: C2 Block Diagram and Annoted Board Image Attaching Peripherals The ODROID-C2 supports the ser- vices of numerous peripherals. The image to the left depicts the follow-... -
Page 9: Power Supply
0.8mm. The plug inner core (center) is positive (attached to the RED wire in the cable) and outer cylinder is negative (attached to BLACK wire in the cable). The ODROID-C2 can be powered using different options, which are outlined below. - Page 10 USB DC plug cable Attach the USB end of this cable to the USB port of a charging de- vice that can generate 2A @5V, and attach the plug to the ODROID-C2. This cable is also available from Hardkernel. DC plug cable If you have a 5V DC 2A PSU which does not have the required plug, you can cut off the plug from such a power supply.
-
Page 11: Monitor
5V/2A USB charger. This port can be used with Li- nux Gadget drivers on your host PC, which means that the resources in the ODROID-C2 can be shared with typical PCs. You can also add a micro-USB to HOST connector if you need an additional USB host port. -
Page 12: Ethernet And Wifi
Chapter 1 XX:XX:XX:XX:XX:XX Rapoo E6700 bluez-simple-agent hci0 XX:XX:XX:XX:XX:XX Push the Connect button again, and enter the shown pin on the keyboard, followed by the Enter key. If no pin is shown, try 000000. Then, type the following to trust the device and restart the bluetooth service: $ sudo bluez-test-device trusted XX:XX:XX:XX:XX:XX yes $ sudo /etc/init.d/bluetooth restart... -
Page 13: Microsd Card
Module Align the eMMC 5.0 module and the eMMC connector on the ODROID-C2 board, using the white rectangle on the PCB as a guide. The female portion of the eMMC module should line up with the male connector on the board. Slowly push it in until it clicks in place. Be gentle. -
Page 14: Technical Specifications
The first is to use a microSD card and another is to insert an eMMC module. The latter is normally used for external storage for smart- phones and digital cameras. The ODROID-C2 can utilize a newer UHS-1 microSD model, which is about twice as fast as a class 10 card. - Page 15 ODROID-C2 model is compatible with a wider array of microSD cards than earlier ODROID SBC models. The ODROID-C2 PCB has the outline of an microSD card as a guide to the proper insertion of the card. Also, note that the microSD slot cannot accept an eMMC module mounted on the eMMC module reader.
- Page 16 You can use the standard micro-USB connector with Linux gad- get drivers on your host PC, which means that the resources in the ODROID-C2 can be shared with other PCs. You can also add a mi- cro-USB to HOST connector if you need an additional USB host port.
- Page 17 Chapter 1 RTC Shield Gigabit Ethernet The Realtek RTL8211F is a highly integrated Ethernet transceiv- er that complies with 10Base-T, 100Base-TX, and 1000Base-T IEEE 802.3 standards. USB MTT hub controller A GENESYS LOGIC GL852G is used to implement the 4-port Hub function which fully complies with Universal Serial Bus Specifica- tion Revision 2.0.
-
Page 18: Heatsink
Heat transfer from components to the surrounding air is related to the surface area available to transfer heat to the surrounding air. The processor of the ODROID-C2 provides a relatively small area to dissipate heat (approximately 1cm x 1cm). The metallic heatsink is much larger and is therefore able to dissipate more heat into the sur- rounding air than the processor itself. - Page 19 $ cat /sys/class/thermal/thermal_zone0/temp 59000 Measuring the operating temperature of the ODROID-C2 The temperature is 59 degrees Celsius. The heatsink will be warm to touch as expected. Make sure to touch a grounded metal object first to discharge all static.
-
Page 20: Frequently Asked Questions
Chapter 1 Frequently Asked Questions What’s an ODROID? ODROID means Open + Android. It is a development platform with hardware as well as software. What SoC are you using? The SoC is an Amlogic S905 quad-core. What GPU does it include? An ARM Mali™-450 GPU (3 Pixel-processors + 2 Vertex shader pro- cessors). - Page 21 • RTC addon module What are the minimum peripherals to run Ubuntu or Android with an ODROID-C2? The following peripherals are not included with the basic ODROID-C2 board, but may be purchased separately from the Hardkernel store, or from a certified distributor:...
- Page 22 Use a 10/100/1000 LAN Ethernet connection, or purchase the WiFi module kit for a wireless connection. What display can I use? There is an HDMI Type-A port on the ODROID-C2. Below is a list of resolutions that are currently supported: • 3804x2160 (UHD/4K) •...
- Page 23 HiFi Shield Plus. Is there an I2S port to connect a HiFi DAC? No, but an ODROID Hi-Fi Shield may be used with the ODROID-C2. What is an eMMC 5.0 module? The eMMC 5.0 module is a NAND flash-based storage IC which is mounted on a custom PCB for easier upgrade/replacement, and is much faster than SD card.
- Page 24 USB-to-DC Plug cable with a 5V/2A charger. Due to the limited power output from a computer’s USB port, we suggest only powering the ODROID-C2 with a good quality 5V/2A PSU at the least. In some cases, since peak power requirements go slightly beyond 10Watts, it may be safe to even use a compatible quality 5V/3A PSU.
-
Page 25: Chapter 2 • Getting Started
ODROID-C2 development board and the fact that you obtained it and the needed peripherals, you must be curious to get started with your ODROID-C2 now. To be able to use the computer on the Internet, we first need an idea of how the ODROID-C2 will fit into a home computing network. -
Page 26: Preparing The Work Area
Chapter 2 Internet. In either case, it is presumed you have a fully functioning in- tranet (i.e., the internal network within the home). There are numerous online guides to setting up a secure network and as such, the setup of such a network is beyond the scope of this guide. -
Page 27: Flashing An Image
Chapter 2 Flashing an Image All SBCs require an operating system (OS) for booting. The op- erating system will be transferred to and reside on boot media, either built on to the board or attachable to the board. The process of placing the operating system on the boot media is termed flashing. - Page 28 Chapter 2 Development boards such as the ODROID-C2, by definition, will at some point either require an OS upgrade or a simple reflash to revert to a known good base state. USB microSD card adapter No matter which boot media you select for your C2, you will need an additional device to perform the flashing process, which is called a micro-USB card reader / writer.
- Page 29 However, you can still use any brand or speed of memory card as storage. Sandisk Class 10 or UHS-1 cards are working well with ODROID-C2, and below is a list of the memory cards that have been tested: Fully compatible microSD cards •...
-
Page 30: Windows 7
• PNY Turbo Performance Class 10 Class 2/4/6 microSD cards have not been tested with the ODROID-C2, therefore it is likely that the ODROID-C2 will not boot properly with them. We strongly recommend to use Class 10/UHS-I microSD cards, and a SanDisk microSD for full compatibility. - Page 31 Here option. After the uncompress process, it will result in the image file that can be flashed. In this example, it will be ubuntu64-16.04lts- mate-odroid-c2-20160525.img. Another essential utility is one that will be used to flash the uncom- pressed image file, such as the Win32DiskImager utility. Hardkernel has an updated version of it that adds a useful step to the flash process, which clears the boot media, prior to writing the image.
- Page 32 Chapter 2 Uncompress the compressed image file using the 7-zip appli- cation, which generates the directory win32diskimager2-binary that includes the Win32DiskImager2.exe application. Move the entire di- rectory to C:\Program Files (x86): C:\Program Files (x86)\win32diskimager2-binary\ You will need to be logged in to Windows OS as an administrator to move this directory.
-
Page 33: Linux
Android image and click the link to download it. The screenshot below shows the webpage that lists the Android images. List of Android images for the ODROID-C2 Once the compressed file has been downloaded, uncompress it and flash it, using the steps listed earlier in this section. -
Page 34: Osx
Given this information, we can carefully construct the image copy command using appropriate input and output paths: $ cd ~/linux-img $ sudo dd \ if=./ubuntu64-16.04lts-mate-odroid-c2-20160525.img \ of=/dev/sdb \ bs=1M conv=fsync $ sync The dd command is very powerful, so use it with a lot of care. -
Page 35: Inserting The Emmc Module Or Sd Card
Ensure that the work area is clear of unnecessary items. Wear the grounded wristband. Touch a metallic surface, like that of your desk- top. Then, open the ODROID-C2 packaging box. Place the anti-static bag containing the ODROID-C2 board, on to the non-conductive work surface. - Page 36 Chapter 2 Blue LED solid glowing The C2 has panicked or frozen, and a reboot is required. Mouse/Keyboard not working Ensure that it’s correctly plugged in, or try a different USB port. You can change it while the C2 is running. No desktop image Be patient, some SD cards require several minutes to boot and •...
-
Page 37: Configuring Linux
Chapter 2 Before requesting an RMA, research the relevant forums and veri- • fy that a solution or workaround doesn’t already exist for your issue. If your issue has not been previously encountered by anyone, cre- • ate a new issue and post it on the forums at http://forum.odroid. - Page 38 Chapter 2 # setenv m “1080i50hz” # Interlaced 50Hz # setenv m “1080p50hz” # Progressive 50Hz # setenv m “1080p24hz” # Progressive 24Hz # 4K (3840x2160) # setenv m “2160p30hz” # Progressive 30Hz # setenv m “2160p25hz” # Progressive 25Hz # setenv m “2160p24hz”...
-
Page 39: Configuring Android
(DVI supported for ODROID-VU7 Plus) • 800×600 For more information on configuring the screen resolution, please refer to the ODROID-C2 Wiki at http://bit.ly/2cUNeli The SSH daemon is enabled by default in the Ubuntu template, and the username:password is odroid:odroid. The root password is also odroid. -
Page 40: Powering Down
$ sudo shutdown -h now Wait until the blue LED goes out, which indicates that all system ac- tivity has completed. It is now safe to unplug the ODROID-C2 power supply, remove the boot media, and detach the peripherals. ODROID C2 USER MANUAL... -
Page 41: Chapter 3 • Operating Systems
Booting Up Ubuntu can be ordered as a pre-installation on the eMMC or mi- croSD card that comes with the ODROID-C2. Please refer to Chapter 2 for instructions on downloading and flashing Ubuntu onto your C2’s boot media. Once the C2 has been powered on, it will boot to a desk- top similar to the one shown in the below image. -
Page 42: Linux Basics
Software Center that facilitates downloading new programs. Home folder structure as viewed in Ubuntu File Manager If the ODROID-C2 is being used as part of robotics project, a more lightweight environment such as Blackbox may be more suit- ODROID C2 USER MANUAL... -
Page 43: Kernel
ARM hard-float ar- chitecture (ARMHF) may be converted to run on the ODROID by in- stalling an ODROID-C2 kernel and modifying the boot partition. This makes Linux one of the most versatile operating systems available, since it can be configured to run on almost any device, including lap- tops, desktop PCs, smartphones, and ODROID microcomputers. -
Page 44: Progressive Vs Interlaced Video
Chapter 3 as well as some sources that use these resolutions. Standard Resolution Aspect Ratio Refresh Rate Typical Sources 2160p (4K) 3840 × 2160 16:9 (1.78:1) 50Hz, 60Hz HDTV, Blu-ray DVD 1080p 1920 x 1080 16:9 (1.78:1) 50Hz, 60Hz HDTV, Blu-ray DVD 1080i 1920 x 1080 16:9 (1.78:1) 50Hz, 60Hz... -
Page 45: Video Upconversion
Chapter 3 that your display is automatically performing a downconversion of the incoming video signal. Despite appearing to work OK, the C2 will be performing unnecessary work in order to create the 1080p output. If a 720p video is viewed with this configuration, the C2 will up- convert the original 720p video by extrapolation to produce a 1080p output, only to have that 1080p video downconverted by interpolation back into 720p by the video display. -
Page 46: Disabling Monitor Overscan
Chapter 3 and if they do have this feature, it is disabled by default. Disabling Monitor Overscan Prior to attempting to fix overscan using the methods detailed below, first verify that the monitor resolution setting and the C2 screen resolution setting match. Unfortunately, there isn’t a standard method or terminology for disabling overscan used by monitor manufacturers, so you may have to search thru the monitor menus a bit until you find the overscan setting. -
Page 47: Adjusting Linux Display Output
The ODROID-VU7 Plus is a 10-point multitouch display that is capable of 1024x600 resolution. To use the ODROID-VU7 Plus with Linux, connect the USB cable from the VU7 Plus to the ODROID-C2’s USB port, then use a Type A HDMI cable to connect the display. Then, edit the /media/boot/boot.ini file on the boot partition as detailed in... -
Page 48: Command Line Interface
Chapter 3 # setenv m “1080i60hz” # Interlaced 60Hz # setenv m “1080p60hz” # Progressive 60Hz # setenv m “1080i50hz” # Interlaced 50Hz # setenv m “1080p50hz” # Progressive 50Hz # setenv m “1080p24hz” # Progressive 24Hz # 4K (3840x2160) # setenv m “2160p30hz”... -
Page 49: Disk Partitions
Web Browsing One of the popular uses of modern computers is to browse the World Wide Web, and the quad-core ODROID-C2 excels at delivering a smooth, enjoyable browsing experience. Using the GNOME Soft- ware Center, a browser such as Firefox and/or Chromium may be in- stalled, along with open-source versions like Iceweasel. -
Page 50: Kodi (Formerly Xbmc)
Kodi (formerly XBMC) Kodi is an application which can turn an ODROID-C2 into an amazingly powerful home media center. In fact, using the C2 to run Kodi is the reason why many, if not most, people purchased their C2 in the first place. -
Page 51: Office And Productivity Applications
Chapter 3 Kodi Backup Backing up your data is always a good idea, and Kodi is no exception. Kodi configurations and databases can become quite de- tailed, but backup and restoration is quite simple. You can perform full or partial backups/restores, as well as copy your complete Kodi setup to another system - even to your PC or laptop. - Page 52 Chapter 3 dard instrument interface, and does not show any signs of falling into obscurity as have many early computing standards. What is MIDI? MIDI encompasses not only the MIDI connector hardware spec- ification, but also includes the communication protocol used for instru- ments and synthesizers, and a MIDI file format specification for MIDI recording and playback.
-
Page 53: Experimental Music With The C2
Android is easy-to-use, yet powerful operating system, intend- ed for smartphones, tablets and other portable devices, but also runs very well on the ODROID-C2, not only as an inexpensive testing plat- form for building Android applications, but also as a set-top box for vid-... -
Page 54: Odroid Utility And Updater
Chapter 3 menu will show the recently opened applications. Power Options al- lows you to reboot, shutdown the device and put it in airplane mode, which disables all wireless functions, including Bluetooth. ODROID Utility and Updater To run the ODROID Utility application, open the applications menu and click on the ODROID Utility icon. -
Page 55: Kodi
30 seconds, depending on the speed of your Inter- net connection. Gaming Most Android games are compatible with the ODROID-C2, but some applications that use multitouch gestures won’t be playable with- out a touchscreen. The ODROID-VU, available from the Hardkernel Store, will allow all Android games to be played without the need for an auxiliary controller. -
Page 56: Using Bluetooth Devices With Android
Adding an ODROID-VU7 Plus touchscreen To use the ODROID-VU7 Plus with Android, connect the USB cable from the VU7 Plus to the ODROID-C2’s USB port, then use a Type A HDMI cable to connect the display. Then, use the ODROID Utility application and select the “ODROID-VU7 Plus”... -
Page 57: Chapter 4 • Hardware Tinkering
Update the Hardkernel image with the following VNC Server: $ sudo apt-get install x11vnc You can control the ODROID-C2 from another device (via VNC Viewer) on the local network and perform routine checks via the Linux desktop, remotely. ODROID C2 USER MANUAL... -
Page 58: Usb / Uart Module Kit
C2 either via a serial connection or SSH. Prior to setting up the kit, power off the ODROID-C2. Attach one end of the USB / UART module to the C2. Attach the other (micro USB) end of the USB / UART module to the USB cable. - Page 59 Chapter 4 device driver. After installation has completed, you can verify which COM port the module is associated. Launch the Computer Manage- ment utility of Windows 7+, highlight the Device Manager option, and expand the Ports list. In this particular case, as shown in the below example screenshot, the module is installed on COM8.
- Page 60 Connection type: SSH Saved SSH configuration in PuTTY Enter the ODROID-C2’s IP address or hostname (if it can be re- solved from the host PC system) and a numerical value of 22 for the Port number. Select the Connection Type to be SSH. Enter c2-1-usb- ssh for the configuration name and save it.
- Page 61 Chapter 4 can be reloaded and used anytime, as long as the C2’s ip-address and hostname remain the same. Click on the Open button to start a session. Reboot the C2, and you will then be prompted for the user’s ID and password, which are typically “odroid”...
- Page 62 0 lrwxrwxrwx 1 root root 9 Aug 12 2016 /var/lock -> /run/lock This information is used to setup the communications between the host system and USB / UART cable attached to the ODROID-C2. The application used to enable communication will be Minicom: $ minicom -version minicom version 2.6.1 (compiled May...
-
Page 63: Bluetooth Module 2
Save setup Minicom session Bluetooth Module 2 Hardkernel offers a bluetooth adapter called the Bluetooth (4.0) Module 2 which is certified to work with the ODROID-C2 under both Android and Linux, in the following modes: Classic Bluetooth v2.0: Android, Linux Bluetooth High Speed v3.0:... - Page 64 Dongle (HCI mode) While some of the required software modules may already exist in your ODROID-C2’s installed image, it is helpful to install the follow- ing additional modules and utilities, using the following commands: $ sudo apt-get install bluez-dbg bluez-tools bluez-hcidump...
- Page 65 Chapter 4 check the presence of the Bluetooth device, which is useful for con- nection configuration later: $ hcitool dev Devices: hci0 00:1A:7D:DA:71:13 $ hciconfig hci0: Type: BR/EDR Bus: USB BD Address: 00:1A:7D:DA:71:13 ACL MTU: 310:10 SCO MTU: 64:8 UP RUNNING PSCAN RX bytes:636 acl:0 sco:0 events:41 errors:0 TX bytes:1224 acl:0 sco:0 commands:41 errors:0 $ sudo rfkill list all...
-
Page 66: Tinkering Kit
Chapter 4 can use the command-line bluetooth packet analyzer/sniffer to ana- lyze bluetooth traffic between the ODROID-C2 and a known bluetooth device using the following command: $ sudo hcidump [sudo] password for odroid: HCI sniffer - Bluetooth packet analyzer ver 5.37 device: hci0 snap_len: 1500 filter: 0xffffffffffffffff <... - Page 67 • 330 Ω / 10 KΩ 1/6W resistors – 50 each Tinkering Kit GPIO layout for the 40-pin header on the ODROID-C2 The T-breakout board breaks-out all the pins from the 40-pin header onto a solderless breadboard. The pins include, power, GPIO, I2C, and ADC pins.
- Page 68 GPIO pin numbering translation scheme used in the WiringPi library. Tinkering project example The image above is a project example using the ODROID-C2 and the kit. Details can be found in the related wiki at http://bit.ly/ You can wire up your project to reflect the example show in...
-
Page 69: Oduino One
Chapter 4 Then, download the C-language sample source code exam- ple-led.c from the previously mentioned Wiki, to a working directory such as tkit-example, then build and run it using the following com- mands: $ cd ~ && mkdir tkit-example/ && cd tkit-example/ $ gcc -o example-led example-led.c -lWiringPi -lWiringPiDev -lp- thread $ sudo ./example-led... - Page 70 The activity on the ONE package also gets transmitted to the ODROID-C2. Hardkernel has provided C sample source code to dis- play this information. You will need to install some pre-requisite soft- ware components first: $ sudo apt-get install qt4-default qt4-designer libqwt-dev...
-
Page 71: Odroid-Show2
ODROID-SHOW2, shown below, that can be used with the ODROID-C2, a PC, and other Hardkernel boards. ODROID-SHOW2 annotated image After attaching the SHOW2 to the ODROID-C2, use the follow- ing commands to get details on it: $ lsusb …... - Page 72 Chapter 4 Bus 001 Device 003: ID 10c4:ea60 Cygnal Integrated Products, Inc. CP210x UART Bridge / myAVR mySmartUSB light … $ sudo lsusb -D /dev/bus/usb/001/003 [sudo] password for odroid: Device: ID 10c4:ea60 Cygnal Integrated Products, Inc. CP210x UART Bridge / myAVR mySmartUSB light Device Descriptor: bLength bDescriptorType...
-
Page 73: 16X2 Lcd I/O Shield
Chapter 4 Additional details, such as, burning new firmware for the SHOW2 (or SHOW1) and sample applications can be found at http://bit.ly/ 1toe7Pl One important aspect of the SHOW2 (or SHOW1) board, is the presence of a Data Terminal Ready (DTR) reset jumper/switch. Its role is important during burning of new firmware. -
Page 74: Weather Board
DC plug cable assembly 2.5mm This accessory, shown in the image below, typically used to pro- vide power to the ODROID-C2, using a special purpose power supply. These power supplies could include bench-top models that can pro- vide clean power at 2~3 Amps, at the least. Use the cable colors to ensure polarities match at either end. -
Page 75: Usb-Dc Plug Cable 2.5X0.8Mm
USB-DC plug cable USB-DC plug cable usage USB audio adapter Attach the USB-powered audio adapter to the ODROID-C2. Af- ter a few moments, check to see if the device is detected: $ lsusb Bus 001 Device 003: ID 0d8c:000c C-Media Electronics, Inc. -
Page 76: Usb-Spdif
Hardkernel offers an ODROID-C2-compatible S/PDIF (Sony/ Philips Digital Interface Format) kit with a USB interface. This allows you to hook up the audio from the ODROID-C2 via USB to an ampli- fier (A/V receiver), when the HDMI audio out option is not used. The images on the next page show the kit and device internals. - Page 77 Attach the cable provided in the kit to one end of the device, and the ODROID-C2’s USB port to the other end, then reboot the system. You can check to see if the device is detected using the following commands: $ lsusb …...
-
Page 78: Usb-Cam 720P
USB-CAM 720P Hardkernel offers a USB-CAM rated @ 720p resolution with up to 30 fps, which is certified to work with the ODROID-C2 as shown below. 720p 30fps USB-CAM Attach the USB-CAM to an available USB port on the ODROID-C2, and wait for a few moments. -
Page 79: Usb3 / Sata3 Hdd/Sdd Interface Kit
Android and Linux. To use it, follow these steps: • Shutdown the ODROID-C2 and turn the power off • Attach the docking system to the ODROID-C2 with the included USB3 cable • Insert the SATA storage device (HDD/SSD) with its SATA interface aligned with the receptacle in the docking system •... - Page 80 Chapter 4 • Turn on the power to the ODROID-C2 and let it complete the boot up process. Next we show the installation of new 1TB HGST Travelstar 2.5” SATA3 HDD suitable for laptops. It works well with SATA3 SSDs too, such as the PNY 240GB XLR8 model, as well as with some SATA 2 desktop-class hard drives.
- Page 81 New partition information Enter a label name odroid-c2-hdd-01, and click the Add button. Select the new partition and Click on the check icon, to apply/save all changes. Reboot the system and run the following command to validate...
-
Page 82: Usb3 To Sata Bridge Board
To use the controller, first power down the ODROID-C2, then in- sert the compatible SATA storage device into the bridge board. Attach the included USB cable to both the board and the ODROID-C2 and power up the SBC. Details about the accessory can be found using the following... -
Page 83: Usb Gps Module
Filesystem Size Used Avail Use% Mounted on … /dev/sda1 1% /media/odroid/odroid-c2- hdd-01 Once mounted this way, you can proceed to use the SATA stor- age device. USB GPS Module Hardkernel produces a 5V 0.1A GPS receiver with an USB inter- face that supports the standard National Marine Electronics Associa- tion (NMEA) GPS protocol, as shown next page. - Page 84 Chapter 4 USB GPS module $ lsusb … Bus 001 Device 004: ID 1546:01a6 U-Blox AG … $ sudo ls -lsa /dev/ttyA* 0 crw-rw---- 1 root dialout 166, 0 Dec 31 1979 /dev/ttyACM0 Now that the relevant TTY port is obtained, you can check to see if the GPS receiver is doing its job, using the following command: $ sudo cat /dev/ttyACM0 | grep GPRMC $GPRMC,161053.00,A,3719.54074,N,12201.49867,W,0.079,,110415,,...
-
Page 85: Myahrs+ Board
Chapter 4 Install gpsd and relevant utilities using the following command: $ sudo apt-get install gpsd gpsd-clients foxtrotgps Then, configure gpsd using the following command and options, then reboot: $ sudo dpkg-reconfigure gpsd From a terminal window, launch the foxtrotgps application using the following command: $ foxtrotgps Foxtrotgps display... - Page 86 Chapter 4 Attach the board to the USB2 port on the ODROID-C2. After a few moments, you should observe the following two LEDs: • Red LED: When ON, the myAHRS+ is connected to PC via USB correctly. • Yellow LED: When blinking, it means that myAHRS+ is in normal state.
-
Page 87: Wifi Module 4
• LED for WiFi Link Activity and WPS status indicators • MediaTek(Ralink) RT5572N chipset Attach the module to the ODROID-C2 as shown in the image below, and wait for a few moments. WiFi module and it attached to an ODROID-C2... -
Page 88: Hifi Shield
Chapter 4 Wireless Adapter … $ sudo lsusb -D /dev/bus/usb/001/014 [sudo] password for odroid: Device: ID 148f:5572 Ralink Technology, Corp. RT5572 Wireless Adapter Device Descriptor: bLength bDescriptorType bcdUSB 2.00 bDeviceClass 0 (Defined at Interface level) bDeviceSubClass bDeviceProtocol bMaxPacketSize0 idVendor 0x148f Ralink Technology, Corp. idProduct 0x5572 RT5572 Wireless Adapter bcdDevice... -
Page 89: Rtc Shield
HiFi Shield+ configuration RTC Shield Like many of the earlier ODROID models, the ODROID-C2 does not come with RTC support on the main PCB. However, Hardkernel has a developed a special add-on shield that can be mounted on the available GPIO header, at the designated pins shown below. - Page 90 The included Lithium-coin battery can keep the RTC chip run- ning up to 4 years without an external power supply, thereby helping with the maintenance of the clock. The official ODROID-C2 case can be used even with this shield mounted.
-
Page 91: Ups3
UPS3 There are many situations when an Uninterrupted Power Supply (UPS) is essential to ensure that the ODROID-C2 is functioning well, even with loss of main power. Hardkernel has developed a 3000mAh UPS kit. This LiPo battery kit, when used in conjunction with the ODROID-C2, charges the included battery pack. -
Page 92: Xprotolab Plain
The main board was developed by Gabotronics, who has pro- vided an open-source QT5-based cross-platform visualization soft- ware, which has been ported to the ODROID-C2. To use it with the ODROID-C2, you must remove the Mali graphics package and install... -
Page 93: Odroid-Vushell For Odroid-Vu7
ODROID-VuShell for ODROID-VU7 The VuShell is a laser-cut acrylic enclosure for the ODROID- VU7 and ODROID-VU7 Plus. With the use of the ODROID-C2, you can create your own desktop PCl. Its design allows for two different viewing angles. The components of the VuShell are shown here. -
Page 94: Universal Motion Joypad
Use the detailed assembly instructions at http://bit.ly/1S- , and attach it to the ODROID-C2 running the latest Android im- be46q age in order to play games, as demonstrated in the January 2016 issue of ODROID Magazine on page 18 ( http://bit.ly/2byzrQq... -
Page 95: Conclusion
Chapter 4 Beach Buggy Racing screenshot Conclusion The ODROID-C2 is compatible with numerous hardware gad- gets, and many USB sensors may be used as long as the Linux driver is available. The hardware sold by Hardkernel at http://bit.ly/2bWxgrK have the advantage of having pre-configured drivers included with the official Hardkernel disk images.
Need help?
Do you have a question about the ODROID-C2 and is the answer not in the manual?
Questions and answers