Table of Contents
Advertisement
Quick Links
Download this manual
See also:
Service Manual
About this Manual
P/N: 01.54.455473-10
Release Date: Jan. 2012
© Copyright EDAN INSTRUMENTS, INC. 2012. All rights reserved.
Statement
This manual will help you understand the operation and maintenance of the product better. It is
reminded that the product shall be used strictly complying with this manual. User's operation
failing to comply with this manual may result in malfunction or accident for which EDAN
INSTRUMENTS, INC. (hereinafter called EDAN) can not be held liable.
EDAN owns the copyrights of this manual. Without prior written consent of EDAN, any
materials contained in this manual shall not be photocopied, reproduced or translated into other
languages.
Materials protected by the copyright law, including but not limited to confidential information
such as technical information and patent information are contained in this manual, the user shall
not disclose such information to any irrelevant third party.
The user shall understand that nothing in this manual grants him, expressly or implicitly, any
right or license to use any of the intellectual properties of EDAN.
EDAN holds the rights to modify, update, and ultimately explain this manual.
Responsibility of the Manufacturer
EDAN only considers itself responsible for any effect on safety, reliability and performance of
the equipment if:
Assembly operations, extensions, re-adjustments, modifications or repairs are carried out by
persons authorized by EDAN, and
The electrical installation of the relevant room complies with national standards, and
The instrument is used in accordance with the instructions for use.
Upon request, EDAN may provide, with compensation, necessary circuit diagrams, and other
information to help qualified technician to maintain and repair some parts, which EDAN may
define as user serviceable.
Terms Used in this Manual
This guide is designed to give key concepts on safety precautions.
WARNING
A WARNING label advises against certain actions or situations that could result in personal
injury or death.
CAUTION
A CAUTION label advises against actions or situations that could damage equipment, produce
I
Advertisement
Table of Contents
Troubleshooting

Related Manuals for EDAN iM80


Summary of Contents for EDAN iM80
-
Page 1: About This Manual
This manual will help you understand the operation and maintenance of the product better. It is reminded that the product shall be used strictly complying with this manual. User’s operation failing to comply with this manual may result in malfunction or accident for which EDAN INSTRUMENTS, INC. (hereinafter called EDAN) can not be held liable. - Page 2 inaccurate data, or invalidate a procedure. NOTE A NOTE provides useful information regarding a function or a procedure.
-
Page 3: Table Of Contents
Chapter 3 Basic Operation ........................ 9 3.1 Introducing iM50/iM80 Series ....................9 3.1.1 iM50 Major Parts and Keys ..................9 3.1.2 iM80 Major Parts and Keys ..................12 3.1.3 iM50/iM80 Configuration ..................15 3.2 Operating and Navigating ....................15 3.2.1 Using Keys ........................ 17 3.3 Operating Mode ........................ - Page 4 4.1 Alarm Category ........................22 4.1.1 Physiological alarms ....................22 4.1.2 Technical Alarms ....................... 22 4.1.3 Prompts ........................22 4.2 Alarm Levels ........................22 4.3 Controlling Alarm ........................ 23 4.3.1 Switching the Individual Alarm Off ................23 4.3.2 Temporary Alarm Mute ..................... 23 4.3.3 Alarm Mute .......................
- Page 5 8.2 ECG Safety Information ...................... 52 8.3 ECG Display ........................53 8.3.1 Changing the Size of the ECG Wave ................ 53 8.3.2 Changing the ECG Filter Settings ................54 8.4 Using ECG Alarms ....................... 54 8.5 Selecting Calculation Lead ....................54 8.6 Monitoring Procedure ......................
- Page 6 9.3 Resp Display ........................67 9.4 Electrode Placement for Monitoring Resp ................68 9.5 Cardiac Overlay ........................68 9.6 Chest Expansion ........................68 9.7 Abdominal Breathing ......................68 9.8 Selecting Resp Lead ......................68 9.9 Changing Hold Type ......................69 9.10 Changing the Size of the Respiration Wave ...............
- Page 7 12.12.1 Procedure of Leak Test ..................78 Chapter 13 Monitoring TEMP......................80 13.1 Overview ..........................80 13.2 TEMP Safety Information ....................80 13.3 TEMP Monitoring Setup ....................80 13.4 Calculating Temp Difference ..................... 80 Chapter 14 Monitoring Quick TEMP .................... 81 14.1 Overview ..........................
- Page 8 17.3 C.O. Monitoring Procedures ....................96 17.4 C.O. Measurement Window ....................97 17.5 Measurement Process ......................99 17.6 Editing C.O........................99 17.7 Blood Temperature Monitoring ..................100 17.8 Setting the Computation Constant ................... 101 17.9 Recording C.O. Measurements ..................101 17.10 Setting INJ.
- Page 9 20.2.3 Switching to Trend Graph ..................116 20.2.4 Recording ......................116 20.3 NIBP Review........................116 20.3.1 Scrolling the Screen ....................117 20.3.2 Recording ......................117 20.4 Alarm Review........................117 20.4.1 Scrolling the Screen ....................117 20.4.2 Selecting Alarm Event of Specific Parameter ............117 20.4.3 Setting Time Index ....................
- Page 10 24.5 Recycling the Battery ....................... 129 24.6 Maintaining the Battery....................129 Chapter 25 Care and Cleaning ..................... 130 25.1 General Points ........................130 25.2 Cleaning ........................... 130 25.2.1 Cleaning the Monitor .................... 130 25.2.2 Cleaning the Accessories..................131 25.3 Disinfection ........................133 Chapter 26 Maintenance .......................
- Page 11 A.10.1 NIBP from EDAN Module ................... 154 A.10.2 NIBP from M3600 Module .................. 155 A.11 SpO ..........................156 A.11.1 SpO from EDAN Module ................... 156 A.11.2 SpO from Nellcor Module .................. 157 A.12 TEMP ..........................157 A.13 Quick TEMP ........................158 A.14 IBP ...........................
-
Page 12: Chapter 1 Indication For Use And Safety Guidance
Indication for Use and Safety Guidance Chapter 1 Indication for Use and Safety Guidance 1.1 Indication for Use iM80: The monitor monitors parameters such as ECG (3-lead, 5-lead, 12-lead selectable), Respiration (RESP), Functional arterial oxygen saturation (SpO ), Invasive or noninvasive blood pressure (2/4 channels IBP NIBP), Cardiac Output (C.O.), Temperature (dual-TEMP), Expired CO... - Page 13 IEC/EN60601-1-1. If in doubt, consult our technical service department or your local distributor. Only patient cable and other accessories supplied by EDAN can be used. Or else, the performance and electric shock protection can not be guaranteed, and the patient may be injuried.
-
Page 14: Explanation Of Symbols On The Monitor
40°C while working. And it should be kept between -20°C and 55°C during transportation and storage. To ensure patient safety, use only parts and accessories manufactured or recommended by EDAN. Federal law restricts this device to sale by or on the order of a physician. NOTE:... - Page 15 Patient Monitor User Manual Indication for Use and Safety Guidance This symbol indicates that the instrument is IEC/EN 60601-1 Type BF equipment. The unit displaying this symbol contains an F-Type isolated (floating) patient applied part providing a high degree of protection against shock, and is suitable for use during defibrillation.
- Page 16 Patient Monitor User Manual Indication for Use and Safety Guidance Menu VGA output, External Monitor RS-232 port Nurse call port SD Card port Signal output port Signal output The symbol indicates that the device complies with the European Council Directive 93/42/EEC concerning medical devices. Authorised representative in the European community Date of manufacture Manufacturer...
- Page 17 Patient Monitor User Manual Indication for Use and Safety Guidance The symbol indicates that the device should be sent to the special agencies according to local regulations for separate collection after its useful life. Consult Instructions For Use Locked position Gas inlet Gas outlet (evac) ISA equipped to measure CO...
-
Page 18: Chapter 2 Installation
Patient Monitor User Manual Installation Chapter 2 Installation NOTE: The monitor settings must be specified by the authorized hospital personnel. To ensure that the monitor works properly, please read the user manual and follow the steps before using the monitor. 2.1 Initial Inspection Before unpacking, check the packaging and ensure that there are no signs of mishandling or damage. -
Page 19: Checking The Recorder
Patient Monitor User Manual Installation WARNING If any sign of damage is detected, or the monitor displays some error messages, do not use it on any patient. Contact Customer Service Center immediately. NOTE: Check all the functions of the monitor and make sure that the monitor is in good status. -
Page 20: Chapter 3 Basic Operation
Basic Operation Chapter 3 Basic Operation This manual is for clinical professionals using the iM50 and iM80 patient monitors. Unless otherwise specified, the information here is valid for all the above products. This user manual describes all features and options. Your monitor may not have all of them; they are not all available in all geographies. - Page 21 Patient Monitor User Manual Basic Operation on, press the key to turn the monitor off. Battery indicator, refer to Section Battery Indicator for details. Mute — Press this button to pause the alarm. All the audio alarm will be closed. At the same time, the message of Temporary Alarm Mute **s and the symbol will be displayed in the information area.
- Page 22 Patient Monitor User Manual Basic Operation iM50 Back View Anti-theft lock interface Security Lock Power Supply Inlet USB Interface VGA Interface Network Interface Defibrillator Synchronization/ Analog Output SD Card Speaker Equipotential grounding terminal, if the monitor or other processing unit are used in internal examinations on the heart, ensure that the room incorporates an equipotential grounding system to which the monitor and other processing unit have separate connection.
-
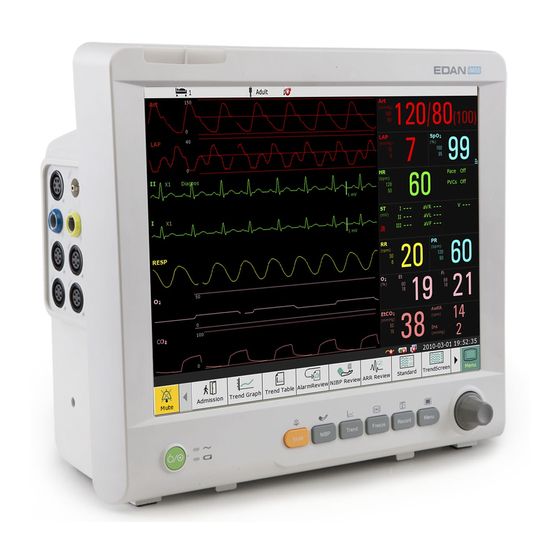
Page 23: Im80 Major Parts And Keys
Recorder door Battery door 3.1.2 iM80 Major Parts and Keys The iM80 patient monitor has a 15-inch TFT color flat panel display. Up to 13 waves can be shown on iM80 screens. iM80 Front View Alarm indicator — when an alarm occurs, the alarm indicator will light... - Page 24 Patient Monitor User Manual Basic Operation or flash. The color of light represents the alarm level. Power supply switch — when the monitor is connected to the AC power supply, press the key to turn the monitor on. When the monitor is turned on, press the key to turn the monitor off.
- Page 25 Patient Monitor User Manual Basic Operation iM80 Side View Sensor port AG fixation bracket Recorder door Battery door iM80 Back View - 14 -...
-
Page 26: Im50/Im80 Configuration
Speaker 3.1.3 iM50/iM80 Configuration iM50/iM80 configuration is listed as below: Function Model Size (L×W×H) Figure Configuration... - Page 27 Patient Monitor User Manual Basic Operation information fields, alarms fields and menus. The configurability of the monitor means that often you can access the same element in different ways. For example, you might be able to access an item through its on-screen setup menu, via a hard key, or via a shortcut key. The User Manual always describes how to access items via an on-screen menu.
-
Page 28: Using Keys
Patient Monitor User Manual Basic Operation Date and time Networking symbol Battery status symbol AC power supply symbol Shortcut key area Scroll left to display more shortcut keys Mute key Parameter waveform 3.2.1 Using Keys The monitor has four different types of keys: 3.2.1.1 Permanent Keys A permanent key is a graphical key that remains on the screen all the time to give you fast access to functions. -
Page 29: Operating Mode
Patient Monitor User Manual Basic Operation Directly select this item on the screen to enter the TrendScreen interface Directly select this item on the screen to enter the standard interface Directly select this item on the screen to enter the OxyCRG interface Directly select this item on the screen to enter the Large Font interface Directly select this item on the screen to enter the module switch interface Directly select this item on the screen to change the key volume... -
Page 30: Standby Mode
Patient Monitor User Manual Basic Operation 2. Select Menu > Common Function, then choose Demo Mode from the popup interface and input password 3045. After entering Demo Mode, the monitor will perform the followings: Storing no data of new patient. ... -
Page 31: Adjusting Volume
Patient Monitor User Manual Basic Operation WARNING Change to date and time will influence the storage of trend data. 3.5 Adjusting Volume 3.5.1 Adjusting Key Volume The key volume is the volume you hear when you select any field on the monitor screen or when you turn the knob. -
Page 32: Understanding Screens
Patient Monitor User Manual Basic Operation 3.9 Understanding Screens Your monitor comes with a set of preconfigured screens, optimized for common monitoring scenarios such as OR adult, or ICU neonatal. A screen defines the overall selection, size and position of waves, numerics and shortcut keys on the monitor screen when you switch on the monitor. -
Page 33: Chapter 4 Alarms
Patient Monitor User Manual Alarms Chapter 4 Alarms The alarm information here applies to all measurements. Measurement-specific alarm information is discussed in the sections of individual measurements. WARNING A potential hazard can exist if different alarm presets are used for the same or similar equipment in any single area, e.g. -
Page 34: Controlling Alarm
Patient Monitor User Manual Alarms The high/medium/low-level alarms are indicated by the system in following different ways: Alarm Physiological alarms Technical alarms Prompt level alarm indicator alarm indicator flashes in red, with a flashes in red. The alarm Mode frequency of 1.4Hz ~ message flashes with red “DO-DO-DO------DO- background,... -
Page 35: Alarm Mute
Patient Monitor User Manual Alarms The user can set the audio alarm pause to 60 s, 120 s, or 180 s based on the requirement. 4.3.3 Alarm Mute To mute the alarm, please select Menu > Maintenace > User Maintain > Alarm Setup, and set Mute to On, then press the key on the front panel for more than three seconds or press the Silence shortcut key on the screen directly. -
Page 36: Latching Alarms
Patient Monitor User Manual Alarms 4.4 Latching Alarms To set the alarm latch function, please select Menu > Maintenance > User Maintain > Alarm Setup and set Alarm Latch from the pull-down list. If it is set to On, when an alarm occurs, the monitor will display the alarm message of the parameter in the alarm status area. -
Page 37: Chapter 5 Alarm Information
Patient Monitor User Manual Alarm Information Chapter 5 Alarm Information 5.1 Physiological Alarm Information Message Cause Alarm level ECG Too Weak Can not detect the signal in designated time period. High ST measuring value is above the upper alarm limit. (X ST-X High stands for I, II, III, aVR, aVL, aVF, V, V1, V2, V3, V4, User-selectable... - Page 38 Patient Monitor User Manual Alarm Information PACE NOT CAPTURE: After the pacemaker is paced, User-selectable QRS complex can not be detected during 300ms. PACER NOT PACED: After the QRS complex, no User-selectable pace is detected during 1.75 times of RR interval. VENTRICULAR BRADYCARDIA: The patient has irregular HR, and his average HR is less than 60bpm.
- Page 39 Patient Monitor User Manual Alarm Information DIA Low DIA measuring value is below lower alarm limit. User-selectable MAP High MAP measuring value is above upper alarm limit. User-selectable MAP Low MAP measuring value is below lower alarm limit. User-selectable Art SYS High Art SYS measuring value is above upper alarm limit.
- Page 40 Patient Monitor User Manual Alarm Information P2 MAP High P2 MAP measuring value is above upper alarm limit. User-selectable P2 MAP Low P2 MAP measuring value is below lower alarm limit. User-selectable EtCO High EtCO measuring value is above upper alarm limit. User-selectable EtCO EtCO...
-
Page 41: Technical Alarm Information
Patient Monitor User Manual Alarm Information FiDES Low FiDES measuring value is below lower alarm limit. User-selectable AG FiO measurement value is too low. High In a specific time interval, no RESP can be detected AG APNEA High using AG module. TB High TB measuring value is above upper alarm. - Page 42 Patient Monitor User Manual Alarm Information The amplitude of ECG Please modify the ECG Signal Overflow signal is too wide. ECG gain. Stop measuring function ECG module failure or module, and notify ECG Comm Fail High communication failure biomedical engineer manufacturer’s service staff.
- Page 43 Patient Monitor User Manual Alarm Information Make sure the sensor sensor is well connected to Sensor Off disconnected from the patient’s finger or patient or the monitor. other parts. sensor Make sure connected well monitor and sensor is No Sensor connected to the monitor, or well connected,...
- Page 44 Patient Monitor User Manual Alarm Information Stop the patient from NIBP Signal Sturated Signal amplitude too strong moving. Measure again, failure persists, stop measuring function NIBP Init Pressure The initial pressure is too of NIBP module and High High high during measuring notify biomedical engineer...
- Page 45 Patient Monitor User Manual Alarm Information Check the NIBP cuff NIBP cuff or pump has a NIBP Pneumatic Leak pump leakage. leakages. Contact your service NIBP System Failure Hardware abnormal High personnel. NIBP cuff isn’t Cuff, pump or airway has a properly connected, NIBP Cuff Leak leakage.
- Page 46 Patient Monitor User Manual Alarm Information Retry twice. Check Abnormal oscillometric for hyperkinesia or NIBP Pulse Abnormal waveform arrhythmia. Check the patient’s NIBP Pulse Signal condition Pulse is too low to measure. Weak wrapped cuff. Temperature cable of TEMP Make sure that the channe1 TEMP T1 Sensor Off cable...
- Page 47 Patient Monitor User Manual Alarm Information Stop measuring of C.O. module, C.O. module failure or notify biomedical C.O. Comm Fail High communication failure engineer Manufacturer’s service staff. C.O. sensor Insert injectate C.O. TI No Sensor connected temperature sensor. C.O. sensor C.O.
- Page 48 Patient Monitor User Manual Alarm Information module software Please replace AG Software Error High abnormal software revision. Please check whether AG module has hardware AG Hardware Error High the hardwares work failure. properly. Please check whether AG Motor Error AG module motor abnormal High motor works...
- Page 49 Patient Monitor User Manual Alarm Information AG module works AG Usa Error AG module has a failure. High improperly. module fails AG module works AG Cal Fail High calibrate. improperly. AG module works AG Zref Fail AG module fails to zero. High improperly.
- Page 50 Patient Monitor User Manual Alarm Information The cannula is off or Check Adapter disconnected. concentration Reduce AA Out Range exceeds the accuracy range High concentration. of AG module. Stop measuring of module, The oxygen sensor of the notify biomedical Sensor Error sidestream AG module has Medium engineer...
- Page 51 Patient Monitor User Manual Alarm Information Put the sensor into the sensor bracket, take measure again. If the Offline: NTC resistance >R problem persists, stop 0 °C; Short: NTC resistance Probe data error using measuring <R+100 °C. function of TEMP module, and notify biomedical engineer manufacturer’s...
-
Page 52: Prompts
Patient Monitor User Manual Alarm Information 5.3 Prompts Message Cause The QRS template building required for Arr. Analysis is in ECG Arr Learning process. module is analyzing the patient signal and searching Search Pulse for the pulse to compute the saturation, when sensor is connected with patient. -
Page 53: Adjustable Range Of Alarm Limits
Patient Monitor User Manual Alarm Information Excessive Temp, C.O. C.O. measuring needs parameters. Measurement Fail. C.O. measure need param HEMOD calculation needs parameters. Insufficient factors for Hemod HEMO Dynamics calculation needs parameters. Dynamics No Sensor, C.O. measurement No Sensor,C.O. measurement fail fail Measuring... - Page 54 ALM LO PR alarm limits is listed as follows: unit (bpm) ALM HI ALM LO NIBP alarm limits are listed as follows (EDAN module): unit (mmHg) Patient Type ALM HI ALM LO NIBP alarm limits are listed as follows (M3600 module): unit (mmHg)
- Page 55 Patient Monitor User Manual Alarm Information IBP alarm limits are listed as follows: unit (mmHg) ALM HI ALM LO alarm limits are listed as follows: ALM HI ALM LO EtCO 150 mmHg FiCO 50 mmHg AwRR 150 rpm 2 rpm C.O.
- Page 56 Patient Monitor User Manual Alarm Information EtIso 5.0% FiIso 5.0% EtHal 5.0% FiHal 5.0% EtSev 8.0% FiSev 8.0% EtEnf 5.0% FiEnf 5.0% awRR 150 rpm 0 rpm Apnea Time FiCO 25.0% 0.0% EtCO 25.0% 0.0% 88.0% 18.0% 90.0% 18.0% 100.0% 0.0% 100.0% 0.0%...
- Page 57 Patient Monitor User Manual Alarm Information 100.0% 0.0% 100.0% 0.0% EtDes 18.0% FiDes 18.0% EtIso 5.0% FiIso 5.0% EtHal 5.0% FiHal 5.0% EtSev 8.0% FiSev 8.0% EtEnf 5.0% FiEnf 5.0% awRR 150 rpm 0 rpm Apnea Time 40 s 20 s - 46 -...
-
Page 58: Chapter 6 Managing Patients
Patient Monitor User Manual Managing Patients Chapter 6 Managing Patients 6.1 Admitting a Patient The monitor displays physiological data and stores it in the trends as soon as a patient is connected. This allows you monitor a patient who is not yet admitted. It is however important to admit patients properly so that you can identify your patient on recordings, reports, and networked devices. -
Page 59: Quick Admit
Patient Monitor User Manual Managing Patients WARNING Changing the patient category may change the arrhythmia and NIBP alarm limits. Always check alarm limits to make sure that they are appropriate for your patient. For paced patients, you must set Paced to On. If it is incorrectly set to Off, the monitor could mistake a pace pulse for a QRS and fail to give an alarm during asystole. -
Page 60: Chapter 7 User Interface
Patient Monitor User Manual User Interface Chapter 7 User Interface 7.1 Setting Interface Style The user can set the interface based on the requirement, and the set options include the following: Sweep of the waveform. Parameters needing to be monitored. Change to some settings may have the risk, so only the authorized person can change them. -
Page 61: Viewing Large Font Screen
Patient Monitor User Manual User Interface 7.7 Viewing Large Font Screen To open the large font screen, please refer to the following steps: 1. Select the Large Font key on the screen directly or. 2. Select Menu > Display Setting > View Selection > Large Font to open this interface. To view the large font interface of specific parameter, please select the parameter pull-down dialog on the interface (the red circle shown in the following figure). -
Page 62: Default Configuration
Patient Monitor User Manual User Interface To export the current monitor’s congifuration: 1. Connect USB device to the monitor’s USB port. 2. Select USB Configure in the Menu > Maintenance > User Maintain, enter the required password ABC. 3. In the USB Configure menu, select Export to export configuration. A status message will display after the operation. -
Page 63: Chapter 8 Monitoring Ecg
Patient Monitor User Manual Monitoring ECG Chapter 8 Monitoring ECG 8.1 Overview The electrocardiogram (ECG) measures the electrical activity of the heart and displays it on the monitor as a waveform and a numeric. This chapter also tells you about arrhythmia monitoring and ST monitoring. -
Page 64: Ecg Display
Patient Monitor User Manual Monitoring ECG IEC/EN60601-1-2 (protection against radiation is 3v/m) specifies that the electrical field density exceeding 1v/m may cause measurement error in various frequencies. It is accordingly suggested that do not use equipment generating electrical radiation near ECG/RESP monitoring devices. The simultaneous use of cardiac pacemaker and other patient-connected equipment may cause safety hazard. -
Page 65: Changing The Ecg Filter Settings
Patient Monitor User Manual Monitoring ECG X1 to make strength of ECG signal waveform of 1mV become 10mm; X2 to make strength of ECG signal waveform of 1mV become 20mm; Auto let the monitor choose the optimal adjustment factor for all the ECG waves. 8.3.2 Changing the ECG Filter Settings The ECG filter setting defines how ECG waves are smoothed. -
Page 66: Connecting Ecg Cables
CAUTION To protect the monitor from damage during defibrillation, for accurate ECG information and to protect against noise and other interference, use only ECG electrodes and cables specified by EDAN. 8.7 Selecting Lead Type To change the lead type, please: 1. -
Page 67: Electrode Placement For 3-Lead
Patient Monitor User Manual Monitoring ECG Brown/ Red White/ Red Brown/ Yellow White/ Yellow Brown/ Green White/ Green Brown/Blue White/ Brown Brown/Orange White/ Black Brown/Purple White/ Purple 8.8.1 Electrode Placement for 3-lead Take the American standard for example, see the following figure: ■... - Page 68 Patient Monitor User Manual Monitoring ECG Electrode Placement for 5-lead NOTE: To ensure the patient safety, all leads must be attached to the patient. For 5-lead, attach the V electrode to one of the indicated positions as below: ■ On the 4th intercostal space at the right sterna margin. ■...
-
Page 69: Electrode Placement For 12-Lead
Patient Monitor User Manual Monitoring ECG V-Electrode Placement for 5-lead 8.8.3 Electrode Placement for 12-lead Take the American standard for example. The 12-lead electrodes should be placed on extremities and chest. The electrodes for extremities should be placed on the skin of legs or arms, the electrodes placed on chest should follow the doctor’s advice. -
Page 70: Recommended Ecg Lead Placement For Surgical Patients
Patient Monitor User Manual Monitoring ECG Electrode Placement for 12-lead 8.8.4 Recommended ECG Lead Placement for Surgical Patients WARNING When using Electrosurgery (ES) equipment, leads should be placed in a position in equal distance from Electrosurgery electrotome and the ES grounding plate to avoid cautery. Electrosurgery equipment wire and ECG cable must not be tangled up. -
Page 71: Ecg Menu Setup
Patient Monitor User Manual Monitoring ECG NOTE: If an ECG waveform is not accurate, while the electrodes are tightly attached, try to change the lead. Interference from a non-grounded instrument near the patient and ESU interference can cause inaccuracy of the waveform. 8.9 ECG Menu Setup 8.9.1 Setting Alarm Source To change the alarm source, please select ECG Setup >... -
Page 72: Setting Pace Status
Patient Monitor User Manual Monitoring ECG to display seven ECG waveforms on the screen, occupying the area of four waveforms. NOTE: If 3 Leads is selected in the ECG Setup menu, only Normal can be selected for Display in the sub-menu. 8.9.5 Setting Pace Status It is important to set the paced status correctly when you start monitoring ECG. -
Page 73: St Segment Monitoring
Patient Monitor User Manual Monitoring ECG 8.10 ST Segment Monitoring The monitor performs ST segment analysis on normal and atrially paced beats and calculates ST segment elevations and depressions. This information can be displayed in the form of ST numerics and snippets on the monitor. ST segment monitoring function is shut off by default. -
Page 74: Adjusting St And Iso Measurement Points
Patient Monitor User Manual Monitoring ECG DEF POINT The ST and ISO measurement points need to be adjusted when you start monitoring, and if the patient's heart rate or ECG morphology changes significantly. Always ensure that ST measurement points are appropriate for your patient. Abnormal QRS complex is not considered in ST segment analysis. -
Page 75: Arr Analysis Menu
Patient Monitor User Manual Monitoring ECG COUPLET 2 consecutive PVCs BIGEMINY Vent Bigeminy TRIGEMINY Vent Trigeminy A type of single PVC under the condition that HR<100,R-R interval is less than 1/3 the average interval, followed by a R ON T compensating pause of 1.25X the average R-R interval (the next R wave advances onto the previous T wave). -
Page 76: 12-Lead Ecg Monitoring
8.12 12-Lead ECG Monitoring 8.12.1 Diagnosis Function If iM80 is equipped with 12 leads monitoring, the device has automatical diagnosis function. To perform this function, please: Set Lead Type in the ECG Setup menu to 12 Leads and set Display in the ECG Setup menu to 12 Leads. -
Page 77: Measurement And Interpretation
Patient Monitor User Manual Monitoring ECG Figure a Figure b Figure b shows analysis time, HR (heart rate), P/QRS/T Axis, RR Interval, RVS/SV1 Amp (RVS/SV1 amplitude), QRS Duration, RV5+SV1 Amp (RV5+SV1 amplitude), QT/QTC Interval and Diagnosis code. More information about diagnosis review, please refer to Section 12-lead Diagnosis Review. 8.12.2 Measurement and Interpretation The measurement function provides the automatic measurement of these common parameters, such as heart rate, PR interval, QRS complex duration, QT interval, P/QRS/T axis, RV5/SV1... -
Page 78: Chapter 9 Monitoring Resp
Patient Monitor User Manual Monitoring RESP Chapter 9 Monitoring RESP 9.1 Overview The monitor measures respiration from the amount of thoracic impedance between two ECG electrodes. The change of impedance between the two electrodes, (due to the thoracic movement), produces a respiratory waveform on the screen. 9.2 RESP Safety Information WARNING If you do not set the detection level for the respiration correctly in manual detection... -
Page 79: Electrode Placement For Monitoring Resp
Patient Monitor User Manual Monitoring RESP 9.4 Electrode Placement for Monitoring Resp Correct patient skin preparation techniques for electrode placement are important for Resp measurement: you will find this information in the chapter on ECG. The Resp signal is always measured between two of the ECG electrodes. There are two standard ECG leads for selection: I lead (RA and LA) and II lead (RA and LL). -
Page 80: Changing Hold Type
Patient Monitor User Manual Monitoring RESP from the pop-up list. 9.9 Changing Hold Type To change the calculation mode, in the Resp Setup menu, set Hold Type to Manual or Auto. When it is set to the AUTO mode, Hold High and Hold Low are unavailable, and the monitor can calculate the respiration rate automatically. -
Page 81: Chapter 10 Monitoring Spo
20 min at a time. Use only EDAN permitted sensors and extension cables with the moniter. Other sensors or extension cables may cause improper monitor performance and/or minor personal injury. -
Page 82: Measuring Spo
Patient Monitor User Manual Monitoring SpO Don’t use the functional tester to access the SpO accuracy. The device is calibrated to display functional oxygen saturation. The materials with which the patient or any other person can come into contact conform with the standard of ISO10993. 10.3 Measuring SpO 1. -
Page 83: Understanding Spo Alarms
Patient Monitor User Manual Monitoring SpO Intravascular dye injections Significant concentrations of dysfunctional hemoglobin, such as carboxyhemoglobin and methemoglobin Excessive patient movement and vibration Improper sensor application Low perfusion or high signal attenuation Venous pulsation ... -
Page 84: Chapter 11 Monitoring Pr
Patient Monitor User Manual Monitoring PR Chapter 11 Monitoring PR 11.1 Overview The pulse numeric counts the arterial pulsations that result from the mechanical activity of the heart in beats per minute (bpm). You can display a pulse from any measured SpO signal or any arterial pressure. -
Page 85: Chapter 12 Monitoring Nibp
Patient Monitor User Manual Monitoring NIBP Chapter 12 Monitoring NIBP 12.1 Overview This monitor uses the oscillometric method for measuring NIBP. It can be used for adult, pediatric and neonatal patients. Oscillometric devices measure the amplitude of pressure changes in the occluding cuff as the cuff deflates from above systolic pressure. -
Page 86: Introducing The Oscillometric Nibp Measurement
Patient Monitor User Manual Monitoring NIBP WARNING Make sure that the air conduit connecting the blood pressure cuff and the monitor is neither blocked nor tangled. Do not attach the cuff to a limb being used for IV infusions as the cuff inflation can block the infusion, potentially causing harm to patient. -
Page 87: Measurement Procedures
Patient Monitor User Manual Monitoring NIBP There are three methods of measuring NIBP: Manual - measurement on demand. Auto - continually repeated measurements (between 1 and 480 minute adjustable interval). Sequence - the measurement will run consecutively in five minutes, then the monitor enters manual mode. -
Page 88: Operation Prompts
Patient Monitor User Manual Monitoring NIBP Cuff Usage 3. Connect the cuff to the air tubing. 4. Check whether the patient mode is appropriately selected. Access the Patient Setup menu from Menu. Turn the knob to select the required patient Type in the Patient Info. menu. 5. -
Page 89: Correcting The Measurement If Limb Is Not At Heart Level
Patient Monitor User Manual Monitoring NIBP continuous measurement. 12.8 Correcting the Measurement if Limb is not at Heart Level To correct the measurement if the limb is not at heart level to the displayed value: Add 0.75mmHg (0.10kPa) for each centimeter Deduct 0.75mmHg (0.10kPa) - Page 90 Patient Monitor User Manual Monitoring NIBP The system will automatically inflate the pneumatic system to about 180 mmHg. After 20 seconds, the system will automatically open the deflating valve, which marks the completion of a pneumatic measurement. If the prompt of Leak Test OK appears, it indicates that the airway is in good situation and no air leaks exist.
-
Page 91: Chapter 13 Monitoring Temp
Patient Monitor User Manual Monitoring TEMP Chapter 13 Monitoring TEMP 13.1 Overview Body temperature is measured by means of a thermistor probe (a semiconductor whose resistance changes with temperature) that is inserted in the rectum. Two TEMP probes can be used simultaneously to measure two TEMP values, and get the temperature difference. -
Page 92: Chapter 14 Monitoring Quick Temp
Patient Monitor User Manual Monitoring Quick TEMP Chapter 14 Monitoring Quick TEMP 14.1 Overview Quick temperature measurement is to establish thermal balance between probe and human body. When the probe is placed on the measurement site until a steady reading is available - after approximately three minutes for oral and rectal measurements and five minutes for axillary measurements. -
Page 93: Measuring Procedure
Patient Monitor User Manual Monitoring Quick TEMP WARNING Make sure disposable TEMP sensor covers used limit patient cross-contamination. The use of any other probe cover may produce temperature measurement errors or result in inaccurate readings. Quick Temp measurement isn’t suitable for use during defibrillation. 14.3 Measuring Procedure 14.3.1 Measurement for Oral Temperature 1. -
Page 94: Measurements For Rectal Temperatures
Patient Monitor User Manual Monitoring Quick TEMP and then take it out for starting a new measurement. To ensure optimal accuracy, always confirm that the correct measurement position is selected. 14.3.2 Measurements for Rectal Temperatures 1. Ensure that the rectal probe (red probe) and probe well are installed. 2. -
Page 95: Changing Temp Unit
Patient Monitor User Manual Monitoring Quick TEMP Measuring Position in Axillary NOTE: Do not take an axilliary temperature through the patient’s clothing. Direct contact between the patient’s skin and the probe is required. To obtain accurate rectal temperature, use the white temperature probe. 14.4 Changing Temp Unit To change Temp Unit, please: 1 Select the Quick Temp Setup menu to open it and select Unit on the interface. -
Page 96: Chapter 15 Monitoring Ibp
Patient Monitor User Manual Monitoring IBP Chapter 15 Monitoring IBP 15.1 Overview IBP is measured by means of a catheter inserted directly into the circulatory system. A pressure transducer connected to the catheter converts the mechanical force exerted by the blood into an electrical signal, which is displayed graphically as pressure versus time on a monitor screen or numerically on digital display. -
Page 97: Selecting A Pressure For Monitoring
Patient Monitor User Manual Monitoring IBP 6. To zero the transducer, please refer to Zeroing the Pressure Transducer. WARNING If there are air bubbles in the pressure line or the transducer, you should flush the system with the solution to be infused. 15.4 Selecting a Pressure for Monitoring Tell the monitor which pressure you want to monitor by selecting its pressure label. -
Page 98: Troubleshooting The Pressure Zeroing (Taking Art For Example)
Patient Monitor User Manual Monitoring IBP 4. When you see the message Zero Ok, please close the stopcock to atmospheric pressure, and open the stopcock to the patient. 15.7 Troubleshooting the Pressure Zeroing (Taking Art for Example) The status message lists the probable cause of an unsuccessful calibration. Message Corrective Action Art ZERO FAIL... -
Page 99: Troubleshooting The Pressure Calibration
Patient Monitor User Manual Monitoring IBP 9. Press the Start button, the device will begin calibrating. 10. Wait for the calibrated result. You should take corresponding measures based on the prompt information. 11. After calibration, disassemble the blood pressure tubing and the attached 3-way valve. 1: Hydrargyrum pressure meter;... -
Page 100: Chapter 16 Monitoring Co
Do not use the device in the environment with flammable anesthetic gas. The device should be used by trained and qualified medical personnel authorized by EDAN. Nitrous oxide, elevated levels of oxygen, helium, xenon, halogenated hydrocarbons, and barometric pressure can influence the CO measurement. -
Page 101: Monitoring Procedures
Patient Monitor User Manual Monitoring CO NOTE: After the low battery alarm appears, please do not start the CO measurement, or the monitor may turn off for the low battery. 16.3 Monitoring Procedures 16.3.1 Zeroing the sensor You must perform zeroing following the steps when using the new airway adapter. 1. - Page 102 Patient Monitor User Manual Monitoring CO for warm-up. Connect the cannula, airway adapter, or sample line as appropriate, to the sensor. It will click into place when seated correctly. Connecting LoFlo module To zero the sensor, please refer to zeroing the sensor. For intubated patients, an airway adapter is required;...
-
Page 103: C5 Co Module
Patient Monitor User Manual Monitoring CO NOTE: Always connect the airway adapter to the sensor before inserting the airway adapter into the breathing circuit. In reverse, always remove the airway adapter from the breathing circuit before removing the sensor. Always disconnect the cannula, airway adapter or sample line from the sensor when the sensor is not in use. - Page 104 Patient Monitor User Manual Monitoring CO Connecting Sensor To zero the sensor, please refer to zeroing the sensor. 5 Install the airway adapter at the proximal end of the circuit between the elbow and the ventilator Y-section. Connecting Airway Adapter WARNING No routine user calibration required.
-
Page 105: Setting Co Waveform Setup
Patient Monitor User Manual Monitoring CO status. To avoid infection, use only sterilized, disinfected or disposable airway adapters. Inspect the airway adapters prior to use. Do not use it if airway adapter appears damaged or broken. Observe airway adapter color coding for patient population. Periodically check the flow sensor and tubing for excessive moisture or secretion buildup. - Page 106 Patient Monitor User Manual Monitoring CO 2. Select Apnea Alm from the menu; 3. Choose the apnea alarm time from the pop-up list. WARNING Safety and effectiveness of the respiration measurement method in the detection of apnea, particularly the apnea of prematurity and apnea of infancy, has not been established.
-
Page 107: Chapter 17 Monitoring C.o
Patient Monitor User Manual Monitoring C.O. Chapter 17 Monitoring C.O. 17.1 Overview The Cardiac Output (C.O.) measurement is performed by using Thermodilution method. The monitor can determine blood temperature, measure cardiac output. You can have iced injecta using either the flow through system or individual syringes of injecta. You can perform up to 6 measurements before editing the average Cardiac Output. -
Page 108: Measurement Window
Patient Monitor User Manual Monitoring C.O. 1: Monitor; 2: Thermodilution Catheter; 3: Cardiac Output Cable; 4: Injectate Sensor Housing; 5: Injectate; 6: Delivery System; 7: In-line injectate Temperature probe. C.O. Sensor Connection WARNING Make sure that the computational constant for the measurement is appropriate to the catheter used. - Page 109 Patient Monitor User Manual Monitoring C.O. ③ ④ ⑤ ⑥ ① ⑦ ⑧ ② ⑨ C.O. Measure Window ① Measurement curve ② Prompt message area ③ Cardiac Output ④ Cardiac Index ⑤ Body Surface Area ⑥ Blood Temperature ⑦ Injectate Temperature ⑧...
-
Page 110: Measurement Process
Patient Monitor User Manual Monitoring C.O. X axis Change the Scale X (time) value. Two modes are available: 0~30s, 0~60s. If you start measurement in the 0~30s mode, it will be switched to 0~60s mode automatically if the measurement can not finish within 30 seconds. After the switch, no further adjustment can be made to the Scale X. -
Page 111: Blood Temperature Monitoring
Patient Monitor User Manual Monitoring C.O. ① ③ ② ④ Window For C.O. Edit Contents displayed in the window: ① Six curves of the six measurements and C.O. value ② Average value of C.O. ③ Average value of CI ④... -
Page 112: Setting The Computation Constant
Patient Monitor User Manual Monitoring C.O. Right ventricle Thermodilution Catheter Site 17.8 Setting the Computation Constant The computation constant is associated with catheter and injectate volume. When the catheter is changed, please adjust Constant in the C.O. Settings menu based on product description provided by the manufacturer. -
Page 113: Chapter 18 Monitoring Ag
Patient Monitor User Manual Monitoring AG Chapter 18 Monitoring AG 18.1 Overview The monitor uses ISA sidestreasm gas analyzer (hereinafter called ISA analyzer) and IRMA mainstream molude (hereinafter called IRMA module) to monitor the anesthetic gas which can be used to measure the gases of adult, pediatric and neonatal patients during anesthesia, recovery and respiratory care. - Page 114 Patient Monitor User Manual Monitoring AG WARNING Never sterilize or immerse the ISA analyzer in liquid. Measurements can be affected by mobile and RF communications equipment. Make sure that the ISA analyzer is used in the electromagnetic environment specified in this manual.
-
Page 115: Safety Information For Irma Module
Patient Monitor User Manual Monitoring AG 18.2.2 Safety Information for IRMA Module WARNING The IRMA probe is intended for use by authorized and trained medical personnel only. The IRMA probe must not be used with flammable anesthetic agents. Disposable IRMA airway adapters shall not be reused. Used disposable airway adapters shall be disposed of in accordance with local regulations for medical wastes. -
Page 116: Monitoring Steps
Patient Monitor User Manual Monitoring AG WARNING Do not use the IRMA airway adapter with metered dose inhalsers or nebulized medications as this may affect the light transmission of the airway adapter windows. Do not try to open the oxygen sensor assembly. The oxygen sensor is a disposable product and contains a caustic electrolyte and lead. - Page 117 Patient Monitor User Manual Monitoring AG 7. If applicable: Perform a tightness check of the patient circuit with the sampling line attached. 18.3.1.2 System Setup for Analyzer If your system is using the plug-in and measure ISA analyzer, please follow the setup instructions below: 1.
-
Page 118: Monitoring Steps For Irma Module
Patient Monitor User Manual Monitoring AG 18.3.1.5 MAC Calculation The MAC value may be calculated and displayed by using end-tidal (Et) gas concentrations according to the following formula: MAC = X (AA): HAL=0.75%, ENF=1.7%, ISO=1.15%, SEV=2.05%, DES=6.0% NOTE: Altitude, patient age and other individual factors are not considereded in the formula above. - Page 119 Patient Monitor User Manual Monitoring AG Connect the IRMA/airway adapter 15mm female connector to the patient’s endotracheal tube. Alternatively, connect an HME (Heat Moisture Exchanger) between the patient’s endotracheal tube and the IPMA probe. Placing an HME in front of the IRMA probe protects the airway adapter from secretions and effects of water vapor and eliminates the need of changing the adapter.
- Page 120 Patient Monitor User Manual Monitoring AG 18.3.2.1 Placement of IRMA Probe When connecting IRMA probe to an infant patient circuit, it is important to avoid a direct contact between the IRMA probe and the infant’s body. If, for whatever the reason, the IRMA probe is in direct contact with any parts of the infant’s body, an insulation material shall be placed between the IRMA probe and the body.
-
Page 121: Setting Work Mode
Patient Monitor User Manual Monitoring AG adapter is of crucial importance for a successful zeroing. If a “ZERO-REQ” alarm should appear directly after a zeroing procedure, the procedure has to be repeated. Always perform a pre-use check after zeroing the probe. Zeroing for IRMA CO probes: Zeroing needs to be performed ONLY when an offset in gas values is observed, or when an... -
Page 122: Setting Alarms
Patient Monitor User Manual Monitoring AG 18.5 Setting Alarms Here we take CO alarm for example. This refers to CO specific alarms. See the Alarms Chapter for general alarm information. To change the alarm, please refer to the following steps: Select the CO Setup menu;... -
Page 123: Effects Of Humidity
Patient Monitor User Manual Monitoring AG Range SetO Range 0~30 vol% 30~70 vol% 70~100 vol% O Range Set N O Range 0~30 vol% 30~70 vol% 18.10 Effects of humidity The partial pressure and the volume percentage of CO O, O and anesthetic agents depend on the amount of water vapor in the measured gas. -
Page 124: Chapter 19 Freeze
Patient Monitor User Manual Freeze Chapter 19 Freeze 19.1 Overview When monitoring a patient, the user may freeze the waveforms and examine them. Generally, the user can review a frozen waveform of a maximum of 120 seconds. The freeze function of this monitor has the following features: ... -
Page 125: Reviewing Frozen Waveform
Patient Monitor User Manual Freeze NOTE: Pressing the button repeatedly over a short period of time may result in discontinuous waveforms on the screen. 19.3 Reviewing Frozen Waveform By moving the waveform, you may review a waveform of 120 seconds before it is frozen. For a waveform of less than 60 seconds, the remaining part is displayed as a straight line. -
Page 126: Chapter 20 Review
Patient Monitor User Manual Review Chapter 20 Review The monitor provides 120-hour trend data of all parameters, storage of 1200 NIBP measurement results and 60 alarm events. This chapter gives detailed instruction for review of all data. 20.1 Trend Graph Review ■... -
Page 127: Switching To The Trend Table
Patient Monitor User Manual Review can scroll left and right the screen manually to see measurement trends that do not fit in the current view by selecting and pressing the symbol displayed on the trend graph. 20.1.4 Switching to the Trend Table The user can switch to the trend table interface on the Trend Graph interface. -
Page 128: Scrolling The Screen
Patient Monitor User Manual Review Menu > Review > NIBP Review, then the NIBP Review window is displayed. 20.3.1 Scrolling the Screen All measurement data can’t be displayed on the current screen due to the screen limitation. The user can scroll up and down the screen manually to see measurement data that doesn’t fit in the current view by selecting and pressing the symbol displayed on the NIBP Review interface. -
Page 129: 12-Lead Diagnosis Review
Patient Monitor User Manual Review in the current view by selecting and pressing the symbol displayed on the Arrhythmia Review interface. 20.6 12-lead Diagnosis Review Select Menu > Review > Analysis Review to open the 12-lead analysis review interface. If there is no analysis result, the prompt of No Analysis Result is displayed on the interface. -
Page 130: Chapter 21 Calculation And Titration Table
Patient Monitor User Manual Calculation and Titration Table Chapter 21 Calculation and Titration Table The monitor provides calculation function and titration table. Calculations are patient data that are not directly measured but calculated by the monitor. The monitor can perform drug calculation. Hemodynamic calculation is not described in this Instructions for Use. -
Page 131: Calculation Unit
Patient Monitor User Manual Calculation and Titration Table 21.1.2 Calculation Unit Each drug has the fixed unit or unit series to calculate. Among the same unit series, the unit binary varies with the entered parameter value. The calcution units of the drugs are listed as follows: Drug Unit DRUG A, DRUG B, DRUG C, AMINOPHYLLINE,... -
Page 132: Chapter 22 Recording
Patient Monitor User Manual Recording Chapter 22 Recording 22.1 General Information A thermal dot matrix recorder is used for the monitor and can support many recording types and output patient information, measurement data, review data waveform and so forth. Recording indicator Recording key, press this key to start or stop recording task. -
Page 133: Recording Type
Patient Monitor User Manual Recording 22.3 Recording Type The monitor provides several types of stripe recording: Continuous real-time recording Time recording Alarm recording Trend graph, trend table recording Arrhythmia review recording Drug calculation titration recording ... -
Page 134: Recorder Operations And Status Messages
Patient Monitor User Manual Recording NOTE: You can press the button on the front panel to stop the currently recording process. 22.5 Recorder Operations and Status Messages 22.5.1 Record Paper Requirement Only standard thermosensitive record paper can be used: otherwise the recorder may not function, the recording quality may be poor, and the thermosensitive printhead may be damaged. -
Page 135: Removing Paper Jam
Patient Monitor User Manual Recording 3. Ensure proper position and tidy margin. 4. Pull about 2cm of the paper out, and close the recorder casing. NOTE: Be careful when inserting papers. Avoid damaging the thermo-sensitive print head. Unless when inserting papers or shooting troubles, do not leave the recorder catch open. 22.5.5 Removing Paper Jam When the recorder functions or sounds improperly, you should open the recorder casing to check for a paper jam. - Page 136 Patient Monitor User Manual Recording NOTE: 1. If the monitor is not installed with a recorder, it will indicate RECORDER SETUP NEEDED after pressing the Record button. 2. Do not touch the thermo-sensitive print head when performing continuous recording. - 125 -...
-
Page 137: Chapter 23 Other Functions
Patient Monitor User Manual Other Functions Chapter 23 Other Functions 23.1 Nurse Call The monitor provides dedicated nurse call port which is connected to nurse call system through the nurse call cable to perform the nurse call function. - 126 -... -
Page 138: Chapter 24 Using Battery
Patient Monitor User Manual Using Battery Chapter 24 Using Battery 24.1 Battery Power Indicator The indicator labeled Battery on the front panel of the monitor illuminates in green when the monitor is battery powered and illuminates in yellow when battery is being charged. The indicator is not illuminated when the monitor is not powered or when AC power is applied. -
Page 139: Replacing The Battery
Patient Monitor User Manual Using Battery WARNING Do not use, leave battery close to fire or other places where temperature may be above 60°C. Do not immerse, throw, or wet battery in water/seawater. Do not destroy the battery: do not pierce battery with a sharp object such as a needle; Do not hit with a hammer, step on or throw or drop to cause strong shock;... -
Page 140: Recycling The Battery
Patient Monitor User Manual Using Battery 24.5 Recycling the Battery When the battery no longer holds a charge, it should be replaced. Remove the old battery from the monitor and recycle it properly. NOTE: To prolong the life of rechargeable battery, it is recommended to charge it at least once every month, and it must be done after the electric energy runs out. -
Page 141: Chapter 25 Care And Cleaning
Warranty does not cover damage caused by using unapproved substances or methods. EDAN makes no claims regarding the efficacy of the listed chemicals or methods as a means for controlling infection. Consult your hospital’s Infection Control Officer or Epidemiologist for control infection. -
Page 142: Cleaning The Accessories
Patient Monitor User Manual Care and Cleaning If liquid is splashed on or into the main unit inadvertently, or enters the conduit, stop using the monitor and contact the manufacturer for service immediately. Clean the monitor enclosure with soft cloth and diluent non-caustic detergents recommended above. - Page 143 Patient Monitor User Manual Care and Cleaning 3. Never immerse or soak the ECG cable. 4. Inspect the cables after cleaning. CAUTION Do not allow a cleaning or disinfecting agent to leave residues on any equipment surface. After allowing the appropriate time for the agent to work (as indicated by the manufacturer), wipe off residues with a cloth dampened with water.
-
Page 144: Disinfection
Patient Monitor User Manual Care and Cleaning below. Never use strong solvents such as acetone or trichloroethylene. Approved Cleaning Substances ■ Mild Soaps ■ Tenside (as active cleaning agent) Cables can be cleaned with a warm, damp cloth and mild soap, or isopropyl alcohol. 25.2.2.5 Cleaning TEMP/Quick TEMP Sensor CAUTION Do not allow a cleaning or disinfecting agent to leave residues on any equipment surface. -
Page 145: Chapter 26 Maintenance
26.2 Maintenance Task and Test Schedule The following tasks are for EDAN-qualified service professionals only. Contact an EDAN-qualified service provider if your monitor needs a safety or performance test. Clean and disinfect equipment to decontaminate it before testing or maintaining it. - Page 146 Patient Monitor User Manual Maintenance NIBP Leakage Inspection At least once every two years, or as specified by local laws. NIBP Pressure Calibration At least once every two years, or as specified by local laws. NIBP Calibration At least once every two years, or as specified by local laws.
-
Page 147: Chapter 27 Warranty And Service
EDAN will, at its discretion, repair or replace the defective part(s) free of charge. EDAN will not provide a substitute product for use when the defective product is being repaired. -
Page 148: Chapter 28 Accessories
Patient Monitor User Manual Accessories Chapter 28 Accessories You can order accessories from EDAN supplies at www.edan.com.cn or consult your local Edan representative for details. WARNING Never reuse disposable transducers, sensors, accessories and so forth that are intended for single use, or single patient use only. Reuse may compromise device functionality and system performance and cause a potential hazard. -
Page 149: Spo 2 Accessories
DB9 to LEMO, TPU, 2M EDAN SH4 adult soft-tip SpO sensor, TPU, (finger type, patient 02.01.210122 weight more than 50kg) EDAN SH4 adult silicone soft-tip SpO sensor, (finger type, patient 02.01.210123 weight more than 50kg) EDAN SH5 child silicone soft-tip SpO sensor, (finger type, patient 02.01.210121... -
Page 150: Nibp Accessories
Patient Monitor User Manual Accessories 28.3 NIBP Accessories Part Number Accessories EDAN NIBP Tube, 3m, Grey 01.59.036118 NIBP Tube, 3m, Black 01.59.36036 01.57.471021 NIBP Tube for neonatal cuff, 3m 01.57.040210-11 NIBP Cuff, Larger Adult, 33cm-47cm, reusable 01.57.040205-11 NIBP Cuff, Adult, 25cm-35cm, reusable 01.57.040211-11... -
Page 151: Temp Accessories
Patient Monitor User Manual Accessories OMRON Neonatal disposable cuff/CUFF (NO.13) arm8.5—13cm, 01.57.471084-10 width5cm,CE Connecting Tube for Neonatal Cuff (Only compatible with Neonatal 01.59.473003-10 Disposable and NIBP Tube)/CUFF HOSE (NO.3) length3.5m,CE 28.4 Temp Accessories Part Number Accessories 01.57.040185 Skin Temperature Probe (2.252KΩ) 01.57.040187 Skin Temperature Probe (10KΩ) 01.57.040184... -
Page 152: Accessories
Patient Monitor User Manual Accessories 11.57.471019 Airway Adapter, reusable, adult/children 11.57.471020 Airway Adapter, reusable, neonate/premature baby 11.59.078155 Disposable Adult Airway Adapter (6063-00) 11.59.078156 Disposable Neonatal (Infant/Pediatric) Airway Adapter (6312-00) 11.57.078142 Adult Nasal CO with O Delivery Sampling Cannula 11.57.078143 Pediatric Nasal CO with O Delivery Sampling Cannula 11.57.078144... -
Page 153: Other Accessories
Patient Monitor User Manual Accessories 12.08.208005 Multi-gas analyzer, ISA AX+ 12.08.208007 Multi-gas analyzer, ISA OR+ 28.10 Other Accessories Part Number Accessories Remark 14.8V, 2.1Ah 11.21.064142 Rechargeable Lithium-Ion Battery 14.8V, 4.2Ah 11.21.064143 Rechargeable Lithium-Ion Battery 01.57.78035 Recorder paper 12.01.19084 Thermal printer 11.21.64056 Vehicle-carried Inverter 12.01.30493... -
Page 154: A Product Specification
A.2 Physical Specifications A.2.1 Size and Weight Product Size Weight iM80 370 mm (L) × 175 mm (W)× 320 mm (H) 7 kg iM50 260 mm (L) × 140 mm (W)× 205 mm (H) 3.6kg A.3 Environment Specification The monitor may not meet the performance specifications given here if stored or used outside the specified temperature and humidity ranges. -
Page 155: Display
Product Specification Altitude Working 860hPa ~ 1060hPa Transport and Storage 700hPa ~ 1060hPa Power Supply 100V-240V~, 50Hz/60Hz Current=1.0A-0.5A(iM50), Pmax=1.4A-0.7A(iM80) FUSE T 1.6AL, 250V A.4 Display Product Display Messages iM50 Display screen: 8.4 inch colour TFT A maximum of 11 waveforms Resolution: 800×600... -
Page 156: Recorder
Patient Monitor User Manual Product Specification A.6 Recorder Record Width 48 mm Paper Speed 25 mm/s, 50 mm/s Trace Up to 3 Recording types 8 second real-time recording Auto 8 second recording Parameter alarm recording Trend recording Titration table recording A.7 Review Trend Review Short... - Page 157 Patient Monitor User Manual Product Specification Notch 50Hz/60Hz (Notch filter can be turned on or off manually) >5MΩ Differential Input Impendance Input Signal Range ±8mV PP Accuracy Input Signal The total error and frequency response comply with Reconstruction ANSI/AAMI EC13:2002, Sect. 4.2.9.8. Electrode Offset Potential...
- Page 158 Patient Monitor User Manual Product Specification Minimum input slew rate >2.5V/S Heart rate Range ADU: 15 bpm ~ 300 bpm PED/NEO: 15 bpm ~ 350 bpm Accuracy ±1% or 1 bpm, whichever is greater Resolution 1 bpm ≥300 μVPP Sensibility Range ADU: 0~300 PVCs/ min PED/NEO: 0~350 PVCs/ min...
- Page 159 Patient Monitor User Manual Product Specification Ventricular Rhythm The interval of 5 consecutive ventricular wave ranges from 600 ms to 1000 ms Ventricular Bradycardia The interval of 5 consecutive ventricular wave is more than 1000 ms Startup time for Tachycardia Ventricular Tachycardia Gain 1.0: 10 s 1 mV 206bpm...
-
Page 160: 12-Lead Monitoring
Patient Monitor User Manual Product Specification ECG Analog Output Diagnosis: 0.05Hz ~ 100Hz Bandwidth (-3dB) Monitor: 0.5Hz ~ 40Hz Surgery: 1Hz ~ 20Hz Maximum transmission delay 500ms (in diagnostic mode, and with notch off) Sensitivity 1V/mV ±10% PACE rejection/enhancement Without Pace enhancement or pace rejection Defib Sync Pulse Output wave Square pulse... - Page 161 Patient Monitor User Manual Product Specification Monitor: 0.5Hz to 40Hz Surgery: 1Hz to 20Hz Diagnosis: >95dB (the Notch filter is off) CMRR (Common Mode Monitor: >105dB (the Notch filter is on) Rejection Ratio) Surgery: >105dB (the Notch filter is on) Notch 50Hz/60Hz (Notch filter can be turned on or off manually)...
- Page 162 Patient Monitor User Manual Product Specification Width: 0.1 ms ~2 ms Ascending time: 10 μs ~ 100 μs Pulse is rejected if the requirements of ANSI/AAMI EC13-2002: Sect. 4.1.4.1 are met: Amplitude: ±2 mV ~ ±700 mV Pulse Rejection Width: 0.1 ms ~2 ms Ascending time: 10 μs ~100 μs Minimum input slew rate >2.5V/S...
- Page 163 Patient Monitor User Manual Product Specification Normal ADU: 41 bpm ~ 119 bpm PED/NEO: 61 bpm ~159 bpm Brady ADU: 15 bpm ~ 40 bpm PED/NEO: 15 bpm ~ 60 bpm Range of Ventricular Rhythm Ventricular Tachycardia The interval of 5 consecutive ventricular wave is less than 600 ms Ventricular Rhythm The interval of 5 consecutive ventricular wave ranges from 600 ms to 1000 ms...
- Page 164 Patient Monitor User Manual Product Specification COUPLET TACHY BRADY VT>2 BRADY BIGEMINY MISSED BEATS TRIGEMINY VENT VBRADY 12-lead Average parameters of heart beat Synchronization Analysis Heart rate (bpm) Time limit of P wave (ms) PR interval (ms) QRS interval (ms) QT/QTC (ms) P-QRS-T AXIS ECG Analog Output...
-
Page 165: Resp
0 to 150 rpm Resolution 1 rpm ±2 rpm Accuracy Apnea Alarm Time Setup 10s, 15s, 20s, 25s, 30s, 35s, 40s A.10 NIBP A.10.1 NIBP from EDAN Module Method Oscillometric Mode Manual, Auto, Continuous Measuring interval in AUTO 1/2/3/4/5/10/15/30/60/90/120/240/480 min Mode... -
Page 166: Nibp From M3600 Module
Patient Monitor User Manual Product Specification MAP: 20 mmHg ~ 110 mmHg Cuff pressure measuring range 0 mmHg ~ 300 mmHg Pressure resolution 1mmHg Maximum mean error ±5mmHg Maximum standard deviation 8mmHg Maximum measuring period Adult/Pediatric 120s Neonate Typical measuring period 30s ~ 45s (depend on HR/motion disturbance) Overpressure protection (Dual overpressure protection) Adult... -
Page 167: Spo 2
Measuring Less than 160s Less than 180s Less than 80s Less than 90s Period A.11 SpO A.11.1 SpO from EDAN Module Measuring Range 0 ~ 100 % Resolution Accuracy ±2 % (70%~100% SpO Adult (including Pediatric) Undefined (0~69% SpO ±3 % (70%~100% SpO... -
Page 168: From Nellcor Module
Patient Monitor User Manual Product Specification A.11.2 SpO from Nellcor Module Measuring Range 1% ~ 100% Resolution Sensor Type Accuracy MAX-A, MAX-AL, ± 2 (70% ~ 100% SpO MAX-N, MAX-P, MAX-I, MAX-FAST OxiCliq A, OxiCliq P, OxiCliq (Adult), ± 2.5 (70% ~ 100% SpO OxiCliq N (Neonate), Accuracy OxiCliq I... -
Page 169: Quick Temp
Patient Monitor User Manual Product Specification A.13 Quick TEMP Measuring Range 25°C ~ 45°C (77 º F ~113 º F) Operating Temp 10°C ~ 40°C (50 º F ~104 º F) Sensor Type Oral/Axillary sensor, Rectal sensor Resolution 0.1°C (0.1 º F) ±0.1°C (25°C ~ 45°C) or Accuracy ±... - Page 170 Patient Monitor User Manual Product Specification AwRR 0 rpm ~ 150 rpm Resolution EtCO 1mmHg FiCO 1mmHg AwRR 1 rpm ± 2 mmHg, 0 to 40 mmHg EtCO Accuracy ± 5 % of reading, 41 to 70 mmHg ± 8 % of reading, 71 to 100 mmHg ±...
-
Page 171: C.o
Patient Monitor User Manual Product Specification Enflurane 41 – 70 mmHg: ± 2.5% additional error Isoflurane 71 – 100 mmHg: ± 4% additional error Sevoflurane 101 – 150 mmHg: ± 5% additional error Xenon *Additional worst case error when compensation for P O, anesthetic agents, or helium is Helium... -
Page 172: Phasein Sidestream
Patient Monitor User Manual Product Specification For C.O. < 4.0 L/min: 0.2 L/min ±0.1°C ±0.1°C NOTE: At least 90% of the C.O. data should reside inside the bounded region, and the lower 95% confidence interval should not exceed 85%. A.17 AG A.17.1 Phasein Sidestream Module Type ISA AX+ Analyzer... - Page 173 Patient Monitor User Manual Product Specification Response Time < 3 seconds Accuracy(Standard Conditions) Measurement Range Accuracy 0 to 15 vol% ±(0.2 vol% + 2% of reading) 15 to 25 vol% Unspecified 0 to 100 vol% ±(2 vol% + 2% of reading) HAL, ENF, ISO 0 to 8 vol % ±(0.15 vol% + 5% of reading)
-
Page 174: Phasein Mainstream
Patient Monitor User Manual Product Specification reading _ 1) _ 1) _ 1) 15 vol% +12% of reading _ 1) _ 1) Xe(Xenon) 80 vol% -10% of reading _ 1) _ 1) He(Helium) 50 vol% -6% of reading Metered dose Not for use with metered dose inhaler propellants inhaler propellants... - Page 175 Patient Monitor User Manual Product Specification Parameters Sevoflurane(SEV), Desflurane(DES), awRR, MAC Measurement O, anaesthesia agent: infra-red absorption characteristic Principle Warm-up Time Concentrations are reported and the automatic agent indentification is running within 10 seconds. 20 seconds for IRMA AX+. ≤ 90ms Rise Time ≤...
- Page 176 Patient Monitor User Manual Product Specification ±(0.3 vol% + 4 % of reading) ±(2 vol% + 4 % of reading) Agents ±(0.2 vol% + 10 % of reading) Apnea Alarm 20s ~ 60s Delay 10 to 40 Temperature(°C) -20 ~ 75 Relative 10 ~ 95% RH(non-condensing ) 5 ~ 100% RH(condensing )
-
Page 177: Wirless Network
Patient Monitor User Manual Product Specification _ 1&2) _ 1&2) _ 1) _ 1) 100 vol% Note 1: Negligible interference, effect included in the specification “Accuracy, all conditions” above. Note 2: For probes not measuring N O and/or O the concentrations shall be set from monitor. (IRMA CO measures neither N O, nor O... -
Page 178: B Emc Information
Patient Monitor User Manual EMC Information B EMC Information - Guidance and Manufacture’s Declaration B.1 Electromagnetic Emissions - for all EQUIPMENT and SYSTEMS Guidance and manufacture’s declaration – electromagnetic emission The monitor is intended for use in the electromagnetic environment specified below. The customer or the user of the monitor should assure that it is used in such an environment. -
Page 179: Electromagnetic Immunity - For Equipment And Systems That Are Not Life-Supporting
Patient Monitor User Manual EMC Information ±1 kV for input /output ±1 kV for input IEC/EN 61000-4-4 typical commercial or hospital environment. signal /output signal ±1 kV for line to line ±1 kV for line to Surge Mains power quality should be that of a line ±2 kV for line to ground... - Page 180 Patient Monitor User Manual EMC Information environment. IEC/EN 60601 test Compliance Electromagnetic environment - Immunity test level level guidance Portable and mobile RF communications equipment should be used no closer to any part of the Patient Monitor, including cables, than the recommended separation distance calculated from the equation applicable to the frequency of the...
-
Page 181: Recommended Separation Distances
Patient Monitor User Manual EMC Information telephones and land mobile radios, amateur radio, AM and FM radio broadcast and TV broadcast cannot be predicted theoretically with accuracy. To assess the electromagnetic environment due to fixed RF transmitters, an electromagnetic site survey should be considered. -
Page 182: C Default Settings
Patient Monitor User Manual Default Settings C Default Settings This appendix documents the most important default settings of your monitor as it is delivered from the factory. Note: If your monitor has been ordered preconfigured to your requirements, the settings at delivery will be different from those listed here. -
Page 183: Resp
Patient Monitor User Manual Default Settings Alarm Level Medium Alarm Record Alarm High Limit (ST-X) Alarm Low Limit -0.2 (ST-X) X stands for I, II, III, aVR, aVL, aVF, V, V1, V2, V3, V4, V5 or V6. ARR Analysis ARR Analysis PVCs Alarm Level Medium PVCs Alarm Switch... -
Page 184: Spo 2
Patient Monitor User Manual Default Settings Alarm Record Alarm Level Medium Alarm High Limit Alarm Low Limit Apnea Time Calculation Type Auto Resp Type Sweep 12.5mm/s Amplitude C.5 SpO Settings Alarm Switch Alarm Record Alarm Level Medium Alarm High Limit Alarm Low Limit Pitch Tone Sweep... -
Page 185: Temp
Alarm Level Medium Alarm High Limit (SYS) Alarm Low Limit (SYS) Alarm High Limit (Map) Alarm Low Limit (Map) Alarm High Limit (Dia) Alarm Low Limit (Dia) EDAN Module Inflation value M3600 Module Inflation value Unit mmHg Interval Manual C.8 TEMP... -
Page 186: Ibp
Patient Monitor User Manual Default Settings Alarm Level Medium Alarm High Limit (T1) 39.0 39.0 Alarm Low Limit (T1) 36.0 36.0 °C Unit C.10 IBP IBP Settings Alarm Switch Alarm Record Alarm Level Medium Unit mmHg Filter 12.5Hz SYS, DIA, MAP SYS, DIA, MAP SYS, DIA, MAP Alarm High Limit (ART, 160, 90, 110... -
Page 187: C.o
Patient Monitor User Manual Default Settings Anes Agent Alarm High Limit (EtCO Alarm Low Limit (EtCO Alarm High Limit (FiCO Alarm High Limit (AWRR) Alarm Low Limit (AWRR) Sweep 12.5mm/s Amplitude C.12 C.O. C.O. Settings Alarm Switch Alarm Record Alarm Level Medium Alarm High Limit (TB) 43.0... - Page 188 Patient Monitor User Manual Default Settings Alarm Low Limit (EtAA) Alarm High Limit (FiAA) Alarm Low Limit (FiAA) Alarm High Limit (EtN Alarm Low Limit (EtN Alarm High Limit (FiN Alarm Low Limit (FiN Alarm High Limit (EtO 90.0 90.0 90.0 Alarm Low Limit (EtO 18.0...
-
Page 189: D Abbreviations
Patient Monitor User Manual Abbreviation D Abbreviations Abbr English Full Name/Description Alternating current Adult Anaesthesia gas Arterial Left foot augmented lead Left arm augmented lead Right arm augmented lead awRR Airway respiration rate Blood pressure BTPS Body temperature and pressure, saturated Cardiac index C.O. - Page 190 Patient Monitor User Manual Abbreviation Ethylene oxide End-tidal oxygen Federal Communication Commission Food and Drug Administration Fraction of inspired FiCO Fraction of inspired carbon dioxide Fraction of inspired nitrous oxide Fraction of inspired oxygen Halothane Hemoglobin Hb-CO Carbon mono-xide hemoglobin Heart rate Invasive blood pressure Intracranial pressure...
- Page 191 Patient Monitor User Manual Abbreviation NIBP Non-invasive blood pressure Oxygen oxyCRG Oxygen cardio-respirogram Pulmonary artery PAWP Pulmonary artery wedge pressure Pediatric Pleth Plethysmogram Pulse rate Premature ventricular complex Right Right arm Right atrial pressure Resp Respiration Reduced hemoglobin Right leg Respiration Rate Sevoflurane Systolic pressure...
Need help?
Do you have a question about the iM80 and is the answer not in the manual?
Questions and answers