Table of Contents
Advertisement
Quick Links
EDAN Agile PLM Electronic Signature Information
--Signatures related to this document and performed in EDAN Agile PLM.
文件名称(Document Name):iM3 说明书_英文
文件编号(Number):01.54.457703
版本(Version):1.1
产品型号(Product Model):iM3
项目编码(Project Code):00004I002
签批信息(Signature):
作者(Originator) : 陈 艳娟 (chenyanjuan)
2017-08-23 10:53:00
审核人(Reviewers) : 程 亮 (chengliang)
2017-08-24 13:01:47
审核人(Reviewers) : 史 洪华 (shihonghua)
2017-08-23 11:16:51
审核人(Reviewers) : 韦 华彪 (weihuabiao)
2017-08-23 11:19:01
审核人(Reviewers) : 陈 良款 (chenliangkuan)
2017-08-23 13:23:34
批准人(Approvers) : 夏 欢欢 (xiahuanhuan)
2017-08-29 18:57:24
批准人(Approvers) : 陈 浩杰 (chenhaojie)
2017-08-29 16:16:36
版权©深圳市理邦精密仪器股份有限公司 (Copyright©Edan Instrument,Inc.)
Advertisement
Table of Contents

Related Manuals for EDAN iM3


Summary of Contents for EDAN iM3
- Page 1 EDAN Agile PLM Electronic Signature Information --Signatures related to this document and performed in EDAN Agile PLM. 文件名称(Document Name):iM3 说明书_英文 文件编号(Number):01.54.457703 版本(Version):1.1 产品型号(Product Model):iM3 项目编码(Project Code):00004I002 签批信息(Signature): 作者(Originator) : 陈 艳娟 (chenyanjuan) 2017-08-23 10:53:00 审核人(Reviewers) : 程 亮 (chengliang) 2017-08-24 13:01:47 审核人(Reviewers) : 史...
-
Page 3: About This Manual
This manual will help you understand the operation and maintenance of the product better. It is reminded that the product shall be used strictly complying with this manual. User‘s operation failing to comply with this manual may result in malfunction or accident for which EDAN INSTRUMENTS, INC. (hereinafter called EDAN) cannot be held liable. - Page 4 Terms Used in this Manual This guide is designed to give key concepts on safety precautions. WARNING A WARNING label advises against certain actions or situations that could result in personal injury or death. CAUTION A CAUTION label advises against actions or situations that could damage equipment, produce inaccurate data, or invalidate a procedure.
-
Page 5: Table Of Contents
Table of Contents Chapter 1 Intended Use and Safety Guidance ................1 1.1 Intended Use/Indications for Use ................... 1 1.2 Safety Guidance ........................1 1.3 Explanation of Symbols on the Monitor ................6 Chapter 2 Installation ........................9 2.1 Initial Inspection........................9 2.2 Mounting the Monitor ...................... - Page 6 4.2 Selecting Alarm Tone Type ....................25 4.3 Alarm Levels ........................26 4.4 Controlling Alarm ........................ 27 4.4.1 Setting Parameter Alarm ................... 27 4.4.2 Audio Alarm Paused ....................28 4.4.3 Audio Alarm off ......................29 4.4.4 Alarm Reset ....................... 29 4.5 Latching Alarms ........................
- Page 7 8.3 Measuring SpO ........................52 8.4 Measurement Limitations ....................53 8.5 Assessing the Validity of a SpO Reading ................54 8.6 SpO Alarm Delay ........................ 54 8.7 Perfusion Index (PI)* ......................55 8.8 Setting Pitch Tone ........................ 55 8.9 Setting Sensitivity ........................ 55 8.10 NIBP/SpO Simul Measurement Setting ................
- Page 8 11.2.4 Measuring Mode ..................... 72 11.2.5 Measuring Procedure....................73 11.2.6 TEMP Setup for F3000 Module ................74 11.3 Infrared TEMP with TH Module ..................75 11.3.1 Introduction ......................75 11.3.2 Measuring Procedure....................76 11.3.3 Replacing the Battery ....................78 Chapter 12 Review (in Monitor Mode) ..................80 12.1 Trend Graph Review ......................
- Page 9 15.3 E-link Function ........................91 15.4 Uploading Data to Network Server ..................92 15.5 Storing Data in the Storage Device ..................92 15.5.1 Data Stored in the Storage Device ................92 15.5.2 Selecting a Storage Device ..................93 15.5.3 Reviewing Data Stored in the Storage Device ............94 15.5.4 Deleting Data Stored in the Storage Device ............
- Page 10 19.2 Contact Information ......................110 Chapter 20 Accessories ........................111 20.1 SpO Accessories ......................111 20.2 NIBP Accessories ......................112 20.3 TEMP Accessories ......................113 20.4 Other Accessories ......................114 A Product Specification ......................... 116 A.1 Classification ........................116 A.2 Physical Specifications ...................... 116 A.2.1 Size and Weight ......................
-
Page 11: Chapter 1 Intended Use And Safety Guidance
Vital Signs Monitor User Manual Intended Use and Safety Guidance Chapter 1 Intended Use and Safety Guidance 1.1 Intended Use/Indications for Use The monitor is intended to be used for monitoring, storing, recording, and reviewing of, and to generate alarms for, multiple physiological parameters of adults, pediatrics and neonates. The monitor is intended for use by trained healthcare professionals in hospital environments. - Page 12 IEC/EN 60601-1. If in doubt, consult our technical service department or your local distributor. Only patient cable and other accessories supplied by EDAN can be used. The performance and electric shock protection cannot be guaranteed, and the patient may be injured otherwise.
- Page 13 Vital Signs Monitor User Manual Intended Use and Safety Guidance WARNING The packaging is to be disposed of according to local or hospital‟s regulations; otherwise, it may cause environmental contamination. Place the packaging at the place which is inaccessible to children. This equipment is not intended for home usage.
- Page 14 The equipment can provide protective means to prevent the patient from being burned when used with HF SURGICAL EQUIPMENT. The equipment can protect against the effects of the discharge of a defibrillator. Use only EDAN-approved accessories. When the monitor is used with HF surgical equipment, the transducer and the cables must be avoided from conductive connection to the HF equipment.
- Page 15 Remove a battery whose life cycle has expired from the monitor immediately. To ensure patient safety, use only parts and accessories manufactured or recommended by EDAN. Before connecting the monitor to the AC power, make sure the voltage and the power frequency are consistent with the requirements indicated on the device label or in this user manual.
-
Page 16: Explanation Of Symbols On The Monitor
The monitor may not be compatible with all models of USB flash drives. Use the USB flash drives that are recommended by EDAN. 1.3 Explanation of Symbols on the Monitor DEFIBRILLATION-PROOF TYPE BF APPLIED PART... - Page 17 Vital Signs Monitor User Manual Intended Use and Safety Guidance Alternating Current Power Supply switch SERIAL NUMBER Network port USB (Universal Serial Bus) Connection CE marking AUTHORISED REPRESENTATIVE EUROPEAN COMMUNITY Date of manufacture MANUFACTURER Part Number General symbol for recovery/recyclable Disposal method Operating instructions Refer to User Manual...
- Page 18 Vital Signs Monitor User Manual Intended Use and Safety Guidance Warning (Background: Yellow; Symbol & outline: black) Ingress Protection IPX1 (Protected against vertically falling water drops) With respect to electrical shock, fire and mechanical hazards only in accordance with UL 60601-1 and CAN/CSA C22.2 No.
-
Page 19: Chapter 2 Installation
NOTE: Connect the power cable to the socket specialized for hospital use. Only use the power cable supplied by EDAN. 2.4 Checking the Monitor Make sure there is no damage on the measurement accessories and cables. Then turn on the monitor, check whether the monitor can start normally. -
Page 20: Connecting Sensor To Patient
Vital Signs Monitor User Manual Installation WARNING If any sign of damage is detected, or the monitor displays some error messages, do not use it on any patient. Contact customer service center immediately. NOTE: Check all the functions of the monitor and make sure that the monitor is in good status. -
Page 21: Chapter 3 Basic Operation
Vital Signs Monitor User Manual Basic Operation Chapter 3 Basic Operation This user manual describes all features and options. Your monitor may not have all of them; they are not all available in all geographies. Your monitor is highly configurable. What you see on the screen, how the menus appear and so forth, depend on the way it has been tailored for your hospital and may not be exactly as shown here. - Page 22 Vital Signs Monitor User Manual Basic Operation Infrared TEMP Module Alarm When an alarm occurs, the alarm indicator will light or flash. The indicator/Standby color of light represents the alarm level; indicator Light indicator will light and flash to represent the standby status. On/Off indicator When monitor is turned on, the indicator is in green.
-
Page 23: Rear View
Vital Signs Monitor User Manual Basic Operation In spot-checking mode, press the button to admit a new patient. The parameters data displayed in interface will be cleared. Series No. will be automatically added by one and other setting items are empty by default. Switch patient It is used to switch patient type, and relevant configuration will be type... - Page 24 Vital Signs Monitor User Manual Basic Operation Portable handle/Accessory collecting Battery compartment latch Equipotential grounding terminal. If the monitor is used together with other devices, connect this terminal to eliminate potential ground differences between devices. AC power input Power cable safety latch. Used to prevent the power supply cord from falling.
-
Page 25: Side View
Vital Signs Monitor User Manual Basic Operation 3.1.3 Side View Left side Right side - 15 -... -
Page 26: Operating And Navigating
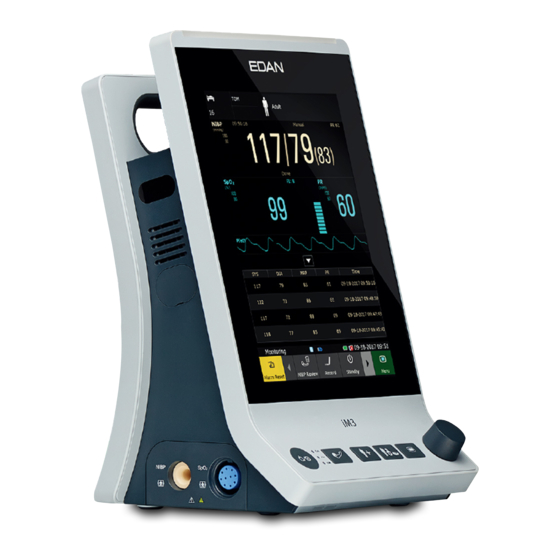
To avoid blocking and affecting NIBP measurement, user can open the built-in interface coverplate and clean vent & dust-free baffle routinely. If NIBP measurement is still affected after cleaning, please contact the service personnel of EDAN. 3.2 Operating and Navigating Everything you need to operate the monitor is contained on its screen. - Page 27 Vital Signs Monitor User Manual Basic Operation 10 11 12 13 14 15 16 18 19 Bed number Patient name and MRN Patient type Physiological alarms area Technical alarms area Measurement value Parameter waveform Alarm reset key Scroll left to display more shortcut keys Shortcut key area Storage device is in the process of storing Removable storage status symbol of U flash disk...
- Page 28 Vital Signs Monitor User Manual Basic Operation e-link symbol Wi-Fi network symbol Battery status symbol Wired network symbol Scroll right to display more shortcut keys Date and time Menu RESP measuring position symbol The icons on the interface and their meanings are as follows: In monitor mode: Medium/Low alarm In monitor mode: High alarm icon In monitor mode: Audio alarm off...
-
Page 29: Using Keys
Vital Signs Monitor User Manual Basic Operation Measuring oral TEMP in ADU mode Measuring axillary TEMP in ADU mode For device with the T2A or Measuring rectal TEMP in ADU mode F3000 TEMP module only. Measuring oral TEMP in PED mode Measuring axillary TEMP in PED mode Measuring rectal TEMP in PED mode For device with... -
Page 30: Shortcut Keys
Vital Signs Monitor User Manual Basic Operation 3.2.1.2 Shortcut Keys A shortcut key is a configurable graphical key, located at the bottom of the main screen. It gives you fast access to functions. The selection of shortcut keys available on your monitor depends on your monitor configuration and on the options purchased. -
Page 31: Operating Mode
Vital Signs Monitor User Manual Basic Operation 3.2.1.4 Pop-up Keys Pop-up keys are task-related graphical keys that appear automatically on the screen when required. For example, the confirmation pop-up key appears only when you need to confirm a change. 3.3 Operating Mode 3.3.1 Demo Mode To change the operating mode into the demo mode, please refer to the following procedure: Select Menu >... -
Page 32: Night Mode
Vital Signs Monitor User Manual Basic Operation The monitor exits standby mode in any of the conditions: 1. The user clicks anywhere on the screen or presses any key. 2. Battery Low alarm occurs. 3. MFM-CMS or gateway sends exit order to monitor. After exiting standby mode, the monitor resumes monitoring, including parameter monitoring, storage and alarm;... -
Page 33: Adjusting Volume
Vital Signs Monitor User Manual Basic Operation 3.4.2 Adjusting Volume 3.4.2.1 Adjusting Key Volume The key volume is the volume you hear when you select any field on the monitor screen or when you turn the knob. To adjust the key volume, select Menu > System Setup > General, then select the appropriate setting for the key volume: six levels represent volume and level five represents the maximum, and level zero represents volume off. -
Page 34: Common Settings
Vital Signs Monitor User Manual Basic Operation 3.7 Common Settings Select Menu > User Maintain, then type the correct password ABC into the displayed interface. Common settings include: Department, Language, Nurse call, Internal Scanner Mode, Scanner Management, Scanner Setup, Format internal storage device and so on. WARNING Change to date and time will influence the storage of trend data. -
Page 35: Chapter 4 Alarms
Vital Signs Monitor User Manual Alarms Chapter 4 Alarms The alarm information here applies to all measurements. Measurement-specific alarm information is discussed in the sections of individual measurements. WARNING A potential hazard can exist if different alarm presets are used for the same or similar equipment in any single area, e.g. -
Page 36: Alarm Levels
Vital Signs Monitor User Manual Alarms 4.3 Alarm Levels In terms of severity, the device‘s alarm levels can be classified into three categories: high level alarms, medium level alarms and low level alarms. 1. High level alarms A high level alarm intensively warns the operator of a high priority alarm condition which requires immediate operator response. -
Page 37: Controlling Alarm
Vital Signs Monitor User Manual Alarms displayed at the alarm area. Mode is ―Di-Di-Di‖, which is triggered once every 25 seconds. The alarm indicator flashes in yellow, with frequency of 0.4 Hz~0.8 Hz. Medium The alarm message flashes with yellow background, and the symbol ** is displayed at the alarm area. -
Page 38: Audio Alarm Paused
Vital Signs Monitor User Manual Alarms When alarm switch is off, the parameter alarm off icon will be displayed in the corresponding parameter displaying area. Upper arrow or lower arrow to increase decrease alarm limit Setting value of low alarm limit Setting value of high alarm limit WARNING... -
Page 39: Audio Alarm Off
Vital Signs Monitor User Manual Alarms 1. Select Menu > User Maintain, and enter the required password ABC. 2. Select Alarm, and set Pause Time to 60 s, 120 s, or 180 s. When alarms are paused, The audio alarm is turned off, and no alarms are sounding. ... -
Page 40: Latching Alarms
Vital Signs Monitor User Manual Alarms All latching alarms are cleared. If the alarm condition is no longer present, all alarm indications stop and the alarm is reset. It will not influence the configuration of physiological alarm off, audio paused, and audio off status. -
Page 41: Testing Alarms
Vital Signs Monitor User Manual Alarms 4.9 Testing Alarms When you switch the monitor on, a self test is started with two ―Di‖ tone. You must check that the alarm indicator lights (it lights in red, yellow and blue in turn during starting up) and that you hear a single tone (that is same with low level alarm sound). -
Page 42: Chapter 5 Alarm Information
Vital Signs Monitor User Manual Alarm Information Chapter 5 Alarm Information 5.1 Physiological Alarm Information WARNING During monitoring, the physiological alarms SpO No Pulse and SpO Desat Limit are preset to be on and cannot be turned off. Message Cause Alarm level High User-selectable... -
Page 43: Technical Alarm Information
Low Perfusion exists, please notify the measurement site is too biomedical engineer low. (EDAN SpO manufacturer‘s service staff. There is interference with Check the condition measurement signals of patient and avoid due to patient movement, patient movement;... - Page 44 Check connections and the wrapped cuff to see whether they are all NIBP pump, valve, cuff or prepared well. NIBP Leak tube has a leakage. (EDAN If failure persists, NIBP) please notify biomedical engineer manufacturer‘s service staff. NIBP...
- Page 45 Vital Signs Monitor User Manual Alarm Information Message Cause Alarm Level Action Taken Measuring time Measure again or NIBP Time Out exceeded specified use other measuring time. method. If failure persists, stop using measuring function Sensor or other hardware of NIBP module and NIBP Self Test Error errors.
- Page 46 Vital Signs Monitor User Manual Alarm Information Message Cause Alarm Level Action Taken Make sure that the Signal noise is too large or patient under NIBP Interference pulse rate is not regular due monitoring to the patient movement. motionless. Fail to deflate normally Test again.
- Page 47 Vital Signs Monitor User Manual Alarm Information Message Cause Alarm Level Action Taken The probe in use is not Correctly Measure Site Error consistent with the measure Medium measure position on position set on the monitor. the monitor. TH TEMP Check the integrity The TEMP value is beyond of the probe cover,...
- Page 48 Vital Signs Monitor User Manual Alarm Information Message Cause Alarm Level Action Taken Predict Mode patient Temp Error P04 thermistor unstable or out of range. Predict Mode heater Temp Error P05 thermistor unstable or out of range. Stop using measuring function of TEMP module;...
- Page 49 Vital Signs Monitor User Manual Alarm Information Message Cause Alarm Level Action Taken The probe in use is not Correctly Measure Site Error consistent with the measure Medium measure position on position set on the monitor. the monitor. Others Please change the Battery Low High Battery Low...
-
Page 50: Prompts
Vital Signs Monitor User Manual Alarm Information 5.3 Prompts Message Cause module is analyzing the patient signal and searching Search Pulse for the pulse to compute the saturation, when sensor is connected with patient. There is interference with SpO measurement signals due Noisy Signal to patient movement, ambient light, electrical interference or else. -
Page 51: Adjustable Range Of Alarm Limits
Desat Limit PR alarm limits is listed as follows: unit (bpm) ALM HI ALM LO NIBP alarm limits are listed as follows: unit (mmHg, kPa, 1 mmHg=0.133 kPa) EDAN module: Patient Type ALM HI ALM LO PR (NIBP) PR (NIBP) - Page 52 Vital Signs Monitor User Manual Alarm Information SunTech module: Patient Type ALM HI ALM LO PR (NIBP) PR (NIBP) PR (NIBP) TEMP alarm limits are listed as follows: Patient Type ALM HI ALM LO Step +0.1 C (32.2 ℉) +42 C (+107.6 ℉) +35.5 C (+95.9 ℉) ADU/PED - 42 -...
-
Page 53: Chapter 6 Managing Patients
Vital Signs Monitor User Manual Managing Patients Chapter 6 Managing Patients 6.1 Monitor Mode Monitor mode is used for single patient‘s monitoring and management. 6.1.1 Admitting a Patient The monitor displays physiological data and stores it in the trends as soon as a patient is connected. -
Page 54: Quick Admit
Vital Signs Monitor User Manual Managing Patients NOTE: Creating new patient and updating patient will clear the history data in the monitor associated with the patient. 6.1.1.1 Patient Category The patient category setting determines the algorithm which the monitor uses to process and calculate some measurements, the safety limits that are applied for some measurements, and the alarm limit ranges. - Page 55 Vital Signs Monitor User Manual Managing Patients 6.2.1.1 Create New Patient To create new patient, you may: 1. Select Menu > Patient Management > New Patient, or 2. Select the shortcut key on the main screen, or 3. Press Admit/Create new patient hardkey on the front panel, or 4.
-
Page 56: Choose Patient For Measurement
Vital Signs Monitor User Manual Managing Patients If patient bed NO. has conflict, a confirmation box will be popped up ‗Bed NO.XXX has conflict. Update now?‘. Choose OK to replace the current patient information which has bed No. conflict. Choose all to replace information of all patients who have bed No. conflicts. Choose NO to prevent the current replacing and continue importing. -
Page 57: Spot-Checking Mode
Vital Signs Monitor User Manual Managing Patients 6.2.3.2 Round Record Confirmation Choose round record Choose manually: in original data table, click the grey reversed triangle and choose data as the parameter‘s round record. Or in the original data table area, choose parameter value as round record. -
Page 58: Central Monitoring System
Vital Signs Monitor User Manual Managing Patients 6.5 Central Monitoring System The monitor can be connected to the central monitoring system only in monitor mode. Through the network: The monitor sends patient information, real-time monitoring or measurement data to the central monitoring system. -
Page 59: Chapter 7 User Interface
Vital Signs Monitor User Manual User Interface Chapter 7 User Interface Changing some settings may have the risk, so only the authorized person can change them. After changing the settings, please notify the operator. 7.1 Setting Interface Style The user can set the interface based on the requirement, such as: Parameters needing to be monitored. -
Page 60: Default Configuration
Vital Signs Monitor User Manual User Interface 7.5 Default Configuration To set default configuration, select Menu > Default Setup. On the Default menu, users can choose a factory configuration (adult, pediatric or neonate) based on the patient category. Also, users can choose a user configuration saved in the monitor if it is available. For more information about user configuration, refer to User Configuration. -
Page 61: Chapter 8 Monitoring Spo
(more than 4 hours). Inspect the sensor periodically according to the sensor user manual. Use only EDAN permitted sensors and extension cables with the monitor. Other sensors or extension cables may cause improper monitor performance and/or minor personal injury. -
Page 62: Measuring Spo
Vital Signs Monitor User Manual Monitoring SpO NOTE: Make sure the nail covers the light window. The wire should be on the backside of the hand. waveform is not proportional to the pulse volume. Avoid placing the sensor on extremities with an arterial catheter, or intravascular venous infusion line. -
Page 63: Measurement Limitations
Vital Signs Monitor User Manual Monitoring SpO NOTE: Injected dyes such as methylene blue or intravascular dyshemoglobins such as methemoglobin and carboxyhemoglobin may lead to inaccurate measurements. 8.4 Measurement Limitations Certain patient conditions can affect the measurements and cause the loss of the pulse signal. Inaccurate measurements can be caused by: ... -
Page 64: Assessing The Validity Of A Spo
CO-oximeter measurements. The volunteer population in the studies are composed of local healthy men and women from age 19 to 37 (for EDAN SpO module), from 18 to 50 (for Nellcor SpO module), with various skin pigmentations. -
Page 65: Perfusion Index (Pi)
This delay is the combination of the configured alarm delay time plus the general system delay time. 8.7 Perfusion Index (PI)* * Only applicable to the EDAN SpO module. PI is a numeric value indicating perfusion level. It reflects the perfusion level at the monitoring site. -
Page 66: Satseconds Alarm Management
Vital Signs Monitor User Manual Monitoring SpO It will not influence other functions of the monitor. 8.11 SatSeconds Alarm Management* * Only applicable to the Nellcor SpO module. * Not applicable to MFM-CMS. 8.11.1 Describing SatSeconds With traditional alarm management, upper and lower alarm limits are set for monitoring oxygen saturation. -
Page 67: Satseconds -Safety Net
Vital Signs Monitor User Manual Monitoring SpO Alarm Response with SatSeconds Saturation levels may fluctuate rather than remaining steady for a period of several seconds. Often, the patient SpO may fluctuate above and below the alarm limit, re-entering the non-alarm range several times. -
Page 68: Chapter 9 Monitoring Pr
Vital Signs Monitor User Manual Monitoring PR Chapter 9 Monitoring PR 9.1 Overview The pulse numeric counts the arterial pulsations that result from the mechanical activity of the heart in beats per minute (bpm). You can display a pulse from any measured SpO signal or NIBP measurement. -
Page 69: Chapter 10 Monitoring Nibp
Vital Signs Monitor User Manual Monitoring NIBP Chapter 10 Monitoring NIBP 10.1 Overview This monitor uses the oscillometric method for measuring NIBP. It can be used for adult, pediatric and neonatal patients. It is also intended for use with pregnant, including pre-eclamptic patients. -
Page 70: Measurement Limitations
Vital Signs Monitor User Manual Monitoring NIBP WARNING Do not apply the cuff to a limb where intravascular access or therapy, or an arterio-venous (A-V) shunt is present, otherwise, it may result in injury to the patient. NIBP readings can be affected by the measurement site, the position of the patient, exercise, or the patient's physiologic conditions. -
Page 71: Measurement Methods
Vital Signs Monitor User Manual Monitoring NIBP 10.4 Measurement Methods There are four methods of measuring NIBP: Manual - measurement on demand. Manual is the default setting in round and spot-checking mode. Auto - continually repeated measurements (between 1 and 480 minute adjustable interval). Auto is used in monitor mode only. - Page 72 Vital Signs Monitor User Manual Monitoring NIBP To start the measurement: 1. Connect the air hose and switch on the monitor. 2. Apply the blood pressure cuff to the patient's arm and follow the instructions below. Ensure that the cuff is completely deflated. Apply the appropriate size cuff to the patient (About the cuff size selection, please refer to Section NIBP accessories), and make sure that the symbol "Φ"...
-
Page 73: Operation Prompts
Vital Signs Monitor User Manual Monitoring NIBP NIBP parameter area can display real-time cuff pressure value till displaying SYS value. NIBP parameter area keeps measured value for 30 mins. If there is no measurement to continue, the area will display invalid value after 30 mins. 10.5.1 Operation Prompts 1. -
Page 74: Correcting The Measurement If Limb Is Not At Heart Level
Deduct 1.9 mmHg (0.25 kPa) for each inch lower 10.6 NIBP Multi-Review Window In monitor mode, clicking the triangle icon at the bottom of main interface can display/hide NIBP multi-review window. 10.7 Resetting NIBP Available for EDAN module only. - 64 -... -
Page 75: Calibrating Nibp
5. Select Leakage Test in NIBP. Then the prompt Leak. Test Running will appear indicating that the system has started the leakage test. For EDAN module: The system will automatically inflate the pneumatic system to about 180 mmHg. After 20 seconds to 40 seconds, if system leakage has detected, the system will automatically open the deflating valve to stop the leak test and indicates NIBP Leak. -
Page 76: Setting Inflation Value
Vital Signs Monitor User Manual Monitoring NIBP pressure level again (P2). Safety circuitry on the module only allows the pressure in the pneumatic system to remain above 10mmHg for 180 seconds. When this safety time limit is exceeded, the valves will open releasing the pressure. Subtract P2 from P1 and this is the leak rate per minute. -
Page 77: Chapter 11 Monitoring Temp
11.1 Quick TEMP with T2A Module 11.1.1 Introduction iM3 with the T2A module takes a temperature in either Predict or Monitor Mode. In the Predict mode, the monitor measures oral/axillary/rectal TEMP in a short time, calculates and gets the measuring results. In Monitor mode, it can monitor patient for 10 min. The Oral/Axillary sensor and Rectal sensor are of standard configuration. -
Page 78: Measuring Procedure
Biting the sensor tip while taking a temperature may result in damage to the sensor. Use disposable TEMP sensor covers recommended by EDAN to limit patient cross-contamination. The use of any other probe cover may produce temperature measurement errors or result in inaccurate readings. -
Page 79: Temp Setup For T2A Module
11.2 Quick TEMP with F3000 Module 11.2.1 Introduction iM3 with the F3000 module measures patient temperatures by oral, axillary or rectal means. The monitor can only measure temperature of adult and pediatric patients. If the user measure temperature of neonate patient, the monitor will not display data. - Page 80 Vital Signs Monitor User Manual Monitoring TEMP WARNING Do not use this device near flammable anesthetics. Not suitable for use in the presence of flammable anesthetic mixture with air, oxygen or nitrous oxide. Do not use this thermometer without first installing a new probe cover. Do not reuse the disposable probe covers.
-
Page 81: Probe Covers -Applying & Removing
Vital Signs Monitor User Manual Monitoring TEMP • Consult a customer service representative. 3. Verification of the temperature module is necessary as frequently as dictated by your Hospital Procedures Policy. When you need to calibrate the temperature measurement, please contact the manufacturer. 4. -
Page 82: Measuring Mode
Vital Signs Monitor User Manual Monitoring TEMP To change probes, remove the isolation chamber as described previously. Grasp the sides of the L-shaped connector piece with one hand and then using other hand pull backward on the latch holding the end of the L-shaped connector. Once free of the latch, slide the L-shaped connector out of isolation chamber. -
Page 83: Measuring Procedure
Vital Signs Monitor User Manual Monitoring TEMP 11.2.5 Measuring Procedure Oral and Axillary Temperature Taking Make certain that the Blue isolation chamber /probe unit is attached. Withdraw probe and apply a probe cover. The thermometer turns on automatically and a beep will be heard when the probe completes warm-up. -
Page 84: Temp Setup For F3000 Module
Vital Signs Monitor User Manual Monitoring TEMP If three short beeps are heard, it means the unit switched to Monitoring Mode for this temperature only. Two beeps are sounded when measurement is complete and the final temperature is displayed. 10. Eject the used cover into a bio-waste container by pushing top button. Rectal Temperature Taking Make certain that the Red isolation chamber/probe unit is attached. -
Page 85: Infrared Temp With Th Module
WARNING The infrared ear thermometer is not intended for neonatal patients. Only use the disposable probe covers supplied or recommended by EDAN. Use of other manufacturer‟s probe covers, reuse of disposable probe covers or absence of probe covers may produce temperature measurement errors and/or inaccuracies. -
Page 86: Measuring Procedure
Vital Signs Monitor User Manual Monitoring TEMP CAUTION Keep the probe window clean, dry, and undamaged at times to ensure accurate measurements. To protect the probe window, always keep the thermometer in the storage cover while transporting or when not in use. Proper installation of the probe cover ensures accurate measurements. - Page 87 Vital Signs Monitor User Manual Monitoring TEMP NOTE: If the probe cover did not install well, the icon will flash on the LCD of the thermometer, and you cannot take the ear temperature (with four beep sounds heard and without reading on the LCD when measuring). Press ON/MEM button of the thermometer.
-
Page 88: Replacing The Battery
Vital Signs Monitor User Manual Monitoring TEMP It is recommended that you measure the same ear for three times. If the three measurements are different, select the highest temperature. Remember to compare the measurement result to the regular temperature of the patient. There is no gender and age limitation for using infrared ear thermometer. - Page 89 Vital Signs Monitor User Manual Monitoring TEMP WARNING Keep the battery away from children. Ensure the positive (+) side is up and the negative (-) side down. - 79 -...
-
Page 90: Chapter 12 Review (In Monitor Mode)
Vital Signs Monitor User Manual Review (in Monitor Mode) Chapter 12 Review (in Monitor Mode) In monitor mode, the monitor provides 120-hour trend data of all parameters, storage of 1200 NIBP measurement results, 200 alarm events and so on. This chapter gives detailed instruction for review of all data. -
Page 91: Setting Interval
Vital Signs Monitor User Manual Review (in Monitor Mode) 12.2.1 Setting Interval The monitor can support eleven kinds of interval. To set an appropriate interval, please select Menu > Review > Trend Table and an interface is displayed. Choose Interval on the interface to open the list and select an appropriate interval among 1 s, 5 s, 30 s, 1 min, 3 min, 5 min, 10 min, 15 min, 30 min, 60 min and NIBP. -
Page 92: Selecting Alarm Event Of Specific Parameter
Vital Signs Monitor User Manual Review (in Monitor Mode) 12.4.2 Selecting Alarm Event of Specific Parameter The monitor can review alarm event of the specific parameters. To view the alarm event of the specific parameter, please select Menu > Review > Alarm Review and choose Event Type to select the required parameter name from the popup list. -
Page 93: Chapter 13 Review (In Round Or Spot-Checking Mode)
Vital Signs Monitor User Manual Review (in Round or Spot-checking Mode) Chapter 13 Review (in Round or Spot-checking Mode) 13.1 Round Record Management Select Menu > Review, or click review shortcut key directly to enter round record management window. Click Time Span to display round record in specified period. -
Page 94: Spot-Checking Data Trend Table
Vital Signs Monitor User Manual Review (in Round or Spot-checking Mode) Enter Menu > System Setup > Recorder > Auto Recording to choose On/Off. Default setting is on. Spot-checking data can be sent by HL7 gateway and uploaded to network server. Also, it can be uploaded in real time once each valid spot-checking is finished, if the monitor is in networking and is also connected with network server. -
Page 95: Chapter 14 Recording
Vital Signs Monitor User Manual Recording Chapter 14 Recording A thermal dot matrix recorder is used for the monitor and can support many recording types and output patient information, measurement data, review data waveform and so forth. Recording indicator Paper feeding key: press this key to start or stop feeding recording paper without outputting anything on the paper Paper outlet Recorder door... -
Page 96: Starting And Stopping Recording
Vital Signs Monitor User Manual Recording NOTE: It is suggested that the user should not use the recorder when the low battery displays, or the monitor may be turned off automatically. 14.2 Starting and Stopping Recording The monitor provides several types of stripe recording. You can start recording following the procedure below: Recording Type Description/ Procedure... -
Page 97: Recorder Operations And Status Messages
Vital Signs Monitor User Manual Recording Recording Type Description/ Procedure NIBP auto triggered recording Support NIBP auto triggered recording. Please refer to NIBP Auto Recording for details. Default setting is off. To manually stop recording, click Record again in the related windows. The recorder will stop recording in the following situations: ... - Page 98 Vital Signs Monitor User Manual Recording 2. Insert a new roll of paper into the paper cassette, printing side facing upwards. 3. Ensure proper position and tidy margin. 4. Pull about 2 cm of the paper out, and close the recorder casing. NOTE: Be careful when inserting papers.
-
Page 99: Removing Paper Jam
Vital Signs Monitor User Manual Recording 14.3.5 Removing Paper Jam When the recorder functions or sounds improperly, you should open the recorder casing to check for a paper jam. Remove the paper jam in the following way: ■ Cut the record paper from the feeding edge. ■... -
Page 100: Chapter 15 Other Functions
Vital Signs Monitor User Manual Other Functions Chapter 15 Other Functions 15.1 Nurse Call The monitor provides dedicated nurse call port which is connected to nurse call system through the nurse call cable to perform the nurse call function. Enter Menu > User Maintain > Common >... -
Page 101: E-Link Function
e-link Name setup When e-link switch is turned on, the e-link Name of monitor can be set. E-link name setup for monitors of same model has fixed rules. 20 characters are supported at most. For example: iM3 default e-link name ―VS_3_XXXX‖. -
Page 102: Uploading Data To Network Server
Vital Signs Monitor User Manual Other Functions Round records stored in the monitor: NIBP, SpO , TEMP (prediction data of Quick TEMP and infrared TEMP data), manual confirmation mark, and transmission time. All round records which haven‘t been transmitted in the round record interface will be transmitted by default. User can also select the data as needed. -
Page 103: Selecting A Storage Device
Vital Signs Monitor User Manual Other Functions In round mode, storage data maximally contains the following information: Round record MRN, name, type, bed No., round record Up to 800 thousand sets and original record Storage starting time, SpO value, PR value Up to 20 sets for a single patient NIBP SYS, DIA, MAP, PR, measurement time... -
Page 104: Reviewing Data Stored In The Storage Device
The power supply is off. CAUTION Not all the removable devices are compatible with the monitor, Use the removable devices recommended by EDAN. Do not set the read-only switch on the removable device to on when the removable device is inserted in the monitor. -
Page 105: Ejecting A Removable Device
Vital Signs Monitor User Manual Other Functions Export Current Data on the Review menu. To export data of all patients, select Menu> Review> History Patient and click Export all. You can also use the OTG interface to connect the monitor to the PC, and user can view and copy the data which stored in internal storage device through the PC. -
Page 106: Warning-Score System
Vital Signs Monitor User Manual Other Functions storage device can be identified and loaded automatically. If formatting is failed, try again. Restart the monitor and retry the formatting, or contact the service personnel of the manufacturer if formatting is failed repeatedly. 15.6 Warning-Score System User can use warning-score system to get score and sum up based on measurement value or input value of each vital sign. - Page 107 Vital Signs Monitor User Manual Other Functions Value ≤40 ≥130 HR (bmp) 41~50 51~100 101~11 111~129 ≤70 ≥200 SYS (mmhg) 71~80 81~100 101~199 ≤8 ≥30 RESP (rpm) 9~20 21~24 25~29 ≤35 ≥39 35.1~36.0 36.1~37.9 38~38.9 TEMP (℃) ≥94 <86 86~91 92~93 Consciousness In NEWS interface, select Criteria to check score criteria as following:...
-
Page 108: Warning-Score Result
Vital Signs Monitor User Manual Other Functions The relationship between consciousness level and its display result is as below: Consciousness Displayed Result Sober Responsive to Voice Responsive to Pain Unresponsive Warning-Score 15.6.4 Result Warning-Score results include parameter value, score value, time and severity level. The relation for value and severity level is as following: Severity Warning-score Remindings... -
Page 109: Warning-Score Trend Table
Vital Signs Monitor User Manual Other Functions Severity NEWS Color Warning-score Remindings Level Observing and checking should be taken every 12 hrs at least, and keep close to the condition NEWS=0 Off-white of patient‘s life signs. Observing and checking should be taken every 4 hrs~6 hrs at least. - Page 110 Vital Signs Monitor User Manual Other Functions physiological alarms. Enter the respective parameter setup menu to set alert limit and alert switch. Alert can be indicated by the system in following different ways: Parameter area has two flash methods to prompt: background flash and text flash. User can select one method from Visual Effect.
-
Page 111: Chapter 16 Using Battery
Vital Signs Monitor User Manual Using Battery Chapter 16 Using Battery This monitor can run on battery power, which ensures its uninterrupted operation even when AC power supply is interrupted. The battery recharges whenever the monitor is connected to the AC power source. -
Page 112: Battery Power Indicator
Vital Signs Monitor User Manual Using Battery WARNING When the monitor is running on battery power, do not replace the battery during monitoring patients; or the monitor will be powered off, which may result in patient injury. Do not place battery in the monitor with the (+) and (-) in the wrong way. Due to high ambient temperature, the monitor gives out Battery Error alarm. -
Page 113: Replacing The Battery
Vital Signs Monitor User Manual Using Battery 4. The running time of the battery reflects the battery performance. If the running time is obviously less than the specified time in the specification, please change the battery or contact the service personnel. 16.5 Replacing the Battery To install or replace the battery, please follow the procedure: Battery... -
Page 114: Chapter 17 Care And Cleaning
Vital Signs Monitor User Manual Care and Cleaning Chapter 17 Care and Cleaning Use only the EDAN-approved substances and methods listed in this chapter to clean or disinfect your equipment. Warranty does not cover damage caused by using unapproved substances or methods. -
Page 115: Cleaning The Monitor
Vital Signs Monitor User Manual Care and Cleaning 17.2.1 Cleaning the Monitor WARNING Before cleaning the monitor, make sure that the monitor is switched off and disconnected from the power line. To surface-clean the monitor, follow these steps: Switch off the monitor and disconnect it from the power line. Wipe the entire exterior surface, including the screen, of the equipment using a soft cloth dampened with the cleaning solution thoroughly until no visible contaminants remain.. -
Page 116: Disinfection
Vital Signs Monitor User Manual Care and Cleaning Wipe the patient contact area of the sensor with the cotton swab dampened with the cleaning solution. until no visible contaminants remain After cleaning, wipe off the cleaning solution with a fresh cloth or towel dampened with tap water until no visible cleaning agent remains. -
Page 117: Disinfecting The Reusable Accessories
Vital Signs Monitor User Manual Care and Cleaning To disinfect the monitor, follow these steps: Switch off the monitor and disconnect it from the power line. Wipe the display screen using a soft, clean cloth dampened with the disinfectant solution. Wipe the exterior surface of the equipment using a soft cloth dampened with the disinfectant solution. -
Page 118: Cleaning And Disinfecting Other Accessories
Vital Signs Monitor User Manual Care and Cleaning 17.4 Cleaning and Disinfecting Other Accessories For cleaning and disinfecting other accessories, refer to the instructions delivered with the accessories. If the accessories are not accompanied by instructions, refer to this manual for the methods of cleaning and disinfecting the monitor. -
Page 119: Chapter 18 Maintenance
Maintenance shall be carried out at least once every two years, or as specified by local regulations. The following tasks are for EDAN-qualified service professionals only. Contact an EDAN-qualified service provider if your monitor needs a safety or performance test. Clean and disinfect equipment to decontaminate it before testing or maintaining it. -
Page 120: Chapter 19 Warranty And Service
EDAN will, at its discretion, repair or replace the defective part(s) free of charge. EDAN will not provide a substitute product for use when the defective product is being repaired. -
Page 121: Chapter 20 Accessories
Vital Signs Monitor User Manual Accessories Chapter 20 Accessories You can order accessories from EDAN supplies at www.edan.com.cn or consult your local EDAN representative for details. WARNING Never reuse disposable transducers, sensors, accessories and so forth that are intended for single use, or single patient use only. Reuse may compromise device functionality and system performance and cause a potential hazard. -
Page 122: Nibp Accessories
Vital Signs Monitor User Manual Accessories Part Number Accessories 01.57.471747 SHD-P SpO2 Sensor, pediatric, disposable, EDAN 2 01.57.471748 SHD-I SpO2 Sensor, Infant, disposable, EDAN 2 01.57.471749 SHD-N SpO2 Sensor, Neonate, disposable, EDAN 2 For Nellcor Module 01.15.30043 Nellcor Reusable Adult SpO Sensor (DS-100A OxiMax) 01.15.40096... -
Page 123: Temp Accessories
Vital Signs Monitor User Manual Accessories Part Number Accessories 01.57.471324 NIBP Cuff, Neonate, 6cm-11cm, reusable 01.57.471157 NIBP Cuff, neonatal #1, 3-6cm,disposable 01.57.471158 NIBP Cuff, neonatal #2, 4-8cm,disposable 01.57.471159 NIBP Cuff, neonatal #3, 6-11cm,disposable 01.57.471160 NIBP Cuff, neonatal #4, 7-13cm,disposable 01.57.471161 NIBP Cuff, neonatal #5, 8-15cm,disposable For SunTech Module NIBP Cuff, neonatal #1, 3 cm -6 cm, disposable... -
Page 124: Other Accessories
Vital Signs Monitor User Manual Accessories 02.01.110130 Rectal Probe 01.57.471871 Disposable Probe Covers TEMP (For TH Module) 01.13.036415 Infrared Ear Thermometer Communication Cable 01.57.208057 Infrared Ear Thermometer 01.57.208058 Probe Cover 01.57.208059 Probe Cover Loader TEMP (For F3000 Module) 01.57.471312 Filac 3000 Oral Probe 4ft 01.57.471313 Filac 3000 Oral Probe 9ft 01.22.066159... - Page 125 Vital Signs Monitor User Manual Accessories Part Number Accessories 83.60.261069 M3\iM50 Trolley 83.60.261116 M3\iM50 Trolley 02.04.243472 Patient monitor mounting arm assembly kit (M3/iM50) 02.04.241699 Patient monitor mounting arm assembly kit (M3/iM50) 01.13.037122 Power cable, length 1.8 m, American standard, medical grade 01.13.036638 Power cable, length 1.8 m, VDE 01.13.114214...
-
Page 126: A Product Specification
Vital Signs Monitor User Manual Product Specification A Product Specification NOTE: The performance of the equipment with ☆ mark is determined to be essential performance. A.1 Classification Anti-electroshock type Class I equipment and internal powered equipment Anti-electroshock degree , NIBP, TEMP: BF Ingress Protection IPX1 With T2A, TH or F3000 TEMP module: Ordinary... -
Page 127: Display
Vital Signs Monitor User Manual Product Specification -20 C to +55 C(-4 ℉~131 ℉) Transport and Storage With TH TEMP module: -20 C ~ +50 C (-4 ℉~122 ℉) Humidity Working 15%RH ~ 95%RH (non-condensing) Transport and Storage 15%RH ~ 95%RH (non-condensing) Altitude Working 86 kPa ~ 106 kPa... -
Page 128: Recorder
Vital Signs Monitor User Manual Product Specification A.2.5 Recorder Record Width 49 mm~50 mm. Paper Speed 12.5 mm/s, 25 mm/s, 50 mm/s Trace Recording types Continual real-time recording 8 seconds real-time recording Recording manually Physiological Alarm recording Trend graph recording Trend table recording NIBP review recording Alarm review recording... -
Page 129: Nibp
Vital Signs Monitor User Manual Product Specification A.3 NIBP Complies with IEC 80601-2-30: 2009. EDAN Module Technique Oscillometry Mode Manual, Auto, Continuous, Average Measuring Interval in AUTO 1/2/3/4/5/10/15/30/60/90/120/180/240/360/480 Mode (unit: minutes) Continuous 5 min, interval is 5 s Measuring Type... - Page 130 Vital Signs Monitor User Manual Product Specification Dual Independent Channel Overpressure Protection Adult (297± 3) mmHg Pediatric (245± 3) mmHg Neonatal (147± 3) mmHg ☆Measuring Range 40 bpm to 240 bpm ☆Accuracy ± 3 bpm or 3.5%, whichever is greater Pre-inflation Pressure Adult Mode Default: 160 mmHg...
- Page 131 Vital Signs Monitor User Manual Product Specification ☆Pediatric Mode SYS: 40 mmHg– 230 mmHg DIA: 20 mmHg– 160 mmHg MAP: 26 mmHg– 183 mmHg SYS: 40 mmHg – 130 mmHg ☆Neonatal Mode DIA: 20 mmHg– 100 mmHg MAP: 26 mmHg – 110 mmHg ☆Alarm Type SYS, DIA, MAP Pressure Resolution...
-
Page 132: Spo 2
Vital Signs Monitor User Manual Product Specification A.4 SpO Complies with ISO 80601-2-61: 2011. EDAN Module Measuring Range 0% to 100% Resolution ☆Data Update Period ☆Accuracy 2% (70% to 100% SpO ☆Adult /Pediatric Undefined (0% to 69% SpO 3% (70% to 100% SpO ☆Neonate... -
Page 133: Temp
Vital Signs Monitor User Manual Product Specification MAX-A, MAX-AL, MAX-N, MAX-P, 2 (70% ~ 100% SpO MAX-I, MAX-FAST ☆Accuracy D-YS (from infant to adult), DS-100A, 3 (70% ~ 100% SpO OXI-A/N (adult), OXI-P/I If sensor is used for neonate as recommended, the accuracy will be larger than adult by ±... - Page 134 Vital Signs Monitor User Manual Product Specification Update time 1 s~ 2 s Warm-up time <10 s Time for predicting <30 s Self-test interval: ≤5 min Calibration Measuring Mode Direct Mode/ Adjusted Mode ≤30 s Transient Response Time Clinical Bias (-0.2 to -0.4 )C Limits of Agreement 0.49...
-
Page 135: Adjustable Range Of Alert Limits
The direct mode refers to monitor mode, while adjusted mode refers to predictive mode and quick predictive mode. A.6 Adjustable Range of Alert Limits 20% ~ 100% 30 bpm ~ 300 bpm NIBP mmHg (1 mmHg=0.133 kPa) EDAN NIBP Patient Type High Limit Low Limit - 125 -... -
Page 136: Wi-Fi
Vital Signs Monitor User Manual Product Specification SunTech NIBP Patient Type High Limit Low Limit TEMP Patient Type High Limit Low Limit +42 ℃ (+107.6 ℉) +35.5 ℃ (+95.9 ℉) ADU/PED A.7 Wi-Fi IEEE 802.11b/g/n Frequency Band 2.4 GHz ISM band Modulation OFDM with BPSK, QPSK, 16-QAM, and 64-QAM 802.11b with CCK and DSSS... -
Page 137: Interfaces
Vital Signs Monitor User Manual Product Specification A.9 Interfaces A.9.1 Nurse Call Drive Mode Voltage output Power Supply 3.14 V ~ 3.46 V, 8 mA MAX Interface Signal 3.3 V power supply and PWM waveform Interface Type Micro USB A.9.2 USB Interfaces Number of USB Interfaces Standard:1 Drive Mode... -
Page 138: B Emc Information
B.1 Electromagnetic Emissions Guidance and manufacture’s declaration – electromagnetic emission iM3 is intended for use in the electromagnetic environment specified below. The customer or the user of iM3 should assure that they are used in such an environment. Electromagnetic environment – guidance... - Page 139 135° , 180° , 225° , 315° on power supply hospital environment. If 270° and 315° input lines the user of iM3 requires continued operation IEC/EN 0 % U ; 1 cycle 0 % UT; 1 cycle during power mains...
-
Page 140: Electromagnetic Immunity
B.3 Electromagnetic Immunity Guidance and manufacture’s declaration – electromagnetic immunity iM3 is intended for use in the electromagnetic environment specified below. The customer or the user of iM3 should assure that they are used in such an environment. IEC/EN 60601 test... - Page 141 RF transmitters, an electromagnetic site survey should be considered. If the measured field strength in the location in which iM3 is used exceeds the applicable RF compliance level above, iM3 should be observed to verify normal operation.
-
Page 142: Recommended Separation Distances
Recommended separation distances between portable and mobile RF communications equipment and iM3 iM3 is intended for use in an electromagnetic environment in which radiated RF disturbances are controlled. The customer or the user of iM3 can help prevent electromagnetic interference... - Page 143 Vital Signs Monitor User Manual EMC Information Rated maximum Separation distance according to frequency of transmitter(m) output power of 150 kHz to 80 MHz 80 MHz to 800 MHz 800 MHz to 2.7 GHz transmitter 0.01 0.12 0.12 0.23 0.38...
-
Page 144: C Default Settings
Vital Signs Monitor User Manual Default Settings C Default Settings This appendix documents the most important default settings of your monitor as it is delivered from the factory. Note: If your monitor has been ordered preconfigured to your requirements, the settings at delivery will be different from those listed here. -
Page 145: Pr Default Settings
Alarm Level Medium Alarm High Limit (SYS) Alarm Low Limit (SYS) Alarm High Limit (Map) Alarm Low Limit (Map) Alarm High Limit (Dia) Alarm Low Limit (Dia) EDAN Module Inflation value SunTech Module Inflation value Unit mmHg Interval 1 minute... -
Page 146: Temp Default Settings
Vital Signs Monitor User Manual Default Settings Auto Recording Alert Switch Alert High Limit(SYS) Alert Low Limit(SYS) Alert High Limit(MAP) 110 Alert Low Limit(MAP) Alert High Limit(DIA) Alert Low Limit(DIA) C.6 TEMP Default Settings TEMP Settings Alarm Switch Alarm Record Alarm Level Medium Measurement Mode... -
Page 147: D Abbreviations
Vital Signs Monitor User Manual Abbreviation D Abbreviations Abbr English Full Name/Description Alternating current Adult Arterial Blood pressure BTPS Body temperature and pressure, saturated Cardiac index CISPR International Special Committee on Radio Interference Central monitoring system COHb Carboxyhemoglobin Direct current Diastolic European Economic Community Electromagnetic compatibility... - Page 148 Vital Signs Monitor User Manual Abbreviation Neonate NIBP Non-invasive blood pressure Oxygen Pediatric Pleth Plethysmogram Pulse rate Premature ventricular complex Right Right arm Right atrial pressure Reduced hemoglobin Right leg Respiration Rate Sevoflurane Systolic pressure Blood Temperature Temperature difference TEMP Temperature Universal serial bus Pulse Oxygen Saturation...
Need help?
Do you have a question about the iM3 and is the answer not in the manual?
Questions and answers